Fishing looper
5 minutes Author: Irina Chernikova 9491
Experienced fishermen usually have many auxiliary fishing tools in their arsenal. They not only simplify some tool preparation processes, but also significantly save time. One of these miracle devices is the fishing looper. With its help, knitting loops is simplified and speeds up several times, which is very important if you need to make a lot of such loops.
What does the tool look like?
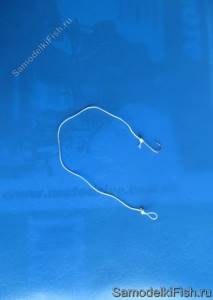
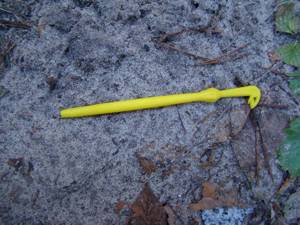
A factory-made fishing looper is a plastic or metal hook of a special shape. At the end of the handle there is a hook with a hole, with the help of which, with simple manipulations, smooth loops of the same parameters are obtained. Homemade looper is also distinguished by the characteristic bend of the hook, although it is made from improvised tools. In principle, making a looper with your own hands is not difficult: it is important to thoroughly treat all surfaces that will subsequently come into contact with the fishing line or braided cord. Flaws in processing can play a cruel joke: the fishing line will be injured and subsequently the loops will break.
What is it for?
All anglers should learn how to knit with loop knitting. There is no specific direction in fishing where this tool is widely used. Spinners find use for it when tying leashes. When equipping a feeder rod with a looper, anglers create ready-made equipment. In fly fishing, such a tool is also needed for preparing spare rigs with flies.
Not only beautiful and even loops of the same diameter can be made using this tool. Also knitted with loop knitting:
- locking nodes,
- connecting two or more fishing lines or other threads.
How does the device work?
To understand how to use a looper, it is best to ask someone experienced to clearly explain the principle of operation. However, if there are no experienced fishermen around you, then use the instructions for the tool. In some stores it is issued when purchasing this product. However, if you were not given such a reminder complete with the looper, then you can do without it. Learning to use a fishing looper is not difficult. Follow the prompts and you will succeed.
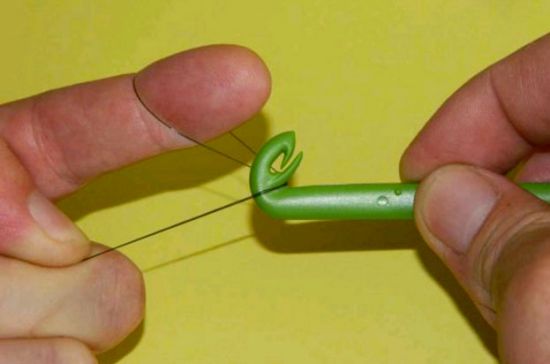
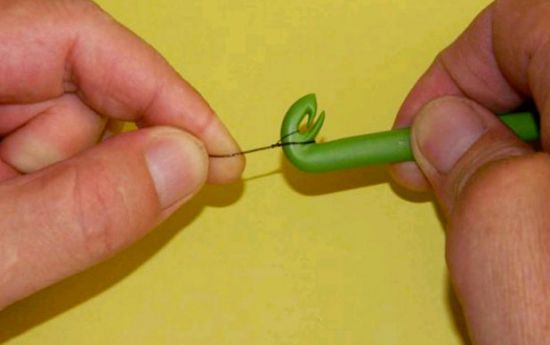
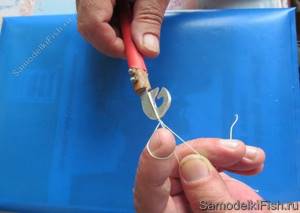
1. The fishing line or braid must be folded in half. Keep in mind that the bend point is the approximate location where the loop will form. Don't leave the end too long; it will have to be cut off, which is a waste of expensive braided cords.
2.Grip the looper in one hand so that the gripping hook is facing up.
3. The fishing line, which is folded in half, needs to be hooked, that is, laid so that it is on the handle. The bend of the fishing line remains on the index finger, and the end of the fishing line and the main thread are clamped between the middle and thumb.
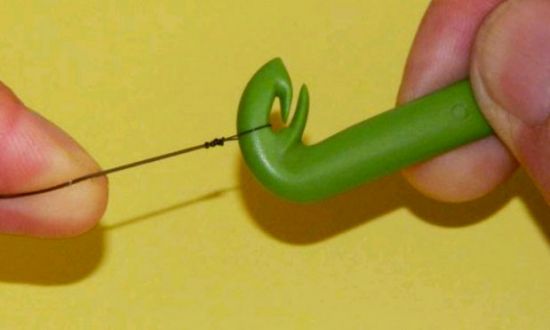
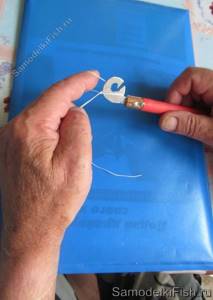
4.Hold the fishing line tightly and make rotational movements with the handle of the device. Each turn of the looper around its axis will tighten the knot at the base of the hook. It is believed that for a strong knot, just one 180-degree turn is enough, but for the sake of experimentation, you can try making several. This will not make the knot itself stronger, but it will look more massive.

5.The next step is dropping the loop. We send it through the notch into the middle of the gripping hook.
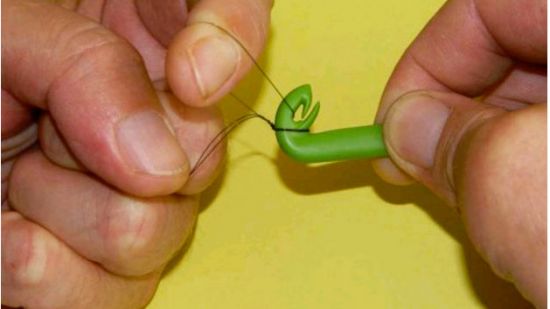
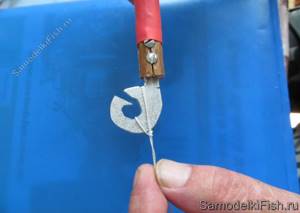
6.And remove it from your finger.
7.After this action, the loop on the fishing line must be tightened well.
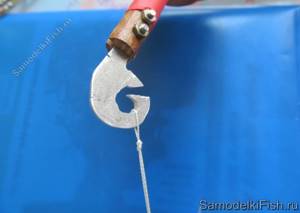
8. We drop the loop from the base of the looper onto the hook and tighten it again. The loop is ready.
At first glance, it may seem that using a looper is no faster than knitting loops by hand. Actually this is not true. With experience, you will develop the necessary speed and dexterity, and you will easily be able to knit loops both at home and in the intervals between casts, while being directly on the pond.
Where can I buy?
This joke, which is necessary for fishing, is sold in almost all fishing stores, and you can also order it on Aliexpress. The simplest plastic loop knitting costs no more than 50 rubles. Improved “gadgets” are made of more durable materials and are much more expensive.
Homemade loopers
If store-bought equipment somehow doesn’t suit you, then you can make a looper with your own hands. The process of constructing the device will not take much time, and the list of your victories will be replenished with another homemade product.
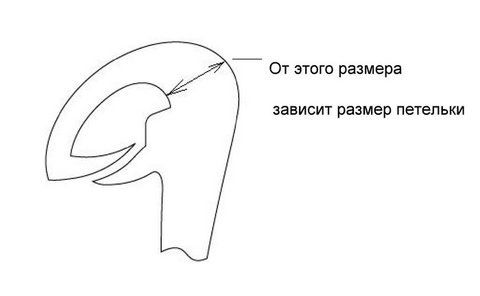
In order to make a looper with your own hands, drawings are basically not needed. It is worth measuring only one point thoroughly (in the photo), all other bends of the hook can be of any size.
To make your homemade looper more durable, you can make the hook itself from aluminum. The aluminum sheet is easily cut with a hacksaw, and the sharp edges are removed with sandpaper: first with a coarse coating, then with a fine one.
You can make any handle for the looper. Some people use them as handles - old toothbrushes, handles from broken screwdrivers, etc. You can also carve a wooden handle into a convenient shape for you. A cut is made at the base of the handle into which the hook is inserted and glued. If properly fixed, it will sit firmly and be easy to work with.
If a fisherman urgently needs a device, but there are no special tools for its manufacture, then a simplified version of the device can be made from ordinary thick aluminum wire. It will work on the same principle as the original one, only the diameter of the loop will need to be adjusted manually. To make a looper from wire, you will need:
The assembly principle is as follows: you need to first bend the upper part of the hook out of wire and secure it to the handle, and then the lower one. Circular turns of electrical tape secure both edges to the handle. For convenience, it should be rectangular in shape.
Popular models and prices:
The specifics of preparing to catch a particular fish sometimes involve tying a large number of rigs at once. In such cases, the looper will save the fisherman’s time and nerves. The device is easy to use, and you can buy it for very reasonable money, or make it yourself.
Fishing looper. How to use a looper? [salapinru]
Fishing looper. How to use a looper? https://www.youtube.com/watch?v=YFt_f.
Subscribe to the salapinru channel – https://goo.gl/0RYxP5
The video channel has added new training videos about fishing gear. This time we will talk about looper. As it turns out, not everyone still knows what this cunning thing with a squiggle is, but it turns out that it’s just a looper, with which you can tie a loop for a leash, for example.
Playlist Entertainment video – https://goo.gl/JG2bTt Playlist Educational fishing video – https://goo.gl/buXaUe Playlist Full-length video – https://goo.gl/ybsMKG More details: https://salapin.ru/ video9351.html Thank you for watching us!
Let me remind you that I already made a video on the topic of how to tie a loop for a leash, but there I showed how it is done by hand. Here, in this video, we show how to use a purchased looper. The result is the same.
Please note that DIY fans can easily make such a device in just a couple of minutes on their own. For the video, I took a paperclip, bent it into a straight line and bent it into a pretty decent looper. This took about one minute and another minute for finishing, folding, etc. As you can see in the video, loops are also knitted quite normally on it.
Watch the video until the end, don't miss an important announcement?
One of the main parts of the equipment is the leashes. No fishing goes without the process of knitting loops and hooks. A successful catch always depends on the length of the leader, its material and diameter.
The leashes are made at home in advance and placed on the leash, so there are no problems with replacing them during fishing. Those who knit loops on their own sooner or later come to the question of using loopers and hooks - auxiliary elements that greatly simplify the process of preparing for fishing.
Making leashes yourself at home requires painstaking and careful work, which puts a lot of strain on your eyes. To make preparing for fishing a pleasure, you will need a looper and a hooker.
The looper is a device for quickly and comfortably knitting loops for fishing. It is a device with a small hook with a hole at the end. When knitting a loop, the line is wrapped around the hook, twisted once and tightened. After removing the fishing line from the looper, you get a neat, strong finished loop that can be used for its intended purpose.
The looper and hooker are two indispensable devices for fishermen
Leashes are perhaps the main element of any equipment. Successful fishing very much depends on the length of the leash, its diameter, and what material it is made of.
Typically, leashes are made at home, packaged in leash holders, and during fishing, replacing the leash is not difficult. I prepared the leashes using the old grandfather’s method: knitting hooks, loops, in general, everything hand-to-hand.
As grandfather Krylov said: “The monkey’s eyes have become weak in old age.” So we had to knit leashes with the help of some mother and other popular words and phrases.
Knitting leashes for fishing using homemade looper and hooker
For a long time now I have seen on the Internet devices for tying hooks and loops, the so-called loopers and hookers, but somehow I was not impressed. And now, probably, I was pressed, and decided to try it. To be honest, the idea was borrowed from Internet sites, maybe slightly modified.
First I made this device for knitting loops and hooks on leashes.
but I realized it’s not very convenient. When knitting loops, the hooker interferes. Maybe this is a subjective opinion, but I do it for myself! Therefore, I decided to separate two homemade devices for knitting loops and hooks.
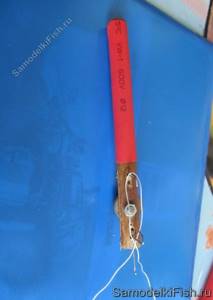
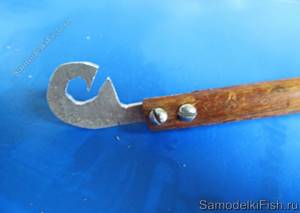
Homemade crocheter
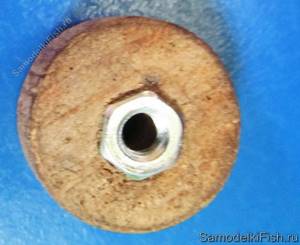
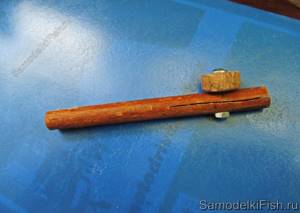
In a round stick (1-1.5 cm in diameter) we make a cut with an iron saw (so that the gap is not large), drill a hole to avoid splitting along the cut line
From the second round piece we cut off this washer, this is the hook clamp handle. We drill a hole on one side and press in a nut, I have an M4.
In the center of the cut, drill a hole for an M4 screw, insert the screw and tighten the nut.
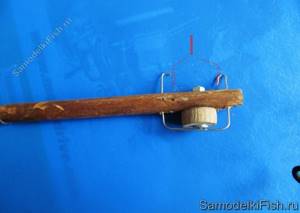
We make a bracket by drilling two holes and cutting grooves between them
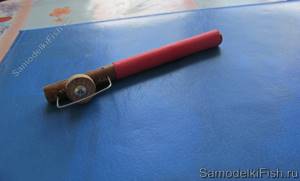
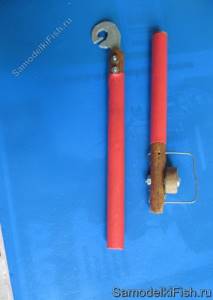
We put heat shrink on the handle
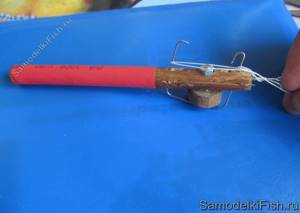
Now the procedure for tying the hook. (to make it easier to see, nylon thread is used instead of fishing line).
Insert and secure the hook.
We make 5-6 turns around the hook and put it behind the bracket.
We press the bracket with our thumb and stretch the fishing line.
Release the hook by loosening the screw tension. The node is ready.
We sorted out tying the hook. I’ll tell you it’s quite convenient, after several trials and errors I learned to knit without looking, I was satisfied.
It's time to knit the loops of the leashes.
Why do we make loop knitting?
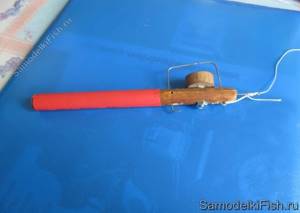
Homemade loop knitting
We make a cut in the same stick,
corresponding to the thickness of such a thing. Can be made from plastic, plywood, metal, etc. Mine is made of aluminum. Please note that the length of the loop depends on this size.
We get hook and loop knitting
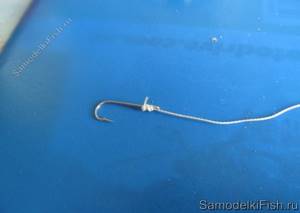
The hook is tied, we knit a loop of the leash:
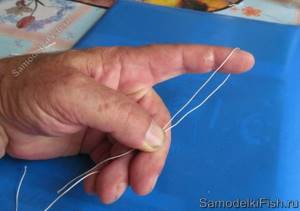
Fold the fishing line, holding it in this way. The bend of the line is the length of the leash.
We put the fishing line behind the base.
Raise and make 1 turn.
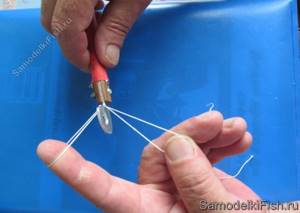
We put the loop inward.
We stretch it, fixing the line in position.
By lowering and continuing to hold the line in tension, we get a loop.
We drop the finished loop and get a nice leash for fishing equipment and rigs.
Thus, we significantly reduce the production time of leashes, while having reliable fastening points and the ability to set the desired leash length. Even while at the fishing spot, we knit leashes quite easily and quickly, depending on the conditions.
But there are a few notes.
There are no questions about crocheting, everything is simple and clear, but there are some inconsistencies with loops. For example, how to make a short leash about 3-5 cm? This horse head will definitely not give the desired results, just a very short distance.
It is not always possible to make leashes of the same length, there is still a difference. I have some thoughts on this matter, which I will outline in the next article. Good luck to everyone and happy fishing!
Useful video - knitting leashes with hooks
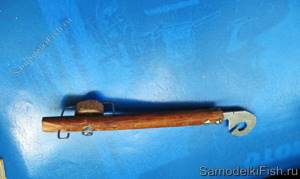
A simple, convenient do-it-yourself fishing looper and instructions ■ All videos of the Technics reviews channel: https://www.youtube.com/user/YuriyBorysenko ■ Playlists of the Technics reviews channel: https://www.youtube.com/user/YuriyBorysenko/playlists ■ My blog: https://yuriyborysenko.blogspot.com/ ••• ■ To order products: https://yuriyborysenko.blogspot.com/p/blog-page.html ••• ■ Contacts: https://vk. com/encyclopedia_paracorda https://www.facebook.com/yuriy.borysenko ••• ■ Group in contact Paracord Encyclopedia: https://vk.com/encyclopedia_paracorda ■ Group on facebook Announcements of video bloggers: https://www.facebook. com/groups/anvib/ ■ Handmade gifts: https://www.facebook.com/gifts.YB/ ••• ■ Visit me: https://www.facebook.com/yuriy.borysenko https:// twitter.com/Yuriy_Borysenko https://plus.google.com/u/0/+YuriyBorysenko ••• THANK YOU for your attention to my channel, for subscribing and rating the video.
Video A simple, convenient do-it-yourself fishing looper and instructions from the Technics reviews channel
Knitting leashes for fishing using homemade looper and hooker
For a long time now I have seen on the Internet devices for tying hooks and loops, the so-called loopers and hookers, but somehow I was not impressed. And now, probably, I was pressed, and decided to try it. To be honest, the idea was borrowed from Internet sites, maybe slightly modified.
First I made this device for knitting loops and hooks on leashes

but I realized it’s not very convenient. When knitting loops, the hooker interferes. Maybe this is a subjective opinion, but I do it for myself! Therefore, I decided to separate two homemade devices for knitting loops and hooks.
Homemade crocheter
In a round stick (1-1.5 cm in diameter) we make a cut with an iron saw (so that the gap is not large), drill a hole to avoid splitting along the cut line

From the second round piece we cut off this washer, this is the hook clamp handle. We drill a hole on one side and press in a nut, I have an M4.
In the center of the cut, drill a hole for an M4 screw, insert the screw and tighten the nut.
We make a bracket by drilling two holes and cutting grooves between them
We put heat shrink on the handle
Now the procedure for tying the hook. (to make it easier to see, instead of fishing line there is a nylon thread)
Insert and secure the hook
We make 5-6 turns around the hook and put it behind the bracket
Push the bracket in with your thumb and pull the line through
Release the hook by loosening the screw tension. The node is ready
We sorted out tying the hook. I’ll tell you it’s quite convenient, after several trials and errors I learned to knit without looking, I was satisfied.
It's time to knit the loops of the leashes.
Why do we make loop knitting?
Homemade loop knitting
We make a cut in the same stick,
We get hook and loop knitting
The hook is tied, we knit a loop of the leash:
Fold the fishing line, holding it in this way. The bend of the line is the length of the leash.
We put the fishing line behind the base.
Raise and make 1 turn.
We put the loop inward.
We stretch it, fixing the line in position.
By lowering and continuing to hold the line in tension, we get a loop
We drop the finished loop and get a nice leash for fishing equipment and rigs.
Thus, we significantly reduce the production time of leashes, while having reliable fastening points and the ability to set the desired leash length. Even while at the fishing spot, we knit leashes quite easily and quickly, depending on the conditions.
But there are a few notes.
There are no questions about crocheting, everything is simple and clear, but there are some inconsistencies with loops. For example, how to make a short leash about 3-5 cm? This horse head will definitely not give the desired results, just a very short distance.
It is not always possible to make leashes of the same length, there is still a difference. I have some thoughts on this matter, which I will outline in the next article. Good luck to everyone and happy fishing!
Pugach Yuri – Specially for Homemade FISH, Avdeevka, Ukraine
Useful video - knitting leashes with hooks
Fishing looper and extractor - simple and effective
There are no trifles in fishing. Any fishing accessories have their purpose and carry a functional load. Among such “small things”, fishing extractors and loopers stand out. They are used everywhere in all fishing directions. We will look at how to use an extractor when fishing, and how to use a fishing looper.
Extractors for fishing will help you and the fish
A fishing extractor is a special device used to conveniently remove a bait or hook from a fish’s mouth. It allows the angler to remove the hook without damaging the catch and keeping his fingers safe. This device is relevant for any fishing method - from spinning to float fishing rod.
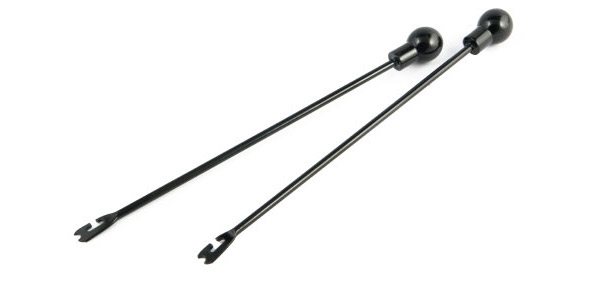
Metal extractor for fishing from Akara ball handle in the Rybolov.ORG store >> fishing tools
There are different design options for fishing extractors. The basic one is a metal rod with a diameter of 3–5 mm and a length of 20–25 cm with a loop at the end. There are varieties with a piece of spiral at the end of the wire.
How to use an extractor while fishing . The operating principle of a fishing extractor is simple. The rod is inserted into the mouth of the fish. Then you should carefully hook the shank of the hook with a loop and, turning it, smoothly remove it from the mouth. This is very convenient, especially when the prey has swallowed the bait deeply and you can’t reach it with your fingers.
When catching peaceful fish with a float rod or donk, plastic fishing extractors are more often used . Structurally, they are similar to a metal “device”.
The advantages of plastic fishing tools include:
– lightness; – greater ease of use; - cheapness.
Many models of plastic fishing extractors do not sink in water, so they are difficult to lose even when fishing from a boat.
For predatory fish, it is customary to use slightly different extractors. Initially, fishermen used surgical forceps and pins, the main purpose of which was not fishing. However, manufacturers quickly realized and began to produce specialized clamps, similar to the mentioned medical instrument, but more suitable specifically for fishing. An important addition to this device will be a yawner, especially when hunting pike.
DIY fishing extractor
If a fisherman does not have an extractor, but the need for one has arisen because the caught fish has swallowed the bait deeply, then this device can be cut out of a stick. It is necessary to cut off the forked branch, one shoot is removed so that a small twig remains, with which the hook will be grabbed and removed.
In general, an extractor can be classified as a small item for fishing, which every angler must have. It makes it much easier to remove the fish from the hook, protects your fingers from injury, and the underwater inhabitant does not suffer, which, if desired, can be released back to its native element.
Fishing loopers - we knit while fishing!
Fishing looper is the simplest device for knitting loops on a cord or fishing line . It is in demand among feeder and float anglers, as well as among carp anglers. With its help, you can easily and quickly tie a loop for a boilie, for attaching a fastener, a feeder or a leash with a hook.
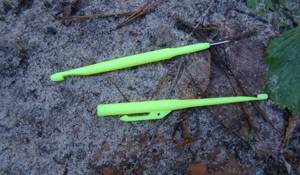
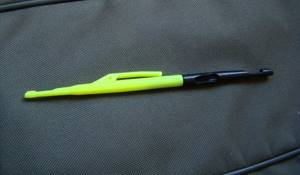
A fishing looper is a plastic rod that has an eyelet with a slot at one end, which allows you to quickly form and tighten a loop. Moreover, with one device, with some experience and skill, you can knit loops of different sizes. You can learn how to use a fishing looper by watching a video on the YouTube channel.
Homemade fishing looper . There are many options for homemade loopers for fishing. The simplest one is made from wire with a diameter of about 2–3 mm. It bends into a staple and is as easy to use as a factory-made plastic looper. The costs of manufacturing such a device are minimal, and if it is lost, you can make a new one in a minute, literally “on your knees.”
What does the tool look like?
A factory-made fishing looper is a plastic or metal hook of a special shape. At the end of the handle there is a hook with a hole, with the help of which, with simple manipulations, smooth loops of the same parameters are obtained. Homemade looper is also distinguished by the characteristic bend of the hook, although it is made from improvised tools. In principle, making a looper with your own hands is not difficult: it is important to thoroughly treat all surfaces that will subsequently come into contact with the fishing line or braided cord. Flaws in processing can play a cruel joke: the fishing line will be injured and subsequently the loops will break.
How to Knit Loops with Loop Knitting for Fishing
Knitting leashes for fishing using homemade looper and hooker
For a long time now I have seen on the Internet devices for tying hooks and loops, the so-called loopers and loopers, but somehow I was not impressed. But at the moment, everyone is dreaming, crushed, and has not decided to experience it. Honestly, the idea was borrowed from websites, maybe little changed.
At first I made this device for knitting loops and hooks on leashes
but I realized it wasn’t entirely comfortable. When knitting loops, the hooker interferes. Maybe this is a personal worldview, but I do it for myself! Therefore, I decided to divide two homemade devices for knitting loops and hooks.
Homemade crocheter
Make a cut in a round stick (1-1.5 cm across)
using an iron saw (so that the gap is not large), drill a hole to avoid splitting along the cut strip
From the second round piece we cut off this washer, this is the hook clamp handle. That we drill out the hole and do not press in the nut, I have M4.
In the center of the cut, drill a hole for an M4 screw, insert the screw and do not tighten the nut.
We make a bracket by drilling two holes and cutting grooves near them
We put heat shrink on the handle
Now is the procedure for tying the hook. (to make it easier to see, instead of a fishing line there is a nylon thread)
We insert and do not fix the hook
We make 5-6 turns around the hook, do not put it behind the staple
How to use a fishing looper
BUY THE BEST PVC BOATS FROM THE MANUFACTURER HERE Review PVC boat Aqua PRO 180.
Fishing looper. How to use a looper? [salapinru]
Petlevyaz
fishing.
How to use a looper
? Subscribe to.
We push the bracket in with a huge finger and do not pull the fishing line through.
Release the hook by loosening the screw tension. The node is ready
We sorted out tying the hook. I’ll say it’s quite comfortable for you, after several trials and no mistakes I learned to knit without looking, I was satisfied.
It's time to knit
leash loops.
For what purpose will we make loop knitting?
Homemade loop knitting
We make a cut in the same stick ,