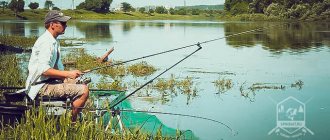
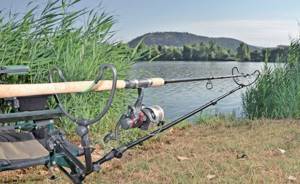
Moreover, the feeder is a deep modernization, since almost everything has been improved, from the fishing rod to the equipment itself, which includes the feeder. As a rule, a powerful but flexible rod is used, capable of casting gear very far from the shore.
What is feeder tackle?
A feeder is one of the well-known tools designed for bottom fishing (peaceful fish), using a specially designed feeder rod and a feeder, which also serves as a sinker. The bite indicator in such rods is interchangeable tips of a certain flexibility, designed for various fishing conditions. This nuance can be attributed to the features of feeder fishing. What is still needed for fishing to be considered feeder?
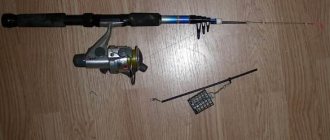
Rod. For feeder fishing, special rods are produced, both telescopic and plug-in. The presence of different flexible tips in the kit allows you to use feeders of different weights. At the same time, instead of feeders, you can install ordinary sinkers, depending on the fishing conditions. Therefore they say:
- picker-quivertypes – for fishing with sinkers;
- feeder quivertips - for fishing with feeders.
In retail outlets you can find rods with lengths from 1.8 to 4.5 m. Depending on the length of the rod, the casting distance also depends. The tips have their own sensitivity and their own test. To avoid confusion during the installation process, they are painted in separate colors.
Coil. Bottom fishing does not require special reel performance, so any spinning reel equipped with a front or rear drag will do. When fishing for carp or carp, especially larger ones, you will need a reel with a baitrunner.
Main line. Since you plan to fish at a considerable distance from the shore, it is better to take a braided fishing line. It does not stretch and is able to quickly transfer bites to the tip of the feeder. In addition, it is stronger and more stable than monofilament fishing line.
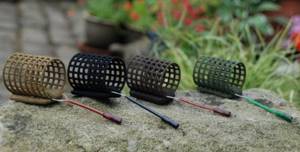
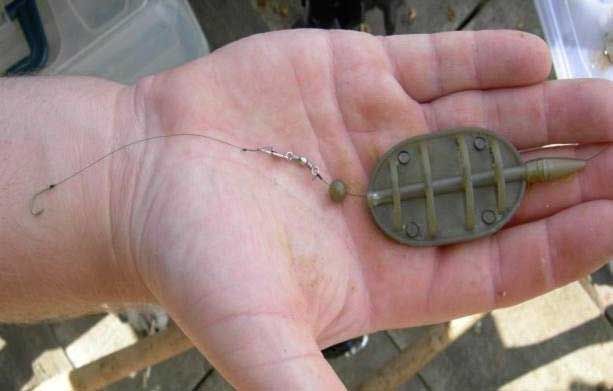
Feeder. The feeder, its dimensions and its weight are selected depending on the casting distance, as well as the presence of a current. As for the shape of the feeder, this is not of fundamental importance.
Leash. Monofilament fishing line or fluorocarbon are used as leashes. Recently, fluorocarbon has been used more often because it is invisible to fish in the water. In this case, you should always install leashes whose breaking load is less than the breaking load of the main fishing line.
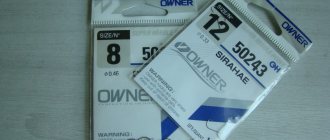
Hooks. Hooks are selected depending on the type of fish being caught. For example, when fishing for carp, carp hooks are used. Hooks come in both thin and thick wire.
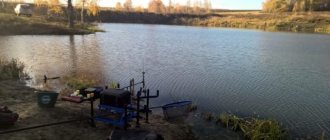
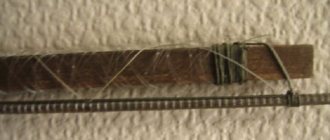
Rod stand. Feeder fishing does not involve constantly holding the rod in your hands, like fishing with a regular float rod. Having thrown the tackle into the water, the rod rests on the stand. You can use a regular wooden flyer, cutting it directly onto the pond.
Fishing. Do-it-yourself feeder tackle.
Simple inline
Sliding feeder rigs are the only ones allowed in feeder fishing competitions. This is explained by the fact that in the case of a dead hook, a break in the leash or working line will not lead to the fish swimming away with a heavy load in the form of a feeder, and therefore will prevent the death of the underwater inhabitant.
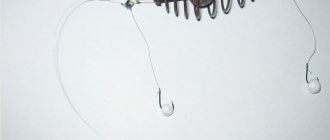
In this installation, the line passes through the body of the feeder or a loop at one of its ends. This could be a spring with a plastic core or a more modern “method”.
At the upper and lower ends, the movement of the feeder along the fishing line is limited by locking elements made of soft materials: rubber or silicone. The leash is attached to the end of the working line using a loop-to-loop method or through a carabiner.
Twisting can also be used in inline editing.
Inline with bend
This modification makes the equipment more sensitive. The main difference from the previous installation is the presence of a short, 5-10 centimeters, line outlet with swivels at the ends. The working line is passed through one of them; the feeder should be tied to the second correctly: with a knot, a loop or through a carabiner.
Inline with a tap combines the properties of several montages:
- separation as in the paternoster and Gardner loop;
- free sliding as in loop rigs.
Advice! In this equipment, it makes sense to attach the leash not immediately after the stopper, but to twist it or tie a rigid bend of 15-20 centimeters in size to prevent overlaps.
Inline with retraction.
Helicopter and two knots
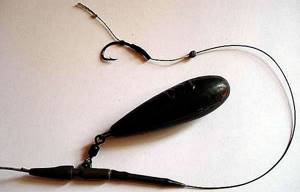
Imagine the previous montage, in which it’s as if the feeder and leash have swapped places. This will be a helicopter with two knots, so named for the free rotation of the branch with a hook around the main line. In this case, the feeder has an end fastening as in the equipment for the donkey, discussed at the beginning of the review.
This installation makes it possible to vary the depth of the working horizon by moving the leash with stoppers up and down along the working cord. Fastening is carried out using swivels or a slip-on loop.
Equipment: helicopter and two units.
Carp montage
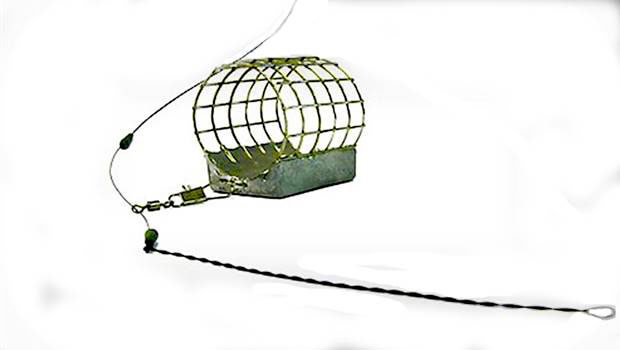
In carp fishing, much attention is also paid to the fish, and the harm caused to it during the fishing process is minimized. To prevent the possibility that the feeder feeder will harm the carp if the gear breaks, it is installed using a safe clip, which allows you to easily remove the heavy load.
The sinker is on a safe clip.
In this case, the carp equipment is not as sensitive as that of the feeder rigs listed above, but the strength of the trophy is such that it can easily pull a heavy feeder and sinker from the bottom. It is almost impossible to miss a bite from a strong fish.
When fishing for carp, use a reel with a baitrunner or do not lock the reel bail. This will help protect the tackle from sudden powerful carp bites.
How to choose a feeder rod?
Depending on where the fish will be caught and what kind of fish will be caught, the feeder rod is selected.
Feeder rod test
This indicator is of serious importance, since it determines how far a feeder with bait of a certain weight will be thrown. In this regard, the feeder rod is divided:
- for ultralight with dough up to 30 g;
- for light ones with dough up to 60 g inclusive;
- medium class with dough from 60 to 80 g;
- for medium heavy with dough from 80 to 100 g;
- for heavy dough with dough from 100 to 120 g;
- for extra-heavy with dough from 120 g and more.
It is not recommended to go beyond the test limits, since extra grams will overload the tip and can lead to its failure. If you use feeders whose weight is less than the test indicator, this will lead to a decrease in the sensitivity of the feeder gear.
Feeder rod length
The longer the rod, the further you will be able to cast the rig. Therefore, when choosing a fishing rod, you should consider how far you will have to cast the tackle. If the reservoir is small, then a long rod is not needed at all. Therefore, you need to pay attention to a rod with a length of 2 to 4 m.
Feeder rod structure
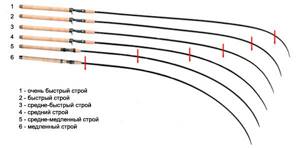
Feeder rods differ not only in test, but also in structure. The structure can be:
- Slow . The blank of this rod bends completely, both when casting and when playing fish.
- Fast . As a rule, in such rods only the upper part is bent. Such rods react very quickly to fish bites and allow you to completely control them when fishing.
- Average _ A similar rod reacts differently to different loads. At low loads, only the upper part works, and when the load increases, the middle part can also be turned on.
Coil selection
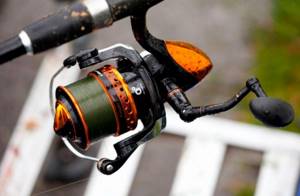
There are no special requirements for the reel for feeder gear. At the same time, you need to take into account that you will have to throw heavy feeders over a considerable distance. Therefore, the reel must be reliable and must have a rear or front clutch. In addition, if you plan to catch large fish, then you need a baitrunner to smooth out the jerks of powerful fish.
The size of the reel depends on the thickness of the fishing line and its quantity, or rather its length. As a rule, at least 150 m of fishing line is wound on the reel. When fishing for carp or other large fish in large bodies of water, it may be 150 meters.
Basically, reels with average gear ratios and traction are selected.
The number of bearings in the reel is also important. The best option is 5-6 bearings. The quality of the reel depends on the number of bearings, which is associated with uniform and smooth winding of the fishing line. Although this indicator is more important for completing a spinning rod.
A very important point! The more bearings, the more expensive the reel. Although the number of bearings in a reel for feeder fishing is not of fundamental importance. You can fish with one bearing, which is what many anglers do.
Blind mount
You can tie the feeder feeder with a blind knot in paternoster, Gardner loop, and helicopter installations. In all these rigs, the feeder is located at the bottom of the rig, and the leash on the outlet is located higher on the main line. The Gardner loop is the same paternoster, just a double bend, not a single one.
Noose
The most common method of binding using a blind method is a noose with a loop in a loop. This can be done either through a swivel or without it directly into the eyelet for attaching the cormak. At the end of the fishing line, a loop is formed for the feeder feeder (it is already equipped with a Gardner loop initially) of such a size that the cage can pass through it. This can be done using a figure eight knot or surgically (regular double or triple knot). We pull the loop into the eye of the swivel, then we thread the cormak into it and tighten it. When tightening, we place the overlap of the loop on the body of the swivel, and not on the main fishing line - this will make it easier to remove the cormak if replacement is necessary. A similar installation can be used in a feeder without a feeder - with a regular sinker with an eye. Article about paternoster equipment:
Into the loop
You can tightly tie the feeder feeder into a loop. When forming a loop, the fishing line can be immediately passed through the eye of a swivel or feeder. Then, when tying the loop, the cage will already be fixed in it. The disadvantage of this method is that it is not possible to quickly change the cormak; you will have to bandage the entire installation. This method is suitable for home reservoirs and well-known fishing spots, when the mass and size of the feed is precisely known. And you won’t have to change it during the fishing process. This method is also suitable for feeder helicopter or paternoster. Accordingly, in the Gardner loop, cormak is passed into the loop when tying the equipment initially.
Knot
You can simply tie the feeder net to the main line with a knot, using a paternoster or helicopter. Feeder feeder assembly - any, as for hooks. You can use a regular fishing self-tightening loop, clinch, palomar and other strong knots. However, the disadvantage is the same - the inability to replace without dressing. Therefore, the most popular way is through a carabiner clasp.
Swivel with clasp
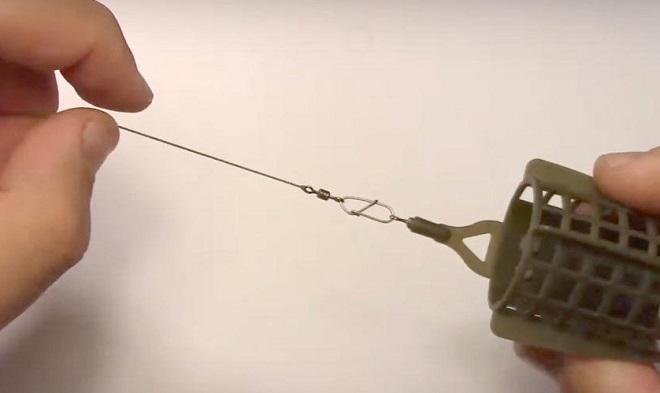
The easiest way to properly tie a feeder feeder is through a two-piece carabiner plus a swivel. We tie the bundle with the clasp to the outlet in any way - with a knot, a noose, or in a loop through a swivel. Cormac is attached with a carabiner. If you tie the feeder feeder in this way, it can be easily removed and rearranged if necessary. Some feeder feeders are already equipped with a swivel. If you put a two-piece with a carabiner, you will end up with an overly cumbersome bunch of two swivels and a clasp. The complete swivel on such models can simply be bitten off, except for plastic mesh options with a branch in which the swivels are tightly fixed. Or simply tie it with a noose, as in the first version of the blind fastening.
Line, leashes and hooks for feeder
Monofilament line or braided line (cord). The most preferable option is braided fishing line, especially if fishing is carried out at a distance of 70-100 meters. In addition to the fact that it has a greater tensile strength and is more wear-resistant, it also does not stretch. This makes the tackle much more sensitive compared to using monofilament fishing line, unless, of course, it is a cheap Chinese fake.
At fishing distances up to 20 or 30 meters, monofilament fishing line is suitable. Therefore, under such fishing conditions, as well as when fishing in still water, you can safely use monofilament fishing line and not pay extra money.
Line for leashes. As a rule, monofilament fishing line is used to make leashes. Its thickness is determined depending on the weight of the fish. When fishing for crucian carp, for example, or roach, a leash with a diameter of 0.1-0.12 mm is sufficient. When fishing for bream, where a medium-sized specimen can bite, you can install a leash 0.2 mm thick, with a main line thickness of 0.25-0.35 mm.
Recently, fluorocarbon has been used as a leader material. It is ideal for this because it is invisible in water, although its characteristics are somewhat inferior to monofilament fishing line. But if you take into account that it is not noticeable to the fish, then you can install a leash of a larger diameter.
Feeder hooks. As a rule, feeder tackle is equipped with the most common hooks. At the same time, they are selected in size, depending on the bait used and the size of the fish. The main thing is that it fits freely in the fish’s mouth. At the same time, you need to take into account that each type of fish has its own mouth size.
How to tie a feeder to a feeder
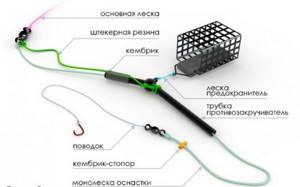
Unlike casting feeder fishing, feeder fishing is distinguished by particularly sensitive and, accordingly, more complex equipment, which includes not only feeding devices and leashes with attachments, but also all kinds of rocker arms and an element such as an anti-twist, which can prevent tangling of rigs in the process of casting and playing fish. Also, to form the connections that make up the installations, it is necessary to use all kinds of combinations of ties from scaffolding material, the main design of which is a variety of nodes and loops. Further, in the course of the material, we will dwell on the basic technologies that allow you to tie a feeder to a feeder.
Paternoster
Paternoster is the simplest and most common type of mounting connection, which can be safely classified as a universal option applicable for most fishing conditions. The technique is based on branching the main cord at the end of the equipment into a short branch, to which a feeding device is attached using a carabiner fastener or simple tying. On the continuation of the cord, a leash is mounted in a loop in a loop or using a miniature metal fastener.
Important! To prevent tangling of the equipment, the length of the leash is always an order of magnitude higher than the length of the outlet.
The outlet on the main cord is formed by twisting the fishing line and fixing it with a knot, or for mobility of use and speed of production, instead of tying a knot, a triple swivel or paired carabiners are installed. The advantages of this knitting technique are the speed and simplicity of the design. The disadvantages of this method are low sensitivity to small bites, especially when using equipment in reservoirs with medium and fast currents.
Gardner's loop
The Gardner loop is an improved type of knitting of the paternoster presented above. The method was invented by an American fisherman, after whose name this method of feeder installation is called. Cunning anglers have been encouraged to move away from forming a cast-off and using a carabiner or directly tying the feeding device to the cast-off line.
Instead of a short branch, a blind loop is knitted, first into which a feeder can be attached to the fishing line through a swivel or subsequently using a winding ring. The leash with bait is attached to the cord without changes compared to the paternoster, through a loop or carabiner. As a result of the innovative approach, tying has become even more simplified without changing its initial functionality, and its formation does not take the fisherman even a few seconds of time. These factors are the main advantages of the connection. The disadvantages are comparable to the paternoster and these are the relative roughness of the equipment and the insufficiently efficient operation of the installation on currents.
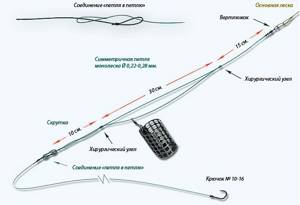
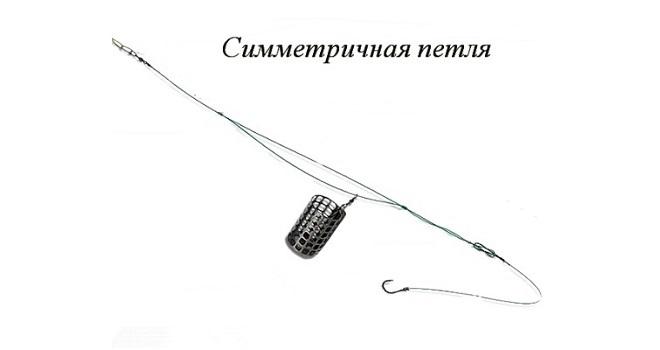
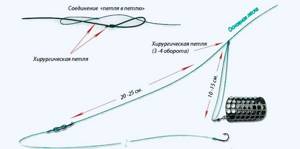
Symmetrical loop
You can tie the feeder to the fishing line in a more sensitive way using the principle of forming a symmetrical loop on the cord. Within the main cord, at a distance of 30–40 cm, a symmetrical loop is formed using two surgical knots along the edges of the structure. A feeding device is inserted into the loop, which should slide freely along one of the arms of the connected loop. In the upper part a carabiner is placed for fastening with the main fishing line; in the lower part, a 10 cm twist is made from the two sections remaining from forming the loop, to which the leash with a hook will be attached.
Important! Installation is considered a specialized method of equipment for feeder hunting in a body of standing water.
The advantages of knitting are high sensitivity. This parameter gives the sliding principle of operation of the feeding structure, the weight of which is not felt by the fish trying the bait. The disadvantages are the specificity of fishing conditions, depending on the type of reservoir and some of the difficulties when tying a loop construct.
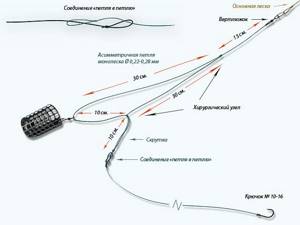
Asymmetrical loop
You can also tie the feeder to the feeder using the antipode of the previous connection option - an asymmetrical loop. The absolutely similar principle of forming the main knitting design differs only in the size of the loop arm.
Important! One of the arms of the loop is made two or three centimeters shorter than the second, and it is on this short part of the mounting connection that the feeding tool is placed again, using the sliding principle.
Fishermen recommend the presented tying especially for fishing on currents, because the advantages of the rig are the ability to clearly transmit even the slightest bite to the quivertip, and the disadvantage is only the relative complexity of tying.
Flat method
There are two principles for tying a method-type feeder onto a fishing line, using sliding and blind connection technology. Using sliding technology or the so-called inline method, the device, due to its design features, is mounted on the main cord. The movement of the feeder is regulated by two stoppers. A leash with a hook is attached behind the feeding tool.
Using blind technology, we tie the feeder to the outlet from the main cord, which is similar to the paternoster technique, mounting the leash in the classic way behind the bait device. A more innovative method, the so-called helicopter and two knot type, places the leash on a sliding carabiner in front of a feeder mounted at the end of the cord. It is more effective to use open-type feeders in weakly flowing and stagnant waters, and the direction of how to tie the equipment, sliding is more sensitive in its principle, gives the activity of the fish.
Harvester equipment
This type of equipment is equipped with anti-twist tubes, on the side of the long arm of which a leash is connected to the main line inserted through the cavity of the tube, and a feeding tool is attached to the break between the components of this element using a carabiner. Easy to assemble, recommended for novice feeders due to the low tangling of the gear and versatility of use. The disadvantage of this method is its roughness and low sensitivity when fishing for passive fish.
Feeder feeder
Depending on the nature of the bottom of the reservoir, you have to decide what to use - a feeder or a streamlined weight. if the bottom is muddy or overgrown with grass, then the feeder can simply drown in mud or grass and there will be zero use from it. In such cases, a regular sinker is installed, and the fishing point is fed in a different way. For example, if the fishing point is not far from the shore, then the bait can be rolled into balls and thrown by hand.
Stand
Feeder fishing requires the presence of a stand to set the rod at a certain angle, for constant control over its tip. The following can be used as stands:
- Wooden flyers . They are very affordable and simple.
- Butt holders . Not very comfortable, especially in the presence of wind.
- Factory racks made of metal (like wooden flyers). They are light in weight and can be adjusted in height. They are widely used by fishermen, since not all bodies of water can cut a wooden flyer.
- Rod-pods . This is expensive, and therefore not every angler can afford such a stand. It can accommodate 3-4 fishing rods at the same time, which is very convenient.
Feeder installations
Types of feeder equipment
There are several types of feeder equipment, differing from each other:
- According to the fastening of the tip: blind or sliding.
- By type of feeder: open or closed.
- According to the placement of the leash: below or above the feeder.
Paternoster
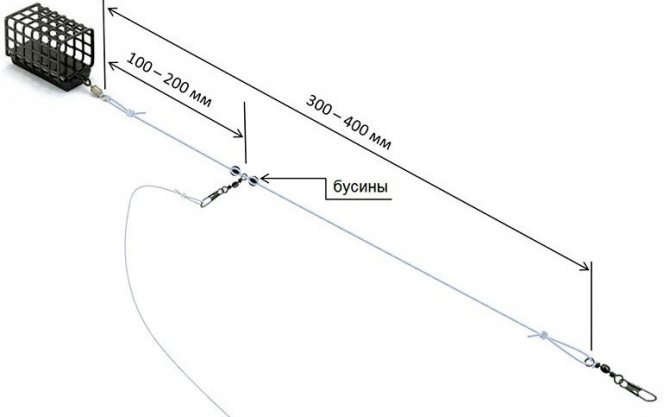
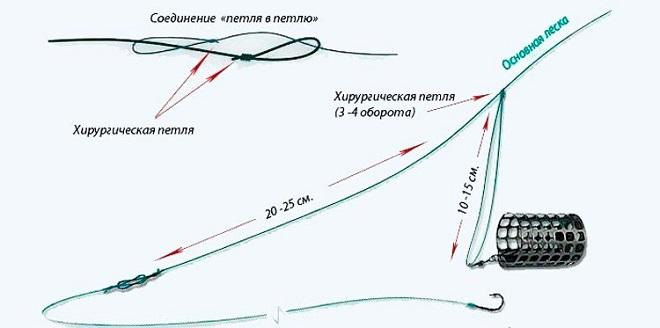
This is the most common and simplest version of feeder equipment. In this rig, the leash is placed below the feeder. To get a “paternoster”, it is enough to form two loops on the main fishing line. A smaller loop is knitted at the end of the main line. A leash with a hook is later attached to it. The second loop, larger in size, is formed at a distance of 25-30 cm from the first. A feeder is attached to it. The leash is fastened according to the “loop to loop” principle, and another method can be used to fasten the feeder, using swivels and latches, fasteners.
Symmetrical and asymmetrical loop
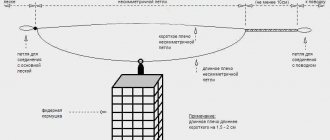
This type of equipment allows you to attach the feeder using a sliding method. In this rig, the feeder is also located above the leash. Sliding installation is done like this: take a piece of fishing line about 1 meter long and fold it in half so that one end is 15-20 cm longer than the other.
At the end of the fishing line, folded in half, a small loop is knitted, to which the leash will later be attached. After this, the fishing line is tightly twisted and, after 5-10 turns, a surgical knot is tied. A swivel with a clasp is attached to a long piece of fishing line to secure the feeder. After this, the ends of the fishing line are tied in such a way that the shoulders of the large loop along which the feeder will slide are the same. As a result, you get a rig that is called symmetrical. At the opposite end from the leash, it is necessary to form another loop in order to connect the equipment to the main fishing line.
An asymmetrical loop is knitted in a similar way, but with the difference that the loop along which the feeder slides must have arms of different lengths. In this case, the feeder should be attached to a longer arm.
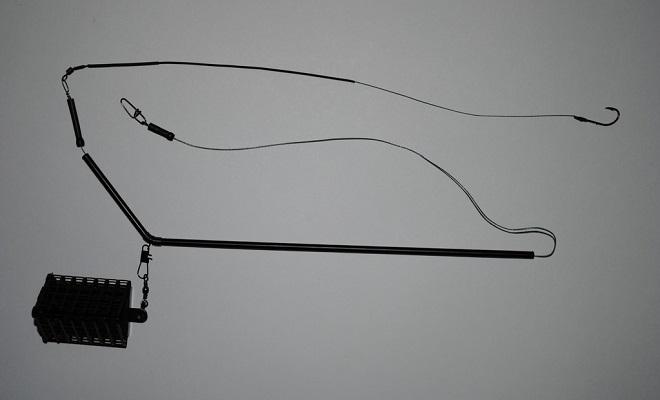
Anti-twist tube

The equipment is based on a sliding installation with a feeder, which is connected to an anti-twist tube. The tube is put on the main line, and at the bottom and top of the tube, on the main line there are restrictive rings. They limit the free movement of the tube to which the leash is attached.
"Harvester"
This equipment option also involves the use of an anti-twist tube, but for attaching the feeder.
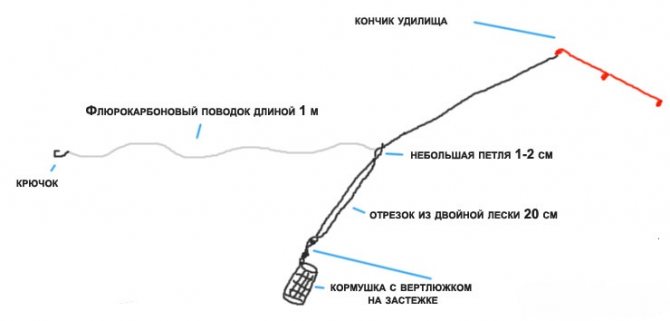
"Inline"
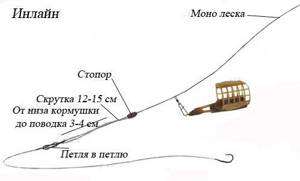
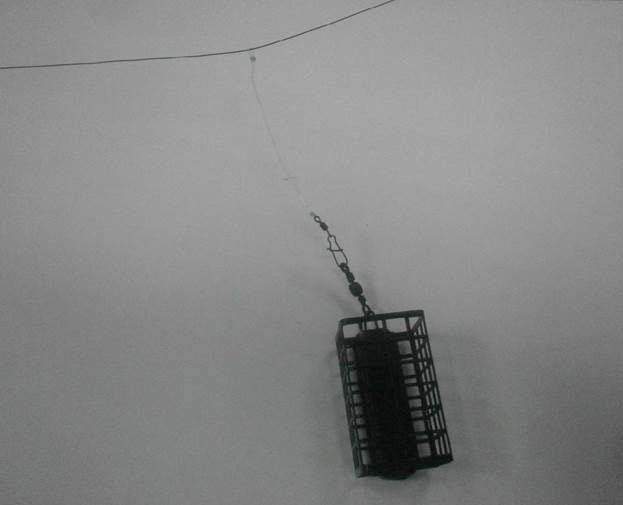
This is a very simple rig, but similar to a sliding feeder rig. The only difference is that the feeder is attached to the main line. The sliding of the feeder along the main line is limited by 2 stoppers located at the top and bottom of the feeder. A leash with a hook is attached to the end of the main line.
"Helicopter"
This equipment, where the feeder is firmly attached to the end of the main fishing line, and the leash moves along the fishing line. The same 2 stoppers limit the slipping of the leash. A swivel with a latch is mounted on the leash. There are two stoppers installed on the main line: 1 at a distance of 25-30 cm from the feeder, and the other stopper can be installed at any distance. The main thing is that the leash rotates freely around the fishing line. The helicopter rig is suitable for fishing on rivers with a current.
How to assemble feeder equipment, step-by-step instructions:
- The rod is assembled and the tip is installed. All rings must be on the same line.
- The reel is installed on the reel seat.
- The fishing line is wound onto the reel, after which it is passed through all the rings.
- A shock leader must be attached to the end of the fishing line if heavy feeders are used.
- Equipment is attached to the shock leader, which is selected for specific fishing conditions.
After such actions, we can say that the feeder tackle is ready for use.
Best HD Feeder Montages
General information about donks
The peculiarity of bottom fishing rods with feeders is that the container in which the bait is placed performs a double function. When cast, it becomes a load and flies over a long distance; when it falls to the bottom, it turns into a place for fish to feed. In this way, the fisherman not only delivers a hook with bait to the required point, but also suggests where to eat.
In addition to this quality, there are other advantages, such as the possibility of fishing over long distances, at depth or in the current, where it is not possible to accurately throw bait, and finally, the costs of components are low. The main disadvantage is the difficulty of using the donkey in snags.
To understand how to make a donk with a feeder, you should familiarize yourself with the types of donks. The most commonly used bottom gear is the following designs:
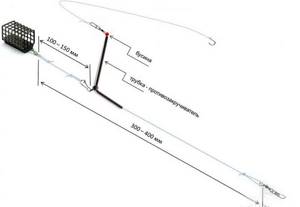
"Zakidushka" The oldest tackle. It is a fishing line with a diameter of 0.3-04 mm and a length of up to 50 meters, assembled on a reel. Initially, a weight was used, attached to the end of the equipment; leashes with hooks were located a little higher. Then sliding sinkers began to be used, and the leash with the hook was moved to the end. This solution increased the sensitivity of the gear. Feeders in this version are not used for a simple reason: to throw the bait, the fisherman first spins the load, and due to centrifugal force, all the bait spills out of the container.
"Rubber". An original and very catchy equipment that helps to achieve high results in mass fishing of such fish as crucian carp, roach, ram, saberfish. To make it a bottom tackle, you simply tie a rubber shock absorber directly to the load. The fishing line that follows then spreads along the bottom. You can make an elastic band with a feeder, but then you will have to choose a tighter shock absorber and the lightest possible container for food, so that you spend less effort on delivering it.
Donka from a spinning rod with a feeder. It has replaced the “stuff”. Initially, the basis was taken on a spinning rod (usually of large test), equipped with an inertial or inertial-free reel, on which a fishing line with a weight and hooks was wound. Later, a feeder, mainly of a spring type, was used as a load, in which the bait was stored for the longest possible time. This option was chosen for a simple reason: it is inconvenient to make frequent casts, but there are no longer any disadvantages of casting.
Feeder. Modern tackle, consisting of a special rod with flexible, replaceable tips (alarms), a spinning reel, monofilament with a diameter of no more than 0.3 mm and multiple variations of feeders and leashes.
How to make catchable feeder gear?
The catchability of feeder gear depends on factors such as the correct choice of equipment, which would take into account all the characteristics of both the reservoir itself and the gear as a whole.
Feeder tackle for bream fishing
First you need to find a catchable place where bream can be found. If fishing is carried out on the river, then you can use heavy feeders weighing up to 100 grams. If it is a pond with standing water, then the weight of the feeder may be less. But at the same time, you should not forget that you cannot throw a light feeder far.
For catching bream, a rod with a length of 3 to 4 meters and a weight of 100-120 grams is suitable. The leash can have a diameter of about 0.18 mm. Hooks are selected in such a way as to use baits such as worms, pearl barley, peas and corn.
Tools such as “paternoster”, “asymmetrical loop”, “symmetrical loop”, anti-twist tube and others are suitable.
Feeder tackle for carp
When configuring feeder equipment for carp fishing, you should take into account the fact that this is a fairly strong fish that can damage both the rod and the reel, not to mention the equipment breaking.
Basically, they choose a rod about 4 meters long and install a reel on it, size 5000-6000, no less. A special carp leash can be used, as can hooks. The thickness of the leash made of monofilament fishing line must be at least 0.25 mm. The thickness of the main line is 0.35-0.4 mm.
Two types of attachment points
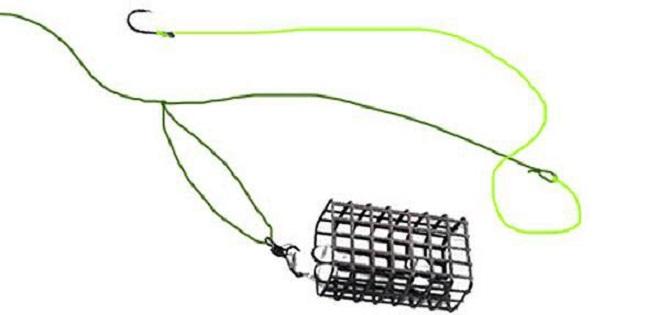
The whole variety of feeder feeders can be divided into two groups: with the usual installation method and inline, where a through channel is provided for installation for the passage of the vein. If fishing is done in the classic style, then ordinary cages are used, and in method fishing - inline feeders.
Types of inline equipment:
- The thread is pulled directly through the flat feeder. Its use is especially effective when fishing in still water, when hunting for crucian carp and crucian carp.
- The line is passed through the ring of the swivel, to which the feed container is mounted. This is a universal equipment option; it can also be effectively used for fishing in reservoirs with moderate currents and calm water.
- Installation of the feeder is carried out to the outlet, which is previously fixed on the swivel of the main fishing line. This type of execution is appropriate when fishing is planned on a fast-flowing river.
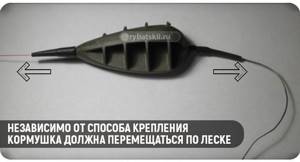
Regardless of the fastening methods, the principle is the same: the food container is not fixed, it must move freely along the fishing line so that the prey does not feel a single hint of tension.
Inline feeder tackle has many advantages, including:
- prospects for spot hunting;
- in the event of a break, the fish needs to free itself only from the hook, and not from the entire tackle;
- use in any reservoir and at different flow speeds;
- prey is especially evident when using the “Method” feeder (there is a spiral on one side and lead on the other);
- self-clipping (clipping occurs due to a heavy feeder).
Sliding installation is performed in different ways. If necessary, the hinge stroke is limited by a stopper. From the technical side, inline rigs can be either completely free sliding or with a limiter for self-hooking fish.
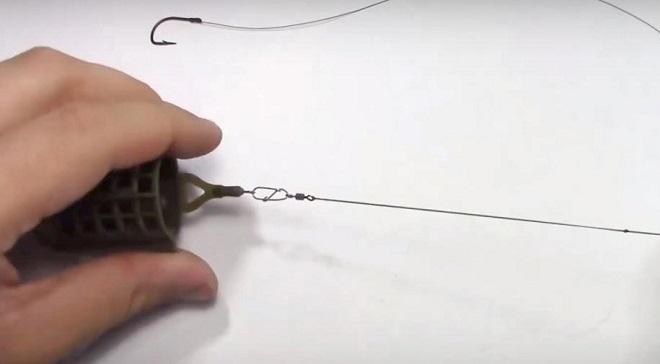
The feeder can be mounted on the feeder tackle in a standard way, using loops, a swivel with a clasp, and knots. When using loop equipment, the feeder feeder moves along the loop, and the leash is mounted to the twist-out. The feed container is located away from the “line of communication” between the prey and the fisherman, although to a lesser extent than in the paternoster.
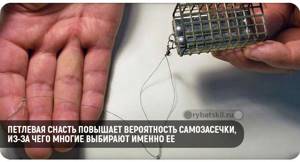
Loop equipment is in demand due to the high probability of self-notching. When the fished object picks up bait from the bottom, it often deviates slightly downstream to leave the school to feast on it. But since free sliding is limited by the size of the loop, at the moment of contact with the feeder, it rips it out of place and hooks itself, falling on the hook. In most cases, this moment is visualized as a bream bite in the current, and a nod is played out. Depending on the location of the leash outlet, a symmetrical or asymmetrical loop is selected.
A symmetrical loop better presses the leash to the bottom surface, and an asymmetrical loop has higher sensitivity indicators; there are similarities with a paternoster, when the feeder is attached to a twist by means of a swivel and a carabiner that wraps around the loop.