In the summer, most anglers use a side nod, which easily copes with the task of fishing in snags and thickets.
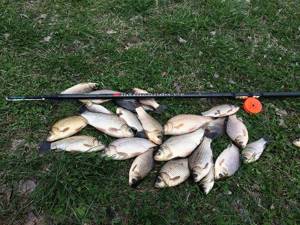
Thanks to this gear, you can become the owner of a hefty catch:
- ide;
- bream;
- carp;
- perch;
- crucian carp;
- chub and roach.
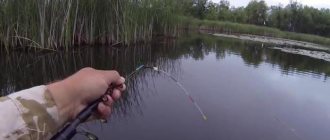
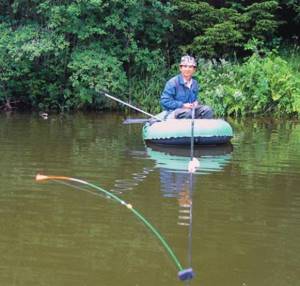
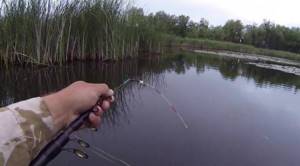
Fishing with a side nod is in no way inferior in excitement to float fishing. The process can be carried out both from a swimming device, and from the shoreline or by wading. The last option is very interesting, which makes it possible to fish a significant part of the coastal waters. It is extremely important to enter the water surface gradually so as not to spook the fish.
The most catchy place in the sultry heat will be a spit overgrown with underwater vegetation. Thanks to the abundance of grassy tangles, you can get to any area of interest for fishing.
If fishing is carried out on rivers, then it is recommended to consider places with fallen trees whose branches hang over the water surface.
The main advantages of using a side nod include:
- Possibility of use in reeds and reeds;
- the presence of vertical wiring minimizes the number of snags;
- maximum accuracy of bait delivery (both by wading and using a swimming device);
- accessibility of gear to the majority of fishermen;
- mobility of the rod, allowing you to expand the search area for fish.
Fishing rod equipment
High-quality equipment, selected with knowledge, will allow you to get a lot of pleasure from fishing.
When choosing fishing accessories, it is very important to pay attention to the following characteristics described below:
- The rod is as light as possible, which will allow you to avoid spending physical effort on holding it for a long period of time. When fishing a reservoir from the shoreline, you can stop at a length of about 6 meters, but for a boat it is recommended to purchase short analogues not exceeding 4 meters.
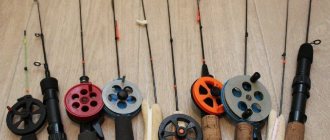
- The reel is the most suitable inertial plastic type of product in this case.
- Fishing line - we give preference to monofilament thread 0.19 mm thick in brown or marsh tones. The leashes are made from thin 0.15 mm fishing line.
Having selected the tackle, we proceed to the configuration of the equipment:
- The blind option is ideal for rods without guides and a reel. The main role in this case is played by the reel, from which the required length of monofilament should be unwinded. The reel is fixed to the top of the tackle. The resulting equipment allows you to go hunting for small crucian carp and roach.
- When using gear with a reel, it is advisable to use a sliding type of equipment. Adjusting the position of the fishing rod directly depends on the depth indicator at the selected fishing point.
How to do it yourself? Step-by-step instruction
We need to take:
- Styrofoam;
- lead sinker (3 g);
- nipple or cambrics;
- 2 mm thick fiberglass wire or stick
Interesting! The drop holds its angle better on the water.
The manufacturing process looks like this:
- We cut out a ball or drop with a diameter of 10-15 mm from foam plastic, and roll it in with a not very hot iron to give strength.
- Drill a 1.8 mm hole.
- We insert the fiberglass rod with force. If the foam moves too easily along the rod, we additionally fix it with cambrics on both sides.
- We attach a sinker at a distance of 10 mm from the edge of the rod.
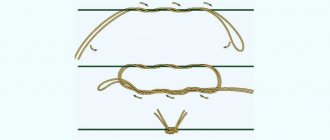
- Now we take 2 pieces of nipple, 10 mm long, thread the fishing line through them and put it on the ends of the float.
- We tie a hook and sinker or jig to the fishing line.
- The top of the upside-down should be made bright - painted or wrapped with colored electrical tape. This will be a signaling device.
Important! The line passes from the fishing rod through the lower cambric located near the sinker, then through the upper cambric and ends with a hook.
The nod float is ready!
Making a nod
A side nod can be purchased at any specialized store or made by yourself.
Option 1
In this variation, you will need to prepare spring material. The most affordable in this case will be a plastic clamp, the length and thickness of which will allow you to easily adjust the sensitivity of the nod.
Before production you should prepare:
- copper wire – cross-section 1 mm;
- electrical tape;
- plastic clamp;
- rings;
- Super glue;
- heat shrink.
Step by step process:
- We construct a tulip with a small middle ring from wire .
- The rings are fixed to the clamp (to the smooth side without a notch) using several turns of insulating tape.
- If the given conditions are observed, the summer jig will spring well. If desired, you can use a couple of drops of superglue for better fixation.
- Next, the heat shrink is put on.
- Using copper wire, we construct a corner that will serve as an attachment to the tip of the tackle.
- The smaller side of the angle is fixed to the clamp in a similar way to fastening the ring.
- If desired, you can decorate the product. Insulating tapes of various tones, heat shrinks in bright colors, and varnishes for nail plates are suitable for this.
- Using insulating tape or a price tag, we make a flag on the top of the nod. This accessory will provide an opportunity to monitor bites without stress when fishing in the reeds.
Option 2
No less popular is the method of making a nod based on a plastic bottle.
When manufacturing a product, you cannot do without the following materials:
- plastic bottle 1.5 l;
- sharp scissors;
- flat file;
- paper clips;
- threads
Step by step process:
- Having prepared the body of the bottle using scissors, you should cut out the body of the summer jig, focusing on the recommended dimensional characteristics: length - 25 cm; width (base) – 0.7 cm; width (top part) – 0.4 cm.
- We process each cut line with a file. Be sure to remove all burrs and smooth out ribbing.
- Having straightened the paperclip, we form a ring with a diameter of 0.4 cm with two outlet legs.
- The legs are pressed against the body of the summer jig (at the top). We fix them by tightly wrapping the thread.
- The wrapping area is treated with waterproof glue.
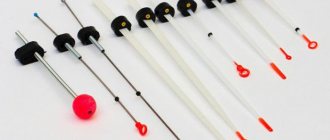
Experienced fishermen recommend making 2-33 nods with varying lengths and base widths. This will be the key to success in fishing. Hard nods are usually used in conjunction with a heavy jig, and the soft version of the product is equipped with a light nozzle.
Option 3
If desired, you can make a side type of summer jig using broken tackle. In this case, the product will be universal, meeting all requirements.
Step by step guide:
- We cut out the body of the nod according to the recommended dimensions (listed above) from the broken knee of the tackle.
- All extreme lines are processed with a file, giving the maximum degree of smoothness and roundness.
- You can make a nod ring from a paper clip or use one that is on a broken tackle.
- The ring is fixed with a thread at the top of the nod.
- Be sure to cover the thread with an adhesive base (waterproof).
- We paint the body of the accessory in black and white.
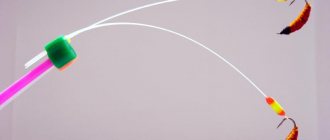
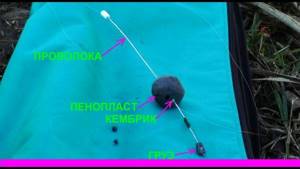
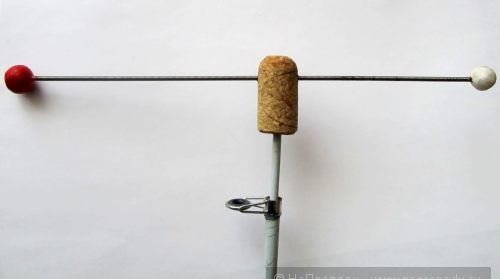
Good afternoon. I wanted to share the gear that I use when fishing on the river from the shore. This tackle successfully replaces a float for me, it is quite unpretentious and easy to manufacture. To fish with this gear, a current is required; fishing occurs from the bottom or near it (donk or half-donk type of gear). The idea of the gear is not mine; at one time it was borrowed from local fishermen. Nod To make a nod, you will need a spring from the oil seal (a large diameter oil seal, spring diameter 3-4mm), a wine cork, pieces of foam. Two holes are drilled in the cork.
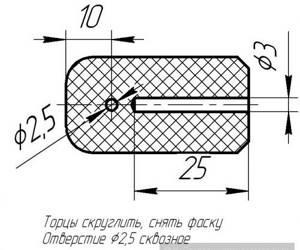
Along the axis of rotation to a depth of 25mm, with a diameter of 3mm under the tip of the rod (in my case 3mm, because the tip is broken off). And a through hole with a diameter of 2.5 mm (depending on the diameter of the spring, the spring should move with little effort) perpendicular to hole D3. Process the ends. At first I cut off the chamfer, but later I made a rounding on the front end, because... The line caught in windy weather, and sometimes when casting. Insert a spring into hole D2.5. We glue foam balls to the ends of the spring, or wrap a patch so that we can see the bite.
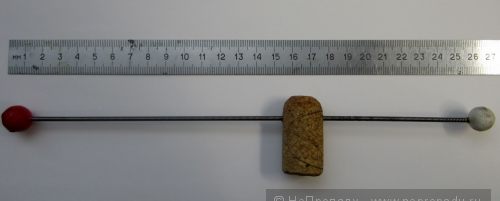
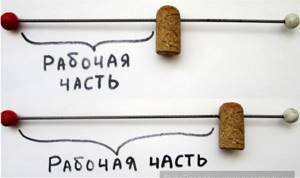
The length of the spring depends on its elasticity; mine is 250mm. By changing the length of the working part of the spring, the sensitivity of the nod is selected (the stronger the river flow, the shorter the working part).
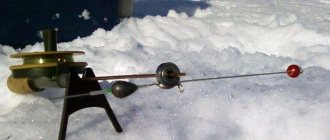
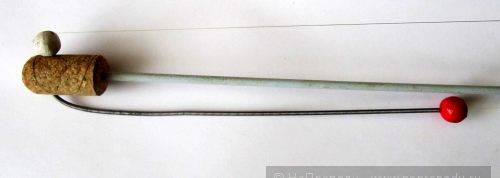
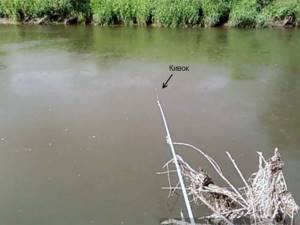
The finished nod is glued to the tip of the rod, in place of the tulip (outermost guide ring).
This is the position the nod takes when transporting the rod.
Another nod option. In place of the plug, a rubber cord of round cross-section, D10 mm and 40 mm long, was used.
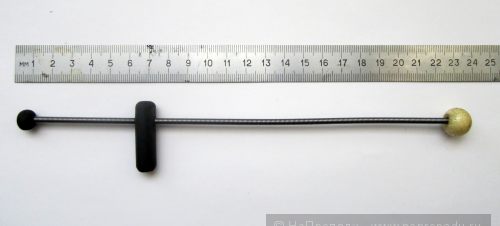
This design proved to be a little better. The windage in the wind has disappeared, the tip of the rod does not swing, and the line does not cling.
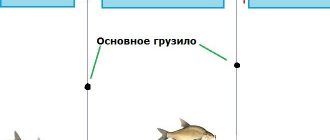
Equipment The guard spring has a fairly large internal hole through which the fishing line passes freely and easily moves when reeling in and discharging the fishing line. I fish with two types of equipment: hook + jig and hook + sliding sinker. Most often I use a hook + jig, since in my opinion the tackle is more catchy. This is what the hook + jig rig looks like:
The jig's leash is tied to the main fishing line. Lead jig, D6-8 mm with a thick hook. This is what a hook + sliding sinker rig looks like:
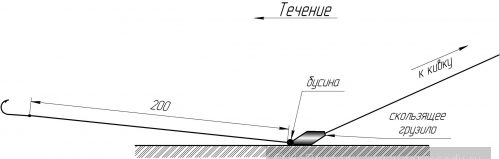
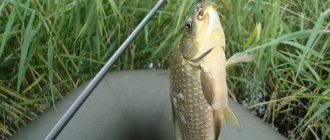
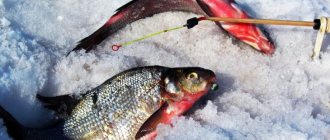
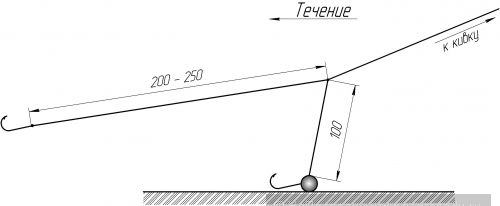
How to catch Fishing in backwaters and pools. Since there is practically nothing to cling to, it is possible to throw it under hanging trees and bushes. The tackle is thrown into the middle of the river. The current carries away the hook + jig, pulling on the fishing line. We place the rod on the slings, take out the slack (if necessary). The nod should be in a vertical position, slightly deflected by the current. Like that.
Catchman's tackle. Almost all peaceful (and not so peaceful) river fish bite. Mainly focused on bream fishing.
Nod attachment
The most accessible nod clamp to the tip of the tackle will be the option based on a small piece of rubber. There should be a hole in it (observing one axis) into which the upper part of the blank elbow can pass. The cut is made transversely. It is into this that the jig will be inserted with the base.
The rubber retainer is ideal for side nods made on the basis of plastic products. Products made on a metal basis help cut through materials. Over time, this leads to complete destruction of the retainer.
You can build a universal type mount. To do this you should prepare:
- nail – 10 cm;
- insulating tape;
- threads;
- adhesive waterproof base.
Step by step process:
- head of the nail is carefully bitten off.
- The body bends, maintaining an angle of 90 degrees (in the central part).
- We wrap with threads.
- Cover the thread with waterproof glue and leave for 30 minutes to dry completely.
- The resulting structure is applied with one of the segments to the tip of the tackle.
- We wrap the product tightly using electrical tape.
- to the opposite section of the nail .
- We wrap it with electrical tape again .
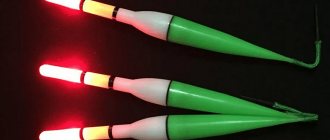
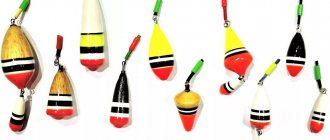
Glowing float
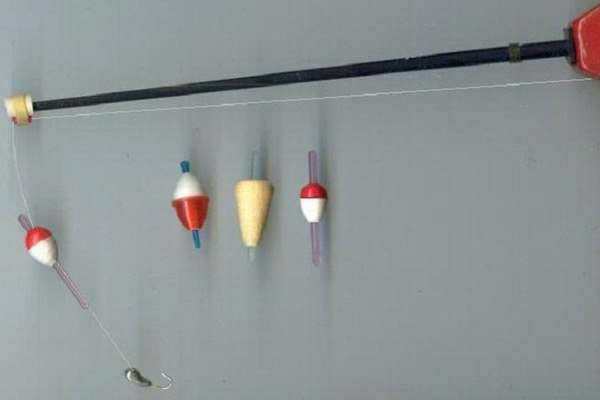
A luminous float for night fishing is an ideal solution for those who prefer active recreation even at night. The most popular brand offering floats of this type is the Japanese company Fuji-Toki.
All models are equipped with Japanese LEDs, which are characterized by high power and burning time, averaging 15-24 hours. All Fuji-Toki floats can be divided into several series:
- FF-1, FF-2, FF-3, FF-4, FF-5. These are small floats of different shapes, the glow point of which is located in the antenna. It is cone-shaped, so even the most careful bite can be easily tracked. This float for night fishing can be used during the day.
- FF-11 and FF-12. These are unusual needle-shaped floats that are distinguished by high sensitivity. The well-thought-out shape ensures a quick response, as drag is minimal. The LED has high power, so it illuminates a large area of the reservoir.
- FF-B3, FF-B4, FF-B6, FF-B8. These floats have a sensitive antenna and a spherical body shape, showing maximum resistance to the influence of external factors.
- FF-C10, FF-C15, FF-C20, FF-C30. These models are equipped with a high-power LED, so a large surface of the water is illuminated. The float has an elongated shape with a conical antenna, which ensures the least resistance.
- FF-E03, FF-E05, FF-E10, FF-E15. These floats have a long keel, which improves resistance to external factors.
To make a luminous float for night fishing, you can cover it with a layer of luminescent paint, which will give off some of the light in the dark. All modern floats are equipped with reliable batteries that will last all night. After changing the batteries, you can go fishing again.
Bait used
For hook attachment the following can be used:
- bloodworm;
- maggot;
- small worm.
Some lucky fishermen successfully fish with:
- beads of various tones;
- devil;
- thread winding (colored).
However, this is rather an exception to the rule and most fishing enthusiasts are unlikely to become the owner of a significant catch if they play with a devil without bait.
Nod fishing technique
When preparing for fishing, you should loosen the tackle. The fishing line is wrapped around the circumference of the form. The free tip is passed through the nod ring. We equip it with a jig. If you are fishing for perch or pike, you should hang a vertical spoon as a bait.
Using a side nod, you can use the following fishing technique:
- We perform the fall and rise. The jig should fall freely to the bottom surface. When lifting, we use light, smooth movements and tighten the fishing line by 10-12 cm, observing a short pause.
- If desired, you can use the game near the bottom surface. To do this, the jig must fall freely to the bottom surface. The lift is made 15 cm above the bottom and slight vibrations are given with a nod. Such a game lasts no more than 2 minutes, after which the jig reaches the bottom again. Repetition follows the same pattern.
- Playing with your finger is no less effective. To do this, they accurately copy the game of the previous method by adding small oscillatory movements of the jig. For this purpose, the index finger periodically taps the tip of the tackle.
- Tension - intended for fishing in areas of a reservoir with a fast current. Slowly lowering the jig to the surface of the bottom, hold the line in tension and pull the bait to the surface of the water.
- Jerks - a jig lowered to the surface of the bottom jerks up 35 cm and reaches the bottom again. The jerk is repeated again.
- Calm state. The bait is lowered to the selected depth and held in one position until the bite occurs.
In various conditions and on different bodies of water, the game should be individual, so when going to a new place you should experiment.
Loading
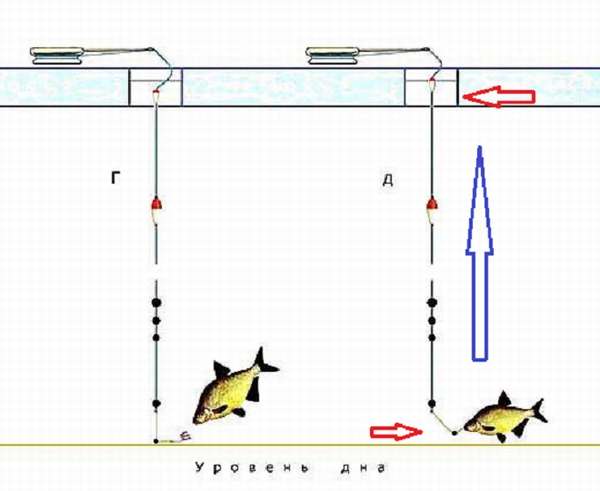
As already noted, the most important thing in installing a winter float is selecting the weight of the equipment. Or vice versa - selecting the carrying capacity for a specific jig. If in a hook rig the weight can be adjusted with pellets, then you can’t do anything with a jig if it is too heavy. The solution is to experiment with floats of different carrying capacities. Or make a homemade one purely for this jig, grinding the foam to the required load-carrying capacity. The correct equipment barely sinks, but floats when the fish touches the hook. The overall buoyancy of the system should be slightly negative as a result of the adjustment.
When there is a bite on the suspension, the alarm dives or moves to the side - here compensation is no longer important. Read more about winter mounts for fishing rods. For fishing in the water column, loading is done in summer style. The foam floats in the hole and holds the equipment in the water column at the required horizon. However, in severe frosts such equipment freezes into the ice. Nodding winter equipment is more suitable for this.
Blitz tips
- When fishing with a side nod, there is no need for extra costs. It can be assembled easily at home with ordinary household items available. The device will turn out to be so convenient that it will be inappropriate to spend money on buying a store-bought analogue.
- It is very convenient that when using a summer jig in a variety of weather conditions, a high level of sensitivity is not lost. It is extremely difficult to miss the time of cutting in this case.
- The most catchy area will be the area of the reservoir near the long reeds. This is worth considering when choosing a location.
On the current
A float for fishing in a strong current will constantly experience the influence of water and whirlpools, and this will also occur under water. In order for the float to withstand such a load and maintain its function as a bite alarm, it needs to be barrel-shaped, which will firmly float on the water, despite the wind and current.
The larger the diameter, the calmer the float will be on the water, and it does not matter what the thickness of the antenna is, and the keel should be long. This will make the float more stable and controllable.
The range of carrying capacity of floats in strong currents is wide - up to 30 g. As for the equipment, it can be either solid or running: the first is more convenient for the fisherman, who can hook the fish in a timely manner.
The float is secured in two places for reliability: first, the fishing line is passed through the ring at the bottom of the float, then clamped with a rubber ring below the antenna. Such a float is clearly visible on the water and is easy to control, but for fishing it is better to take a rod with a reel.