22.06.2017 0
7193
Fishing is an unusual and rather complex process that requires knowledge of certain subtleties. Sometimes it is not enough just to catch fish; it is also necessary to keep the catch intact and fresh. A cage is used for these purposes. You can either purchase it in a store or knit it yourself. Next we will talk about exactly this (detailed video instructions are attached).
What you will need
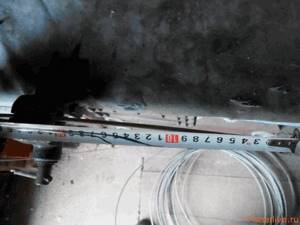
The idea to make such a cage arose when I came across wire suitable for rings:
When they replaced the wires near our house, the electricians threw away this wire, and I picked it up and adapted it for the cage. Such rings will not rust and will be elastic, since the outside wire is aluminum and the inside is steel.
I think electrical stores sell such wire; you can replace it with thick aluminum wire.
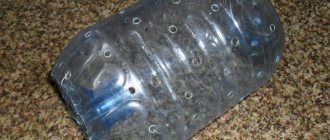
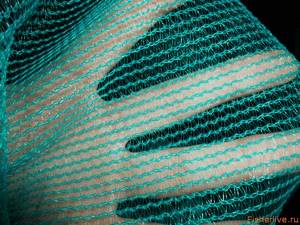
Next we needed a fine mesh. In the fishing store they charged as much as 300 rubles for the required net for a piece of 1 by 1.5 meters, it was necessary to look for an alternative. I immediately liked the façade mesh. This kind of mesh is used to cover houses during construction, but buying a roll was very expensive, about 1,500 rubles.
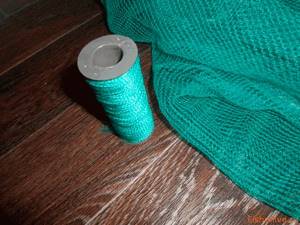
Recently, while passing by a gardener's store, I saw the treasured construction mesh, and it was sold by the meter. It turns out that this net is also in demand in gardening; gardeners use it to protect cherries from birds.
The price of the mesh was 100 rubles per meter, its width was 3 meters, out of joy I took the mesh for 300 rubles, and got a piece of 3x3 meters. Here's the mesh itself:
Take the mesh with a reserve, it’s better to have some left than not to have enough.
In addition to the mesh and wire, you will need tools: pliers, scissors, a marker and a lighter.
To tie
For some lovers of handicrafts, it will not be difficult to knit a fish tank from a strong thread or fishing line. The following tools can be used:
- a small ruler or a regular popsicle stick ;
- special knitting needle.
It should be clarified that the size of the cells of the cage being manufactured will depend on the width of the available device (ruler or stick). The principle of making a cage in this way is based on tying simple knots, which are obtained by following a certain pattern of pulling a needle from a fishing line or thread wound around it. Initially, two loops are obtained, from which the basis for knitting cells will be created in the future.
Having mastered the beginning of knitting, you can then make a strip of any length. At the end of the thread or fishing line, the end of the next portion of such “yarn” is tied to its remainder and the work continues. When the mesh strip reaches the length planned for making the cage, the workpiece is turned horizontally and knitting of the product in width begins. This simple process of tying knots can be quickly mastered using information from special sources. In addition, in a similar way you can tie not only a fish tank, but also a landing net or some other thing needed on the farm.
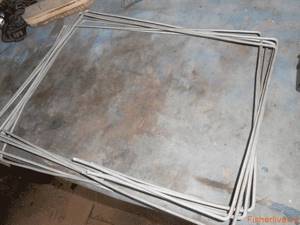
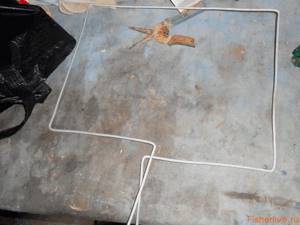
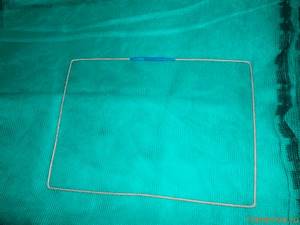
Making rings for the fish tank
First we need to decide on the size of our cage. I decided to make a cage 30x40cm, since the sports size is 40x50cm. I thought it was too big. The length of the cage is 3 meters, we will place rings every 50 centimeters, simple calculations yielded 6 rings.
We take the wire and measure 21cm.
We bend at this place
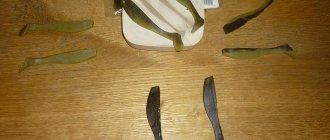
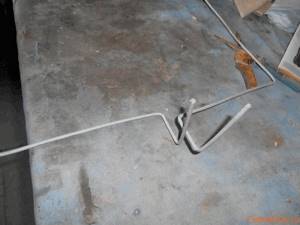
Then we measure 30 cm from the bend and bend it again. Then again from the bend 40cm, then again 30, and 21cm. As a result, we got this product:
We need 5 of these rings, and the sixth, topmost ring is made a little differently. Instead of 1 cm in reserve, we leave 10-15 cm so that it would turn out like this:
And bend it at a distance of 5 cm to the side:
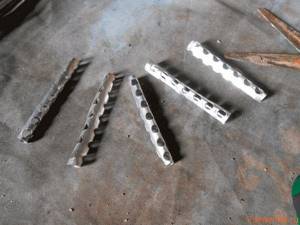
I also had aluminum mesh from old curlers, from which I bent connections for the rings, so that I could then solder the rings.
From scrap materials
Making a cage with your own hands is possible if you have a suitable material, which can be used:
- a piece of nylon mesh or a ready-made mesh bag;
- thick aluminum or any other metal wire;
- ordinary nylon rope.
In addition, you should prepare the necessary tools: scissors, marker, pliers.
When choosing a mesh material, you should give preference to one whose cell side does not exceed 1 cm. If you do have a ready-made bag, which is often used for storing vegetables and fruits, you will save significant time. Otherwise, you need to spend it on stitching the sides of the cage. It is only important that there are no holes in the finished product. After all, a nimble fish, trying to get out of a trap, can accidentally enlarge even a small hole.
You should begin your work by forming the neck of the cage. To do this, a metal wire is passed through the top of the bag and twisted into a ring. In a similar way, you need to make several such stiffeners and place them at an equal distance (no more than 30 cm) from each other. By creating several rings stretched into the mesh of the bag, you will thus ensure better stability of the cage in the water.
To securely fasten the manufactured hoops, a nylon thread is used, the knots of which will not harm delicate fish scales. All that remains is to attach comfortable handles to such a fairly simple cage, for the manufacture of which a nylon rope is used.
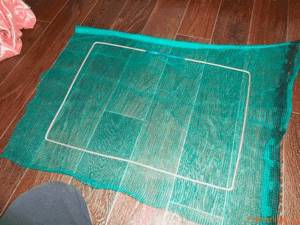
Marking the grid
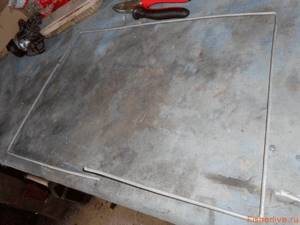
When all the rings are ready, you need to mark the grid. It is best to do this outside, since doing it at home is not very convenient, and there is a risk of smearing the floor with a marker.
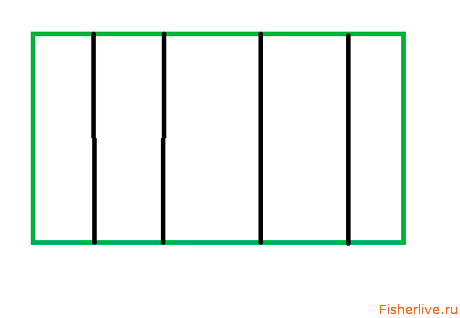
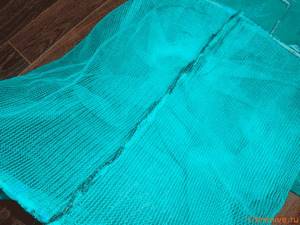
Using a tape measure, a marker and an assistant, measure the dimensions of the grid. We need a length of 3 meters, the width needs to be made with a margin of 30+40+30+40=140cm, and let’s take a margin of 10cm, for a total width of 150cm.
Now you need to make marks for the rings. We draw lines where the rings will go at intervals of 50 cm, and our grid is ready. It should look something like this:
Types of fencing
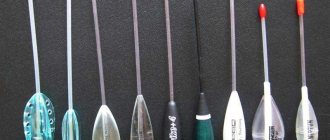
Beginner fishermen usually do not think about where to put their catch - a plastic bag is enough for them, but experienced fishermen brainstorm in advance how to securely place their trophies without losing their freshness. Fish storage devices differ in several ways:
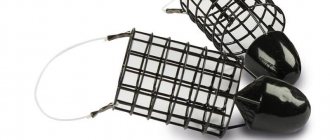
- The fencing material is metal or soft mesh (made of fishing line, artificial thread). Rigid braiding is not suitable for long-term fishing, as it damages the scales and reduces the vitality of trophies. When fishing from a boat, it is possible to lower the catch to the bottom, where the water is cooler, and the metal will prevent the prey from being stolen by a mink or otter. The volume of such storage is up to 20 liters.
- The shape of the support rings gives the contours of the entire structure: round cages with a diameter of 35 and a length between them of 30 cm are considered classic, and rectangular cages are considered sports models - for their stability on the bottom and significant space for fish to move. The last statement applies to shallow depth conditions.
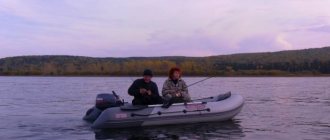
- The length of the structure varies widely - from 0.4 to five meters. When fishing from a high bank, cages with a partially unused volume that is in the air are used. Short mesh containers are used when fishing from the water's edge, in the current and from a boat.
- The cell size is important for storage facilities with a soft braid made of synthetic materials: small holes (up to 2 mm) protect the fish from damage, but impede the flow of water. For carp, carp and crucian carp, a net with a cell larger than 8 mm is not suitable - their sharp fins can cut the fragile shell, which will allow the desired trophies to be freed.
- Conditions of use. Based on this indicator, fish cages are divided into coastal models and metal ones for fishing from a boat. The first ones should be long, because in shallow water the water is warm, and the catch is located further from the shore, where it is cooler.
A separate category of cages is sports cages; they are made of polyester and nylon, since these materials have increased strength. The shape is usually rectangular, with a cross-section of 40x50 cm and a length of 2-5 meters with a fine mesh.
Making a cage
When all the blanks are made, you can start manufacturing. We thread the rings through the mesh so that the ends of the mesh are inside the cage.
After this, you can solder the rings, by the way, I didn’t solder them, but simply wrapped them with electrical tape like this:
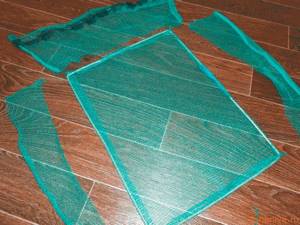
There is no need to thread the last (bottom) ring; it must be covered with mesh.
To do this, take the remaining piece of mesh (we took it with a reserve), and put the last ring on it.
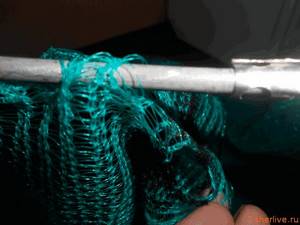
We cover the ring with a mesh using fishing line or nylon thread.
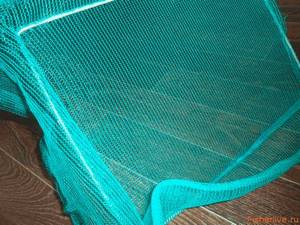
And cut off the excess pieces
Now that all the rings are threaded, you need to turn the fish tank inside out and sew on the bottom ring. After this you can sew the main seam.
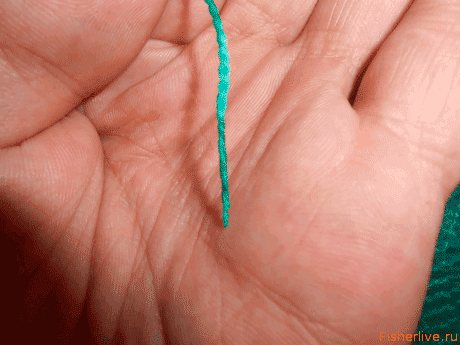
At first I stitched it with 0.3 fishing line, but then I stitched it again with nylon thread, which is sold in fishing stores and costs 20 rubles.
To sew with this thread you don’t need a needle, just heat it with a lighter and squeeze it with your fingers, it becomes as hard as a needle.
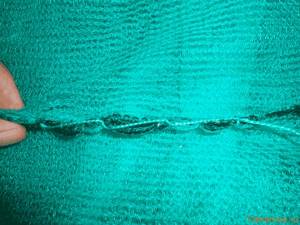
The node I used is this:
It turns out this neat seam
Now you can see what happened
Turning the cage back will make it look even better.
Rope ring design
Any suitable option can be used as a mesh for the base. As in the previous case, you need to make sure that there are no tears or damage to the mesh. It is important to pay attention to the absence of large nodes. Metal mesh is not suitable for this option.
The rings here are made of metal cable in PVC braid. They need to be passed through the mesh and at the same time connected to it with fishing line or thin nylon cord. The ends of the rings are inserted into a thin tube, which is flattened if it is metal, or sealed if it is plastic.
Creating the neck is similar to the previous option.
Basically, the differences from the previous cage design are insignificant and consist only in the material of the rings. Are there any advantages to this model? Yes, there is, because it is more convenient to use and has a compact size. This fish tank can easily fit in a small bag, backpack or fishing bag, because its rings fold up quickly.
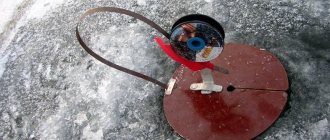
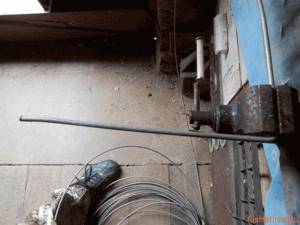
Mounting the cage
In order to secure the fish tank while fishing, you can come up with many different clamps, ties, and other things. I didn’t bother, and just took an old fishing rod knee with me, and inserted the fishnet into it like this:
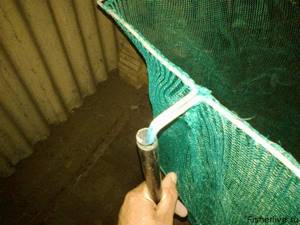
It holds normally and does not turn, but if you want, you can come up with some kind of fastening.
That's all, dear fishermen. I hope you found something useful in my article and got a lot of new ideas for long winter evenings. See you again, dear friends!
Some recommendations
- The places where the net wraps around the rings are considered the most vulnerable, this is especially true when fishing on reservoirs with a rocky bottom. Based on this, the most preferable option is a cage with an additional ring. It's not a problem to make an additional ring from a PVC hose.
- The cage should not emit unpleasant odors for fish, which can scare away fish at the fishing point. Metal products may have unpleasant odors, which cannot be said about cages made from nylon threads or fishing line.
- The cage will not last long if it is not looked after. Therefore, upon returning home from fishing, it is better to rinse it under running water and dry it.
- It is better to dry the cage outside, where it can get rid of foreign odors under the influence of sunlight and wind.
- It is better to wash the fish tank in water, without using different detergents.
- Metal cages are more durable and more practical because they are easy to clean. Such cages are cheap. Also, they will not allow various predators to attack the caught fish. This is possibly the same pike or otter.
- Handle caught fish with caution so that it remains alive as long as possible. This is especially true during long fishing trips. Based on this, fish must be placed in the cage only in water.
A cage is an important element of the fishing process, despite the fact that not all fishermen use it. If fishing is carried out near the house, then it is possible to do without it, but if you have to go out for the whole day, then you cannot do without a cage. Fish spoils quite quickly, and even more so in the summer, in hot conditions. If you fish without a cage, the fish will quickly die and it is possible to bring home not just dead fish, but already broken ones, unsuitable for consumption.
It goes without saying that it is possible to purchase a fish tank, but it is also possible to make it yourself, especially in the winter, when there is often nothing to do and the winter days last especially long. This is not only very interesting, but also an opportunity to quietly wait out the cold in order to go summer fishing with a new fish tank of your own making. It is enough to stock up on all the necessary details in advance and be patient. In terms of complexity, this is a simple device that does not require special skills; all you need is the desire and materials.
DIY crafts: fish tank
Fishing is an unusual and rather complex process that requires knowledge of certain subtleties. Sometimes it is not enough just to catch fish; it is also necessary to keep the catch intact and fresh. A cage is used for these purposes. You can either purchase it in a store or knit it yourself. Next we will talk about exactly this (detailed video instructions are attached).
Installation Tips
The effectiveness of fishing depends on the ease of use of the mesh storage - it is necessary to combine the processes of fishing, unhooking and lowering the catch into the container. There are differences in cage installation depending on specific conditions:
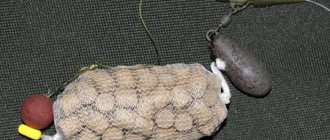
- Shallow water does not allow the rings to be completely hidden when they are in a vertical position, so it is necessary to fix the supports so that they fall over and do not fold. If the fish gets caught in the traps, it will soon die from the stressful situation. The correct thing to do is to go into the water and tighten the net, tying its end to a peg driven into the bottom.
- The depth simplifies the use of the cage - to straighten it, a weight is tied to the far ring. When casting, the load pulls and straightens the structure, and the neck is already accessible for installation in the desired position.
- The current determines the location of the mesh storage. To prevent the sleeve from oscillating, you need to secure the far end. It’s good if there is a shoal or an underwater ledge in the fishing spot.
The use of the cage is also regulated in order to preserve the vitality of trophies . Lower the fish into the net smoothly from your hand directly onto the water. There is no need for haste here. Well, the best way to save the life of a crucian carp or pike is to take a photo and release it to freedom.
Fishing technique
You can see roaches flashing along the very shore, shining with silver scales, but they are in no hurry to catch them with a float rod. In this case, you need to throw some bait near the shore and take out a winter fishing rod. Remove about three or four meters of fishing line and attach maggot or a small piece of worm to the hook of the jig. Then it’s quite simple - you need to throw the jig into the water, wait until it lies on the ground and start playing with it like icebreaker, only moving the nod from the water to the shore using steps.

To catch live bait you will need a winter fishing rod with a jig.
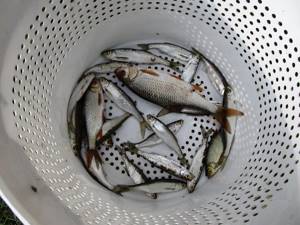
In this way you can catch quite decent roach
This fishing accessory is designed for catching live bait and fry, but sometimes larger fish also fall into the bait.
The most common is a rectangular spider, which consists of a mesh and four steel rods with a diameter of 4-6 mm. Steel rods end in hooks and are threaded on the other side. The rods are connected with a washer to threaded holes. A small rectangular sheet of clean nylon mesh measuring 1 x 1 m is put on the hooks, along the edges of which there is a strong cord or thick fishing line with a cross-section of 0.8-1 mm. In order not to scare away live bait (fry), the net is painted in a dark color, such as green or brown, to match the color of algae or soil.
A simpler connection of rods is a cross made of duralumin tubes.
A very reliable fastening is a bolt with a nut (M5, MB). The bolt is passed through ears bent at the ends of the rods. This connection ensures the safety of all parts included in the malyavochka. You can make a doll of the described design yourself, or the easiest way is to buy it in a store. Some craftsman fishermen make round-shaped baitfish from three or four steel rods (
b).
Of course, it is better to make it from duralumin rods: it will not rust, and such a structure is easier to transport.
A mesh with cells with a diameter of 1 m is attached to the rods, and then the rods are connected with four couplings, they are tied to the ends of the cords attached to the main cord. This little fish has a serious drawback - it is quite difficult to transport, so it is better to use it for those fishermen who live near a reservoir and do not go fishing in public transport. Drawing
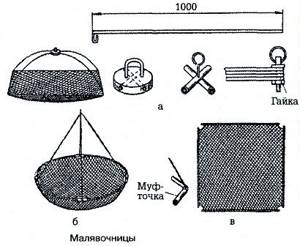
For transportation, a doll of a different design is most convenient (see fig., position c). The nylon mesh fabric is placed on four duralumin tubes with a diameter of 8 mm and a length of 1 m.
The tubes are connected by couplings pre-tied to the ends of the cords. On such a baby maker you can attach couplings to the ends of two tubes. The mesh itself is not put on the tubes, but attached to the corners of the assembled frame. When using the bait, proceed as follows: lower it from the pole, then throw in small portions of slowly sinking bait, for example bread porridge. After waiting 2-3 minutes, the little one is quickly raised. For greater accuracy in placing the bait in the middle of the mesh, at the intersection of the diagonals of the bait box, the inside of the mesh is coated with dough. Then there is no need to throw crumbs of bread after the drowning little one. Or in the very middle the little ones tie a crust of bread with a thread. The pole for the toy should be chosen thicker so that it does not break under the forces of water resistance when the toy rises quickly.
Live bait net.
The live bait, held in its hands, quickly falls asleep. Therefore, it is removed from the bucket with a small net. Dimensions of the net: handle length 380 mm, hoop diameter 80 mm, gauze or tulle mesh depth 100 mm.
Trap for fry.
During the autumn feeding season of predatory fish, it is difficult to obtain fry for bait. As the weather gets colder, all the little fish move away from the shores; you can’t catch them with an ordinary little fish. You can make a trap like a herbalist.
This is a wire ring with a diameter of 60-70 cm with a mesh. A weight is tied into the net at the bottom, and on a ring on top there are three thin copper rods on which pieces of bread crust are strung. The rods are fixed at one end to the ring. A thin, durable cord is attached to the float, its length is adjustable according to the depth of the reservoir.
The fisherman throws a trap into the water and, when it lies on the bottom, winds the excess cord around the float and throws the float over the side of the boat.
Glass fry bowl for catching fry.
A funnel made of transparent oilcloth or plastic film is inserted into the neck of a glass jar with a capacity of 1-3 liters. Cone angle 45-60°, hole diameter 30 mm. The edges of the funnel are sewn together with thread or fishing line. The finished cone is inserted into the jar with the top down so that its base rises 30-40 mm above the neck of the jar. On the base, cuts are made every 20 mm to the line of contact of the cone with the edges of the jar. The resulting petals are folded back and secured with a cord. First, a hole is pierced in one petal through which the end of the cord is passed, and only after tightly winding it around the neck, the base of the funnel is secured to the jar with a second winding. Drawing
They put food that attracts the fry into a jar (baby bowl) - bread, bloodworms, porridge, maggots - and, having filled it halfway with water, they lower it on a cord to the bottom in a shallow place near the shore where the fry swim. The free end of the cord is tied to a tree branch bent over the water or to the top of a thin rod stuck into the shore. At the bottom, the little baby should lie on its side.
In dry, hot climates, when fish have to be preserved during a long summer day in 40-degree heat, a good cage becomes extremely important. A practical, cheap and easy-to-carry cage is a bag made of rare bag fabric. The advantage of a bag over a net is that it does not dry out during transitions and protects the fish from drying out. Made with a drawstring, the fish tank is lowered to the very bottom. The sparse fabric ensures an influx of fresh water. In such a cage, subject to frequent transitions from place to place, it is possible to keep the caught fish alive for 24 hours.