Do-it-yourself “Finnish board” for stretching nets and hauling lines under the ice
“A handy fisherman showed and checked himself how to stretch a cord under the ice using a homemade device.

As the fisherman says, his “Mechanism” is not new - there are others that have been invented for a long time, but he was wondering whether what he made with his own hands would work.
This type of “device” is used to install slings and nets where permitted. The fisherman says that it is forbidden to fish with nets.
In my previous publications, I have already touched on the topic of pulling a cord under ice in one of the simplest and fastest ways - using a pole assembled from several boards (you can look here).
Today there is another option and this method came to us from Finnish fishermen. The device is called a “Finnish board”.
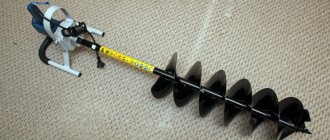
Take a wide wooden board and screw a couple of corners to it. The corners play the role of runners, like a sled.
On the reverse side there was foam plastic attached, which acts as a float.
A slot is made in the board at one edge into which a steel wire bent into an arc is inserted - its role is to push the board further under the ice instead of a spring. And at the other end there is a cord attached.
The fisherman called this cunning design a “net broaching mechanism”...
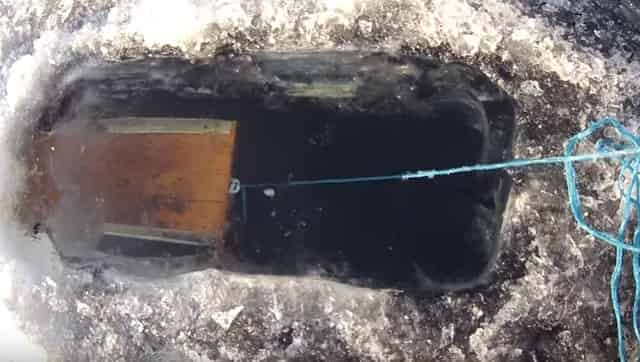
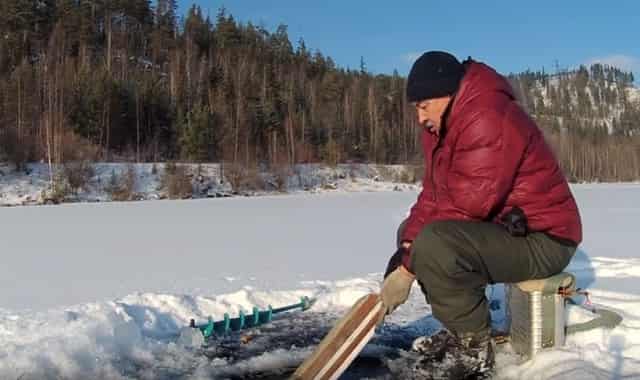
He conducted tests with this miracle device on the Karapchansky Bay in the Istrovsky Reservoir. I made a lane in the ice measuring 30 by 50 cm and pushed a “Finnish board” under the ice.
Then he begins to pull the rope, the wire pin rests on the ice and, like a spring, pushes the board forward. We pull and release - the board goes further and further.
You can watch a video of the operation of such a cunning fishing “Mechanism” here:
Whatever the private people can come up with in order to get fish in winter. The “Finnish board” is effective for pulling cords, and subsequently nets and slings. Maybe this “device” will suit someone.
NHNCH (No tail, no scales) to everyone! Follow my new publications - it will be even more interesting!
source
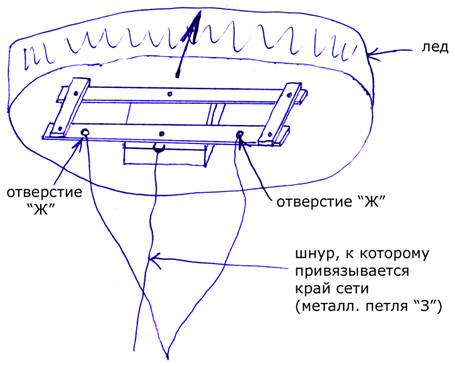
Board for installing nets under ice drawings
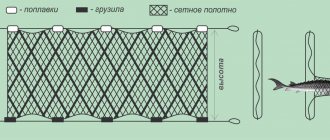
A design with which you can pass a fishing net of various lengths through two ice holes

A - wooden slats 2000 mm long, 50 mm wide, 15 mm thick. B - wooden slats 400 mm long, 50 mm wide, 15 mm thick. B - brass bushings. D - self-tapping screws screwed in from below, so that the tip of the screws extends outward by 5-6 mm (to engage the ice). D - a square made of foam plastic 400x400 mm and 150 mm thick, glued to a plywood or board square. E - plywood or board square 400x400 mm and 10-20 mm thick. F - holes for tying cords. Z - metal loop for tying a cord for pulling a fishing net. And - a cord.
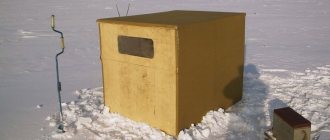
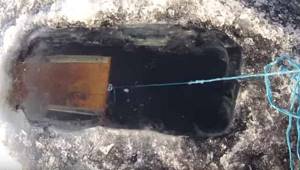
Depending on the thickness of the ice, you need to cut a rectangular hole, approximately 80x100 cm. Insert an oilcloth into the cut hole (one end of the oilcloth should go under the ice, and the other end should lie on top of the ice).
This is necessary to prevent the cords from rubbing on the sharp edges of the ice.
We tie the end of the cord intended for pulling the net to a metal loop “Z” (the length of this cord must be no less than the length of the fishing net). Then we tie both ends of the other cord to the “F” holes (it is better to paint this cord with marks every meter so that you know how much of it went under the ice). If the length of the fishing net is 50 meters, then this cord should be twice as long, i.e. 100 meters.
Then we insert this “walking structure” into the hole under the ice so that the tips of the screws point in your direction (that is, you need to screw in the screws at an angle for better grip with the ice.
Next, by lightly tugging the “W” cords (left-right, left-right, etc.), you move this “walking structure” under the ice in the chosen direction.
When the specified length of the cord has completely gone under the ice, we visually check the direction and measure the length of the driven cord (length of the net) along the ice. We cut the same hole as the first one and pull the structure onto the ice. Then we pull the cord tied to the “Z” loop and thereby stretch the net under the ice. (see pictures).
Safety precautions
Fishing on the first ice is associated with a number of dangers for the fisherman.
1. Ice
Let's start with the fact that going out on the first ice is a big risk. No matter how cold it is, there is no need to rush out on the ice. At a temperature of about minus 10 degrees Celsius, more or less strong, uniform ice is established on a reservoir without a current within 5 days. Ice thickness of 5-8 cm is considered safe. The first ice appears near the shore. At the beginning of winter, it is the coastal ice that is considered the most durable.
The thinnest ice on reservoirs without a current is in the center of the reservoir and near coastal vegetation. On rivers, ice sets in within 10-15 days, but extremely unevenly.
The first ice on the river is the thinnest:
- in places where small rivers and streams flow into a body of water;
- in areas where there is a reverse current;
- in the remains of aquatic vegetation;
- on riffles and whirlpools.
When planning to go out on the ice, pay attention to the color of the ice. If it is transparent, the chances of a successful winter fishing trip increase sharply. White, opaque ice or ice with air bubbles frozen into it is dangerous, even if it is thicker than 10 cm.
2. Equipment
Before going out on the first ice, you should pay attention to the fisherman’s equipment:
Collapsible ice pick PR-02 (Stupenka knife) Tonar 1,625 for 1 piece. Collapsible lance L-1300 mm Three whales 620 for 1 piece. Collapsible lance L-1500 mm Three whales 650 for 1 piece. A-elite rescue ropes A-elita 230 for 1 piece. Rescue ropes 70JS01 Rubicon 237 for 1 piece. Self-rescuer (30772) Three whales 128 for 1 piece.
- Winter footwear
– warm boots or winter boots. Good boots are boots with liners. Boots – preferably insulated ankle boots. The requirement for shoes is water resistance, reduced heat transfer and thick soles with a large tread. - Clothing
– winter fishing suit. A good suit is a jacket and trousers (or overalls), made of three-layer material. The top layer of such a suit should be made of membrane material. It would be nice if the suit was made of brightly colored material. A good addition to this costume would be a fleece hat and gloves. - Ice pick
- on the first ice there is no way without it; - Ice fishing box
. It would be good if it was on runners or short skis. - A ball of rope
, preferably painted in bright, “poisonous” colors.
3. Brief safety rules:
- Don’t go out on the first ice without a partner;
- Probe the ice with a pick;
- If the ice begins to crack, try to slide along the ice at low speed towards the shore;
- If the ice does break and one of the fishermen ends up in the water, do not try to get close to open water. Try handing him a pick or throwing the end of a rope;
- Having got out on the ice, the fisherman must move crawling towards the shore.
In case of an emergency, you should forget about fishing. The victim must be brought to the car, changed into dry clothes, given hot tea and taken to the nearest medical facility.
Do-it-yourself “Finnish board” for stretching nets and hauling lines under the ice
“A handy fisherman showed and checked himself how to stretch a cord under the ice using a homemade device.
As the fisherman says, his “Mechanism” is not new - there are others that have been invented for a long time, but he was wondering whether what he made with his own hands would work.
This type of “device” is used to install slings and nets where permitted. The fisherman says that it is forbidden to fish with nets.
In my previous publications, I have already touched on the topic of pulling a cord under ice in one of the simplest and fastest ways - using a pole assembled from several boards (you can look here).
Today there is another option and this method came to us from Finnish fishermen. The device is called a “Finnish board”.
Take a wide wooden board and screw a couple of corners to it. The corners play the role of runners, like a sled.
On the reverse side there was foam plastic attached, which acts as a float.
A slot is made in the board at one edge into which a steel wire bent into an arc is inserted - its role is to push the board further under the ice instead of a spring. And at the other end there is a cord attached.
The fisherman called this cunning design a “net broaching mechanism”...
He conducted tests with this miracle device on the Karapchansky Bay in the Istrovsky Reservoir. I made a lane in the ice measuring 30 by 50 cm and pushed a “Finnish board” under the ice.
Then he begins to pull the rope, the wire pin rests on the ice and, like a spring, pushes the board forward. We pull and release - the board goes further and further.
You can watch a video of the operation of such a cunning fishing “Mechanism” here:
Whatever the private people can come up with in order to get fish in winter. The “Finnish board” is effective for pulling cords, and subsequently nets and slings. Maybe this “device” will suit someone.
source
Fishing in Finland - how to set up nets in winter
Today we would like to talk a little about fishing and specifically about how to set up nets in winter. Right under the ice. It's an interesting process.
Why are we talking about this on a website about Finland? Simply because in Finland it is officially possible to install networks. Both in winter and in summer. That is, in Finland anyone can legally set up nets, not just commercial hunters. You really need a license. But a license for a network 30 meters long costs only about 5 Euros and you can buy it in 5 minutes.
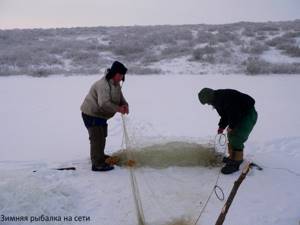
How to install a network in winter? After all, there is ice on the lake. This can be done in different ways. We will tell you about one Russian-Karelian method. The method is quite simple and after our explanation you will also be able to put the network under the ice in winter. And not only in Finland.
You need to install the network in winter together with an assistant. To set up a net in winter, the most important thing is to pass the rope under the ice between two holes. More precisely, between the hole and the wormwood. When the rope is passed, you tie the net to the rope, direct the net into the hole, and an assistant through the hole pulls the net by the tied rope and stretches it under the ice. That's all.
How to pass a rope under the ice? In Finland, the ice in winter is usually more than half a meter and you can drive on it. In addition to an assistant, you will need a standard ice drill, a special ice saw to cut out the wormwood, and the most important part - a special board.
An ice drill and a saw are, in general, standard fisherman's tools. But the board is a cunning tool. I won’t say for sure whether this is a Karelian-Finnish invention or an ancient Russian one, but we know for sure that in Karelia such a special board is definitely used (on Onega and Ladoga).
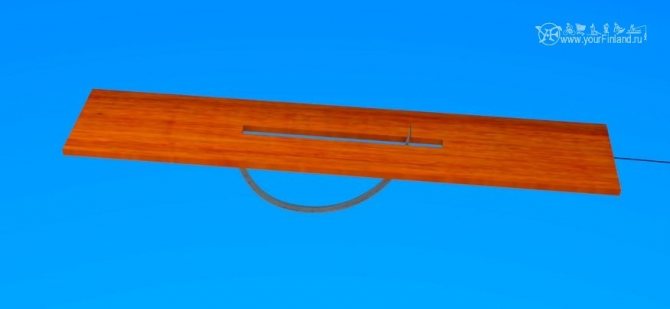
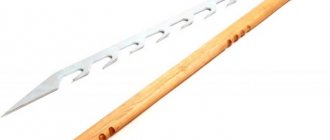
A special board to pass a rope under the ice.
A board is an ordinary board a little more than a meter long, a centimeter thick and 20 centimeters wide. On the board, as shown in the picture, there is a cut in the middle, 50 centimeters long. An elastic, curved metal pin passes through the cut (see picture). The pin is sharpened. When the board is under the ice, it floats up and the tip of the pin rests under the water on the ice. Next, you pull the rope that is tied to the board. In this case, the pin rests on the ice and works like a spring. You pull the rope, the board moves back, and the tip of the pin remains in place and bends the spring pin. The spring pin is stretched and when you release the rope, the board is pushed forward like a spring. The board jumps forward and again catches the ice with its tip. You pull the rope again, release it and the board jumps forward again. And so on the board moves under the ice.
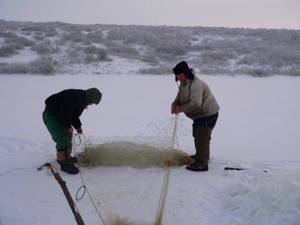
At the same time, your assistant walks on the ice and either looks, if the ice is transparent, how the board moves and where, or listens to determine its position. When the board has gone to the required distance (for example, 30 meters, if the net is 30 meters), then another hole is made, which is located just next to the board. You lower a hook or hook into the hole, hook a rope and pull it out from under the ice. That's it, the rope is passed under the ice from the ice hole to the second hole.
Next, you tie a net to the rope and lower it into the water through the hole, and your assistant pulls the net using the second end of the rope through the second hole to straighten and stretch it under water.
So the network can be installed not only in Finland or Karelia, but anywhere. You can buy a saw and an ice screw, and make the board yourself.
Come to Finland, set up your nets and fish completely legally!
The process of installing a network under ice is quite simple to describe, but will you understand how it works? I was told about this method of installing networks many times, but until I went and saw everything myself, I still did not understand all the nuances. So I filmed everything during the network installation right on the Finnish lake. Everything will become clear to you when you watch our program about how to install nets under ice in Finland and not only:
Preparation for placing nets under ice
Preparation is pre-prepared equipment for setting up nets, as well as choosing a place for drilling holes.
The application of knowledge in practice turns out to be a very complex process in many cases. When going on ice, you should once again familiarize yourself with the rules for such setting. Feedback from people who have experienced difficulties and can tell you what to do or not do will be very helpful.
How to choose a place?
The choice of location must be approached responsibly.
And for this you need:
- Know the body of water well;
- Be located closer to the center of the reservoir;
- When drilling holes under the ice, there should be no snags, algae or other obstacles to avoid damage to the nets.
Cutting holes for the network
- First, it is recommended to clear the selected area of snow;
- Using a drill or chainsaw, cut 2 holes next to each other (the dimensions should be about 0.5 meters by 1 meter);
- The edges of the holes are beveled at an acute angle to allow the nets to slide under the ice;
- Between the main holes (lanes), several more are cut, but of a smaller size (in order to control the process).
Fishing on a winter river
Photo by the author
Fishing from ice on large rivers with noticeable and even strong currents is associated with considerable difficulties, due to the peculiarities of the structure of the gear and the special technique of their use. Among other things, on a winter river it is not enough to know the places where this or that fish can stay; they have to be found anew every year, since the next spring flood changes the bottom topography of seemingly well-known areas beyond recognition.
So the main thing that is required of a fisherman on a river is to be able to carefully examine the chosen area and find some feature on the bottom where fish can be found. A simple depth measurement, a portable echo sounder, and observations of other fishermen help in this matter. True, the latter can also play a cruel joke on those who want to join the crowd, where there seems to be a good bite. In fact, usually only one or two in a “heap” are caught well, and the rest are present as extras. Therefore, it is better to look for your catching “spot”, your fish, and luck does not pass by the persistent...
For this task you will need a good ice drill with sharp knives. You need to have either spare knives or a diamond file for straightening knives that have become stuck - there are a lot of fine river sand in the current in the ice. You also need a scoop with a long handle and a hook that is at least a meter long in working condition. The fact is that even in a strong current, due to the rapid mixing and cooling of water, the ice reaches a thickness greater than on reservoirs.
A thin stick with a flyer at the end, the length of which should also exceed the thickness of the ice, is also useful. It can be cut from coastal willow. Such a tool is necessary for the reason that in a strong vortex current, the fishing line is pressed against the wall of the hole and constantly moves up and down due to changes in water pressure on it: the fishing line gradually “saws through” the ice and in this gap, when removing the tackle, either the sinker or the jig. And if there is a fish on the hook, then such an obstacle usually leads to its escape. With the help of a flyer, the tackle is pressed away from the cut and safely removed from the hole. To further get rid of the described inconvenience, a hole should be drilled in the ice with a significant inclination: the ice auger is first drilled vertically, and then tilted to the side, as far as the diameter of the auger allows - the inclination of the hole in the ice goes in the direction of the flow.
For strong currents and significant depths, the tackle must be heavy. Usually a rig with an end sinker and a leader above it is used. The external simplicity of the gear is very conventional. The main thing is to configure the equipment for specific fishing conditions: depth and strength of the current, fish activity, the presence of other anglers nearby. The latter is important, since gear that is too light will be subject to large drift by the current and will begin to “catch” lower than the sitting anglers. On the contrary, too heavy tackle, standing vertically in the hole, will be hooked by nearby brothers in passion located upstream, and the fish will most likely ignore it.
It is optimal that the line with the sinker, under the influence of the current, goes into the hole at an angle of about 30 degrees, that is, almost at the angle of inclination of the hole’s trunk to the flow. This way the tackle becomes extremely sensitive to bites, since most of the effort when pulling the fish will be on the line going to the guard, and not on the sinker.
Another important rule: the stronger the current, the heavier the load and the longer and thinner the leash; the shallower the depth or weaker the current, the lighter the load needed. Typically, fishermen carry with them a set of interchangeable weights of different weights and leashes of various lengths and diameters, equipped with either a jig or a hook, and they are stored on marked reels. The sinker and leash are attached using a carabiner and a swivel - this prevents the line from twisting and allows you to quickly modify the tackle.
When fishing stationary in the current, when a fish is found, the main fishing line is used with a fairly large diameter, 0.2-0.25 mm, which slows down the process of “sawing through” the wall of the hole and protects the tackle from getting tangled on ice when fishing in strong winds. The leashes are made of high-quality transparent monofilament up to 0.15 mm thick.
The most important part of the gear is a guard with a variable length of elastic element. Its working part should only counteract the pressure of the flow on the fishing line, since the sinker with this fishing method lies on the bottom. Ideally, a properly selected guard bends under the influence of the current at an angle of 30-45 degrees to the ice surface.
A fishing rod must be equipped with a built-in or removable reel of sufficiently large diameter for quick maneuver with tackle. It should have a heavy handle, and a fly-stand on the pole: this way it won’t be “dragged” into the hole or thrown there during a sharp bite.
Fishing begins with lowering the gear under the ice. To prevent the leash from wrapping around the main line or the hook getting caught on other elements of the equipment, you should hold the hook or jig with bait with the fingers of one hand, and lower the sinker into the hole with the other hand, simultaneously bringing the bait closer to the surface of the water on a stretched line, and then release it into the hole. Then the main line is released into the water until the sinker reaches the bottom, which will be visible by a short-term weakening of the deflection of the guard. Under no circumstances should the equipment be allowed to freely fall to the bottom! When the sinker falls to the bottom, you need to put an additional 0.5-1 m of the main fishing line into the current and install the fishing rod above the hole.
If there are no bites for some time, then the tackle should be smoothly raised by 1-1.5 m and again slowly lowered to the bottom. The sinker will move slightly downstream, but the supply of free line has already been made. Often bites occur precisely during this manipulation or immediately after it - the fish grabs the bait. Such work with the tackle should be done constantly, alternating with pauses, the duration of which is determined by the activity of the fish. With a good bite, there is usually no need for such a “game”.
Bites in a strong current are expressed in fractional and sharp fluctuations of the signal tip of the guard - hooking should follow immediately and immediately turn into landing if the fish is hooked. If the fish is not caught, then the tackle is taken out and fresh bait is put on - during the current the fish usually breaks it off.
Recently, as the fish population has declined everywhere due to poaching and the exorbitant appetites of the fishermen themselves, the technique of fishing in strong river currents has been significantly improved, it has acquired the form of tempo bottom fishing, the method is also called “rolling the ball.” Fishing has only benefited from this, it has become more active, moving, rather than the rather passive sitting over the hole with stationary and heavy bottom equipment.
The most popular bait for fishing in the winter on the current is a large bloodworm. As a rule, 1-3 larvae are placed on a hook. At the beginning of freezing on the river, until the fish have lost a sufficiently high activity, it bites well when the hook is baited with two or three larvae of large bloodworms. However, then the bites become hyper-cautious. Therefore, it is better to fish with a single larva, and often change it on the hook if the bites stop. At the same time, if the bloodworm bite is bad, it is better to pierce the hook sting through the middle of the body, rather than near the head - this will result in more effective bites.
Anatoly Mailkov December 22, 2021 at 06:17
The process of installing a network under ice
There are several types of installation. Each type has its own special characteristics. Such rules are mandatory, since without following them with independent actions, there is a possibility of going home with nothing.
Standard method
- In the very first lane, a net attached to the top is driven through;
- A special weight is attached to the bottom, and the stick should move towards the second lane;
- The process is controlled using additional holes to avoid network jamming;
- In the second lane there should be a run (a wooden stick up to 10 meters in size);
- The entire rope stretches under the ice until the gear is completely gone;
- To prevent the mesh from freezing, lower it down slightly.
Installation of nets under ice
Fishing with nets is equated to poaching, but not always and not everywhere. In winter, you can fish in large quantities, but only after obtaining permission for this activity from the relevant authority - Rosrybolovstvo.
You can obtain a fishing permit for some water bodies of the North, Siberia and the Far East. In these regions, fishing with nets in winter is even encouraged, because this reduces the fish population in places where there is an overabundance of fish. But these are legal components. Let's move on to the process of catching fish with a net in winter.
What is the best gear and equipment for fishing?
In situations where fishing on the first ice is accompanied by a very successful bite, you shouldn’t be surprised, everything is quite simple, the main thing is the correct selection of place, gear and complementary food. It is necessary to learn that you should not make too many holes in a small area, since these actions can scare away all the fish.
The main equipment for winter fishing on the first ice is:
1. Mormyshka. 2. Tackle with float equipment. 3. Sports gear with special microscopic jigs with the thinnest line possible.
The third option is best used for catching live bait. For perch, pike perch and other fairly large species, it is best to use larger balancers. The ideal option is to choose medium-sized gear. Because even if the bite is bad, you can still get a good catch. The use of the smallest bait jigs is absolutely not necessary; medium tackle is quite enough.
Whatever the bite, a large number of fishermen film the entire fishing process. On the Internet you can find a lot of videos with tips and examples of how best to fish in winter. Video fishing on the first ice in winter is in very high demand. Therefore, by filming your own fishing process and then posting the video on YouTube, you can gain popularity among fans of this extreme form of recreation.
Many people post a lot of video lessons online. Each video may contain certain information regarding a particular type of fishing. Therefore, video shooting can become not only a memory, but also bring benefits. A video for beginners can not only describe, but also show how to choose the right place and do the fishing itself. Every fisherman knows that you shouldn’t make noise while fishing, otherwise the catch will either be absent or minimal. Winter fishing on the first ice is a hobby for the hardy and patient. Because it is not always possible to quickly achieve the desired result. In addition to the fact that it is necessary to choose the right gear, fishing location and complementary food, in some cases it is necessary to correctly play with the gear itself. Every fisherman knows that if the fry pay attention to the bait, then the appearance of a predator is not far off. Many amateurs even shoot videos underwater. This kind of video can be called unique. Since the entire process of fishing, or more precisely, the game of bait, the appearance of a predator and other moments are visible. This video is interesting not only for beginners, but also for fairly experienced fishermen. Often, many experienced fishermen set up a girder in case a predator such as pike appears. It is also worth remembering that after drilling a hole, it must be thoroughly cleaned of any remaining snow and all ice chips. Because even small amounts of ice can simply scare away the fish.
The benefits of winter net fishing
Net fishing becomes a good source of fish in winter. Traditional fishing methods require the fisherman to have a lot of free time and even waste, which cannot be said about nets.
Thanks to winter fishing, the number of fish is regulated. The cut-out ice holes become a source of oxygen for all inhabitants of the reservoir. For nature, such fishing in harsh winter becomes an even greater advantage, because at this time there is even less oxygen in the water.
How to properly place nets under ice
In winter, setting up gear is extremely problematic. It is best if several people do this.
Installation location
Not every body of water is suitable for installing gear. The best options are deep rivers and deep lakes. Small ponds are also suitable, but with reservations - there are no big fish there, the depth of the pond should be at least 3-4 meters, and you will need small-sized tackle.
Already when choosing an installation location, the behavior of the fish and the bottom topography are taken into account. With the onset of cold weather and the formation of ice, the vegetation near the banks freezes. To find food and not die, the fish goes to depth. That is why you need to look for places with the maximum possible number of fish, at depth. This way, fishing with nets in winter will be more successful.
But we must not forget about the bottom topography, snags, fallen trees and other unwanted obstacles. Otherwise, you can ruin the tackle, but before that it’s good to tinker with pulling the net out of the water. It is best to spot the optimal areas before the temperature drops in the first days of winter.
Places for installing gear
Before setting up a net in winter, you should remember that it is better to fish with nets in large and deep bodies of water - these are lakes and deep rivers. You can, of course, try to install a net on a small pond, but most often the caught fish will not recoup the time spent on it, since in small reservoirs it simply cannot grow to huge sizes.
As you might guess, it is better to place the gear closer to the middle of the reservoir. When choosing a location, it is advisable that anglers know the body of water well. The place for placing nets under the ice should be as clean as possible, without snags and thickets, otherwise you may encounter a situation where the net gets caught and breaks.