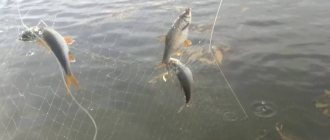
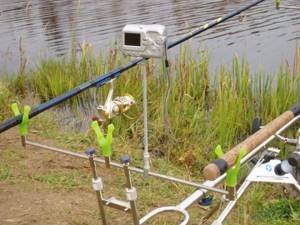
Gear such as a net is actively used either during professional fishing on an industrial scale, or by poachers. Casting networks are a small exception to the generally accepted rules. Catching underwater inhabitants with its help is in most cases classified as a sport type of fishing. This is due to the fact that the casting net, in comparison with ordinary gear of this type, does not provide for permanent installation on a reservoir. Also, it does not need to be moved across a body of water using a boat or other watercraft.
Fishing using such gear is done manually. In addition, their use involves an active, constant search for places where fish accumulate. It is worth noting that the use of such gear requires constant activity and movement around the reservoir, so they will not leave any angler indifferent. The editors of the YaNashla website have prepared for your attention, taking into account the advice and recommendations of the overwhelming number of users, a rating of some of the best new products, high-quality popular models of casting networks for 2021.
Description of the gear
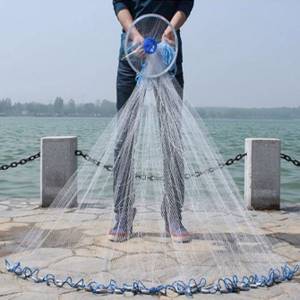
Fishing with casting nets, often called parachutes or capes, is a traditional fishing method in countries located in Asia and South America. Among domestic fishermen, this method of catching fish is not widespread and widespread. However, recently, due to its high catchability, as well as ease of use, this tackle is gaining more and more popularity.
How to use and throw
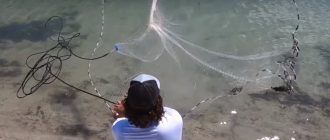
Applying capes is a very labor-intensive and also very painstaking process. However, with great diligence and desire, almost every user will be able to master the technique of casting such equipment. The fishing technique using this gear is as follows:
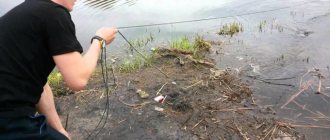
- The fisherman, using a special technique, wraps the net around his hand and then throws it into a pre-designated place on the pond.
- After the throw, the parachute opens completely, thereby covering a certain area on the water area.
- After the loaded part of the equipment is completely immersed to the bottom, it forms a dome.
- After a successful cast, after a couple of seconds, the fisherman sharply pulls the rope, which is tied at the base of the rig. Thanks to this, the loop is tightened and the dome is closed.
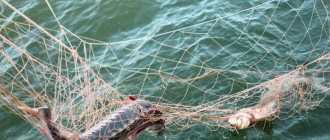
- After the dome is closed, the fish that were in the casting area fall into the bag and cannot get out of it. At the final stage, the cape is raised from the reservoir to the surface and the catch is removed from it.
What are they? Casting nets are divided into 2 types, differing from each other both in design features and in the technique of use and fishing method. Such equipment comes in American (American) and Spanish (Spanish) types.
Overview of American-type equipment
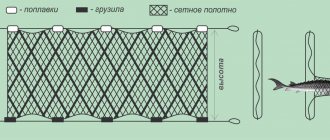
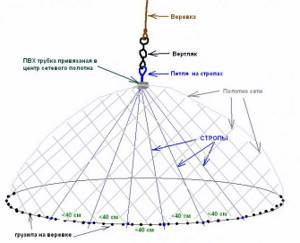
Casting nets of the American type, or as they are also called - American, are round tackle, along the outer edges of which a cord made of nylon is threaded. Special weights made of lead are additionally attached to the cord. In the central part of the circle there is a special hole equipped with a ring.
The central ring is connected to the outer circle using special slings. At the top, the slings pass through the hole itself and are attached to the surface of the ring. Thanks to a special swivel, the ring is attached to the traction cord. This cord is used for throwing equipment into the water, as well as pulling it ashore. American women come in 2 varieties, which differ in the size of the rings (large and small).
When fishing the tackle, the traction rope, with the help of installed slings, begins to pull the cord equipped with a load towards the center. Thanks to this, the parachute is tightened tightly, and a dense, impenetrable bag is formed in its center, which does not allow the prey to get out of the gear.
Using an American woman with a large ring
American-type casting nets are equipped with large rings (also called “Frisbees”). As a rule, such gear is equipped with rings consisting of 3 rows. In addition, equipment equipped with one large double ring is often found.
It is worth noting that American ones, compared to other gear of this class, are much more convenient to use. They are easier to throw into the water, as well as pull them to the surface. During casting, they will not open prematurely, and their lines, during active use and fishing, will not get tangled, which greatly simplifies the fishing process.
American type casting nets with small ring
American ones, which are equipped with small rings, are vaguely reminiscent of Spanish-type capes in their design. When pulling such a rig ashore, the ring gradually tightens the parachute and presses it tightly against the rope. It is worth noting that such a cape is usually used in reservoirs with difficult fishing conditions.
The American, equipped with small rings, unlike other types of gear, is suitable for fishing even in strong gusts of wind. Selecting an American type cape equipped with small rings should first of all take into account the height of the angler who will use it. The criteria for selecting such gear are as follows:
- If the angler’s height is less than 145 cm, then it is recommended to select gear whose diameter does not exceed 3 meters.
- Users whose height is up to 170 cm should select such equipment with a diameter of up to 3.5 m.
- For people whose height exceeds 180 cm, equipment of any diameter is suitable.
Networks are discordant
But there are nets that are only partially related to sports, and they are allowed, in certain sizes, to catch various types of fish, except for those classified as caviar.
But if a private entrepreneur rents a pond and breeds fish, then this method of fishing is much better than the barbaric one - draining all the water and collecting fish along the bottom when the slightly grown fry dies.
Such drags or lines are not installed for a long time and any watercraft are not used.

Everything is done by hand, like a net - a spinning rod. And fishing with a casting net is faster than a fishing rod.
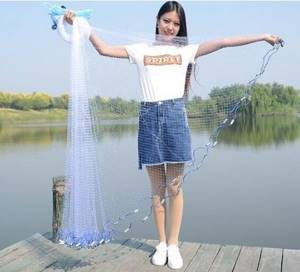
This article is devoted to two types of so-called casting (casting) networks - an American woman and a Spanish woman.
View them on the casting network photos. They are already common in our fishing areas, but have long been traditionally and actively used in the countries of Asia and Latin America; and have already arrived in Europe.
But many Russians know about the effective removal of fish from the waters with such nets, which in our manner are called a parachute, a cape, and a chandelier. And we would like to learn the basics of weaving casting and managing it on the water.

Although you can buy such nets without leaving your home: by ordering purchase and delivery via the Internet or by phone. This is all from the desire of Russians to create everything simple with their own hands. They are naturally curious: how did Latin Americans feed their families fish for centuries using this method?

Description of Spanish-type casting networks

In their design, Spanish women have some differences compared to American women. The design features of the Spanish flu include criteria such as:
- lack of slings;
- the pull cord is attached to the center;
- The sinkers are located a short distance from the edges.
Due to such differences in design, when casting into the water, the Spanish net behaves differently from the American-style casting net. While fishing it and pulling it ashore, the sinkers begin to collect in the central part. Thanks to this, all exits of fish caught in the pocket formed along its perimeter during casting into the water are blocked.
Material of manufacture
In the manufacture of casting gear, materials such as fishing line and nylon thread are used. It is worth noting that these materials have long proven themselves in the fishing industry on the positive side, but they have some differences. For example, if you plan to use a small cape in a dirty or cluttered pond, then in this case it is better to buy equipment made from durable nylon threads.
For fishing in clean waters, it is recommended to buy products made with light fishing line. In addition, fishing line, unlike nylon, has better tensile strength.
When purchasing large-diameter nets made of nylon, you need to take into account the fact that such equipment becomes heavier when wet, since its mass increases significantly, as a result of which it will be much more difficult to re-throw into the water. That is why you need to know that products in the manufacture of which fishing line was used are much lighter than equipment made from nylon. For the same reason, a cape made from fishing line, even after it gets wet, is simpler and easier to re-throw into the water over a long distance.
Main selection criteria

When purchasing a casting net, it is first of all recommended to pay attention to the thickness of the thread from which its fabric is made. This is due to the fact that equipment made of thin thread better holds prey during fishing.
Before purchasing such gear, you need to familiarize yourself with such parameters as the size and sinking ability of the material from which they are made. It is the sinking ability of a parachute that determines its catchability. It is determined by the following criteria:
- Cell size indicator.
- Total weight of equipment.
- Line diameter indicator.
The weight of the tackle directly depends on the sinkers, in the manufacture of which, as a rule, lead is used. For 1 sq. m of canvas account for 1.5 kg of sinkers. When selecting a material, you also need to take into account that fishing line, unlike nylon thread, sinks faster and does not absorb moisture. However, a cape made of nylon becomes heavier after the first cast, so when casting again, it sinks to the bottom faster than gear made from fishing line.
It will be difficult for novice fishermen who have no experience in using casting nets to use canvases with a large diameter, so inexperienced users are advised to purchase canvases whose size does not exceed 1.5 m. However, when purchasing such equipment, you need to take into account that its radius should not be less depth in the intended fishing spot.
RusCamping - exchange of experiences and opinions
Where to buy a casting net, what to look for.
And so you can buy a parachute net in several places:
1. On the bird market or through an advertisement from private traders - the advantages of the casting network can be seen immediately, and not in the picture. In addition, you personally see the person who made it (of course, we are not talking about resellers from China here). The downside is usually a high price and a small selection; as a rule, such nets are knitted to order. — I tried to find one of these networks from one private owner in a group in contact, but after my questions about the case and links to this site (ruscamping.ru), he obviously considered me a problem client and even blocked my access to his group by refusing to sell the network ...

casting network purchased in the USA
2. Purchase in Europe, Japan and the USA from trusted companies that have been producing casting nets for generations. Pros: high quality. Disadvantages: price and a small chance that the net will not be allowed through customs - sending fishing gear is prohibited by law (the probability of such a misfortune is statistically less than 1%, but it does happen). There I bought 3 casting networks for myself and friends - all of good quality and Spanish and American type (recommended manufacturers Miomi,) maybe others are not bad - so far I have tried these.
3. Option - Chinese manufacturers. Pros - price, cons - quality (out of 3 attempts I made to purchase Chinese ones, 2 were subject to modifications and alterations, one turned out to be defective with moving knots and nasty cords) Also, when purchasing a casting network through an online store from China, there is a chance of getting problems with customs.
The network from Russian networks that I bought several years ago, apparently, was ordered for production somewhere in China
4. Domestic manufacturer. The pros here are equal to the cons - as a rule, the price is more or less acceptable, cheaper than a foreign purchase, but more expensive than a Chinese one. As a rule, companies either buy a Chinese castineg net of more or less acceptable quality or supply a domestic one themselves, but people who, unlike the manufacturers described in the second option, do not fish with their own products, and therefore do not monitor the disadvantages of their products. And it turns out to be “crooked”... I was sold an American thread like this in Moscow, it was sold, for example, by the company Russian Networks (safenets website) - I completely remade it, and eventually gave it to a friend. The net either needs to be completed, or it won’t catch well.
It’s a good idea to knit along a cord with a reinforced thread, although the knots along the cord are not at an uneven distance, so they may crawl.
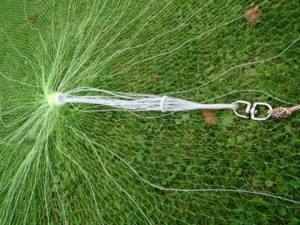
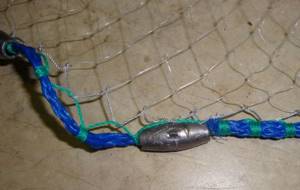
Although from the latest purchases made by one of the respected visitors to the Ruscamping site (thanks to him for the photo), a copy: cost 3800 rubles. for a radius of 1.8, sold to him by the manufacturer "Baltset" from the photo (I present them with my comments here to the right of the text of the article) I liked it, if it also opens with dignity to a full diameter of at least 3.5 meters, then it is already a competitor to the American to manufacturers.
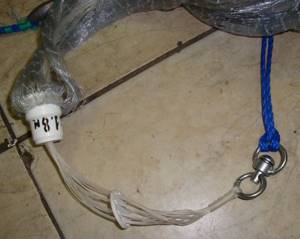
a sufficient number of slings, a swivel, a straightening ring - everything for an adult
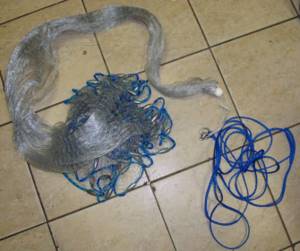
Actually, the casting network itself, it’s a pity there are no photos in a stretched form - it’s not clear whether it’s straightened out normally around the circumference.
This article, of course, will be finalized and supplemented taking into account the accumulation of invoices - follow the site, write comments.
Best Casting Networks for 2021

Most novice fishermen ask the question: “which casting net model is better?” No one can give a definite answer to such a question. The fact is that such equipment is selected depending on the purpose of its use, as well as taking into account the conditions of the reservoir.
To catch live bait, it is recommended to buy equipment with cells whose size does not exceed 1 cm. For sea fishing, you should purchase an American one equipped with a small ring. This is due to the fact that Frisbee is not suitable for fishing in strong gusts of wind, which often occurs at sea. To decide which tackle is better - American or Spanish - you should study their features in more detail. The advantages of an American are:
- ease of operation (it is easier to throw it into a pond);
- good catchability indicators;
- high levels of strength and reliability.
The main advantage of the Spanish flu is that it can be used even in bodies of water with difficult terrain. This kind of tackle is often used in reservoirs with a heavily cluttered, overgrown bottom, because the Spanish, unlike the American, is not prone to the so-called. hooks.
In the domestic market, gear from the mid-price category of Russian and American production is very popular. Also in high demand among consumers are inexpensive Chinese-made models, which are slightly inferior in quality to their American counterparts, but at the same time are much cheaper.
Where can I buy? You can purchase such tackle, which is perfect for both beginners and experienced fishermen, in specialized online stores, for example, on AliExpress.
Casting net (cape or parachute).
1.Casting network.
A casting net (cape or parachute) is one of the most ancient methods of catching aquatic life with a net. You can fish with it from a boat from the shore or from a pier. Wherever there is a convenient place to throw it, and where there is a good bottom you can catch with this net.

Casting networks are divided into 2 groups: “Spanish Women” and “American Women”. This division means a difference in their design and functionality.
The main difference between the American ones is the presence of slings stretching to the center of the network fabric. These slings pass from a thick rope through a ring located in the center of the net and are tied to a rope with weights tied around the perimeter of the net. During the throw, the net opens due to centrifugal forces and falls onto the surface of the water in its entire plane. Then, due to the weight-weight, the net is quickly immersed in water around the perimeter, and in the center
Due to water resistance, a small dome of network is formed. This net can be used to fish both in the water column and from the bottom. If the bottom is good, then you can wait until the net falls to the bottom and immediately pull the rope. If the bottom is not very good, then without waiting for the net to fall to the bottom, you need to pull the rope tied to the slings in the center of the net. This will avoid unwanted snags. Further, continuing to pull, the slings will pull all the sinkers into one place - the net closes. At the same time, the middle of the net will lower and pockets will form on the sides where the caught fish will be clogged. When the sinkers begin to rise and press against the center of the net, the fish will not escape anywhere. Such nets are usually made from fishing line or nylon thread. The weight of a net with a diameter of ~3 m with weights is about 2.2 kg.
Spaniards do not have such slings. Closing the network is ensured by a cord stretched along the perimeter of the entire network, pulling which tightens the ring of the network - a circular drag is obtained.
Unlike Americans, due to these design features, the Spanish can reach up to 7 kg (D=3m) in weight! It all depends on the diameter of the network. They are usually made from nylon thread.
What type of network to buy or make for yourself is up to you! I advise you to go to the store, look and decide which one you need.
But for my region where there are silted ponds and small rivers, American is suitable for me. And it is easier to use. It’s easier to pull out the catch, easier to prepare for the throw, and it’s lighter. But for faster rivers the Spanish Flu would be more suitable.
The prices for casting networks in Russia are too high. You can buy a Chinese one with a diameter of 2.5 m in the store for 2-4 thousand rubles. And normal ones will cost even more. It would be cheaper to buy it in foreign online stores, but according to customs rules, all fishing equipment and their parts for catching animals are PROHIBITED for transportation! Therefore, it is more profitable to make such a network yourself. It will take a long time, but you will get the network you need.
To make a cape net (its fabric), a regular net fabric is not suitable, since such a net will have cells stretched diagonally in the four corners when thrown and pulled. Because of this, the canvas in the elongated state can have the same radius, and when it opens, it can become square-like (or vice versa). Because of this, it won’t be possible to throw and the canvas will get tangled. From ordinary fabric, you can sew a casting fabric from triangles, so as to prevent the cells from stretching diagonally. But such networks will have many seams and there may be problems with load balance, which will affect the quality of the network opening.
The fabric must be knitted by hand or ordered from craftsmen.
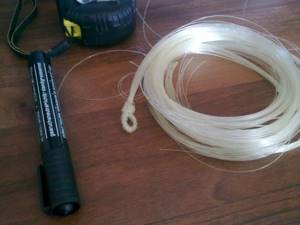
I made such a network myself with a diameter of 3 m. cell=1.7cm. The thickness of the fishing line is 0.24 in about 1 month, but I knitted it whenever I had to. As a result, 28,000 knots were tied, 900 m were spent. fishing line (250 rub.) +50 rub. 75m. fishing line 0.8 for slings +10 rubles swivel +35 rubles 20m. BRAIDED rope for body kit +20 rubles 10m. ropes for pulling (preferably also braided, but not essential) TOTAL = 415 rubles + lead from batteries. I used cheap “Klin” fishing line in reels, now I regret it. You need to take an inexpensive fishing line, but without memory! Klinskaya is a bit stiff, but it remembers the knitting position - then it springs back.
For knitting we will need:
- Make a shuttle and template
- Line for canvas. For cells from 15mm. up to 25mm, a fishing line D=0.20 (0.25) without memory is suitable. You can calculate the length of the fishing line and the expected amount of work in tablica seti
- Line for slings D=0.8. 100m coil is enough.
- Rope for body kit. Nylon, wicker!!! See the length in the same table. Select the diameter depending on the weight of the sinker. Usually they recommend 5mm, but for me it’s 3mm. went great.
- Rope for pulling the net. Nylon, thickness from 10mm (so as not to cut your hands) is also wicker.
- Sinkers calculated at 1.2 kg. at 1m of network radius.
- The swivel is stronger.
- PVC pipe (connection) 32”
- Plastic plate or bottle cap.
- more
Making a shuttle for knitting a net.
Shuttles for knitting nets come in different types.
Basically, for weaving nets with large meshes, plate shuttles with two or one pointed side are used. Such shuttles are now sold in almost every fishing store and cost about 50 rubles.
These shuttles can be made of wood, plastic, textolite, metal plate or wire. It’s your choice of what to make from and what materials are at hand.
First, a plate is cut out in the form of a rectangle, the length of which should be from 15 to 30 cm. There is no point in making it longer as it will be inconvenient to weave. Longer ones can be used when weaving strong nets with thread or rope for hammocks. The width of the workpiece should be less than the mesh size of the future network, but sufficient to ensure the strength of the shuttle. For example, when I knitted a 1.7 cm mesh net, I used a 1.4 cm wide shuttle.
1. I recommend using a duralumin plate to make the shuttle. It is easy to process, the material itself is quite elastic and light, and sharp edges can be smoothed to a mirror state, which makes weaving easier.
2. Next, on one side of the plate, you need to make two cuts with a hacksaw at the same distance from the edge (see the black dotted line on the left), and on the other side, cut off two triangles, giving the shuttle a pointed shape.
3. Next, use pliers to break out a piece between the slots as in the picture along the red line. You should get two horns. And at the other end, many holes are drilled in a “U” shape. For braiding with 0.24-0.35 fishing line, the optimal gap at the top of the “U” will be about 2-3 mm. If you do more, the line will spontaneously fall off the shuttle during weaving.
4. Carefully process the break point (on the left) with a file, smooth out all sharp edges and irregularities. At the right end, use a file or other tool to grind off the partitions between the drilling holes and also remove all irregularities.
5. Next, you need to process the entire resulting shuttle with sandpaper or a needle file. There should be no sharp edges or irregularities on it.
The line needs to be wound from one edge to the other. On the left, the fishing line is passed between the horns, then from the side where it comes out the fishing line is put in a loop on the remaining rod inside the “U”, then the fishing line is again led between the horns to the other side. etc.
The same shuttle is sometimes made pointed on both sides. But it seems to me that this will create more problems when making it and winding the fishing line.
In the next version of the shuttle, there is no core inside the “U”, but thin cuts are made on the edges for the passage of the fishing line. These shuttles can hold a lot of fishing line. The fishing line is wound by alternately threading it through thin cuts at the edges.
These same shuttles are sometimes made of elastic wire. The wire is bent in this shape, after which another thinner wire, thread or electrical tape is wrapped in the center to give the shuttle strength. The fishing line is wound in the same way as the first shuttle discussed. In fact, this is what it is, only made of wire.
For knitting with a thin thread or thin fishing line of a network with a mesh size of less than 10 mm. It is better not to use a regular plate shuttle. In this case, due to the small size of the mesh of the network, every millimeter of the mesh should be saved so that as much fishing line as possible can be wound on the shuttle, and then it can be easily pulled through the mesh when tying knots. A needle-shaped shuttle made of thin elastic steel wire is suitable. To make it, you need to cut two pieces of wire of the same length. Next, using a vice and pliers, bend both ends of the wire as follows:
Both wires must be bent at each end so that the edges and places of bends coincide along the axes indicated in the figures.
When both wires are prepared, they need to be connected by wrapping them with a ton of wire or in some other way to ensure their immobility relative to each other.
Now the ends of the wires (see left) need to be slightly bent so that they rest against each other (see right end). And additionally, the ends of each wire on the outside can be sharpened, giving them a pointed shape. And grind down the places where the ends of the wires come into contact so that planes are formed with which they will touch, but sharp edges of the wires must not be allowed to remain in these places!
Now the shuttle is ready for winding fishing line or nylon thread onto it. The fishing line must be wound from one end of the shuttle to the other, passing it between the touching ends of the wire. To make it easier to wind the wire at both ends of the shuttle, you can bend it slightly (only while winding the fishing line) - this will not only make it easier to thread the fishing line between the ends of the wire, but will also prevent unnecessary friction and damage to the fishing line on the remaining sharp edges.
To ensure that all network cells are the same size, a template plate is used. It can be made from anything. The main thing is that it is thin and durable. During the weaving process, you will repeatedly wind loops of fishing line around this template, which can lead to the appearance of cuts from the fishing line on its edges, to which it will cling. Therefore, in order not to make the template several times, it must be made of scratch-resistant material. For example, textolite, aluminum or some types of plastic. If you knit a little, you can use unnecessary plastic cards (bank cards, discount cards, etc.)
The length should be about 10-13 cm (this depends on the size of your palms). The length should be such that the template fits comfortably in your hand. The width of the template is equal to the cell size of your future network.
After you have cut the template to the required dimensions, carefully sand it with fine sandpaper to make it smooth. There should be no sharp edges or edges on it!
3.Knitting the net fabric.
I don't know exactly what this node is called. I have been knitting with it since childhood, as someone taught me. In principle, the knot is good, it does not stretch, but perhaps in comparison with the others it takes a little longer to knit, but when you learn how to knit it you will be able to knit very quickly.

I divided the knitting order shown in the picture into 6 stages using colors and numbers.
1. (necessary at the very beginning of knitting when we don’t have a single row yet) We tie a loop on a fishing line, the edge of which is fixed somewhere. See Fig.1 - Black
2. We already have a loop or loops from the previous row of the network. We thread the shuttle through the loop. See Fig.2 - Blue
3. Insert the template plate into the resulting new loop and pull the shuttle, pulling the fishing line and squeezing the template with it. See Fig.3 - Gray
4. While the fishing line is still stretched, press it with your finger to the template, thereby fixing it. Hold your finger. See Fig.4 - Orange
5. We hold our finger. And we draw the shuttle with fishing line around the previous loop (into which we threaded the black one in steps 1 and 2 ). We move the shuttle to the side. See Fig.5 - red
6. We hold our finger. And we pass the shuttle into the previous loop (into which we threaded the black one in steps 1 and 2 ) on the right. In this case, the loop from point 5 should also remain on top as in the figure. Then we pass the shuttle into the loop, which we still hold with our finger on the front side (closest to us).
Now, without releasing your finger, pull the shuttle and line down. at the same time, the loops of points 5. and 4 . And when you feel that the tension of the fishing line has reached your finger and there is no excess fishing line left on the loops, loosen your finger and continue to pull the shuttle until the loop under your finger is completely tightened.. See Fig. 6-Purple
You should start knitting the network with a set of primary loops. The knitting itself will be from the center of the network circle to its edge, so you can choose the diameter of the network yourself, the one you need or how much patience you have.
So, first you need to decide which way to knit in the round. There are two ways. The first is in a spiral from the center and the second in circles.
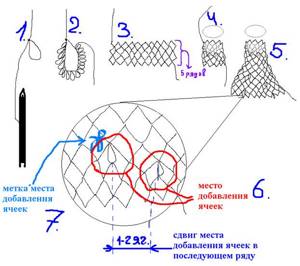
In any of the options, first we make a loop on the fishing line, see in Figure “1”, onto which we then cast on the required number of initial loops. I usually knit about 16 stitches. But it should be taken into account that the other end of the fishing line (not the one on the shuttle) should be left longer - approximately equal to the radius of the future net.
Now we knit the second third and fourth row. This way we get a rectangular network fabric. see figure “2 and 3”
For this fabric you need to tie the beginning and the end so that you get a ring of mesh. see figure "4"
Next, we knit the remaining rows of the future network to the ring from one of the edges, simultaneously increasing the number of loops in each subsequent row (this is necessary for your network to increase in radius).
see in figure "5"
Well, if you want to weave in a spiral, then when tying the edges of the network, make a shift by 1 row (i.e. tie the end of the 1st row to the beginning of the 2nd, the end of 2 to the 3rd), after which the end of the 4th row will remain free. Next, to the free end of the 4th row, we will begin to knit the remaining loops, gradually increasing their number in each subsequent row, thereby increasing the number of spirals of the network and increasing the radius of the network, and so on ad infinitum.
Now about adding loops. This is necessary so that your network increases in radius, but at the same time remains flat and not in the form of a pipe or cone. To do this, you can calculate for yourself that it is necessary to increase the number of cells of each row or spiral by the number = PI = 3.14 - this is ideal. But in fact, after you tie it, the net will be pulled into a cone due to the memory of the fishing line. Therefore, increase the number of loops by 4 or 5 cm
in Figure “6.”
Now about knitting methods. I would still advise weaving in rows (parallel rings). With this method, when casting, the net opens up better.
I also advise you to mark with some marks on the network canvas the places on the circles where you need to add the number of cells (for example, I use tapes with Velcro). This is necessary in order to remember to add cells exactly where needed. Naturally, they need to be removed and moved to the right places.
see in figure "7"
Also, in order to avoid curvature of the mesh circumference on each new weaving row, you should shift the place where cells are added by +1 cell!
For example, we started the network with 16 cells, we need to add 4 cells to each new row, which means that on the new row the places where +1 cells are added (four times) will be located through 4 cells of the previous row 16/4 = 4, etc. for the next row the number of cells is already 16+4=20, and the places where cells are added are 20/4=5 cells. Etc. But do not forget to shift the places where you add cells by +1 cell in the row.
see picture
If during knitting you forgot to add cells in any place, it’s okay to make another +1 cell in the next row - in the future this defect will be leveled out and will be invisible, but try not to make such mistakes. It’s better, of course, if you notice the omission of adding a cell before you finish the row and add the missing cell to the same row.
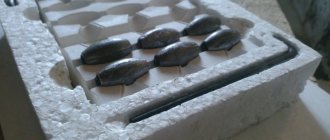
4. Casting sinkers.
There are many different options for casting sinkers with ready-made holes for the rope. Basically, they are based on one simple principle - lead is poured into a mold with a steel core (rod) in it, which is then removed. Believe me, drilling holes takes much longer, and due to the viscosity of lead, there is a chance of breaking a bunch of drills.
First I tried to carve the shape of the sinkers into two plaster plates. At the same time, it is very difficult to carve in the already hardened plaster the very shape of the future sinkers, a groove for placing a steel rod in it, and even so that it is all symmetrical on both plates!
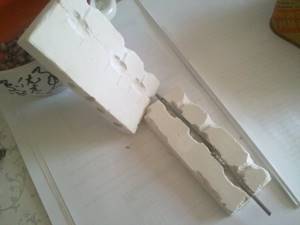
Accordingly, due to these same difficulties, the resulting weights were very crooked, scary, and the injection molds did not always match.
After struggling with them, I found an easier and faster way to cast with a hole.
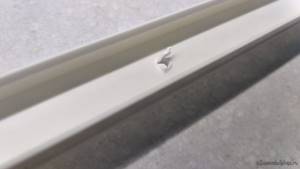
In the same plaster plates, using this device, I drilled several holes of the diameter I needed. And the knitting needle sticking out in the center additionally drilled a small recess into which I later inserted a steel rod to create a hole in the weight. This can also be done using drills and drills. And this thing just fell into my hands. This seems to be the former pointer of a pressure gauge or other pointer instrument.
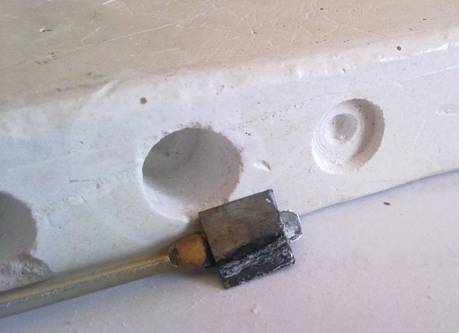
During the casting process, I tried to drill such holes from the flat side of the plaster, but this greatly increases the overlay on top of the mold, which will have to be trimmed further in the future. Therefore, I advise you to make a gypsum plate 3-5 mm thick. larger holes (on the sides), which will ensure easy drainage of excess poured lead from the surface of the mold.
The casting process itself is very simple. Melt lead in an iron tin can. Insert the steel core into the center of the mold (exactly into the recess whose diameter should approximately coincide with the steel core rod). The diameter of this rod should be equal to or slightly larger than the diameter of the rope later used to hang the net.
Once all the lead has melted, take the jar with pliers and pour it into the mold. I advise you to tilt the mold a little so that excess lead flows to one side. While the lead is cooling in the mold, but has not yet hardened, rotate the steel rod along the axis - this will prevent the cooling lead from sticking. As soon as the lead begins to harden (it becomes like porridge, even grains are visible J), pull out the rod.
Next, fill in the remaining mold holes in a similar manner.
Having cooled a little in the mold, the lead shrinks and you can pull out the resulting sinker blank by lightly shaking it.
The plaster mold must be dry! You can’t cool it or the lead in it with water! In the first case, there is a chance that lead will splash on you and burn you, and in the second, the form will simply crack!
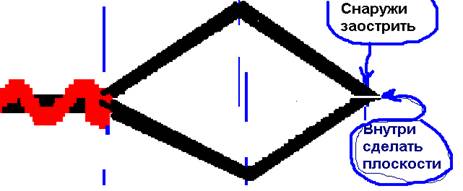
It should be noted that from my own experience I know that in order for the sinkers to be less confused with the net fabric, they need to be made of an elongated, cylindrical shape. It is desirable that their length be equal to two cell sizes.
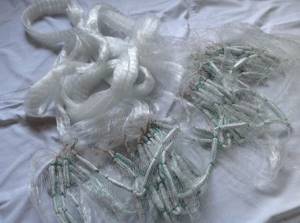
When casting, you get these ready-made but not yet processed sinker blanks. Here you can clearly see that the excess lead has stacked on the side of the mold, and the buildup is very small.

Next, you need to cut off the entire overlap with wire cutters. Carefully collect the scraps and pour them into a jar for re-melting.

So that when using the sinkers they do not cling, scratch or cut the fishing line or rope, then it is necessary to smooth out the sharp edges remaining after trimming the excess. Although the metal is soft, there is a small chance of damaging the network fabric.
We will smooth the edges using the rolling method. To do this, pour all the finished, cut weights into a plastic bottle or canister (it all depends on the volume and size of your weights). According to the technology, you can also add several large balls from bearings, but special +
will not be. Now this bottle or canister needs to be shaken, kicked or whatever else you can think of, the main thing is that the weights inside shake, hit and rub against each other. They need to be taken out when ready. The edges should be rounded, without burrs or sharp edges. You can also add a little paraffin to the bottle when rolling, so that in the future the sinkers will get less dirty on your hands.

5.Assembling the body kit.
Finished weights with holes should be washed with water and dried.
To make a net kit, weights need to be placed on a nylon braided rope. A twisted rope is not suitable, as it may subsequently affect the opening of the net when throwing. Or simply, it will get tangled with slings and nets, twisting under the weight of the sinkers.
Since the net is nylon, and even braided, to make it easier to attach the sinkers, as well as to prevent the upper braid of the rope from moving relative to the inner one, one end of it must be melted over a fire and while it is hot, give an elongated, refined needle shape.
Having strung all the sinkers, they need to be secured on a rope at an equal distance, so that the weight is enough for your net (1.2 kg/1 m radius). This can be done in 3 ways:
- Simplest. You can squeeze the sinkers a little by holding the rope inside. But with this method there is a chance of crushing the rope. And if you make a mistake with the distance between the weights, it will be impossible to redo it, and the weights can only be cut off and melted down.
- Having placed the weight at the required distance from the previous one, secure it by tying knots with fishing line or nylon thread on both sides. In this case, it will be possible to redo the detected errors.
- Secure the sinkers with knots of the same rope. It will also be possible to correct the error without damaging the weights. But you will have to untie knots, a bunch of knots, or cut the rope.
6. Linking the body kit to the network.
You can tie the kit to the net using fishing line or nylon thread pre-wound on the shuttle - this is more convenient.
Before tying the body kit, you need to calculate how many net cells should be located between the weights and at what distance so that the net cells are neither compressed nor stretched. And monitor the uniformity of the number of cells while knitting. It is advisable to tie a suspension to each cell to more evenly distribute the load on the network fabric.
After the kit is completely tied to the network, you need to tie the ends of the rope with two ordinary knots and tighten them tightly with pliers. The knot can also be wrapped with nylon thread, giving it additional strength. Or, after tightening the knots, both ends can be cut off, melted over a fire and fused into one ball, which will also prevent the rope from coming undone. It would be enough.
If the loads are small, then they can be secured to the rope several at a time. For example, my loads turned out to be too small, 5-6 grams each. For my network with a radius of 1.6 m, 2 kg of weights are needed. At the base, the network had about 410 cells. Which means to hang 2 kg. Weights then need to be tied 1 to each loop. It would be long and tedious, so I grouped the loads in groups of 3 and secured them with knots of the same rope. In this version, the rope with weights gets even less tangled in the net and its mobility is not limited.
7.Attaching the slings
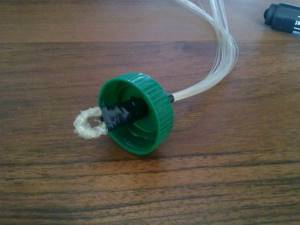
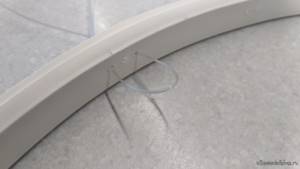
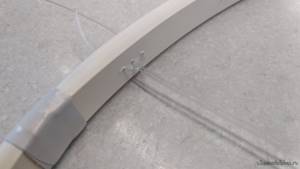
Before we start tying the slings, it is necessary to make and secure a pass-through ring. This ring is necessary so that when casting and pulling the net, the lines do not get tangled with the net itself, but pass freely through it.
For manufacturing you will need a PVC adapter tube with a diameter of 32-25 used for welding PVC water pipes.
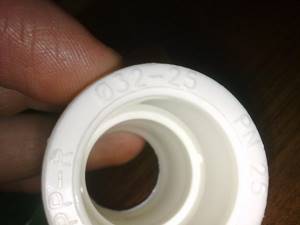
On the wide part it is necessary to machine or melt a groove of small depth.
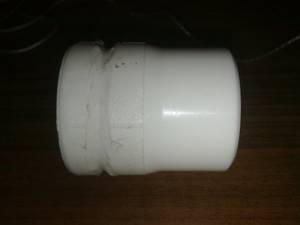
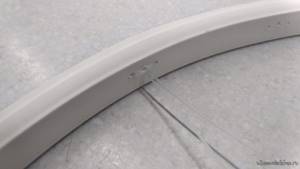
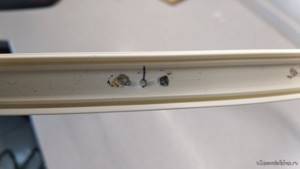
Next, string the center of the network fabric with a nylon thread (around the hole left during weaving). This hole in the center is where you started the first rows of your net when weaving
Then pull the hole with the nylon thread onto the prepared PVC tube and firmly fasten the net fabric to the tube by winding it with the remnants of the same nylon thread. It should look like in the photo:

The photo shows that I fused two wires in the center of the PVC tube. They are necessary to divide the slings into four groups - according to sectors of the network. This will provide additional separation between the lines so that they do not stick together when casting. Later I removed them, but it turned out in vain! Without these wires, wet slings began to stick together more strongly, which greatly interferes with the good opening of the net.
8.Manufacture and fastening of slings.
Slings for American-type casting nets are made from fishing line with a thickness of 0.8-1 mm. The fishing line must be without memory so that it does not get tangled. First you need to calculate how many slings you will need. Many casting network manuals offer this calculation option. Considering that the slings should be tied at least every 40cm. you need to divide the circumference of the straightened net by 40. Let’s say I have a net in the straightened state (flat circle) with a radius of 1.6 m. Then its length is L=2*P*R =10.048 m. number of lines = 10.048/0.4=25.12
It turns out that my network will require 25 lines. But there is a minus in this calculation! The number of weights tied to the net between the slings may be different, which will upset the balance of the net.
It is better to count the total number of sinkers (or groups of sinkers) connected to the network. measure approximately how many sinkers need to be placed so that the distance is within 40 cm and divide the total amount by the amount in the measured distance.
You may have to experiment a little with the distance between future sling attachments and the number of weights between them. It is necessary to select such a number of weights between the lines that when dividing the total number of weights by the number of them between the lines, the number closest to the whole is obtained.
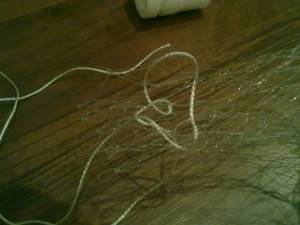
Now cutting the slings:
The length of the sling differs from the radius of the circle of the straightened net! When you take the net by the ring in the center of the circle and lift it from the net, all the cells are stretched diagonally. This extended length should be used for slings. You can measure it with a meter, having stretched out the net in advance. Or a more accurate method is to count the number of rows of the network (the number of circles of the network) from the center to the edge (you can count the knots). Then multiply the calculated amount by the size of the side of the cell. This is exactly how long all slings should be + allowance for a loop and knot of about 15-20 cm for each sling.
On each cut sling, you need to tie a loop on one side with a single or double knot. The loops of all slings should be approximately the same.
To align, string all the slings in loops onto a hard object, such as a nail driven somewhere. Next, smooth out the slings, untangle them along their entire length and pull them out. Now measure the distance of the length of the sling from the knots of the loops (without the previously added margin) and add 1 cm to it. (The slings are still gathered together and extended) at this distance we will tie the rope with weights. This distance now needs to be marked with a marker on each line!
Now everything is ready for binding. Place the net with the inside facing up.
One sling at a time, alternately tie them to a rope with weights at the previously calculated distance. And don’t forget about the mark on the lines made with a marker! The knot must be located at this mark! I do not recommend using a regular knot tied twice as it ruins the fishing line. In the place where you pull the knot, the sling may break (as it already happened to me).
I tried this one (1)
knot and it hasn’t let me down yet (the line in this knot does not tighten, but wraps around the rope and has a self-tightening knot):

Having tied this knot, I advise you to tie the remaining short end to the rope with a double knot, just in case. (2)
, and then tie a single one next to it
(3).
All three knots must be knitted very close to each other. This line catch combination will last forever!
By the way, do not rush to cut off the remaining short pieces from the slings. In many methods of casting a casting net, the lower edge of the net (the rope itself with weights) is taken into the mouth, but since after the first cast it can already be dirty, it is better to take with your teeth not the rope, but just these remaining pieces of lines. The fishing line still retains less silt and dirt on its surface.
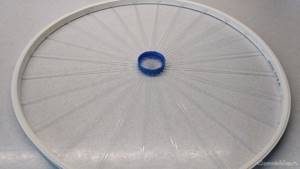
Now, so that the lines do not get tangled in the future when casting, take them one by one along the circumference of the net and string them on a thick rope. When all the slings are strung, tie all the loops of the slings with several knots and pull the entire resulting bundle through a ring of PVC tube tied in the center of the net.
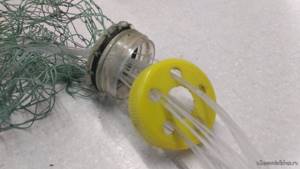
Now the net can be turned over with the outer side up. Pull a plastic plate with a hole in the center with a radius of about 1.5-2 cm over the sling loops tied together; this will serve as a limiter for the slings. You can use a plastic bottle cap. The plate (plug) must be lowered below the nodes (on the slings themselves). Wrap the hinge nodes with several layers of electrical tape so that the nodes cannot slip back through the plastic plate.
Tie a strong swivel onto the same rope after the knots with loops. The swivel will prevent twisting of the pulling rope, slings and net web, since when casting the net rotates along its axis. A thick braided rope is tied to another ring of the swivel to pull the net out of the water.
To pull the net, you need to tie a small self-tightening loop at the free end of the rope, which will secure the rope to your hand when casting.
All! Now your casting net is ready to fish. Good luck with your fishing and fewer snags!
PS photo of my first catch:
You might be interested in:
- How to restore Task Manager
- How to crimp a twisted pair cable with an RJ45 connector?
- Error while initializing the application (0xc0000005).
- DIY spray gun.
- Restoring the view of the “Task Manager”
- How to get rid of cracks in plastic windows.
Rating of the most inexpensive models
KIPPIK (American type), nylon
This is an inexpensive equipment made in Russia, in the manufacture of which nylon (29x6-28 mm) was used. The lower harness is equipped with a durable polypropylene double cord. Each weight, made of lead, is hand-stitched to ensure it does not get tangled in the cells when cast into the water.
The cell size of this model is 20 mm. The cord is equipped with a double one-piece carabiner, thanks to which the possibility of breaks and loss of gear during casting is virtually eliminated. Additionally, the net is equipped with a one-piece Frisbee ring, which does not expand when thrown into the water. After getting wet, the nylon becomes heavier, so the tackle sinks faster after re-casting, which ensures a good catch.
casting network KIPPIK
Advantages:
- low price (average cost is 900 rubles);
- made from high-quality nylon;
- ease of use (product diameter is only 1.2 m).
Flaws:
- not suitable for catching fry and live bait;
- after the first cast, the nylon thread gets wet and becomes heavy (to re-cast, you need to apply more physical force).
American thread “Best catch of fish”
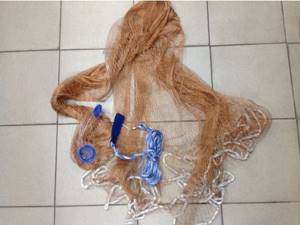
This model is made of durable nylon. It is perfect for both beginners and professional fishermen. The network is equipped with hardwired loads. The diameter of the product is 4.2 m, and its height is 2.1 m. This parachute model allows you to quickly cover a water area of up to 4 meters without the use of great physical force. The bag is tightened quickly and to the maximum possible level using slings.
Thanks to the use of high quality nylon threads, this tackle is capable of supporting fish weighing about 30 kg. It is suitable for catching predatory fish. The slings are equipped with a strong fishing line, the thickness of which is 0.5 mm. The presence of a small ring does not allow the tackle to open in the air while being thrown into the water, since the lines in its design are distributed evenly. This model is suitable for fishing both from the shore of a reservoir and from a boat.
casting net American made of thread “Best fish catch”
Advantages:
- low cost (1600 rubles);
- ease of use;
- good strength indicators;
- presence of sewn cargo;
- easy to throw into the water from a boat;
- Can be used in strong winds.
Flaws:
- after getting wet it becomes heavy (problematic to pull out);
- not suitable for catching live bait.
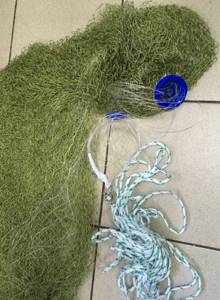
Spanish type casting net (IM40)
This is a reliable equipment, in the manufacture of which a strong white fishing line, 0.35 mm thick, is used. Additionally, it is equipped with pockets and metal weights, which ensure its rapid immersion under water after casting. The height of this tackle is 2.5 meters, and the diameter is 4 m. The cell size of this model is 20 mm, which is quite enough to catch medium and large fish. The package also includes cords. The total weight of the product is 3 kg.
Spanish type casting network (IM40)
Advantages:
- affordable price (1980 rubles);
- light weight;
- allows you to make long casts;
- rich equipment;
- good strength indicators.
Flaws:
- the cell size does not allow the use of tackle for catching small fish (live bait);
- At first, it will be difficult for a beginner to make long casts, since this model is not equipped with a ring (if cast incorrectly, it opens up in the air).
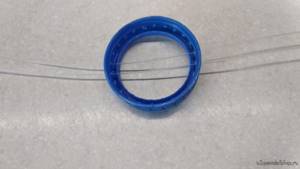
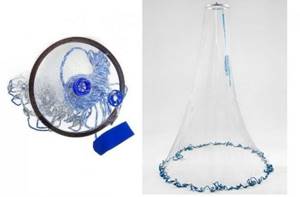
Ring and Neck for Casting Net
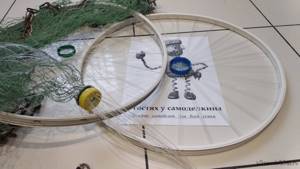
Hello, Today, with my own hands - a ring for the casting network.
Having once decided to make a casting net with a large “American” ring, I was faced with the need to purchase or make a ring for it, but the problem was the shortage of the thing as such, on the one hand, and the lack of a good, simple idea for self-production, on the other.
It was necessary - reliable, cheap, and since it was, after all, gear - easy to repair and suitable for repair.
I solved this problem for myself a long time ago, and maybe something better has been invented now - I haven’t found out, but I think that the design described also has a right to exist.
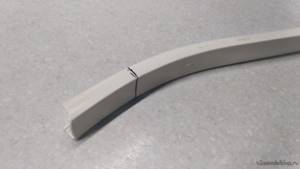
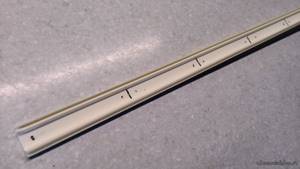
Material for making the ring:
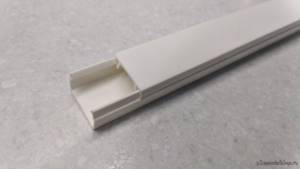
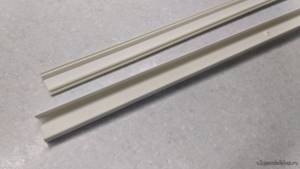
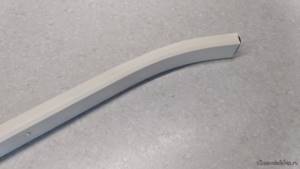
Cable – plastic channel 10 × 15 × 2000 mm. - 1 PC.
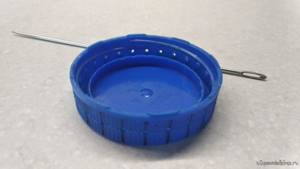
Cap from a PET bottle for 5 ÷ 6 liters with a wide neck (in principle, any suitable cap will do, but this cap is convenient for marking due to the scratches on the end) - 1 pc.
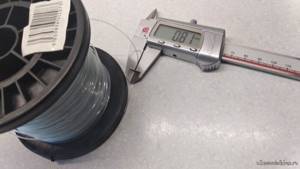
Thick fishing line (use the same as for casting net slings).
Insulating tape.
Manufacturing:
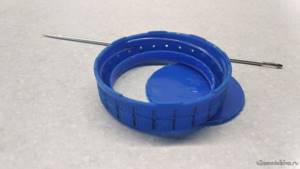
Place the cable channel in half onto the base and cover.
If the cable channel was purchased with holes for fastening, remove burrs from the inside of the cable channel base at the holes.
To smoothly join the edges of the ring, they must be slightly bent inward, so the production of the ring must be in a certain sequence.
First, bend one edge of the cable channel base onto a three-liter jar and cut it off at the bend.
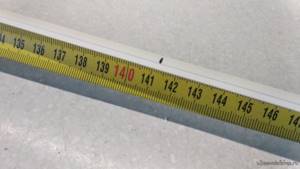
From this cut, measure a length of 1413 mm, which will subsequently correspond to a ring with an internal diameter of 450 mm (L = πD).
Also, on a three-liter jar, bend the marked edge of the cable channel.
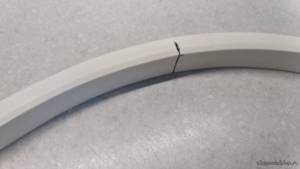
Then cut along the mark.
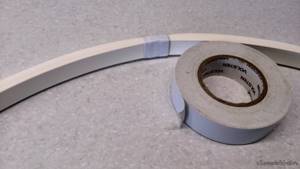
Next, you need to bend the base of the cable channel on a three-liter jar along its entire length.
Inside the prepared base, rolled into a ring, you need to put the cover of the cable channel.
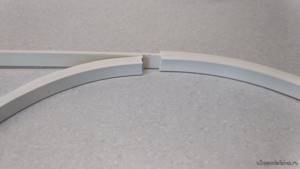
Having cut it in place, dock the cable channel cover inside the base.

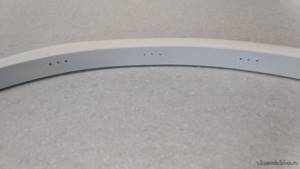
Next, you need to mark the locations for the holes for the “soft” knitting needles.
The number of such spokes in the ring is only necessarily even, and the number of lines in a particular casting network will depend on it (in this case, 24).
To mark, you need to pull out the included cable channel cover, straighten it and measure its length. Dividing the result by the selected number of soft knitting needles, mark the locations for the holes.
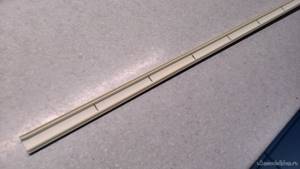
On both sides of each mark at a distance of 5 mm. make two more marks.
Place the already marked cable channel cover inside the prepared, rolled up base (it is advisable that the markings do not coincide with the factory mounting holes).
Wrap the junction of the cable channel base with electrical tape (two or three turns).
Using an awl or drill, make holes according to the markings, taking into account that two fishing lines will fit into the central hole of the three located nearby.
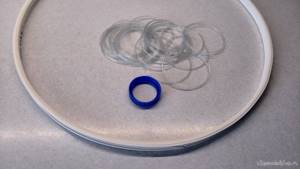
Next, you need to make an inner ring from a PET bottle cap. At the end of the lid, mark the required number of holes for holes (in this case, 24).
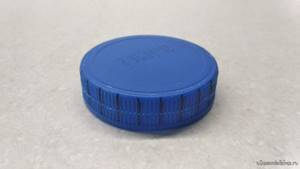
And use an awl or a “gypsy” needle to make holes, taking into account that two fishing lines will be inserted into all holes.
Next, using the same “gypsy” needle, cut out the bottom of the lid.
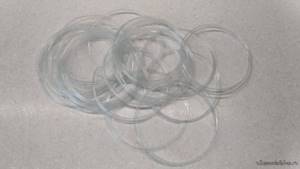
From thick fishing line, cut into pieces with a length equal to double the diameter of the ring - plus 10 cm (in this case - 24 pieces, 1 m each).
Now everything needs to be put together.
Having folded one of the prepared pieces of fishing line in half, pull the fishing line through the outer holes on the inside of the ring, starting from the junction of the cable channel cover inserted inside.
Then, putting the ends of the fishing line together, pull it through the central hole, already on the outside of the ring.
Next, pull the ends of the fishing line through parallel holes, in the center of a ring made from a PET bottle cap.
Then, putting the ends together, pull the line through the central hole on the opposite, inner side of the ring.
Now pull the ends of the fishing line through adjacent holes on the outside of the ring, avoiding twisting of the fishing line in the “soft” knitting needle, and then from the inside of the ring through holes on opposite sides.
At the final stage, cut off the remnants of the fishing line, and carefully, without damaging the adjacent fishing line, melt the remaining ends (8 ÷ 10 mm) with a soldering iron tip and flatten them, thus securing them from falling out.
The same should be done with the other prepared pieces of fishing line, starting with one located at 90° in relation to the first one, already secured, to center the inner ring made from a PET bottle cap.
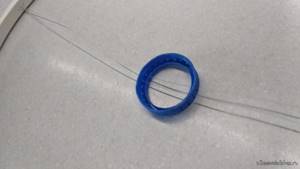
DIY ring for the American casting network - ready.
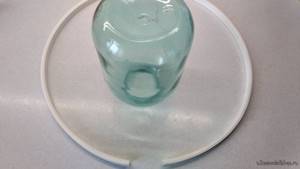
The neck for the casting net is made from the neck of a 5 ÷ 6 liter PET bottle and I will not explain its production, everything is clear from the photographs below.
That's all. Good luck!
Become the author of the site, publish your own articles, descriptions of homemade products and pay for the text. Read more here.
Review of popular models in the mid-price segment
FindFish Original tackle
This is a reliable mesh fabric equipped with a small ring. Additionally, the net is equipped with special weights and has a convenient design. This model takes up little space when folded, so it can be easily transported over long distances in a car.
This net can be made either from fishing line, the diameter of which is 0.3 mm, or from nylon, coated with special impregnation, with a diameter of 0.535 mm. Equipment made from fishing line is suitable for fishing on small lakes, as well as rivers in which there is no strong current. A product made from nylon has better tear resistance, so it is preferable to use it on reservoirs with a rooty bottom.
The mesh size of this tackle is 12 mm. The model is equipped with a cord with a diameter of 8 mm. The cord is equipped with weights that are located at a distance of 15 cm from each other. Total weight – 2.5 kg. The diameter of the aluminum ring is 30 cm. The diameter of the gear is 3.6 m. The design includes a wide cuff that allows you to secure the cord to your hand.
casting network FindFish Original
Advantages:
- thoughtful design;
- good equipment;
- Suitable for catching fry and larger fish;
- compact dimensions;
- light weight.
Flaws:
- high cost (average price 2490 rubles);
- It is problematic to cast in strong winds.
KALUGA D4.4 m (American)
The canvas of this tackle from a popular domestic manufacturer is made of nylon thread, 0.5 mm thick. The cell size is 20 mm. The net is equipped with a “Frisbee” made of plastic, with a diameter of 48 cm. A strong polymer line with a diameter of 0.8-1.0 mm was used to make the slings of this product. The total diameter of this model is 4.4 m. The length of the lifting cord is 10 m.
Thanks to the presence of a large ring, KALUGA D4.4 m can be quickly thrown into a pond without much effort, even while sitting in a boat. The net is perfect for catching medium and large fish in lakes, as well as rivers with weak currents and a bottom covered with snags or sharp stones.
casting net KALUGA D4.4 m
Advantages:
- high quality workmanship;
- low cost (2250 rubles);
- possibility of casting from a boat;
- Suitable for reservoirs with difficult fishing conditions.
Flaws:
- after the first cast, the nylon gets wet and the tackle becomes difficult to cast again;
- not suitable for catching live bait.
Kippik (American, fishing line, no ring)
An easy-to-use product that allows you to fish straight out of the box. Strong fishing line was used to make the canvas. The cell size is 16 mm, the blade diameter is 0.3 mm. The cord is made of high quality polypropylene. The area of the dome when opened is 5.4 m.
This model is suitable for catching medium-sized fish from the shoreline of a reservoir. It is recommended to use in those areas of lakes or rivers where there are no snags or sharp stones at the bottom. It is light in weight and can be easily thrown into a section of the reservoir pre-marked by the fisherman.
casting network Kippik American
Advantages:
- compactness (light weight);
- convenient to use;
- high quality materials.
Flaws:
- high price (2400 rubles);
- Suitable for fishing in reservoirs with a clean bottom without snags and sharp stones.
AN EFFECTIVE METHOD OF FISHING
EVEN IN THE MOST DIFFICULT TIMES, YOU ALWAYS HAVE A CATCH
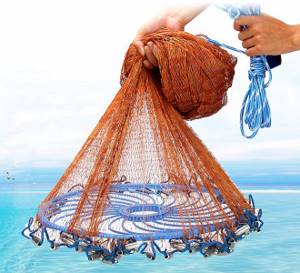
| You can pull out 5-10 kg at a time. fish! This type of gear is also called a casting net, a parachute net, or a cape net. The working casting network FindFish Profi is distinguished by its effectiveness, unlike many traps currently offered! The FindFish Profi casting network is currently the best network in its class on the market in terms of price and quality, and that is why it is so popular. |
|
The FindFish Profi casting net with a small ring is a durable, high-quality net, well equipped with weights, and a convenient design. Compact when folded. Often called an American, cape, or net parachute. The FindFish net made of impregnated nylon with a diameter of 0.535 mm is more resistant to tearing and is suitable for lakes and rivers with a snagy bottom and a bottom with sharp stones. Easy to cast.
- Cell 16 mm;
- cord with installed weights, diameter 8 mm;
- sinkers every 15 cm. Net weight 2200 g;
- 30 cm aluminum ring, allowing the net to easily open when thrown;
- slings for tightening the net - monofilament line with a diameter of 0.8 mm;
- wide cuff for attaching the network cord to the arm;
- diameter 3.6 m.
| DO NOT LOVE WAITING FOR HOURS FOR A BITE? | WANT BIG CATCHES? DO YOU NOT WANT TO SPEND MONEY ON BAIT, FEEDING AND TACKLE? | TIRED OF WAITING FOR THE RIGHT WEATHER TO FISH? |
| Now you don’t have to sit with a fishing rod when there’s no bite and watch the fish pass by you. | ||
Review of the best premium models
Fishtex (Cast Net) American type

One of the most popular gear, according to fishermen, which is in demand among buyers. Carries out its work according to the so-called. the jellyfish principle - when thrown into the water, the parachute opens, and as it dives, it begins to form a dome. During lifting to land using the lower lines, the lower cord is pulled up, after which the dome bowl is completely closed and does not allow the fish to get out of it.
Only high-quality materials are used to make this model. American Fishtex (Cast Net) is made of fishing line with a diameter of 0.28 mm. Additionally equipped with 110 weights. The mass of one load is 26 g. The diameter of this equipment is 4.8 m. The cell size is 20 mm.
casting net Fishtex (Cast Net) American type
Advantages:
- high quality product;
- good strength indicators;
- suitable for professional fishing;
- does not require special skills;
- easy to cast;
- suitable for catching carp;
- you can catch big fish.
Flaws:
- high cost (4500 rubles);
- not suitable for catching small fish.
American D-3.6 m
A feature of models of this type is that they are equipped with special veins that are capable of tightening the equipment while lifting it, thereby forming a closed dome or bag. For its manufacture, high-quality nylon thread with a diameter of 0.66 mm was used.
Thanks to this, it can be used in reservoirs whose bottom is strewn with snags or sharp stones. The mesh size of the parachute is 8 mm, so the net can be used both for catching live bait and for catching larger fish. The total weight of the product is 3.1 kg. The model is equipped with a throwing polyethylene cord (diameter - 7 mm), as well as a special weighting cord (diameter - 5 mm), with weights (the weight of one weight is 26 grams).
casting network American D-3.6 m
Advantages:
- high quality;
- excellent strength indicators;
- suitable for any reservoirs with difficult fishing conditions;
- can be used to catch fish of different sizes, including live bait;
- easy to cast.
Flaws:
- high price (5600 rubles);
- Some users point out the heavy weight of the product.
Parachute net, casting, American D-4.0 m. Thread 0.66 mm. Cell 24 mm. Weight - 2.9 kg.
Diameter - Ø 4.0 m. Thread Ø 0.66 mm. Cell 24 mm. Weight - 2.9 kg.
Watch the video on how to throw a casting net, casting tackle video, how to throw a casting net
The principle of fishing with a casting net is as follows: the net is put on the hand, thrown into the water in a certain way and covers an area of water corresponding to the diameter of the opened net. After the loaded part of the net sinks to the bottom, the net is pulled out by a cord attached to the base.
Video on how to properly throw a casting net, parachute casting net
The peculiarity of American-type casting nets is that they are equipped with special veins that tighten the net, forming a bag with a closed outlet. As a result, the caught fish remains inside this bag. Throw cord is a braided polyethylene cord with a diameter of about 7 mm. Weighting cord is a braided polyethylene cord with a diameter of 5 mm, equipped with weights of about 26 grams. The color of the mesh fabric is white, green.
Design of “American-style” casting networks
- — the netpolon is made of high-quality monofilament produced at the Japanese plant of the Momoi Fishing company. The fishing line is treated with a special coating to make it soft and durable. In order for the network to open to the maximum possible width, it undergoes preliminary stretching in production.
- — the cargo cord consists of two braided polyethylene cords of smaller diameter twisted together, which provides significant strength and wear resistance. At the moment of pulling the net ashore, the sinkers are connected, forming a bag in which the entire catch is collected. — additional lacing ensures the strongest possible connection of the cargo cord with the loads of the net. She weaves the cord three times, strengthening the lower part of the casting net. — the sinkers are made of lead and weigh 26 grams.
- — the carabiner protects the cord from twisting. — the horn is made of composite material, collects the net in the upper part, being inside it. It is connected to the network using a special high-quality glue. The horn ensures the strength of the casting net and makes it more convenient to cast. - line veins made of thick monofilament line connect the casting line to the lower weight line. As they rise, they tighten the net, forming a bag with a closed exit, as a result of which the caught fish remains inside this bag. The high strength of the fishing line veins provides additional strength to the entire network.
- — the casting cord is made of polyethylene, does not absorb water and has sufficient buoyancy. The large length reserve allows you to use the net for fishing from the shore, boat, pier and catching shrimp at great depths. — a convenient loop at the end of the cord, has a tight weave, and is designed to be secured around the wrist.
Video instructions for casting a casting net
Casting Network Comparison Chart
| Title, description | Cell size (mm) | Material of manufacture | Price (in rubles) |
| KIPPIK (American type) | 20 | nylon | 900 |
| American woman with a small thread ring “Best catch of fish” | 20 | nylon | 1600 |
| Spanish type casting net (IM40) | 20 | fishing line (0.35) | 1980 |
| FindFish Original | 12 | depending on the model: fishing line (0.3 mm) or nylon (0.535 mm) | 2490 |
| KALUGA D4.4 m | 20 | nylon thread | 2250 |
| Kippik | 16 | fishing line (0.3) | 2400 |
| Fishtex (Cast Net) American type | 20 | fishing line (0.28) | 4500 |
| American D-3.6 m | 8 | nylon thread (0.66 mm) | 5600 |
To use casting nets, the user does not need to take out a special permit or permit, however, the use of such equipment requires the fisherman to strictly comply with special regulations for catching various objects in water bodies. When choosing casting nets, it is recommended to pay attention to the material from which they are made, as well as their sinking ability. If you use the equipment presented in our rating in everyday life, or use other products, please share your experience and opinion in the comments.
See also:
See also:
Casting network
The casting net is one of the most structurally complex fishing nets. Popularly, the casting network is called differently, among the most common and most common:
- cape;
- tentorium;
- parachute;
- bedspread.
Just a few years ago, casting net fishing was something unattainable. Today, every year this method of fishing is becoming increasingly popular among fishermen. There are two types of casting networks:
- American type;
- Spanish type.
It is worth noting that these are just names of network types and have nothing to do with the country of origin.
Structurally, the casting net is a circular net, framed at the bottom by a nylon cord with a load, usually in the form of many lead weights. When cast correctly, the net opens in flight and forms a circle, which, under the influence of the load, falls to the surface of the reservoir and the net is submerged. Then, at any stage (depending on the required fishing depth), the net is assembled and raised using the main guide cord.
The principle of fishing is to cover a school or individual fish. The “parachute” is assembled in a certain way (there are many videos on the Internet with casting options) and thrown into the place designated for fishing.
The Spanish type casting net has distinctive features in the form of so-called pockets at the junction of the net fabric with the cord at the bottom. It is these pockets that are the fishing grounds for this network. Also, along with the pockets, the netting itself also catches on the principle of a three-walled net; the fish can simply cling to the cells. Spanish flu fishing is considered to be professional in comparison with the principle of fishing with an American-style casting net.
The American-type casting network is externally similar to the “Spanish flu”, but its design is more complex, but no less significant. If the “Spanish flu” uses pocket fishing as its main method of fishing, the “American flu” works on the principle of a jellyfish. From the top sleeve, slings pass along the inside, which are tied to the main cord. Line slings, usually with a diameter of 0.8mm-1.0mm. When pulling the net out of the water, the slings tighten the net at the bottom, forming a so-called bag, thereby the fish, covered at the moment the casting net falls and sinks to the bottom, is closed, and all that is necessary is just to lift the net.
It is believed that the American type casting net is more catchy and the most popular. In principle, this is true, and analysis and demand once again prove such a theory.
However, the apparent simplicity of fishing in theory is not entirely applicable in practice. In this case, the most important thing when using a casting net is the skill of casting, and not knowledge of fishing spots.
The description and name of casting nets indicate the size of the radius; accordingly, the diameter of the parachute in these cases is twice as large. It is worth noting that these dimensions are indicated taking into account the measurement of the net in the maximum stretched state; accordingly, achieving maximum opening of the net is not easy, and this should be taken into account when choosing the required size of the mantle.
The material for the manufacture of casting net is a mesh fabric made from fishing line (monofilament mesh fabric) or nylon mesh fabric (nylon thread). A mesh made from twisted fishing line (multi-monofilament mesh) is also increasingly being used. The latter is often chosen as having the highest tensile properties.
Both fishing line casting nets and nylon casting nets have a number of their own advantages and disadvantages. For example, nylon absorbs water, and after the first cast the net becomes wet, which means it is much heavier, which negatively affects the casting of the net, in other words, it is harder to throw something heavy. However, this same feature also has a positive effect on the parachute’s diving speed due to the increase in weight.
As a rule, the thickness of the material used is fishing line in the range of 0.25mm-0.3mm, and nylon thread 0.4-0.5mm. Cells vary from 8mm to 20mm.
The industrial equipment online store offers a wide range of American-type casting nets from 1.0m to 4.0m, both line and nylon. Industrial equipment store employees will provide detailed information if necessary and advise on any issue.
Please note that low-quality casting nets that do not meet the basic criteria for their production are currently appearing in markets and online stores.
These networks, both American and Spanish, are made of low-quality mesh with a number of distinctive features:
— the cells of the mesh fabric “run around” (the nodes are not fixed), the fishing line is of low quality with minimal breaking characteristics;
— nylon nets made of brown fabric;
— slings for ties made of thin fishing line (about 0.4 mm);
— a fragile, unreliable swivel (possible fracture or tearing off and subsequent loss of the net in the reservoir).
When analyzing or making offers on the Internet, we ask you to pay attention to such facts and ask sellers.
Our specialists strive to implement high-quality casting nets, reliable components and precise execution. All Kippik casting nets are packaged in special shipping packaging, and the net loads are marked with the abbreviation “PIK”. You can buy an American-type casting net in the industrial equipment online store by following the link.