Purpose of the locking unit for the sliding float
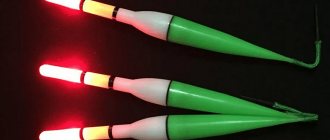
The deep-sea areas of reservoirs are richer in fish, but it is more difficult to get it: a float fixed at a certain distance from the sinker prevents the hook from sinking to the bottom. The problem was solved by a small invention - a sliding bite alarm. What has changed, however, is not its shape, but the ability to move along the line of a match fishing rod.
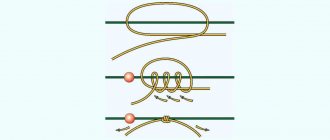
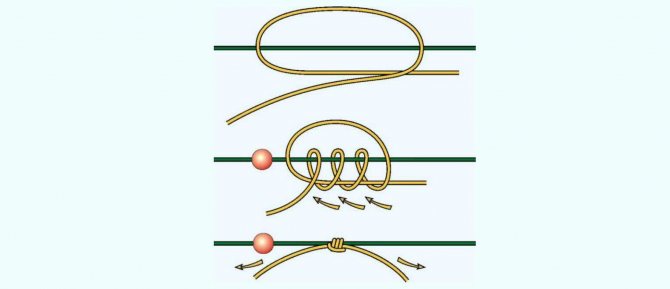
How to tie a stopper knot quickly and easily. Scheme
But the movement of the float should not be along the entire length of the fishing line - from the rod to the hook. Based on the fishing conditions, you yourself regulate the course of the equipment by placing a sliding float locking unit along its path.
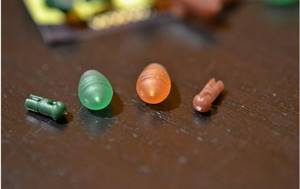
Factory limiters are sold in retail chains. Manufacturing materials: silicone or rubber, threads and cambric.
The “braking devices” move along the cord with some force, but do not allow the float to slide up arbitrarily. At the same time, the knots easily pass through the equipment’s passage rings, which has a good effect on the casting distance.
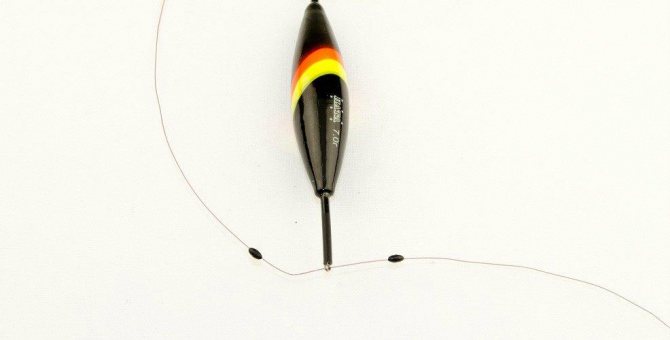
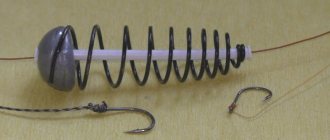
When using stoppers, the float can slide only between them, for example, preventing the tackle from going too deep. In the photo, purchased stoppers are used, but in their place there may be just knots, this is not so important.
The thread stop absorbs the pressure of the heavy float. The limiter can be used in spinning fishing to regulate the movement of swivels and in feeder fishing to stop loads.
A sliding knot on a fishing line for a spinner is a godsend and makes carp fishing easier. Fans of the “old-fashioned” method of hunting this fish were the first to appreciate the advantages of such equipment. The hook is in a briquette with cake, and the carp, sucking in such a device, feels the weight of the top and leaves. Now that the movement of the hook is not limited by the load, the bites have become more effective.
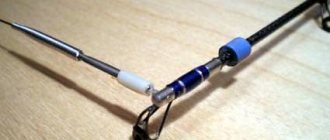
How to attach a float to a fishing line
The float is attached using two main methods, which largely cover all the nuances that arise under any fishing conditions.
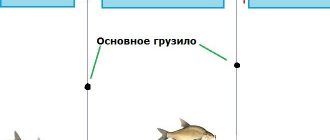
A blind mount implies a rigid attachment of a float to a fishing line at a certain point, which can be radically changed only by applying a certain force to the movement of the alarm. With this attachment, the device plays the role of a fixator of a certain depth, which the angler determines before starting fishing and changes depending on the intensity of the bite.
A sliding mount implies free movement of the alarm along a certain section of fishing line, which is limited by stoppers, marking the upper and lower levels for movement. Often, in such rigs, a sliding float plays the role of not only a bite alarm and depth fixer, but also a load for delivering the rig over a considerable distance to the selected fishing point. Next, we will look in more detail at attaching the float to the fishing line in the context of each technique with some nuances and tricks for carrying out such operations.
Attaching the float to the blind
There are several effective ways to attach an accessory to a blind wall. The simplest option, which gives an idea of how to attach the float, is the method with nipples. A nipple or silicone cambric, matched to the diameter of the antenna and keel of the product, is cut into pieces of 7-10 millimeters and strung on a fishing line. Next, the antenna and keel are inserted into the nipple. The product is clamped on the fishing line through the compression force of the nipple or cambric. If there is an eyelet on the body of the alarm, do not forget to string the nipple in the order of the attachment points. Initially, a piece for the antenna is threaded, then the fishing line is threaded into the eye of the accessory, and only then a piece of fastener intended for the keel is mounted. In floats with a built-in eye, fastening with a nipple to the keel is often sufficient. If there is no eyelet, it is recommended to attach the antenna with one piece and the keel of the signaling device with two pieces.
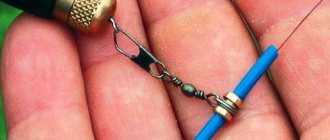
The lower attachment point of the keel should be positioned in such a way that the cambric threaded on the fishing line extends a couple of millimeters from the edge of the keel mast. This installation prevents the line from tangling with the product when casting. When mounting a signaling device with an eye on the keel on a blind structure, you just need to tie the fishing line behind the ring with a running knot, which will allow the device to move unhindered. If the fishing depth is known in advance and the activity of the fish allows its level to be strictly recorded, it is reasonable to use a fastening based on the installation of a triple swivel with a fastener for the float.
Important! Fishing with a blind rig allows you to fish at depths of a reservoir that do not exceed the length of the rod currently being used. Fly tackle and plug type fishing are the most suitable fishing options for this method of attaching a bite alarm.
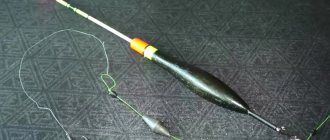
Sliding mount
For rigs using the sliding fastening method, floats with a ring on the keel or an opening along their body are suitable. A fishing line is installed on the fishing rod, which is equipped with stoppers, which limit the movement of the alarm. In this option, it is not necessary to tie the float to a fishing line with an eye. You just need to thread the line through the top stopper, the accessory itself and the bottom stopper.
Important! This method allows you to fish over long distances and depths that can significantly exceed the length of the gear.
Therefore, special requirements are placed on the miniature size of the stopper. The stoppers are selected to be soft in their components and with dimensions that allow them not to interfere with the passage of the fishing line through the rings of the tackle when casting. The lower stopper is mounted as close as possible to the load of the equipment. The upper stopper is fixed at the level of the required bait delivery depth. When casting, the float moves to the lower stop and gives the equipment greater inertial force of movement. After splashdown, the load pulls the fishing line through the eyelet to the upper stop, thereby occupying the desired water horizon, bringing the alarm into the working position.
Important! Sliding rigs are excellent for match and Bolognese fishing.
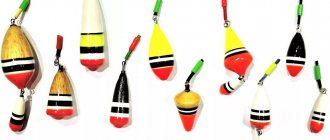
How to choose the right stopper
A miniature thing, on which the outcome of a fishing trip often depends, must meet certain criteria.
Fishing stopper
Characteristics of stoppers that people pay attention to when choosing fishing accessories:
- Density - with a normal indicator, the accessory holds well on the fishing line and does not slip without effort.
- Elasticity – needed for comfortable, snagging-free sliding. The elastic item does not cause excessive tension on the cord.
- Quality - the stopper always works in the external environment, exposed to the sun and moisture. A good fishing attribute does not rot or deteriorate from water, which means it will not fail at a crucial moment.
- Information content - the fisherman sees the depth of the hook.
The shape - oval, round, cylindrical - is a matter of your preference. But the optimal length is 3-5 mm, thickness is up to 3 mm. A limiter of this size does not unduly load the equipment and does not affect its sensitivity. A neutral color will be in harmony with the general appearance of the fishing rod; the element will remain invisible to the victim: cautious fish fix a foreign object and go into inaccessible places.
But don't rush to buy retainers. It is not difficult to master the pattern and learn how to knit stopper knots yourself.
Color of fishing stops
Now in stores you can see a variety of color solutions for stoppers. Most fixing elements are black, light coffee or transparent. Such colors are considered the most acceptable, since they do not attract prey in the water and thus do not distract prey from the bait used.
The use of colorful brakes must be justified. For example, red color can be used when fishing on a reservoir with a clay bottom, green - in a reservoir rich in vegetation, yellow color - in a reservoir with a poor sandy bottom.
Types of locking knots, knitting techniques
The sliding limiter is made independently in different ways. It is not difficult to learn one or more techniques for knitting and installing a float stopper.
Practice has shown that there are only four reliable and functional techniques suitable for bottom fishing. The scheme of each of them is simple, memorized during short training sessions at home.
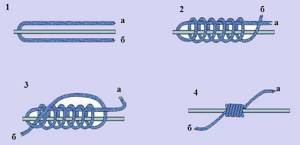
Duncan
The practical compact knot is difficult to loosen. For knitting, take a woolen thread 20 cm long. It is better to train on fairly thick laces and ribbons.
Duncan knot
Dunken technique step by step for right-handers:
- Lay the wool thread along the fishing line. Pinch with the thumb and index fingers of your left hand four centimeters from the beginning.
- Place the free end of the thread behind the fishing line with your right hand. This movement creates a large loop in front of the fingers.
- Pinch it with your fingers.
- Pass the long end of the thread through the loop in front of the fishing line. Pull until the first turn is formed. Next, make 3-4 more of the same, placing them sequentially one next to the other.
- Moisten the resulting structure with water.
- Pull the ends of the thread in different directions until you feel secure.
- Leave 2 cm at each end, trim off the excess.
A small and soft knot is capable of limiting the movement of a sliding float and weights spread along the braid.
Clinch
To knit a stopper using this method, take 30 cm of wool thread. Make sure that the diameter of the thread and fishing line match.
Clinch
Algorithm for knitting fishing knots using the clinch method:
- Fold the thread like a woman's hairpin, but not strictly in half. Leave one piece slightly longer than the other.
- Attach the resulting “hairpin” to the fishing line with the short end. Hold the line and thread with your fingers in the place where the loop formed from the bend of the thread.
- Take the longer end and wrap it around both the fishing line and the short part of the “hairpin” at the same time. Do this 5-6 times to form a spiral.
- Lay the turns evenly one to one.
- Now return the long end to the beginning, thread it through the loop formed by the fold of the thread.
- Wet the resulting knot.
- Pull the ends of the thread in opposite directions until they are fixed.
- Leave the ends 2 cm long free, cut off the rest.
Another option: apply the turns not from the loop, but from the short end of the “hairpin”, moving towards the fold. The result of the two methods is the same.
An important condition that experienced fishermen observe is 2 cm tips at the knots. There are explanations for this. Shorter ends become stiff: when they touch the ring, they interfere with accurate casting. In addition, during prolonged fishing, the locking assembly for the sliding float may weaken. You will return the device to its former elasticity by simply pulling the ends in opposite directions.
Kremkus
Using this technology, a double heavy stopper is knitted - an attribute of feeder equipment. But fishermen also use it for a sliding bite indicator.
Take a woolen cord 33-35 cm long, then work step by step:
- Fold the thread in half.
- Step back 6-7 cm from the ends and wrap the main line in a circular motion.
- Make 4-6 wide turns. After this, a free piece of double thread 6-7 cm long remains.
- Pull the other end of this double thread to the outermost turn and make a few more - with a long piece in the opposite direction.
- Wet the knot with water.
- Pull the loose ends.
Kremkus
Feel the fixation, cut off the excess pieces of thread, leaving two-centimeter ends.
Improved
To make a modified stop knot, take a gypsy needle and thread and place them parallel to the fishing line. Wrap one end of the needle: 5-6 turns are enough. Next, insert the same end into the eye of the needle. Pull the needle towards its point. Moisten the thread and tighten.
The tightening force should be greater than that which the float will exert on the stopper.
What are the advantages of sliding equipment?
Some anglers are skeptical about this progressive type of fishing. Meanwhile, this has advantages:
- Casting is simplified and its range increases due to the fact that the mass of the entire equipment of the fishing gear is collected at almost one point.
- It becomes possible to fish with bottom rods at great depths. In the blind version of fastening the limiter and the float, the fishing depth depends on the length of the rod.
- Carp hunting becomes easier. A slipknot on the fishing line for a spinner yields a greater catch.
- The accuracy of casting gear increases, which allows you to fish in small windows of reservoirs free from thickets. True, in such places, fishing requires a certain skill.
- With the sliding rig of a match fishing rod, you can go after a predator and take it with live bait or a wobbler.
- You have more information about the depth of the bite.
- Installation is carried out without additional equipment.
However, adherents of traditional, deaf, float installation also have their own truth. Often, such tackle is simpler, lighter and more sensitive than the sliding version. And not everyone is ready to learn how to knit sea knots.
Basic requirements for stoppers
A float stopper, in order for it to make sense to be used in a rig, must meet certain requirements:
- It should securely fix the float at a given depth. There is no point in using a stopper that will slip every second cast. The depth will be lost, which will lead to the loss of the fishing horizon.
- The stopper should not damage the fishing line during installation, because when a trophy specimen bites or in the event of a snag, the break will be precisely in the weakest place. When the gear is assembled correctly, it is usually the leashes or knots connecting the leash to the main line that break, and not the main line at the place where the stopper is attached.
- Installing a stopper on a fishing line should be quick and simple, without requiring any additional equipment.
- In the case of factory-made products, it should be clear what diameter line a particular stopper can be used with.
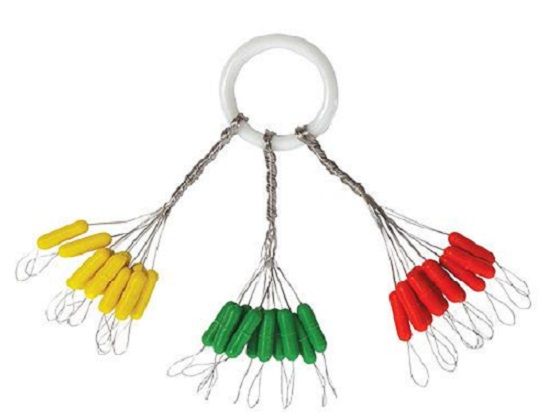
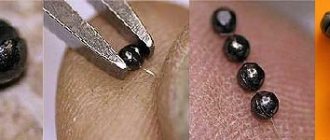
Ready-made plastic stoppers. The colors correspond to the different diameters of the main line.