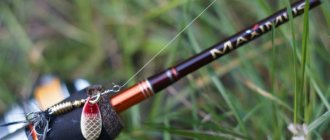
These instructions for equipping a spinning rod are suitable for all types of spinning rods - jig, ultralight, microjig and jig. All elements are identical, you just need to choose the gear that suits your purposes. Using the example of a spinning rod shown below, you can catch pike, perch and pike perch.
In order to equip (put together all the elements of gear and equipment) a spinning rod for your first fishing trip you will need:
- spinning rod
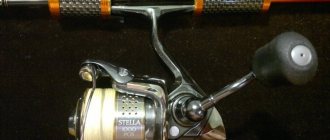
- spinning reel
- braided fishing line
- swivel
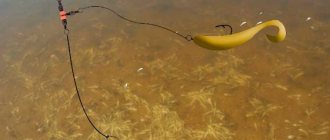
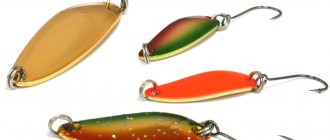
- bait (for example, a spinner or wobbler).
Assembling the rod
There are two types of spinning rods: plug-in and telescopic. If we are talking about a plug rod, you just need to insert the thinner part of the plug into the thicker one. Make sure that all the rings are on the same straight line. If you have a telescopic spinning rod, then simply unfold it starting from the tip (the smallest throughput ring), gradually moving towards thicker legs with large rings. Also make sure that all the rings are lined up in an even row.
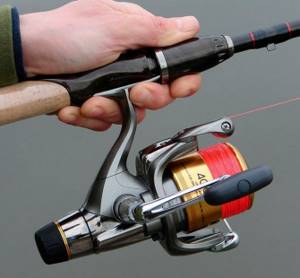
Installing a reel on a spinning rod
The position of the reel on the rod handle can be different: it depends on the design of the reel seat and on the casting methods. In rods equipped with a screw reel seat, the location of the reel is strictly defined. A spinning reel with an open spool is installed at the bottom, and a closed and multiplier reel is installed at the top. The non-reactive one can be installed both at the bottom and at the top.

On a fishing rod with a movable ring reel seat, the inertial reel can be installed in four positions. When casting from the right and over the head, it is more convenient to position the reel in the upper part of the handle with the drum up or down, and when casting from left to right - in the lower part. If your left hand is more developed, place the coil in the opposite positions. The most convenient position of the reel is in the upper part of the handle with the drum down: this way your hands get less tired, the varnish of the rod is not damaged by the fishing line when reeling in, and it does not bend.
About
Reel mount
Any spinning rod has a special lock, which you first need to unscrew, insert the reel handle, and then tighten it. Do not tighten it too tightly so that you can then easily unscrew the lock and remove the reel after fishing. If you apply too much pressure, you can strip the threads.
Attaching the fishing line to the reel
In order to secure the line to the reel, you need to secure it to the spool. This is done as follows.
- Open the packaging with fishing line.
- Find the end of the fishing line and thread it through all the rings, starting with the smallest (at the tip) and ending with the largest.
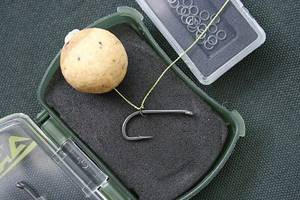
- Tie the line to the reel with a self-tightening loop, to do this: remove the spool by pressing the button at the top of it, and then tie the loop as shown in the image below.
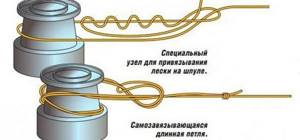
Please note that the loop tightens if you pull the line in one direction and stretches if you pull it in the opposite direction. Observe which way your line guide turns when you turn the reel handle, and position the loop on the reel in the correct way so that it tightens as the reel turns.
Open the line guide on the reel. Insert the bobbin back into its place. Now you can close this bow. The line is secured.
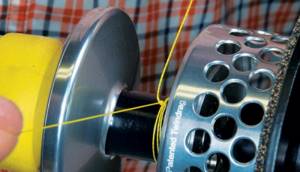
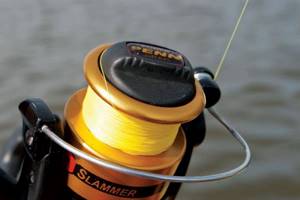
Proceed to wind the line onto the reel, but take care that the line reel does not unwind too freely. It can be placed between the knees and lightly support her rotation. Thus, when winding the fishing line onto the spool, it will lie in a dense layer and will not create unnecessarily large turns, which could deform over time under more densely laid turns on top. But also do not wind the fishing line too tightly; such deformation can also cause it to deteriorate over time.
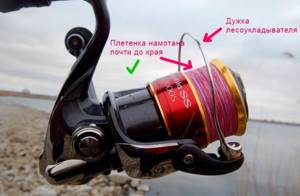
Wind the line onto the spool until the distance from the limiting edge of the spool to the line of the last layer of line remains slightly less than 0.5 mm. It may seem to you that you need too much fishing line for this, but this is a necessary measure if the ability to make long casts with light baits is important to you. If the line is wound almost to the edge, nothing will interfere with it as it flies off the reel; during casting, it flies freely off the reel and does not experience excessive friction against the edges of the spool.
Insufficient braid winding. The bait will fly close.
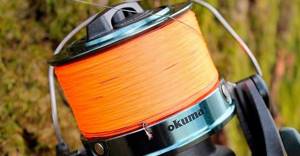
Sufficient winding. Lures will easily fly over long distances.
Rods for float fishing
Depending on what type of reservoir and under what conditions the fishing takes place, the angler uses different types of float rods. Fishing rods for float fishing are divided into 4 categories:
- flight feathers;
- Bolognese;
- match;
- plug-in
Flight feathers are the most common group, used for fishing in stagnant bodies of water or on rivers with moderate currents. The casting range when fishing with fly tackle is determined by the length of the rod, which can range from 3 to 12 m. Due to the limited casting range, fly rods are used to fish in small bodies of water or in places where the channel edge or hole is located in close proximity to the shore.
The Bolognese float rod is used for fishing on rivers with weak and medium currents. This tackle is equipped with a spinning reel and rings, which allows you to fish at some distance from the shore. The length of Bolognese fishing rods ranges from 4 to 8 meters.
Match float tackle is used for long-distance fishing. The match fishing rod is equipped with an inertia-free reel and a heavy float with its own weight, which allows you to cast the equipment 30–60 m from the shore. The length of fly rods rarely exceeds 6 m.
A plug rod for float fishing can be used in both standing and flowing reservoirs. It is more often used by sports fishermen, since it requires certain handling skills. Plug fishing rods are equipped with a rubber shock absorber located inside the working part of the rod, which is called the “whale”. The length of such fishing rods reaches 15 m.
Friction Brake Setting
The friction brake is an important part of a spinning reel. It allows the fishing line not to break under too heavy loads: when fishing for large fish and jerking them, as well as if the angler hooks the bait on a snag.
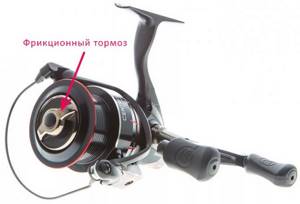
In most spindles it is located on the front and looks like a round nut that can be turned clockwise or counterclockwise. When twisting clockwise, you tighten the friction brake, which means that an increased load on the line will be required for it to start being released from the spool. You can release the friction brake completely by turning the knob counterclockwise. Having done this, you will notice that you just need to slightly pull the line coming out of the reel, and it easily begins to twist.
You have to find a balance between keeping the drag drag tight enough and putting enough pressure between the bait and the rod tip to get the line off the reel.
Correct adjustment of the friction brake occurs when pulling the line not from the reel itself, but from the last ring (rod tip) at an angle of 90 degrees to it. This is necessary in order to take into account the friction of the guide ring, which is present in real spinning fishing.
Ask your friend to hold a pencil or pen in his hands and wrap 10-15 turns of fishing line around it, so as not to cut your fingers while holding onto the bare fishing line. Step back a few meters and begin to pull the spinning rod very hard perpendicular to the direction of the fishing line. If, under critical load, it is the clutch that allows the fishing line to rewind, and the fishing line does not break, then the clutch is configured correctly.
Equipment
Fishing / Fishing tackle / Float rod
So, everything you need to equip your fishing rod is in store: there are hooks, fishing lines, sets of sinkers and floats, excellent fishing rods are prepared. Now, in order for the parts to become one whole, they must be connected (mounted). How to attach hooks, leashes to a fishing line, and attach sinkers and floats to it has already been discussed in the relevant sections. How to attach the fishing line itself with the parts sitting on it to the rod? If anyone thinks that it is enough to firmly tie the end of the fishing line to the tip of the rod and the rod is ready, he is deeply mistaken. Yes, with such tackle you can go to a pond, you can even throw a hook with a nozzle into your favorite place. But it’s impossible to pull a half-decent trophy out of the water - the tip of the rod will certainly be broken and all the tackle will float away along with the fish. In the hands of an unlucky fisherman, only a mutilated fishing rod will remain.
To prevent such an embarrassment from happening, the fishing line is attached to the rod differently. They do this in two ways. And according to how the fishing line is attached, fishing rods are divided into two types: with “blind” equipment and with “running” equipment. When mounting a fishing rod with a “blind” rig, the supply of fishing line is wound onto a reel located at the butt, and the working part wraps around the entire fishing rod several times and is passed through a loop made of thick fishing line, nylon core or string specially wound to the tip of the fishing rod.
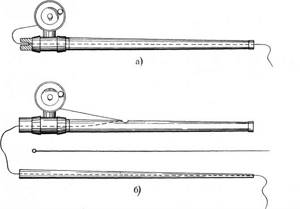
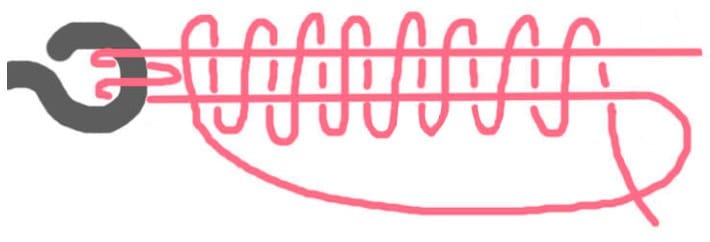
Fig 13. Reel: I - rod, 2 - half rings (hooks), 3 - winding, 4 - rubber shock absorbers, 5 - fishing line, 6 - rubber retaining rings for the hook
What a reel is is clearly visible in Fig. 13. These are two wire half-rings (hooks) facing each other with the backs of their heads, wound to the fishing rod with silk or nylon threads. These hooks are made from copper, brass or other stainless wire with a thickness of 1.5-2 mm. The winding legs are flattened. The distance between the hooks does not matter much, but on a bamboo rod it is better to install them at the knots or in close proximity to them. In any case, you should try to ensure that the bamboo knots do not interfere with winding and unwinding the fishing line from the reel. So that after fishing there is somewhere to hide the hook, one or two rubber retaining rings are placed in the middle of the reel or pieces of cork are attached. It is known that after a long stay in the water, the fishing line “shrinks” a little. If the wet fishing line is tightly wound on the reel, when it dries, it can break the hooks or pull them out of the reel. Rubber shock absorbers will help prevent an accident. They are pulled across the hooks, while the backs of the half rings must be bent so that the shock absorbers do not jump off them.
Not an idle question - where to place the reel? Of course, wherever is more convenient! But... if the rod is solid. And even then it is more advisable on the butt. A fishing line entwined along the entire length of the rod better absorbs and dampens the desperate jerks of the caught fish. Well, what if the rod is composite or telescopic? There can be no doubt here - only on the butt. Otherwise, no matter what the hour, the upper knee may jump out one day when casting, including along with the reel. And then... goodbye fishing! There is no consensus on how to attach the fishing line to the tip of the rod with a “blind” rig. Some authors of manuals on amateur fishing advise using an elastic nipple attached to the fishing line, a piece of vinyl chloride tube, and all kinds of protection. It seems that all these recommendations are unacceptable. Firstly, with such a fastening, the load when fishing for prey does not fall on the entire rod, but only on its tip, as with a blind garter. Secondly, this also has a number of inconveniences. For example, if you need to increase or decrease the length of the working part of the line - pull the tip of the rod towards you, remove the tube and only then can you work on the line.
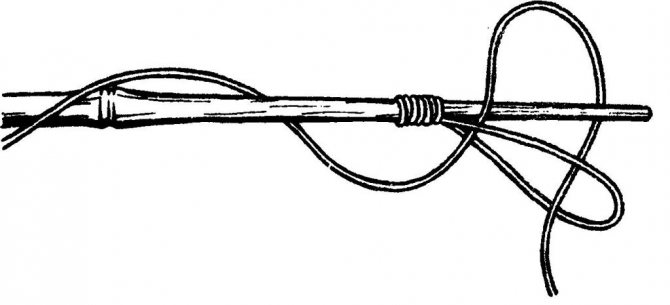
Rice. 14. Attaching the fishing line to the rod using a loop
There is no need to do any of this if you attach a small ring of thick (0.5-0.8 mm) nylon core or some string to the tip of the rod, 8-10 mm from the tip. The line wrapped around the rod is finally folded into a loop, passed through the wound ring and thrown onto the tip of the rod. The mount is ready. Fast, reliable and, most importantly, allows you to quickly maneuver the length of the working part of the scaffold. By the way, for a fishing rod with a “blind” rig, the fishing line should not be more than 1.5 meters longer than the rod, otherwise the angler will not be able to make a targeted cast and pull the prey towards him. Fishing rods with “blind” equipment are used mainly for catching small fish. The “running” tackle is more advanced. Instead of a reel, a reel is placed on such a fishing rod, and so-called “pass” rings are wound along the entire length of the rod at a certain distance from each other: the threaded fishing line runs along them back and forth. The advantages of “running” tackle are that it allows you to cast the bait far (especially with a sliding float), quickly maneuver the length of the fishing line and even fish out large prey on a thin leash. The qualities of the “running” tackle are largely determined by the reel. Its purpose is to increase or decrease the working part of the fishing line. The reel must be light, durable, hold a sufficient supply of fishing line, have a good rotation speed and a reliable brake. All these requirements are met by coils produced by the domestic industry. Their range is quite wide. For a float fishing rod, a small (4-6 cm in diameter) reel of the simplest design is suitable. It consists of a body with an axis and a foot for installing it on a fishing rod and a drum (spool) rotating on this axis with handles. A braking device is mounted on the housing.
Rice. 15. Reel with bobbin for float fishing rod
To place the reel on the rod, a special handle is made on the butt. It can be made of cork, polystyrene foam, wood, or other suitable materials. Making a pen at home is not difficult. The best material is cork. But since it is not easy to find today, you can use polystyrene foam. Of course, it would be nice to place a solid piece of foam plastic 20-25 cm long on the butt. But... it is impossible to drill a through axial hole of the required diameter in it without a special device. Therefore, the pen has to be made in typesetting. Cut out 6-7 pieces of foam plastic 3-4 cm thick and use a rifle casing of the appropriate caliber to punch an axial hole in each of them. Of course, the edges of the sleeve or other suitable tube must first be sharpened. Then these pieces are glued onto a fishing rod, dried and processed. To make the handle sit on the butt more securely, the ring pieces are tied (wrapped) with cord or other strong threads before drying. A foam handle can be made in another way. A block of foam plastic 20 cm long is sawed lengthwise into two equal parts and a groove is cut out in each half along the diameter of the rod. Then these halves are smeared with glue, applied to the butt, and tightly wrapped with twine along the entire length. After drying, the handle is treated with a knife, rasp and sandpaper. True, the reliability of such a handle is lower than that made from individual pieces. It is useful to equip the lower part of the handle with a buffer. It is made in a lenticular shape from a piece of hard rubber and screwed to the end of the rod with a long screw. The buffer performs two functions: it protects the fisherman’s clothing from possible snags by the tackle and serves as an additional weight to shift the center of gravity of the rod closer to the fisherman’s hand.
Rice. 16. Rod handle made from corks: a - reel seats (conical rings), b - cones, c - buffer
By the way, about the center of gravity. Do this simple maneuver. Take an unequipped rod by the butt, hold it horizontally for a minute and mentally estimate how much it weighs. Now lift the rod by grasping the middle knee and you will notice that it has become much “lighter”. So, in order to make a fishing rod lighter, it is often filled with... lead. Yes, yes, 150-200 grams and more! True, only in the butt part. This shifts the center of gravity of the rod and makes it easier for the angler to control the tackle. For this purpose, both the reel and the reel are placed as close to the butt as possible. A buffer can also be made from a rubber tip for a crutch (sold in pharmacies). There is no need to screw it in. Shortened by a third or half, it easily fits over the lower end of the handle. However, before installing the buffer, you need to equip the handle with a device for attaching the coil. The simplest thing is two rings of a rubber hose 1.5-2 cm wide. If you don’t need to remove the coil every time, you can tightly tape it to the handle with electrical tape or adhesive tape. There are several designs of metal and plastic reel seats on sale. Many factory fishing rods are equipped with them. An essential part of the “running” tackle is the guide rings. They serve to pass (hence the name) the line from the reel to the tip of the rod, prevent it from sagging and disperse the load from the weight of the fish along the entire length of the rod. The rings should be light, durable, with a well-polished inner surface to allow the line to pass through without friction. They are made from steel or brass wire, porcelain, agate mineral, plastic, and other materials and are sold in a large variety in sports stores. The most reliable (but expensive) rings are made of agate and chrome-plated steel. The ring intended for installation on the tip of the rod is called the end ring and has the shape of a “tulip”, that is, it is equipped with side posts that protect it from being caught in the line.

Rice. 17. Metal reel seat
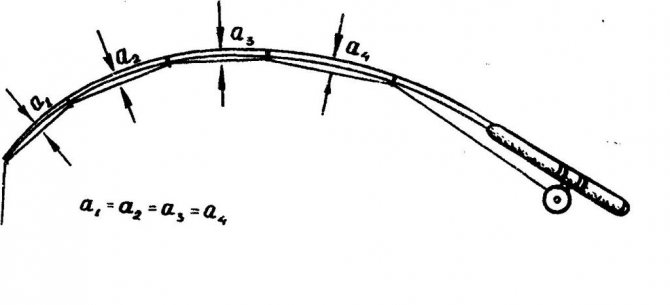
The question of how many guides to put on a fishing rod does not have a clear answer. But practice shows: if you put in too much, you will disrupt the structure of the tackle, and the fishing line will experience increased friction when moving. If you put in little, it’s even worse: the line will begin to sag in the spans, float in the wind, and individual sections of the rod will be unevenly loaded. For two-meter rods of normal elasticity, 3-4 rings can be considered sufficient; for rods with a length of 2 to 3 meters - 4-5 rings; 3-4 meters long - 5-6 rings. A more precise number of rings is determined taking into account the qualities, structure and purpose of each specific fishing rod. But there is no dispute among fishermen about where to install the rings. A fairly simple method is used to determine the attachment points. At the intended points, the rings are temporarily (so that they can be moved) tied with thread. The line is threaded through them and a load of 100 grams to 1 kilogram (depending on the power of the rod) is suspended from its free end. Then they place the rod at an angle of 45 degrees and, moving the rings, ensure that all the deflections between the rings are equal, that is, the distance from the rod barrel to the fishing line stretched between the rings (clearance) is the same in all spans (a1 = a2 = = a3 = = a4). It is recommended to place the first ring 90 cm from the coil. When the installation points are finally determined, the rings are secured: the legs are wound to the rod with silk or nylon thread, and the winding is coated with varnish.
Rice. 18. Samples of end and pass rings
Rice. 19. Installation of access rings
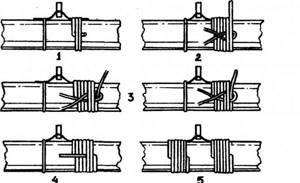
Rice. 20. Winding the rings A neat and reliable winding can be done in the following way: the end of the thread is placed next to the foot (parallel to it) and wound to the rod along with the foot; before the last four or five turns of the thread, a small loop of thread or thin soft wire is placed under it and also wound to the rod; then the end of the thread used to make the winding is passed through the loop and, with its help, is pulled under the winding. It has been noticed that the threads wind better and then hold the ring more tightly if they are pre-wetted in water. After the winding has dried, it is coated with nitro varnish. Things are somewhat more complicated with the installation of a telescopic fishing rod. The reel and reel on the “telescope” are mounted according to the same principles as on other fishing rods. True, there is no need to build a handle for the reel here, since the butt tube of the “telescope”, as a rule, is thick enough for this. But if you don’t attach rings to the middle of the tubes, the rod won’t fold in that case.
There are two solutions to the problem. The first thing is to buy removable pass rings in the store. They are light, convenient, and with the help of small insulating tape pads they can be installed at any calculated point. But... they are very fragile. The fishing line wears them out almost in one fishing trip, and they break from the slightest accidental blow or bump. Second, place rings made of pins on the upper ends of the tubes. Although this method has significant drawbacks, for example, the load from the weight of the caught fish will not be distributed sufficiently evenly throughout the entire rod and you cannot fold it completely into the stowed position, however, many fishermen prefer just this way of winding the rings to the “telescope”. Why? The compactness of the gear is slightly disturbed, but it is brought into working condition very quickly. To do this, just remove the coil from the brake and manually pull out all the tubes one by one (starting from the top) until they stop. If the fishing rod is equipped with a reel, a supply of fishing line for two rod lengths is first removed from it.
Rice. 21. Removable guides An angler's dream is a telescopic rod with a hollow tip: he doesn't need any guides! The fishing line in such a rod is placed inside, and its working end comes out through the axial hole of the tip. This kind of tackle is light and elegant. The fisherman is freed from excess weight (there are no rings with winding), the fishing line does not “sail” in the wind, the load from the caught fish is distributed evenly along the entire length of the rod. There are two ways to thread the fishing line inside the rod. Since this is far from a simple matter, you should strictly adhere to the developed technologies! Method one. In a rubber (plastic) cap, which covers the bottom of the butt tube, a hole with a diameter of 2-2.5 mm is made in the center with heated silt (nail). They unwind a piece of fishing line one and a half to two lengths of one knee from the reel (reel), thread it through the hole in the cap, and then pass it through the thinnest (central) tube of the rod. For ease of use, it is better to remove this tube from the rest, and then insert it with the fishing line already threaded. The line passed through the tip of the rod must be secured so that it does not slip back out. Then assemble the knees, tightly close the butt with a cap - and the tackle is ready for further equipment (you can hang a float, sinker, tie leashes with hooks). It is sometimes difficult to push a fishing line, especially a thin one, through the rod tip - it curls and does not go. A simple device called a “flexible needle” helps to facilitate this operation. A thin (0.7-0.8 mm) piece of copper or brass wire is taken (it should be 20-25 cm longer than the butt knee) and an eye is made at one end. The working end of the fishing line is inserted into this eye (like a thread into a needle), then a “flexible needle” is passed from the wide end through the central (with the tip) tube of the rod and pulls the fishing line behind it. A “flexible needle” must be stored and carried when fishing: a small wire coil on a foam reel is not a burden, and without this device you cannot tuck fishing line, especially wet, into the rod.
Rice. 22. Methods for threading fishing line into a telescopic rod: a - first, b - second
It must be said that the above method of threading the fishing line has a serious drawback: when fishing for fish, the fishing line does not go directly to the reel, but works “at a break.” This creates additional resistance; the line quickly wears off against the walls of the cap. This can be avoided by threading the line differently. Method two. The butt tube is freed from all other tubes. 25-30 centimeters above the attached coil (or the place where the removable coil should be installed), a small (3-4 mm in length) oval hole is made in the wall of the butt (widest) tube. The part of the fishing line wound from the reel is threaded into this hole and taken out... towards the butt. After this, the fishing line is threaded into the central (apex) tube using a “flexible needle,” as in the first method. Then the rod is assembled, making sure that the fishing line is not pinched between the tubes. With this method of threading, the line even ends up at a double “kink”: it goes up from the reel, after the hole it turns down, then along the central bend it goes up again. But such a zigzag is not terrible. The line will be “at a break” only when the rod is not in use. As soon as you straighten it to its full length, the line will straighten and move through the tubes as freely as through the guide rings.
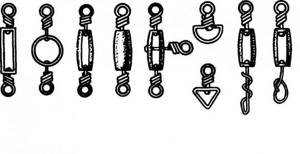
Rice. 23. Shapes of carabiners When using tackle with a fishing line tucked inside, you should also remember this rule: after fishing, you must fold the fishing rod, starting from the top bend, while constantly holding the fishing line so that it does not get between the walls and jam the tubes. To finish the conversation about the design of a float fishing rod - this most versatile recreational fishing tool, we need to talk about one more small but important detail - a carbine.
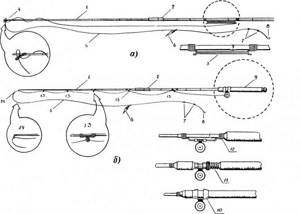
Rice. 24. Float rod assembly: a - with blind rigging, b - with “running rigging”; 1 - rod, 2 - connecting tubes, 3 - reel, 4 - end loops, 5 - fishing line, 6 - float, 7 - sinkers, 8 - hook, 9 - handle with fungus (buffer) and reel; 10 - spool holder made of bonus rings, 11 - screw holder, 12 - plate holder, 13 - pass rings, 14 - end ring (tulip)
Carabiners (swivels) are designed to counteract the twisting of the fishing line. They are made from steel or brass and come in many shapes. The main advantages of the carbine are good rotation and durable parts. On a float fishing rod, a carabiner is placed between the main line and the leash and prevents the nozzle, which rotates from the movement in the water, from twisting the main line. The carabiner is also good because without a radical re-equipment of the fishing rod, just by changing the leashes, it allows you to quickly adapt the tackle for catching fish of various sizes.
When installing a fishing rod, all its parts are selected depending on the expected production. To catch small fish, use a thin line, a small hook, a small sinker and a very sensitive float. For medium-sized fish (weighing up to 1 kg), you need a fishing line with a cross-section of 0.25-0.3 mm with a carabiner and a leash (0.18-0.20 mm). Large fish, especially predators, can be pulled out of the water only with a thick ( 0.4-0.8 mm) fishing line and on a large (No. 8.5-14) hook. In a word, we must try to ensure that all parts of the fishing rod are “coordinated”, nothing disturbs its “structure”. At the same time, one cannot help but note this trend. More and more fishermen prefer to have one fishing rod for different occasions. Most often, it consists of a telescopic rod 3-4 m long, a medium-sized bobbin (inertial) reel, replaceable floats and sinkers, as well as replaceable leads of different lengths and cross-sections. The main line is set with a cross-section of 0.3-0.35 mm. By promptly changing (depending on fishing conditions) floats, sinkers and leashes, the fisherman can fish in still and flowing water, in shallows and at depth, in coastal thickets and far from the shore. Source: Ivnev P.V. “An amateur fisherman’s companion” With a hook, jig and spoon.
Discuss on the forum
How to tie bait to fishing line
The rod and reel are fully equipped. All that remains is to attach the bait. For beginners, I recommend using a swivel with a carabiner. This is a small fishing accessory that allows you to quickly change baits from one to another. And the main purpose of the swivel is to prevent the line from twisting during casting, retrieving and winding the reel onto the spool. This will greatly extend the life of your fishing gear.
Grinner knot
The most suitable knots for tying a bait or swivel with a carabiner are the double clinch, grinder and American knot. The double clinch is the simplest of these knots, however I do not recommend using it when tying line on winding guides. Many wobblers and some spinners, for example Kastmaster, are equipped with winding rings, and this unit does not hold well on double wires or holes that are located in the body of the bait. In these cases, use the American knot.
Double Clinch Knot
If you are using braid rather than monofilament line, which is more appropriate for a spinning rod, you can try a knotless fastener for braid. This is a small fishing element that allows you not to tie any knots and very firmly attach baits to the braid.
Fixing the leash on the fishing line
For beginners this is a real problem. The leash can be attached using a variety of methods, but it is better to use the one that is considered the most famous and effective.
You can find out other options for fastening a leash from professional fishermen, if you have such friends among your friends, and if not, then just go to the fishing forum and ask for the necessary information.
But the most current method involves tying the fishing line and leash using insulation. This element is put on a fishing line. Next, loops are made on the fishing line in such a way that the cambrics are inside the loops. Which fishing line to choose for a float rod? Here you need to focus on the mass of the fish. There are camouflage lines in blue and green. It is advisable to buy a stronger reel, since you may catch a heavy fish that will break the entire tackle.
There is a wide variety of hooks for a specific type of fish. Therefore, the fisherman can choose the most preferable option
. They can be of different sizes and shapes. Again, it all depends on what size and what kind of fish the angler is going to catch. Let's say a large hook is not suitable for catching small fish, since it is not strong enough to swallow it.
Unlike Russian models, foreign ones are in great demand; they are of better quality and more efficient. Many anglers leave only good reviews about them.
To catch aggressive fish of medium or large size, you need to select the appropriate size hooks. For fishing in river conditions with a quiet current, the choice is given to small hooks.
Attaching the hook to the fishing line
The technology involves several options for tying hooks to fishing line
. Among all the methods, you only need one effective and simple one, which is suitable for beginners.
The hook must be tied to the fishing line using a special fixing knot. To perform this action, it is necessary to pass the fishing line through the carabiner so that several turns can be made. After this, the edge of the fishing line is inserted into the carabiner, and then the entire knot is tightened, thus securing the hook.
Over the years, many fishing methods have been invented. Among all the methods, you can choose the most convenient and effective one, however, with good ingenuity, it will not be superfluous to develop your own personal tactics, which will always be successful. As previously mentioned, it is better to go fishing with experienced fishermen who will tell you and show you how to fish correctly.
Attention, TODAY only!
What kind of bait to equip a spinning rod with?
Here is a simple table that will help you easily make a choice between baits for catching pike, perch, pike perch and asp. The information in the table is a recommendation. Of course, you can catch any fish with any bait, but the question of expediency arises. The table will help you choose the most suitable bait for the fish you need.
| Bait/Predator | Pike | Perch | Zander | Asp |
| Turntables | Large | Small | – | Large |
| Oscillators | Large | Small | – | Large |
| Castmaster | – | Small | – | + |
| Twisters | With a long tail | Short | Long with short ponytail | – |
| Wobblers | Large | Small | Narrow | – |
| Poppers | + | – | – | – |
| Croatian egg | + | – | – | – |
If you liked the article, then read the guide to spinning for beginner anglers. I'm sure you will find a lot of useful information for yourself.