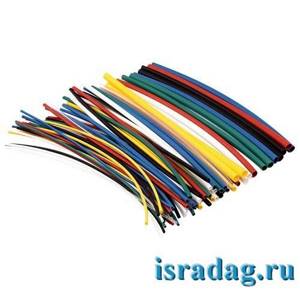
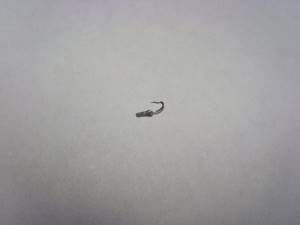
A fishing cambric is one of the types of inexpensive equipment, the purpose of which is not only to fix parts of fishing equipment, but also for fishing, as it is used as an independent bait for many freshwater fish.
This simple tube made from scrap materials in an advantageous combination of colors allows you to bring a good catch both during summer fishing and in winter.
What is a fishing cambric, how to use it not only for the purpose of fixing, but also as bait - read in this article.
Content
- 1. What is a fishing cambric
- 2. Why are cambrics needed in fishing?
- 3. Types of fishing sets with cambrics
- 4. Size (diameter) of the cambric
- 5 General points of fishing with cambric
- 5.1 The most catchy combinations of cambrics for fishing
- 5.2 Key points when fishing with cambric
- 5.3 How to attach a cambric to a jig
- 6.1 Fishing for grayling using cambric
- 6.2 Catching perch with cambric
- 6.3 Catching roach using cambric
- 6.4 Catching roach with cambric
Fishing in Siberia on rivers and lakes.
Like
IT news
Many fishermen independently make cambrics for themselves and fishermen they know. This process is not particularly complicated and does not require any special skills. The manufacturing process will be outlined in this article.
In one of the articles about cambrics for grayling, we did a short review of this very catchy bait. However, the secrets of its manufacture were not revealed. Let's try to open the curtain a little and show the manufacturing process. To do this you will need acetone, dyes that can be dissolved in acetone, a 100 cc syringe and small containers for diluting the dye. Glass vials of penicillin or similar are excellent containers.
It is necessary to equip the workbench in such a way that if you accidentally turn over the container with dye, you will not spill paint all around. Some kind of bath is gentle, for example a tray for developing photographs (if anyone remembers such ). We place all the necessary items in the bath. You can make a bubble holder out of wood, for example from a small wooden block, otherwise it tends to turn over
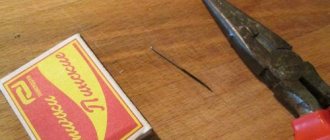
So everything is ready, what will we make our cambrics from? Everything is very simple, they can be made from medical droppers or urological catheters. But the diameter of the dropper, like the catheter, is quite large and is not suitable for use. It’s okay, the PVC tube stretches perfectly, the main thing is to heat it properly. To do this, take a kettle with a spout, pour water into it so that when it boils, it does not start to boil over the spout. Place it on the stove and heat it to a boil. Once it boils, turn down the heat, let it continue to boil, take the already painted (this is important!) PVC tube and hold it over the steam from the spout and stretch it to the desired size. After stretching, it must be fixed in cold water. This way the entire tube is stretched to the desired diameter, which is about 1 mm. It should be painted at the initial stage, that is, before stretching, because after such a procedure the tube should no longer be in contact with acetone, because it will return to its original appearance and simply shrink to its normal size.
There is another method, more dangerous and no less time-consuming, but if you follow banal safety measures, it’s not so scary. Moreover, with this method of stretching, the tube can be painted even after stretching. To do this, you need to take vegetable oil and bring it to a boil, you need to be careful here, you don’t need to splash water into the oil and let the oil boil, otherwise you can get injured. So, the oil is boiling, the protective mask and gloves are on. Carefully take the tube with a clamp and lower it into the oil for 1…2 seconds. The tube will melt a little, and when removed, it will begin to stretch under its own weight. In addition, this method can produce much thinner tubes than the steam stretching method, down to one millimeter. And as noted, in the future the tube can be painted without fear that it will return to its original size.
In the next article we will talk about the coloring of cambrics.
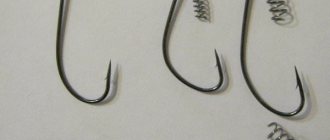
What is a fishing cambric
Cambric for fishing:
- this is one of the types of fishing fasteners, which is a short piece of tube made of plastic, silicone, nipple, thin elastic band or other material through which a fishing line is threaded;
- This is an independent bait for catching many freshwater fish.
Fishing cambric has a number of advantages:
- durability, as it is not subject to rust, rotting and the influence of other natural factors;
- reliability;
- elasticity;
- protects the fishing line from injury.
Why are cambrics needed in fishing?
Thanks to the silicone cambric, the angler can attach a sinker, float with any diameter and keel length to braided or other fishing line.
Also, this element is often used as bait, imitating the appearance of bloodworms and other invertebrates; well-chosen colors of cambric for fishing can increase your chances of a good catch.
This simple fishing device can also be used as a nod to the whip of a winter fishing rod, when two cambrics are connected to each other (one fits into the other) and fastened with a nod plate.
Here you can find a selection of the best deals on fishing products we found on the aliexpress website. Thanks to this catalog, you can reduce the cost of installing gear by 2, and sometimes 5 or more times. You will find a detailed description of various products, their characteristics and justification for the benefits of purchasing them. And if you spend 10 minutes and learn how to use cashback, you can additionally save up to 15% on all purchases in a Chinese hypermarket.
How to attach a float to a fishing line with an eye?
The essence of the method is simple and resembles one option from a fixed float mount. The fishing line is threaded through the hole in the keel of the float; fixation is done using two lead pellets or cambrics. Although you can also use heat shrink tubing.
The use of pellets is not recommended for thin lines.
You also need to be careful with heat shrink tubing. Otherwise, you can burn the line. In addition, this option is not suitable for very thin monofilament and flucarbon fiber lines.
Regarding the clamps, the lower one can be moved as close as possible to the end of the main line , which connects to the leash. Thanks to this, floats will be available for long casting.
When the bait is immersed, the float will rise to the required height, limited by the upper cambric (heat-shrinkable tube, piece of wire insulation or pellet).
An alternative would be to pass a piece of copper wire through the eye of the float. After which a slight bend is made and then the two ends of the wire are aligned in opposite directions. The ends of the wire are attached to the fishing line with cambrics.
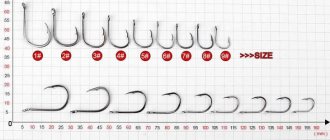
Cambric size (diameter)
The size of the cambric depends on the diameter of the fishing line used and is selected in accordance with all the fittings based on the principle of “general harmony” of the elements. The cambric should not stand out from the overall picture, and should not be bulky or long.
Who doesn't know yet? You can return up to 15% of the price of your purchase on aliexpress. In addition to Aliexpress, the possibility of cashback (returning part of the money) also works for many other online stores. Here is a detailed description of this service and everything about how to work with it. It really works and helps you save a lot of money. The cashbacker website often runs promotions that allow you to buy goods at a discount of up to 90%.
General points of fishing with cambric
As you know, cambric is an excellent bait, used not only to save live worms, but also as an independent bait. Small pieces of multi-colored elastic are placed on the shank of a fishing hook or a jig (a bait that resembles a jig, a small gray amphipod crustacean). Equipment made of small colored tubes becomes more catchy and creates additional noise for prey, vibration in the water, which has an alluring effect on the fish.
Cambric, as an independent type of bait, is successfully used in both winter and summer fishing from a boat with a fishing rod.
5.1 The most catchy combinations of cambrics for fishing
The secret to successful fishing is in what sequence and color scheme you attach the silicone cambrics, since different combinations of colors affect different fish.
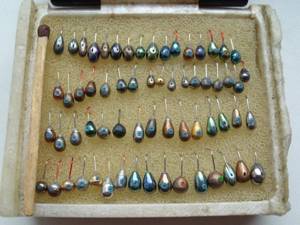
Proven combinations of cambrics (beads can be used instead):
- black and yellow, black and white, white, red, pink and lemon colors, 2 white + black + 2 white, you can also try fishing with green cambrics (roach);
- 2 black and white (perch);
- yellow + red + black, red + yellow, yellow + black (perch);
- red + red, pink (grayling).
5.2 Key points when fishing with cambric
The most important points when fishing with multi-colored cambrics:
- The color of the fishing line should be inconspicuous, that is, combined with the color of the water (green, brown, etc.).
- Diameter of fishing line - thin line is used, the diameter of which varies from 0.08 mm to 0.1 mm.
- The fishing technique should not be similar to that used when fishing for bloodworms (smoothly lowering and raising the bait with slight swaying and pauses). The nozzle made of colored cambrics must always be in an active state, otherwise the fish will lose interest in it: from 5 to 10 oscillations in 1 minute, the nod should tremble slightly, but without sudden jumps.
- For those who, due to objective reasons, cannot ensure the play of the jig, you can use a rod with a built-in vibration function.
- Cambric fishing should not converge on fishing at one point; it is recommended to change the place after several casts.
- For effective cambric fishing, you need a body of water with a current. For example, the best places are considered to be areas with bays, places with reverse currents, and corridors of vegetation, that is, a hook with cambrics should drift through the water, imitating natural food.
5.3 How to attach a cambric to a jig
For more information on how to equip a jig with a cambric, see the channel “Salapin.ru Fishing - a way of life”
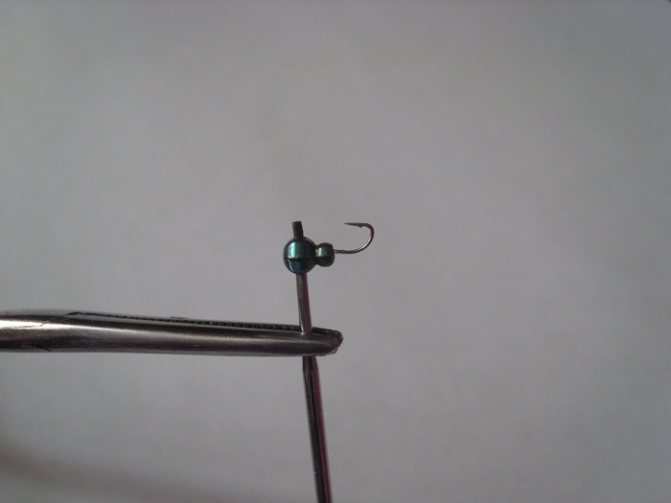
The secret of attaching a cambric to a jig is that the rubber bands that are attached closer to the tip of the jig's hook are the shortest so that the fish does not come off when hooked, but the segment located closer to the body of the jig is thicker and longer.
5.4 How to attach a cambric to a float
Along with swivels and winding rings, every fisherman should have cambrics in his fishing arsenal, as irreplaceable parts of float equipment.
As you know, a float can be attached to a fishing line in several ways.
- Through blind installation, when a silicone cambric, 7 to 10 mm long, with a diameter slightly larger than the diameter of the keel and antenna of the float, is mounted on the fishing line. Then the antenna and keel are inserted into the cambric, thus the float is clamped to the fishing line. If there is a fastening ring (eyelet) on the body of the float, then you need to thread the fishing line here too and attach the clamp to it in the following order: casing for the antenna + into the eyelet on the body and then onto the keel. If there is no eye (ring) on the body, we recommend attaching one casing for the float antenna and two pieces for the keel. Read more about blind mounting of the float in the following articles.
- Read more about the types of sliding float mounting, the necessary equipment elements and other important points here
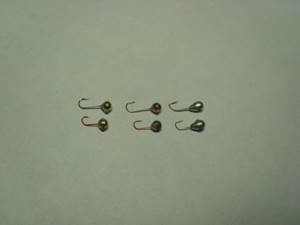
Replacing hooks in jigs + installing or replacing cambric in jigs.
Many jig fishermen have encountered such a nuisance as a broken hook on a jig, or the hook turning in the body of the jig. There are several reasons for this: breakage as a result of prolonged fishing, or gradual unbending of the hook, again as a result of prolonged fishing, poor-quality hook or overheated during soldering, poor-quality soldering, poor-quality galvanizing.
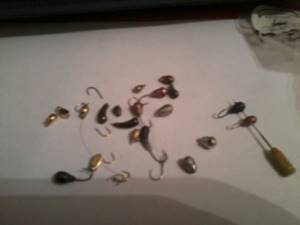
I was prompted to write this article by a recent message from a 2osm forum member about low-quality jigs.
“For 12 years I fished with tungsten jigs with a hole in the body, I really liked them. 2 years ago I switched to jigs with an eye. I’ll explain why - the hooks fall out of the body when you start tying the fishing line. Not a single fish was caught with the jigs that you see in the photo (all hooks rotate 360 degrees or fell out altogether. Jigs from all well-known companies. The most important thing is that the price of the jig does not affect the quality. In the photo, the jigs range from 30 rubles to 130 rubles. In In general, be careful when buying tungsten frames with a hole.”
And also share your personal experience in replacing the hook, by re-soldering and another way, if re-soldering is no longer possible! Moreover, I think everyone can do this.
My goals for replacing hooks were not much different; more on this below, but the essence of the matter (article) does not change. In general, in most cases it is possible to revive the jig and subsequently catch more than one perch with it!
Not much of a preface. Since I live near the South-Western pit, I spent all my free time during my school years on it, both in winter and summer, fishing. Back then there were still decent-sized fish in the pit, nothing like today. And then one day in the spring I was fishing with jigs, I didn’t have much success, I saw our athletes for the first time, and as it turned out later, they came to train before the Chechen Republic. And I observe the following picture: almost everyone begins to catch fish immediately. This is where my interest in fishing began, as a sport, because I don’t catch fish like that, but then athletes arrived and immediately started fishing, I wanted to learn how to fish just as successfully. And at the dawn, when I just started to join the fishing sport of jig fishing, and this was the beginning of 2000, in order to somehow be on par with the athletes in my arsenal, I had to have tungsten jigs, which only they just began to appear on store shelves, although they were not made of tungsten, but from the so-called VRP and VNM (powdered tungsten), but everything is better than lead.
I fished for a while without changing anything in the jig, bought it, tied it on and off I went. But as it turned out, the fact that the jig was made of tungsten was not enough for successful fishing, since there was a large percentage of failures due to hooks made of thick wire, which is good, I also think many people encountered a discrepancy between the size of the hook and the body of the jig , which in the compartment affected the grip, and as a result, the loss of precious grams and space in the middle, jigs with thin and sharp hooks were needed. These points are also relevant for everyday fishing, especially when the fish are passive and nibble on the bait! And then the question arose of replacing the hooks with better, thinner and sharper ones. I started trying to solder. From experience I can say that it is really possible to successfully re-solder a hook 2-3 times if you do it carefully, do not overheat the solder until it boils and seems to pour out of the hole, but all is not lost here, because there is another way , But more on that later.
So, let's begin. The first method is resoldering.
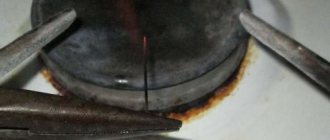
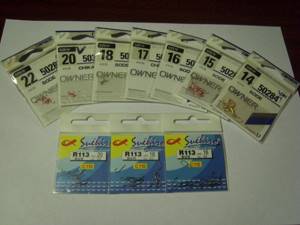
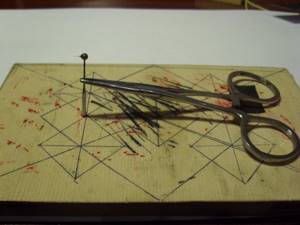
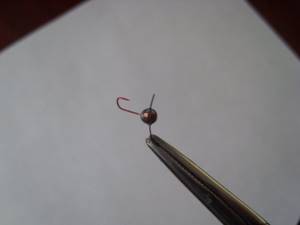
A low-power soldering iron will help us with this, preferably with a pointed tip, since with such a soldering iron there is less chance of overheating the jig. You will also need tweezers, a fisherman's clamp and a sewing needle according to the diameter of the jig's hole, or so-called burs, as in the photo from 2osm and, of course, hooks. To replace, I use hooks of different brands, but more often from OWNER, since the packaging indicates the diameter of the wire from which the hook is made, which is very convenient when selecting both for a specific jig and for the type of fishing for sports or for everyday fishing.
1. We put the jig on the needle (bur) so that it does not move and is held rigidly, then we clamp the needle (bur) into the clamp at an angle so that the jig looks slightly upward, this will make it more convenient for us to solder.
2. Next, use a heated soldering iron to heat the tip of the jig, not the tin itself, and carefully remove the hook.
3. In one hand we take tweezers with a new hook, having previously cleaned the place of the intended soldering with a file and tinned, dipping the tip of the hook into soldering acid, if the hook is long, then we shorten it by breaking off or grinding off the blade, in the other hand we take the soldering iron.
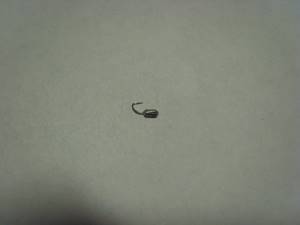
We also carefully heat the tip of the jig and, with a slight movement of the hand, set the hook in place and voila, the jig is ready, all that remains is to install the cambric.
Above are what they were like before and after replacing the hook.
Of course, the first time it may turn out that the hook will not fit perfectly straight and will be tilted in one direction or another, but everything can be corrected by reheating and leveling.
Method two. We solder and glue.
We use this method when it is not possible to resolder the hook and in front of you is the body of the jig with an empty hole for the hook (the tin fell out of the hole for some reason) or some small part of it remains in the hole that we will need to remove. The simplest thing is to hold the jig over the lighter and the tin will boil away on its own and you will be able to use a needle to remove the residue, but here we will lose the appearance of the jig, but if we want to preserve the galvanization, then we can heat the tin with a soldering iron and remove it with the same needle.
The tools are the same, you will also need Super Glue (I use Contact glue).
1. Our task is to make a small oblong drop of tin at the end of the hook. We take a hook, as a rule, the hook will be a little long, then there are two options: a) using a needle file, we slightly clean the metal in the soldering area, treat it with soldering acid and make a drop, then shorten the hook, grinding it together with tin using emery, or b) I immediately remove the blade on the hook, breaking it off, and then I do the soldering.
2. Now we need to sharpen the solder to the diameter of the mounting hole in the jig, so that the hook fits freely, but tightly and does not slack. A diamond needle file will help us with this. The end result should be a cylinder of tin on a hook.
3. Take the workpiece, wedge it on the needle, as in the first case, clamp the hook into the clamp, try without glue for now, as we will do, drip a drop of super glue and quickly and confidently insert our hook into the body of the jig. Leave the jig for a day until the glue dries completely.
4. Using a utility knife, trim off excess tin and glue. In principle, the jig is ready, all that remains is to insert the cambric and you can fish.
This method is especially convenient for remaking medium and large jigs, since their holes for the hook are quite large. But I also remade small ones for sports, the main thing is that the diameter of the hole allows us to do this. If you suddenly glued it crookedly and the glue has already set, then you shouldn’t bend the hook, throw the jig into the solvent and after 3 hours the hook will fall out of the jig itself and glue it again. The method was born from the fact that, in addition to a thin hook, we started experimenting with the color of the jig, and then simply soldering it won’t work (it’s possible, of course, but it will be a very complicated and long process), you can only glue it. But that's a completely different story.
Installing or replacing cambric in jigs.
At the request of a hobby colleague, I am supplementing the article with a topic on replacing or installing a cambric in a jig.
This is relevant since most jigs are sold without a cambric, and also for those with a cambric, over time, depending on the intensity of fishing, the cambric cuts through and loses its properties, there is a high chance of losing the jig, as a rule, this happens at the most inopportune moment and on a large copy, which is doubly annoying. Therefore, it is better to spend little time replacing or installing the cambric, performing a number of simple operations.
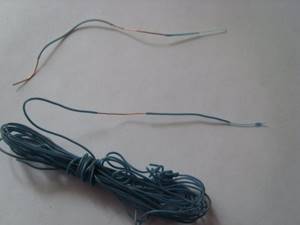
We will need the following materials: a wire from an Internet cable or, as I have in the photo, a wire from a telephone cable of those times, these used to be in the entrances (multi-core cable), it is thinner than the Internet cable and stretches better, accordingly, you can put it on a jig with small hole. Also, the wire that enters the cambric (insulation) after its installation in the jig must be thinner than the one from which the cambric (insulation) was removed. In my opinion, I found some from champagne, it fits perfectly, but I come across jigs with a small hole. In this case, I found a string from a guitar, it is thinner than wire.
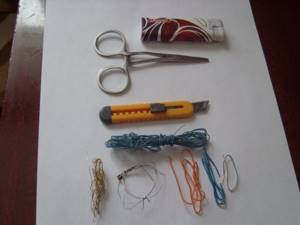
1. We cut our future cambric to about 5cm long and pull it off the wire by about 1-2cm. Using a clamp at the tip, stretch it until it is thin.
2. We remove this piece of cambric and cut off the part by which we pulled it obliquely, so it will fit into the hole easier, and then we actually insert it into the hole of the jig.
3. Pull out the cambric with a clamp until the wide side of the cambric appears, and it will appear)). If the cambric does not stretch as it should, then perhaps the reason is the unevenness of the hole that formed during the pressing of the jig; this problem is removed with a bur or a needle along the diameter of the hole, by rotating them in the hole. Trim off the excess, leaving 1mm on each edge. For convenience, so that I didn’t have to pull out the cambric every time, as written in point 1, and when I had identical jigs, I immediately ran the entire length of cambric through the jig and then cut it off, and reused the rest!
4. Cut a piece of wire about 2-3 cm longer, no need, and insert the jig into the cambric and leave it on the side that we will heat for about 5-7 mm and use a lighter to heat the wire, watching as the cambric melts, forming a kind of hat, then move the jig to the other side and perform the same operation. The main thing here is not to overdo it and not to overheat, since the wire, when overheated, will melt the cambric to the jig and the essence of the cambric will disappear. We do everything by holding the jig with our fingers.
Well, that's basically it.
Thank you for your attention.
How to fish with cambric
6.1 Fishing for grayling using cambric
For grayling, the best color of cambric is purple or, as fishermen call it, Panasonic color, named after the famous telephone, the wire from which was used to make this bait. The bait gains catchability not only from the combination of the purple color of the cambrics, but also when a bead is placed in front of the rubber tube, which is responsible for the playfulness of the design and is an attractive element for the fish to bite.
Fishing for grayling in the autumn and in muddy water will also be effective when using pink cambric.
6.2 Catching perch with cambric
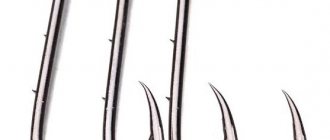
To make cambrics for perch, watch the video above. Next, cut the finished tubes into small pieces (no more than 3 cm each) and pull them onto a fishing hook (No. 5-7) with a fishing leash. The cambers need to be tied above the spoon at a distance of every 10 cm. Place a perch eye (a type of artificial bait for perch) on the clamp, which will affect the effectiveness of the bite. Using the same principle, cambrics for catching perch are attached to jigs. The peculiarity of installing the cambric on a hook is that the rubber is not stretched over the tip of the fishing hook. Then a wire is wound onto a hook with an elastic band, the main function of which is to leave thread marks on the cambric to attract fish.
Carving is done in two ways:
- On a dry tube.
- On dry, just to leave traces from winding, the cambric with wire must be immersed in boiling water for 2-3 seconds.
Important! When treating cambric for perch with acetone, you need to take into account that the rubber dries out (becomes shorter in length) and can be removed only after treatment with the same solution. Considering this property, take a longer cambric.
This method of using cambrics is also suitable for catching other freshwater fish.
Advice: before stringing the rubber, you need to install the leash to the hook, and then pull the cambric over the eye of the fishing hook and the connecting fishing knot, so the knots will not get tangled anywhere.
Don't forget to take these useful little things when fishing
Another way to prepare equipment for cambric fishing is this: a leash with a lock is tied to the main line in the opposite direction from the sinker. This installation makes it possible when wiring to ensure that the fishing line “springs” with the flow and the latch does not get confused with the leash. In order for the fish to “sit on the hook” efficiently, the ends of the cambric should be cut along the bend of the fishing hook shank.
Another interesting point is a trick. Often anglers catch perch using the following setup: a Tyrolean stick, 2 or 3 hooks with silicone baits, worms or just colored threads on fishing leashes and a weight. Regardless of the method of attaching the leashes, it happens that when there is a current, the leashes and fishing line get tangled and form a beard. So, in order to avoid this trouble, experienced fishermen resort to this trick: a cambric is tightly placed on the prepared main loop of the fishing thread, with a cross-section corresponding to the fishing line and such a length that it would cover the fishing line, leaving free a small section of the loop (the place where the loop enters leash). This manipulation will prevent the leash with hooks from getting caught in the loop of the main fishing line.
6.3 Catching roach using cambric
Spinning asp fishing using cambric equipment is one of the most catchy and cheapest types of fishing, which has been practiced for dozens of years.
Equipment diagram
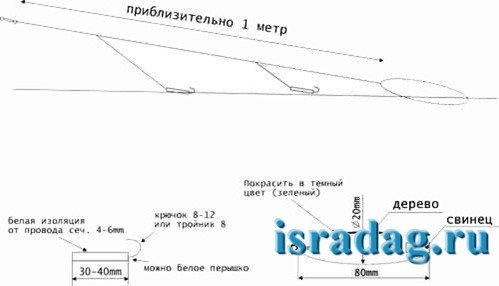
The wood used is an ordinary chock, pre-painted in a color that would not repel fish. Lead is attached to avoid tangling of the fishing line. 2-3 cambrics are installed. A large number of cambrics can lead to problems when casting bait. It is advisable to use a spinning rod that is convenient for long-distance casting, since the asp is a cautious fish and does not allow close range. It is better to use monofilament because of its tensile properties, since the fish bites are strong. Select line diameter 0.25 mm or 0.30.
You should pay attention to 2 types of wiring when fishing with a cambric:
- The rod is held so that the cambrics drift on the surface of the reservoir, bouncing and releasing bubbles in the water.
- After lowering the bait into the water, a quick reeling occurs until the asp is hooked; as soon as the bite is noticed, the reeling slows down and the angler waits for the fish to attack again and be hooked.
6.4 Catching roach with cambric
Preparing cambric equipment for roach is as follows:
- Take 3 pieces of cambric and place them on a fishing hook (No. 18-10). The casings on the hook should slide freely, but not slide; to do this, they are secured with a clamp of a smaller diameter or a fishing bead (yellow or white).
- The fishing line used is thin (about 0.1 mm) for better glide of the nozzle through the water.
- The rod is selected with rings and a spinning reel, which will take on all the work at the moment of landing the fish. Its length should be at least 3 m, and its weight should be as light as possible, since the fisherman needs to constantly hold it in his hands and play with the equipment.
- The float is installed in accordance with fishing conditions, and its installation is made at two attachment points. It is loaded with pellets so that only the tip of the float antenna peeks out from the water.
Cambric roach fishing technique:
- The equipment is lowered into the water at a distance of 5 to 10 cm from the bottom.
- As soon as the fish is hooked (the float will sink), it must be hooked immediately.
- In order not to miss the X-moment, you need to monitor the fishing line so that it does not drift chaotically through the water through constant reeling.
DIY float casing
So that you are not tormented by the question of where to get a cambric for a float or weight, we have prepared for you this video from the “kembrik” channel, after watching which you can not only make a catchy cambric with your own hands, but also learn how to paint it
useful links
https://gun.ru/rog/32-15.htm - a detailed and interesting article about preparing equipment for asp fishing;
https://regionalkonferenz.info/kak-sdelat-kembrika/ - article about fishing with cambric;
https://burbot.ru/index.php?option=com_content&task=view&id=462&Itemid=65 - how to make a cambric with your own hands;
https://ulfishing.ru/forum/viewtopic.php?f=6&t=4381 - conversations among members of one of the Israeli fishing forums about cambrics for perch.
How to insert a cambric into a jig
- VK
Miniature tungsten jigs are becoming more and more popular from year to year, and today they are actively used not only by athletes, but also by ordinary fishermen.
To avoid the problem of “sharp edges,” the edges of the holes in tungsten jigs are countersunk, and polymer inserts are also inserted into the holes. Very often this is done by manufacturers, but sometimes the fishermen themselves have to modify miniature tungsten baits. Countersinking requires a special tool, but anyone can insert a polymer insert into the jig hole.
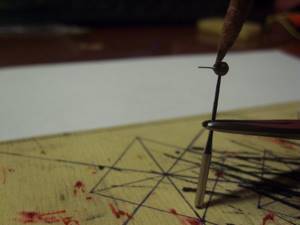
First of all, you need to choose the “right” cambric. A tube of insulation removed from a telephone wire was inserted into fairly large tungsten jigs. This was very difficult to do, since it is made from a fairly hard material. Over time, jigs became smaller and smaller, and the holes in them became thinner, but new materials also appeared. A cambric suitable for our purposes can be removed from the so-called twisted pair of communication wires (photo 1).
So, we cut off a piece of wire of the color we need, 10-12 cm long. I would like to note right away that if you cut a longer piece, it will be quite difficult to pull off the polyvinyl chloride sheath from it. We pull the insulation off the copper conductor. Now we have a cambric, which we need to hold tightly in our hands on both sides and stretch in the middle. It stretches just wonderfully, not along its entire length, but only in some areas, becoming thinner and thinner (photo 2).
What’s good is that the twisted-pair insulation material is unusually plastic, and when the load is removed, the diameter of the cambric in the stretched section does not change. We stretch the polyvinyl chloride insulation tube until its diameter becomes smaller than the diameter of the hole in our jigs. After this, we cut the cambric diagonally (to make it easier to get into the hole of the jig) in the thinnest place with something very sharp (usually using a safety razor blade) (photo 3).
If the tool is blunt, it can flatten the polyvinyl chloride, which will then make it difficult to thread the cambric into the jig. Thus, we obtain insert blanks for two jigs.
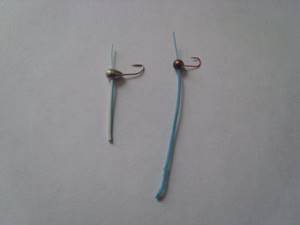
We insert the thin end of the workpiece into the hole of the jig from the side of the hook tip (photo 4),
after which we grab it from the other side with tweezers (or some similar tool) and tighten the cambric into the jig (photo 5).
Efforts must be made so that the insert sits tightly, after which the excess polyvinyl chloride is cut off with the same sharp tool (photo 6).
There may be two options here.
First: the polyvinyl chloride tube is simply cut flush with the body of the jig.
Second: we also want to melt the edges of the insert, so we leave about a millimeter or a little more cambric on both sides of the jig.
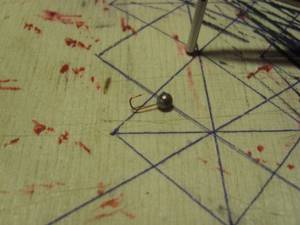
The next operation is to check, and if necessary, clean and widen the hole in the PVC insert. To do this, it is highly advisable to have such a simple tool as dental “needles” (they can be purchased at medical equipment stores or take “dental” ones from a familiar dentist). The screw notch on these conical needles allows you to “screw” them into the thinnest hole, expand and clean it (photo 7).
By the way, the need to clean or widen the hole in a jig often arises during its operation, so having such a tool in a box with winter baits is simply necessary.
After cleaning the holes, those jigs where we cut the cambric flush are ready for use, and they can be placed in the bait box. In those where we left a millimeter or a little more, the protruding parts of the cambric still need to be melted.
To successfully carry out this operation, we will need a source of open fire (matches, lighter, burning candle) and a piece of steel wire of suitable diameter - so that it fits into the hole in the polyvinyl chloride insert, but is not thinner than 0.12-0.15 mm. The wire must be inserted into the jig before melting, and this is done in order to preserve the internal hole in the cambric - without it, the melted polyvinyl chloride can simply block it.
And one more thing: do not forget that the hooks are soldered into the body of the tungsten jig. and the mass of this body is very, very small. That is, it heats up very quickly, and the slightest overheating can lead to the hook either falling off, or, which is no better, “letting go.” Therefore, in order to protect the bait, it is advisable to wrap a piece of knitting thread (not synthetic) around the hook at the soldering point (with the outlet on the body of the jig), and then carefully wet it. This is necessary, of course, so that at the moment the edges of the cambric melt, the jig is not overheated.
So, we inserted a wire into the hole of the cambric, secured the hook with a wet thread, after which we take the jig by the hook with tweezers and melt the edges of the cambric over an open fire (photo 8).
In order for them to melt and press tightly against the body of the jig, it is enough to hold them over the fire for a second, maximum two. After this, the jig must be allowed to cool and the polymer inside it to harden. If you don’t want to wait, you can put the jig in the water for a while. After cooling, the wire must be carefully removed (there are usually no problems with this), and the fully prepared jig must be placed in a box with baits.
Related articles:
Spinning reel disassembly and lubrication
New capabilities of vibrotails
Homemade wobbler-minnow
Making a wobbler