1
Prepared by: AlenaPrika
11/29/2019 Preparation time: 1 day. 14 hours 0 minutes
| Save | I cooked) | Estimate |
There is nothing easier than preparing dry-salted red fish at home. They say that such fish cannot be spoiled, but it needs to be salted for 2 to 5 days, depending on your taste.
How to dry-salt fish correctly?
Today everyone knows about this method of cooking. There are many recipes and types of salting fish. The most common methods are: dry salting and wet. The first type of fish salting uses only bulk ingredients without the use of water. They are simply mixed together and added to the product. And in the second case, such a salting mixture is diluted with water and only then the fish is dipped into the resulting brine.

But the fastest and easiest is still dry. Thanks to it, the fish retains all its properties and taste. When dry salted, the fish gets a fairly dense structure, which is ideal for canapés, sandwiches and sushi. This cooking method can be used by both experienced cooks and beginners. The ideal fish for dry salting are pike perch, pike, balyk, roach, ram, sprat, sardines, bream and carp. This cooking method is especially good for medium-sized seafood, from 300 grams to 2 kg. You can also use dry salting for salmon.
Recipes for dry salting fish at home
For this method of preparing salting, it is recommended to take a medium-sized river product. Before the process itself, you need to process the fish carcasses. Initially, they must be washed and dried. Sprat and sardines can be salted in their original form, but in large specimens the entrails and gills should be removed, then the abdominal cavity should be washed and wiped with a cotton rag.
Useful tips for salting
How to pickle bream
- If fish are salted of different sizes, then larger specimens are placed below and smaller ones on top.
- Leftover brine (salt) should never be reused, as it contains organic residues (blood, flesh particles).
- A good material for the lid is wood species that are difficult to deform, such as linden or aspen.
- It is believed that fish weighing up to half a kilogram can be used without gutting.
- Iodized salt is not recommended. Firstly, it can give a peculiar taste to the product. Secondly, iodine is less able to form useful brine for salting.
- If during the process the temperature regime was violated for some reason, for example, the electricity was turned off, but the product does not show signs of rotting, it is still not recommended to eat it.
Step by step preparation
- Gutted fish, its gill openings and mouth should be covered with salt.
- If the product remains in its original state, then simply sprinkle it on.
- The largest fish should be placed in the prepared dish first, back down, in layers.
- Each new row of carcasses should be sprinkled with a little salt, sugar and black pepper.
- The layers should be laid out in the opposite direction. If the first one was laid out towards the heads of the fish, the other lays on top of it towards the tails. The layers should fit tightly to each other.
- When all the carcasses are laid out, the fish also needs to be sprinkled with salt and sugar on top.
- Next, you need to put a suitable sized lid or a wooden circle with a hole on the salt and press it down with a weight or a clean stone.
- Place the fish in a cold place for 4-10 days.
- During this time, monitor the formation of brine. If after four days it is not enough to cover all the carcasses, you need to prepare your own (250 grams per liter of water) and pour it into the salting.
- After 10 days, when the back of the fish has hardened, it can be removed from the liquid. Before storage, it should be rinsed from salt and dried in air for 10-15 days.
- After dry salting, the fish can be eaten or placed in a basket or box for further storage.
Granulated sugar can be added to the salting as desired. But it is worth noting that thanks to it the product acquires a delicate taste.
The following recipe for dry salting fish is valued for its ease of preparation.
Wet hanging salting of fresh fish
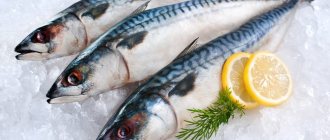
This very gentle salting method is good for fatty sea fish: mackerel, mullet, sardines, bonito and others, as well as for fish with very tender meat, such as salmon and grayling. For hanging salting, choose medium-sized fish, since it will be salted without gutting. Prepare the brine in such a concentration that an egg or raw potato dropped into it floats in it. Hang the prepared carcasses from rods placed on top of a container with brine, and the carcasses should be completely immersed in the brine and positioned so as not to put pressure on those nearby. After 5-7 days (depending on size) the fish will be ready. Remove the fish from the brine, dry or hang to dry. Pour out the remaining brine.
Cooking process
Before the salting process itself, process the fish, rinse well and dry with a cotton rag.
Place burlap on the bottom of the basket or box so that it covers the sides of the container.
Sprinkle each fish well with salt, not forgetting the belly and gill openings.
Place it in the prepared basket, back down, tightly to each other, each layer in the opposite direction (head to tail).
When the rows are finished, cover the salting with a wooden lid and press down on top with a weight (a stone or some other heavy object).
Place the fish in a cool place and place a waterproof cloth under a box or basket, since during the dry salting process the fish will release juice that flows out through the cracks.
Leave for 7-12 days until completely salted.
When the back of the fish hardens, you need to remove it from the liquid, rinse and air dry a little. The finished salted product can be stored in the refrigerator for no more than a week.
Dry salting of fresh fish (universal recipe).
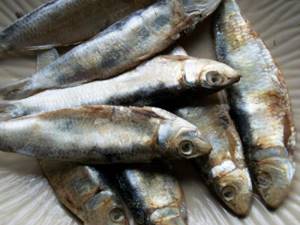
For 10 kg of fish - 1.5-1.7 kg of salt (for light salting), 2 kg of salt (for moderate salting), 2-3 kg of salt (for strong salting) Roach, silver bream, ram, bream, carp are suitable for this salting , perch, pike perch, carp, asp, rudd, roach, bream, fisherman, sabrefish, anchovy, sprat, sardines, horse mackerel, etc. But it is especially good for salting medium-sized river fish weighing from 250 to 500 grams. Before salting, if necessary, wash the fish and dry it; if not, wipe it with a clean cloth. Salt anchovy, sprat and sardines without gutting them; remove the gills and entrails of horse mackerel without cutting the belly. For fish weighing more than 1-1.5 kg, in addition to removing the gills and entrails, cut the abdomen or make an incision along the back and remove the entrails, and then carefully wipe the abdominal cavity with a dry, clean cotton rag. Place a layer of salt on the bottom of the prepared salting container (strong barrel, enamel pan or bucket, stainless steel tank). Sprinkle the gutted fish generously with salt outside and inside and place it in a salting bowl, belly up. Roll the prepared, ungutted fish in salt and also place it in the bowl, belly up. Lay the fish in layers, and if in the first layer the fish is laid in one direction, then in the next layer put it in the opposite direction, that is, heads on tails, and tails on heads. Please note that larger fish should be placed down and smaller ones on top. Cover the fish placed in the dish with a layer of salt, place a holey wooden circle on the salt, and put pressure on it (a clean stone or a jar of water), and the more fish there are, the heavier the pressure should be. Cover the dish with salted fish and take it to a cold cellar. After 2 days, check to see if enough brine has formed to cover all the fish. If sufficient, monitor its condition while the fish matures. If this is not enough, add a little fresh brine prepared at the rate of 200 g of salt per 1 liter of water. Usually after 3-7 days, depending on the size, the fish is completely salted. Remove it from the brine, rinse it in running water, air dry it and put it in a wooden box or basket for storage. Please note! The remaining brine cannot be reused! Remains of blood and mucus in it make it unsuitable for another salting. I’ll tell you a secret, if you add about 1 tbsp to the salt. l. sugar, your fish will turn out even tastier.
Cooking process
Remove the insides of the fish, fins and tail, rinse well and make two cuts along the back.
Fill its belly, gill openings and mouth with salt.
Rub the outside of the fish as well.
Prepare a barrel or box before the process itself, wash, dry and add a layer of salt to the bottom.
Mix the remaining salt, sugar and spices.
Layer the fish in the same way as in previous recipes, not forgetting to sprinkle each new layer with a mixture of salt and seasonings.
Cover the finished dry pickling with a lid or a wooden circle and put it in the basement or on the balcony (if it’s winter) for 12-15 days.
If it is necessary to speed up the process of dry salting fish, the box does not need to be put in a cool place, but left at room temperature. In this case, it will be left to dry for a week.
When the approximate salting period has passed and the back of the fish has hardened, it can be removed from the liquid.
The finished product should be stored in the refrigerator, after wrapping it in parchment or newspaper. If the fish needs to be dried, then after removing it from the brine, it should be washed under running water and dried for 5-7 days in a suspended state, in a room with good ventilation. This salted product can be stored at room temperature in a dry place.
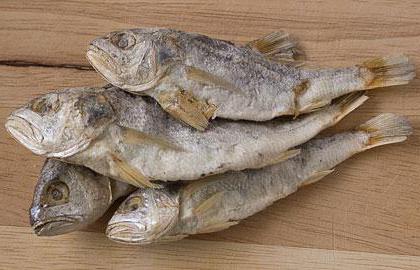
Fish for drying can be salted in different ways
When dry salting, dried fish is prepared by rubbing salt against the scales, then the carcasses are placed tightly in a wooden box or some other container, each row is sprinkled with a layer of salt, pressed down with pressure and placed in a cold place, for example in a basement or cellar. In 5-7 days the fish is well salted. With the wet method, first, using a needle, several fish are strung on twine, after which the bundles are placed in a container (barrel or enamel bowl), filled with brine (2.5 kg of salt per 10 liters of boiled and cooled water), covered with a circle with oppression, and taken out into a cold cellar and kept for 2-3 days, depending on the size of the fish and the weather. But most often, before drying, the fish is salted in brine - a saturated aqueous solution of salt (the salting method is described in the recipe “Wet salting of fresh fish in brine”). After soaking in brine, the fish is removed from the container and thoroughly washed with clean cold water. Sometimes you have to soak it to remove excess salt. If the meat is very dense, then you have to soak the fish in cold water for 5 to 10 hours, changing the water 2-3 times.
Drying tip!
The moment of normalization of the salt content in fish meat is easy to determine: when the fish is sufficiently wet, it begins to float. This happens because the specific gravity of a salted carcass is greater than that of fresh water, causing it to sink. Floating up indicates that the salt content in it is already normal. The salt rate is 5-7% of the weight of the fish. Soaked carcasses, layers or pieces are laid out on paper and allowed to dry. Then the fish is strung on twine, leaving a distance between the carcasses of at least 1 cm. The fish is dried in the open air on moderately warm days, but not in the sun, but in the shade, preferably under a canopy, in a well-ventilated place. But it is best to dry fish in the spring in cool, dry weather. At this time, the fish will not only dry out more evenly, but will also not be attacked by aggressor insects.
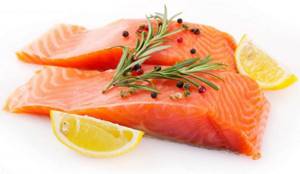
Recipe for dry salting red fish at home
Among the many ways to prepare seafood, I would like to highlight recipes for red fish. This delicacy is found at almost every feast and holiday. Red fish is loved for its delicate and pleasant taste and beneficial properties. You can use it to prepare appetizers, salads, soups, or serve it as slices. Today you can buy salted red fish in almost any supermarket. But it won’t be cheap, and a quality guarantee can’t be found on every product. Because of this, many modern cooks prefer to dry-salt red fish themselves at home.
Preparing seafood before salting
For dry salting, you can use both fresh and frozen red fish. The skin of the product must be free of damage, unpleasant odor, yellow spots and streaks. A layer of ice up to 5 mm is allowed on frozen fish. Also, when you press on seafood, it should not release liquid.
Before preparing salting, red fish should be defrosted naturally at room temperature. On average, this will take from an hour to three. Slightly frozen fish is suitable for cutting.
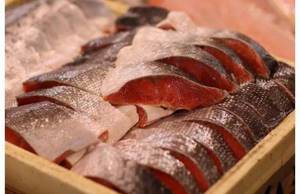
The first step is to remove the scales from it and rinse it under cold water. Then you need to remove the fish's head, tail and fins. Particular attention should be paid to the abdomen, which may contain caviar. To do this, you need to cut it vertically and carefully remove all the contents. If caviar is still present in the fish, it can be subsequently salted along with the fillet of the product.
Next, remove the backbone and bones from the carcass. To do this, cut the fish in half along the back. Then transfer to a cutting board so that the fillet is on top and carefully remove the backbone and all large bones using a knife. The last step in preparing fish for dry salting at home is to remove the skin. This procedure is optional and you can leave the skin if desired.
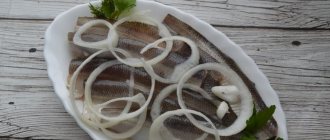
How to pickle herring
This is how fresh Black Sea herring is most often salted. To prepare herring for pickling, cut open the belly of the fish and remove all the entrails. Using a knife with a sharp end, cut the blood vessels that are located deep in the chest cavity, removing blood from them. Rinse the cut herring 2-3 times with cold water to remove the blood as best as possible. After this, dry the fish, sprinkle salt on all sides (take the amount of salt as usual - 200 g per 1 kg of fish), fill the abdomen and gill cavities with it. Then place the fish in an enamel or wooden bowl, sprinkle with salt and store in a cool and dark place. Before eating, soak the salted herring in water. Tips for salting herring! Salted herring does not store well at home: a yellow coating (rust) appears on the surface of the fish, resulting from fat oxidation. To prevent rusting, you can store herring in a sealed container in a salt solution prepared at the rate of 200 g of salt per 1 liter of water. The container with salted herring should be kept in a dark, cold room or in the refrigerator. The shelf life of salted herring in brine in the refrigerator is 20-30 days, in the cellar - 10 days.
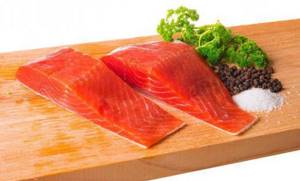
Cooking process
Mix sugar and salt; if desired, you can add spices (cloves, bay leaves, basil or pepper), or lemon juice.
Cut the red fish fillet into 5 cm pieces, not reaching the skin.
Cover the carcass completely with the mixture of sugar and salt. Pay special attention to cuts and skin.
Transfer the fillets to a bowl, cover with a lid and leave in a cool, dark place for 24 hours. You will get lightly salted fish.
After salting, remove the layers of salt from it and dry it in air or with napkins.
The fish can then be cut into pieces and tasted.
It is recommended to store seafood fillets in the refrigerator, after wrapping them in parchment.
Dry salting of pink salmon at home
Not all salmon fish have a soft texture and do not harden when salted. For example, pink salmon meat with the classic recipe for dry salting can become very dry. In such cases, a special recipe is needed that can preserve all the beneficial properties of red fish and not harm its structure.
To begin with, you should also start preparing the carcass, remove the scales from it, remove the tail, head, fins and all the entrails. After this, rinse it under cold water and dry it with napkins. Then you need to make a deep cut along the back of the pink salmon and pull out its spine and large bones. Then, if you wish, you can either leave the fillet whole or cut it into pieces.