What are boilies
Most anglers only know how to put a boilie on a hook, hook their catch and pull the fish ashore, without thinking about what it is made of or why it is so effective. Let’s try to understand why this particular bait is so interesting to carp and its “relatives”.
The word “boilie” itself, translated from English, means “cook” and implies a certain heat treatment of the bait at the manufacturing stage. This is a spherical bait with a diameter of 0.5 to 3 cm, consisting of a boiled, dried or compressed mixture based on various types of meal, including fish or bone meal.
The composition of boilies may include ground cereals, bran, sunflower cake, adhesive components such as, for example, starch, casein, gelatin, as well as various kinds of attractants (flavors).
Fishing with boilies
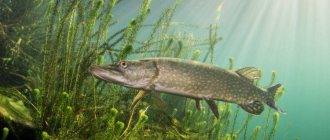
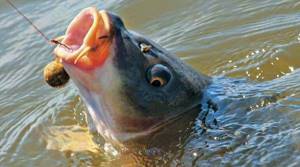
Knowledgeable fishermen have repeatedly been convinced of the caution and excellent vision of the carp.
This unpretentious fish is quite difficult to lure onto a hook, since thanks to its intelligence it senses danger. Carp prefers well-warmed water, so you can go hunting for it only if the temperature does not drop below 15 degrees. In such weather there is a good, stable bite.
After hooking, it is worth remembering that a cunning representative of cyprinids can offer very serious resistance. In order to be able to reduce the force of jerks, in no case should you loosen the fishing line too much. And of course, a good quality rod and reel is very important.
Determining the presence of carp in a reservoir is quite simple. You just need to take a closer look. It reveals itself by jumping in the shape of a candle from the surface of the water and making loud splashes when diving. Jumping occurs along the path of movement in search of food.
Hiding under water, the carp leaves bubbles on the surface of the water as it moves, and its feeding site can be seen with the naked eye. It is necessary to make casts to the feeding area.
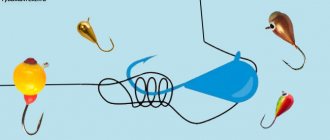
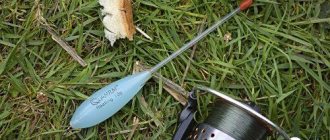
Using PVA bags in which hooks and bait are placed
equipment with PVA package
The entire circumference is filled with fine-grained bait, which vaguely resembles the natural food that fish are used to eating. The package contains materials that begin to dissolve after a short period of time. Fishermen equip bags with 2 methods: floating and submersible.
In the submersible form, gear with bait and a weight is placed inside. The bag is filled to the end with bait and tied, leaving the main line coming out from the central part of the PVA. After casting the tackle, the sinker begins to pull the bag to the bottom surface, and the air remaining in the bag, collected in the lower part, turns the container over, pushing out the leash and bait.
An appetizing bait with a hook is located just above the accumulated bait mixture.
When floating, all components are filled in the same way, however, much more space is left for air so that it pulls the bait to the surface of the water. Thanks to the dissolving composition, the bag, after a certain period of time, gradually releases the bait mixture from top to bottom, and the weight pulls the leash with the bait to the bottom surface.
Types of boilies
It comes in different types:
- Soluble (dusty) boilie is not an entirely accurate definition, since this type has not been subjected to any heat treatment, it is simply frozen. And this is where there is a minus: when the carp feeds on such bait, it will be full for a long time. because cooked cereals are digested better than dry ones, and accordingly the time until the next bite will increase. But there is also a plus - water-soluble boilies leave a good mark in the water, signaling the fish about food.
- Insoluble boilie. It is heat-treated and does not dissolve in contact with water. Accordingly, its main advantage is that it keeps its shape for a long time. Another plus is that it is digestible. It is used as bait, not as feeding for fish.
- Sinking. This type of bait is recommended to be used in clean water, when the bottom is sandy or gravel, so it lies on the very bottom of the reservoir.
- Floating. This type of boilie will be at the height from the bottom that the angler sets. It is good to use in cloudy water.
Drowning
The density of this type of bait is so high that the bait easily sinks to the bottom immediately after casting the tackle. The sinking bait is also made from cereal crops, but the production technology is aimed primarily at giving these products more weight. The balls have significant strength, so they can be used as the main bait even when fishing in sections of rivers with strong currents.

Sinking baits are used primarily for catching bottom fish. The load quickly sinks even into very deep holes, where large specimens of carp fish can be found in the rubble of snags.
Floating
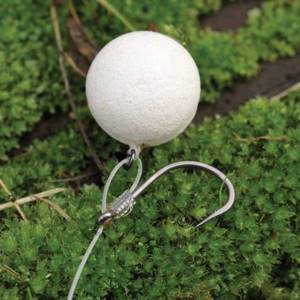
Floating boilies, on the contrary, remain buoyant due to the fact that their density is much lower than that of water. To provide greater buoyancy, small foam balls can be used in the design of fishing gear. This type of fishing attachment is used when it is necessary to catch a specimen feeding in the upper layers of water.
Floating baits are less resistant to mechanical stress, so they are practically unsuitable for long casts and fishing in areas of the reservoir with strong currents.
Homemade boilies
Many fishermen prefer to use homemade boilies. A homemade nozzle can be made from wheat flour or finely ground cereal. Home-made balls, which are cooked from semolina with the addition of sunflower oil, have proven themselves well.
To prepare such an attachment, just cook thick porridge, add unrefined oil, and after cooling, cut the mass into small cubes.
Homemade dough boilies are made like dumplings. Small balls are poured into boiling water. After boiling for several minutes, they are taken out and placed in the oven, in which the balls are simmered at a temperature of 60–80 degrees for several hours.
All of the listed types of attachments can be soluble or insoluble. The advantage of the first type is the ability to attract fish from a long distance due to the “dusty” trail formed when the bait is destroyed. Insoluble balls are more durable, so they can be successfully used for fishing in the current, as well as at a considerable distance from the shore.
Boilies can only be used to attract fish. In this case, the ball can be easily delivered over a considerable distance using a bait spoon.
Cooking boilies
Boilies are sold in special stores of different types, sizes, tastes and colors. There are also many different companies, the quality of the product itself and the price category. But some fishermen prefer to make them themselves at home.
Binding components can be chicken or quail eggs, honey, gelatin, wheat gluten, corn syrup, beet molasses, etc. Some of them have a good smell.
Natural products can also act as odor enhancers, for example, fish oil, vanillin, essential oil extracts and a variety of aromatic spices. For plasticity, glycerin, fruit syrups, and honey are used.
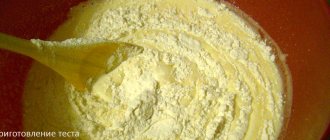
The main components in the preparation of boilies are flour, eggs, crushed cereal, food coloring and flavor enhancers.
Cooking steps:
- The eggs and liquid ingredients are mixed well, separate from the dry ingredients.
- Everything is combined and mixed into the dough. Eggs can be added until the dough becomes elastic. dense and it should not stick to your hands.
- We form sausages from the dough, which we cut into small pieces of the required boilie diameter.
- Heat treatment, cooking, microwave or freezing is everyone's choice. but you also need to take into account some nuances, such as cooked boilies become loose, become limp faster and hold their shape less, and can also float.
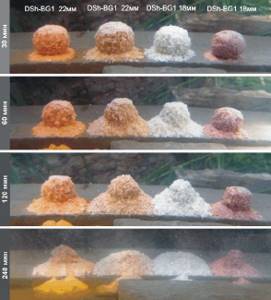
Groundbait boilies
There are also bait boilies, which are used to feed the fishing area and are prepared in such a way that they dissolve when entering the water. One of their varieties are “dusting” balls. They have added components that, when dissolved, create a kind of cloud that attracts fish. This can be cocoa, milk powder or other finely divided ingredients with an alluring aroma. As a rule, feeder feeders are filled with such boilies. Sometimes fishermen use them for fishing with other bottom gear. In this case, feeding is carried out manually or using a special slingshot.
Dusting boilies for carp
Boilies of this type are not subject to heat treatment. Dust boilies for carp are made without the use of eggs (the place of the binding component is taken by syrups, honey, molasses) and are simply dried. After the bait gets into the water, it begins to gradually dissolve, shedding one layer after another. If high-quality attractive components are added to the bait, such boilies will immediately attract the attention of carp swimming nearby.
The right hook is the basis of a good boilie
You should carefully select hooks before you start catching carp with boilies. Firstly, the ideal hook should be large and sharp enough to pierce the carp's thick lip. However, this should not happen due to the hook, but under the influence of the sinker.
Attention! When fishing with boilies, the fish always hooks itself.
Forged hooks with a ring and a short shank will suit you. The hook number depends on many factors:
- weather;
- water;
- boilie diameter.
Color of boilies for carp
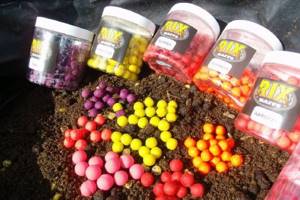
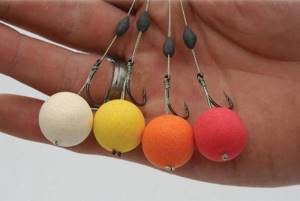
It is still not known for sure whether the color of the boilie really matters. Be that as it may, for bottom fishing in reservoirs with a clean bottom, it is recommended to use light-colored baits.
In the middle layers of water they fish with red, orange, yellowish boilies, which, according to legend, can attract the attention of carp not only with their smell, but also with their appearance.
For bait, boilies similar to those used directly as bait are used, that is, the colors, sizes and, above all, smells of the baits must be the same.
Required tools and fasteners
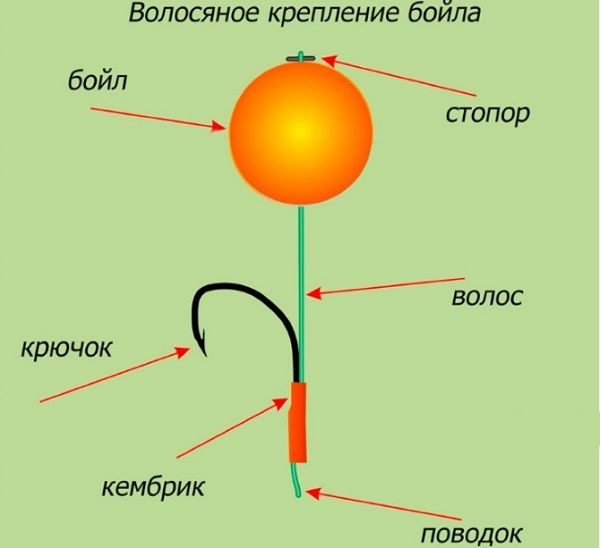
To attach the boilie to the hook, the fisherman will need specific tools and additional fasteners, with the help of which the rigid bait can be quickly and reliably mounted on the equipment. To perform various bait installations on a “hair” rig, the fisherman will need:
- special needle;
- drill;
- stoppers;
- metal rings;
- swivels;
- cambrics of various diameters.
To attach a hard bait to a “hair” rig, which is most often used in carp fishing, the angler will need a special needle with a notch at the end. This needle is similar in design to a regular knitting needle, but differs from it in its smaller diameter. The notch at the end of the tool is needed to pull the loop through the through hole of the boilie. You can make such a tool yourself or purchase it at a fishing store.
On a note! If the bait used is highly plastic, then a through hole can be made in it using a regular sewing needle. To make a hole in a fragile bait, the fisherman will need a small diameter drill. Such a tool can be electrically driven, which significantly speeds up the installation of the boilie on the hook.
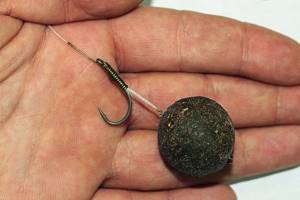
If the boilie is set correctly, the fish is hooked on the lower lip
Correct installation of the “hairy” boilie equipment is impossible without the use of stoppers, which do not allow the nozzle to fly off the loop during casting. Store-bought stoppers are a small plastic rod, 0.5 to 1.5 cm long, with a semicircular notch in the middle. During the installation process, the tip of the loop is fixed in the center of the stopper, and a semicircular recess is sunk into the body of the bait. Experienced carp anglers, as a rule, use store-bought options for stoppers, since they hold the bait more securely. Some fishermen prefer not to spend money on purchasing this piece of equipment and make it themselves while fishing.
Equipment for catching carp with boilies
The stopper can be quickly made from scrap materials:
- matches;
- hard stem of grass;
- thin tree branch.
To make this element, you will need to take a small part of a match, branch or blade of grass about 1 cm long and insert it into the hair loop. Then you need to pull the equipment so that the stopper slightly enters the body of the boilie.
Small metal rings, which are sold in fishing stores, are necessary to give the bait greater mobility. The increased mobility of the bait after hooking does not leave the fish a chance to escape. In addition, hooking with such a ring is more effective. The diameter of the rings used in boilie equipment is usually about 3 mm. In some types of rigs, the boilie is attached to the hook using a small swivel, driven halfway into the body of the bait.
Equipment for fishing with boilies often includes cambrics of various diameters, which are usually mounted on the shank of the hook and serve to increase the efficiency of hooking. The diameter of the cambric used directly depends on the thickness of the wire from which the hook is made.
Important! The cambric should be put on the hook with noticeable force, which will prevent it from moving along the fore-end during casting.
The color of this element should be such that it does not stand out on the bottom soil and does not alert the fish. As a rule, anglers use black or dark gray cambrics.
Tools and materials for knitting rigs
To attach the boilie to the hair rig, you need to make a through hole in it, which should be located along the central axis. Such a hole can be easily made using a tool sold in fishing stores and which is a small-diameter drill. Some companies specializing in carp fishing produce similar products equipped with an electric drive, which significantly speeds up the drilling process.

The use of special tools will significantly simplify the process of knitting hair accessories.
How to make a hair mount on a carp
To pull the leader loop through the hole, the angler will need another tool, whose design resembles a knitting needle. To place a boilie on a hook, the pointed end of the knitting needle, on which there is a small hook, is threaded into the hole made in advance.
The driving loop clings to the hook of the knitting needle and is pulled into the hole, after which the attachment is fixed. In addition to these tools, the carp angler will need a few more elements:
- silicone cambrics of various colors and diameters;
- stop beads;
- swivels;
- forged metal rings;
- limiters.
Beginner carp anglers often make the mistake of using monofilament or fluorocarbon monofilament as leader material. The fishing line is not suitable for these purposes because it has a rather rigid structure and does not allow the bait to move naturally in the water. When using fishing line as a leash, the number of slips increases sharply, since the hook moves in the fish’s mouth along the wrong path, which is also due to the excessive rigidity of “fluorocarbon” and “monofilament”.
The leash of boilie equipment must be made of a special leash material, which has a very soft structure and does not hinder the movement of the bait in the water. A four-strand braided cord, which is used in feeder or spinning fishing, can be used as a leash material. During fishing, the leash lies on the bottom and often comes into contact with the sharp edges of shells and other hard objects, so multi-strand cords should not be used to install the boilie on the hook. Multi-strand “braid” does not tolerate abrasive loads well and even with minor damage significantly reduces its strength characteristics.
How to plant correctly
To successfully fish on any type of reservoir and with different types of fish nutrition, a fisherman must be able to set boilies in different ways. The type of fastening may depend on several factors:
- type of reservoir;
- fish feeding horizon;
- fish activity;
- type of nozzle used. A silicone tube 1–1.5 cm long placed on the eye of the hook improves the grip of installation
A hard bait can be attached to a hook in several ways. In the most common version, the “hair” loop is passed through a through hole in the nozzle and then fixed with a stopper. This method is the most universal and allows you to fish with baits of various sizes and any buoyancy.
To attach the bait in this way you will need:
- insert the needle into the hole of the bait;
- hook the pre-formed loop with the needle beard;
- pull the loop through the body of the hard bait;
- secure the end of the loop in the center of the stopper;
- holding the stopper along the edges with your fingers, pull the leash.
The next mounting option is ideal for novice fishermen who have not had time to acquire a specialized tool. For this method, you need to make a shallow cut around the circumference of the nozzle ball. The cutting depth should be about 1–2 mm. Next to the hook, not an ordinary loop is formed, but a noose loop, which is inserted into the cut and tightened tightly. It should be noted that only slowly dissolving boilies are attached in this way. For dusty, quickly dissolving baits, this installation is not suitable, since the bait will quickly be released from the loop.
Another method involves inserting a swivel into a round nozzle. Before driving the swivel into the boilie, you need to drill a hole in the bait and insert a silicone casing of the appropriate size into it. The swivel is inserted into the cambric only halfway. The free ring of the swivel is put on the hook and secured with a small rubber stopper. This method of attachment is quite reliable and allows you to perform power casts. It is most often used for fishing from the bottom on a slowly dissolving bait.
Fishing with floating pop-up baits involves the use of a fastening element such as a rubber ring. In this case, the fisherman will not have to tie complex equipment. To fix the nozzle, just put a rubber ring of the required diameter on it and hook the hook onto it.
Attention! After fixing it by the rubber ring, the hook should point in the direction opposite to the bait.
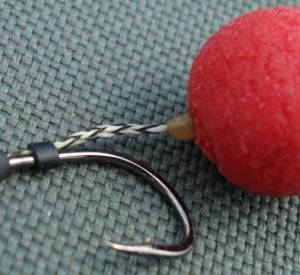
The size of the hook in a boilie rig should always be slightly smaller than the size of the bait used
Mini boilies are equipped with a thread, which makes the installation process very simple. To attach a mini boilie, just hook the hook onto the thread. It is important for the angler to remember that placing a hard bait on a hook should be done with great care. Beginning fishermen are often in a hurry when performing this procedure, which often leads to injury.
Equipment with a swivel on the forend
This mounting option works great with both floating and sinking boilies. To create it you will need:
- put a small swivel on the hook;
- insert the free part of the swivel into the boilie hole;
- put a stop bead on the hook and slide it onto the bend of the forend.
You should put the locking bead on carefully so as not to drive the sharp sting into your finger. The main advantage of this installation is that the swivel gives the attachment greater mobility and makes its behavior more natural. This option is ideal for presenting sinking bait. The bead placed on the hook can be moved along the fore-end during fishing, which will allow you to quickly change the mechanics of the equipment.
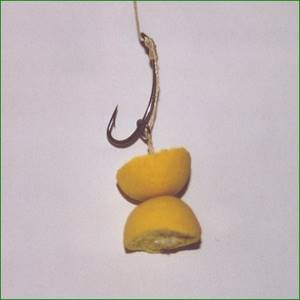
BLOWBACK RIG with ring
This setup has proven itself well when fishing with double boilies and snowman-type baits. To make a BLOWBACK RIG you need:
- tie the hook so that there is a tip a few centimeters long with a small loop at the end;
- put a forged metal ring on the forend and fix it at a distance of 0.5–1 cm from the hook ring using the remaining tip of the leash;
- pull the loop into the hole of the nozzle using a special tool;
- secure the stopper in the loop and lightly pull the boilie.
The bait secured in this way, thanks to the ring, moves freely on the hook and creates minimal resistance when swallowed by carp. This installation has great mobility, which makes it very difficult for the fish to free itself from the hook during fishing.
How to properly plant boilies
To successfully fish on any type of reservoir and with different types of fish nutrition, a fisherman must be able to set boilies in different ways. The type of fastening may depend on several factors:
- type of reservoir;
- fish feeding horizon;
- fish activity;
- type of nozzle used.
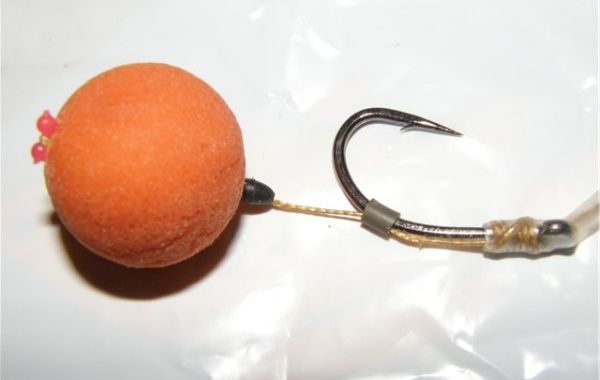
A silicone tube 1–1.5 cm long placed on the eye of the hook improves the grip of installation
A hard bait can be attached to a hook in several ways. In the most common version, the “hair” loop is passed through a through hole in the nozzle and then fixed with a stopper. This method is the most universal and allows you to fish with baits of various sizes and any buoyancy.
To attach the bait in this way you will need:
- insert the needle into the hole of the bait;
- hook the pre-formed loop with the needle beard;
- pull the loop through the body of the hard bait;
- secure the end of the loop in the center of the stopper;
- holding the stopper along the edges with your fingers, pull the leash.
The next mounting option is ideal for beginner fishermen who have not had time to acquire a specialized tool. For this method, you need to make a shallow cut around the circumference of the nozzle ball. The cutting depth should be about 1–2 mm. Next to the hook, not an ordinary loop is formed, but a noose loop, which is inserted into the cut and tightened tightly.
Another method involves inserting a swivel into a round nozzle. Before driving the swivel into the boilie, you need to drill a hole in the bait and insert a silicone casing of the appropriate size into it. The swivel is inserted into the cambric only halfway. The free ring of the swivel is put on the hook and secured with a small rubber stopper. This method of attachment is quite reliable and allows you to perform power casts. It is most often used for fishing from the bottom on a slowly dissolving bait.
Fishing with floating pop-up baits involves the use of a fastening element such as a rubber ring. In this case, the fisherman will not have to tie complex equipment. To fix the nozzle, just put a rubber ring of the required diameter on it and hook the hook onto it.
Attention! After fixing it by the rubber ring, the hook should point in the direction opposite to the bait.
The size of the hook in a boilie rig should always be slightly smaller than the size of the bait used
Mini boilies are equipped with a thread, which makes the installation process very simple. To attach a mini boilie, just hook the hook onto the thread. It is important for the angler to remember that placing a hard bait on a hook should be done with great care. Beginning fishermen are often in a hurry when performing this procedure, which often leads to injury.
It comes in different types:
- Soluble (dusting) boilie is not an entirely accurate definition, since this type has not been subjected to any heat treatment, it is simply frozen. And here there is a minus: when the carp feeds on such bait, it will be full for a long time. because cooked cereals are digested better than dry ones, therefore the time until the next bite will increase. But there is also a plus - water-soluble boilies leave a good mark in the water, signaling the fish about food.
- Insoluble boilie. It is heat-treated and does not dissolve in contact with water. Accordingly, its main advantage is that it keeps its shape for a long time. Another plus is that it is digestible. It is used as bait, not as feeding for fish.
- Sinking. This type of bait is recommended to be used in clean water, when the bottom is sandy or gravel, so it lies on the very bottom of the reservoir.
- Floating. This type of boilie will be at the height from the bottom that the angler sets. It is good to use in cloudy water.
The boilie can be placed directly on the hook itself, that is, on its shank. It is held in place by a spring attached to the bottom of the hook. This method is only possible with homemade boilies, since a store-bought one simply cannot be pierced with a fishing hook. It’s not entirely correct to use it, but some fishermen still use this method.
How to catch more fish?
I have been active fishing for quite some time and have found many ways to improve the bite. And here are the most effective:
- Bite activator. Attracts fish in cold and warm water with the help of pheromones included in the composition and stimulates its appetite. It’s a pity that Rosprirodnadzor wants to impose a ban on its sale.
- More sensitive gear. Reviews and instructions for other types of gear can be found on the pages of my website.
- Lures using pheromones.
We invite you to read: How to make a leash for a pike with your own hands?
You can get the rest of the secrets of successful fishing for free by reading my other materials on the site.
Bandage tape
The boilie can be attached to the hook using bandage tape.
It is attached to a hook or an auxiliary D ring, which is attached to the shank of the hook using a Knotless knot.
Thread the ribbon through the boilie using a needle and install the stopper. The tape is made of latex, thanks to this the boilie is attached tightly to the hook.
Algorithm for tying a ribbon: take a latex ring, thread one end of it into the D ring and then thread it into the loop of the latex ring itself, tighten the resulting knot.
Now we have the free end of a closed, double-folded tape. We thread this free end into the boilie and install a stopper.
Bandage thread
Here, a bandage thread is used as fastening. It is made of silicone, just like the tape. Very durable, but also stretches very well. It is attached to the hook thanks to an auxiliary ring; you need to tie it to it with a Knotless knot.
The remaining steps for putting on the boilie are the same as with hair mounting. Only the boilie should fit snugly to the handle.
KNOTLESS KNOT
Surgical loop:
- fold the end of the fishing line in half;
- make a loose loop and thread the folded end through it several times;
- Do not fully tighten the knot;
- Wet the line in the area of the knot and tighten it completely.
Perfect Loop Knot:
- Tighten the knot after wetting the fishing line.
- Pass the top loop through the bottom loop;
- Run the free end of the fishing line between the resulting loops without tightening;
- We make a loop again repeating the first point, placing it on top of the first loop;
- Make a loop by passing the free end under the fishing line;
- The long end of the hair is wrapped around the shank of the hook at least seven times.
- Next, thread the long end into the eye of the hook.
- All that remains is to tighten the knot.
Mini boilies differ from regular boilies in size, and therefore hooking will have its own nuances:
- Selecting a hook according to the size of the boilie is a mandatory rule.
- To bait a spot, mini boilies are thrown using a “bait spoon” for a close distance, and for a long distance using a “rocket”.
- In order to avoid catching small fish, you can cheat by improving the design of the bait. Instead of one mini, tie several pieces of hair with boilies. For such a harness, a Rig-Ring is used.
- Mini boilies are carefully drilled with the thinnest drill.
How to attach boilies so that they do not fall apart when casting and fishing in the current:
- Firstly, pierce the boilie strictly in the middle.
- Secondly, it should not be loose in consistency.
- Thirdly, calculate the hair length correctly. If the boilie is about a centimeter wide, the length of the hair is two centimeters, or the width of the boilie is about 1.5 centimeters, then the length of the hair is 4 centimeters.
- Fourthly, use only a specially designed needle to pierce the boilie.
- Fifthly, use the correct method to attach the boilie, and not on the hook itself.
This article contains all the information not only about what a boilie is, but its installation, preparation, varieties, knot technique. And not only a beginner in fishing, but also an experienced fisherman will receive information from it.
Having mastered the technique of fishing with boilies, you can catch not small carp, but large trophy ones. There will be photographs and impressions of such fishing that will last a lifetime.
Quick tips:
- To feed the fishing spot, use instant boilies.
- For main bait, use insoluble boilies.
- Use sinking boilies in clean reservoirs where the bottom is sand or gravel.
- Floating boilies are recommended for use in reservoirs with muddy water and muddy bottom.
- Don't be afraid to experiment with flavors. Carps are smart and curious; they will get used to one taste and remember that it is dangerous. And a new unknown scent will outwit them 100%.
- Use colorful boilies. The main thing is that they do not match the color of the natural cyprinid zone.
- If you prepare boilies yourself, remember that cooking in the microwave makes their consistency more loose. Such boilies will lose their shape faster in water. Than those that were boiled.
- Depending on the carp fishing season, the composition of the boilies changes. Rich in carbon in summer, rich in protein in autumn and spring.
- In order for homemade boilies to last longer, they must first be boiled and then frozen.
- boilies are attached to the hook using hair, bandage tape and bandage thread.
- The length of the hair, as well as the size of the hook, depends on the diameter of the boilie.
- When tightening any knots on the line, do not forget to wet it in order to reduce heat at the point of friction.
- Mini boilies are thrown with a “bait spoon” for close distances, and for long distances a “rocket” is used, but not a “cobra”.
- By using mini boilies when fishing, you can improve the design to several hairs per hook.
- If you cannot pierce the boilie, then simply drill it with the thinnest drill.
- To pierce the boilie, it is better to use a special needle with a hook.
Most anglers only know how to put a boilie on a hook, hook their catch and pull the fish ashore, without thinking about what it is made of or why it is so effective. Let’s try to understand why this particular bait is so interesting to carp and its “relatives”.
The word “boilie” itself, translated from English, means “cook” and implies a certain heat treatment of the bait at the manufacturing stage. This is a spherical bait with a diameter of 0.5 to 3 cm, consisting of a boiled, dried or compressed mixture based on various types of meal, including fish or bone meal.
We invite you to read: Fishing boilies – what are they?
Making boilie equipment with your own hands
Even a novice angler can easily make some equipment for boilies with his own hands. To achieve success, a fisherman must understand which equipment will work best in specific fishing conditions.
Knotless fastening method
The knotless fastening method is the most popular among fishermen, as it has repeatedly proven its versatility and high catchability. To create this installation you need:
- pass the leash into the eye of the hook, leaving a free end 5 cm long;
- tie a “hair” loop at the end of the leash;
- wrap the end with a loop around the shank of the hook several times, and then pass it through the eye again;
- Pull the loop through the boilie hole and secure with a stopper.
This boilie rig can be used with both floating and sinking types of boilies. Simplicity of manufacture makes knotless installation the most popular among novice fishermen.
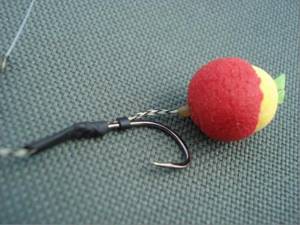
Blowback rig
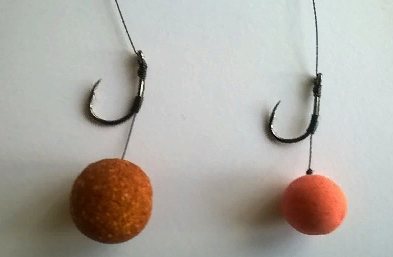
The Blowback rig is perfect for catching trophy fish with large baits. Carp anglers often use this setup when fishing with a “snowman” type bait made up of two boilies. To make a blowback rig you need:
- pass the leader material through the eye of the hook, leaving a free end about 5 cm long;
- wrap the free end around the forend several times and secure with a self-tightening loop;
- form a classic “hair” loop at the end of the leash;
- put a metal ring on the shank of the hook;
- pass a piece of leash with a loop through the ring, securing it with a simple knot in the middle of the forearm;
- pass the “hair” loop through the boilie and secure it with a stopper.
An example of constructing a catchable boilie rig.
The main advantage of this installation is that the ring moves freely throughout the entire structure, making it almost impossible for the fish to get rid of the hook.
Installation with silicone cambric
Installation with a cambric located on the bend of the hook has proven itself excellent when fishing from the bottom. The procedure for its manufacture is as follows:
- the leash is passed through the eye of the hook, leaving an end about 4 cm long;
- the end of the leash is wrapped around the forend and secured with a self-tightening loop;
- at the end of the leash material a “hair” loop is formed, which is threaded into a cambric about 0.5 cm long;
- the cambric is put on the hook;
- The “hair” loop is passed through the nozzle and secured with a stopper.
On a note! The use of cambric significantly increases the grip of the equipment. The fish is detected even before it tries to spit out the hook with the boilie.
In combination with this equipment, sinking leashes with a lead core are often used. Installation with cambric can also be used in zig-rig equipment.
Fishing with boilies is a trophy type of fishing, so the gear used in combination with this attachment must have a large margin of safety. If you know how to properly place boilies on a hook and create different types of equipment, a fisherman can always count on a good catch.
DIY boilies
The most popular among fishermen are sinking boilies.
.
They are very easy to make at home, you just need to know the recipe and have some manufacturing knowledge. To prepare you will need the following ingredients
:
- 1 part corn grits;
- 1 part milk powder;
- 1 part soybean cereal;
- 2 parts semolina;
- 0.5 parts ground sunflower seeds;
- a dozen chicken eggs;
- unrefined sunflower oil (2 tablespoons).
Manufacturing
Such baits are quite simple. You just need to follow a clear sequence and recommendations:
- All dry ingredients must first be ground using a blender or coffee grinder.
- Liquid ingredients must be mixed in a large bowl.
- Gradually add dry ingredients to liquid ingredients and knead the dough.
- Place the dough in the refrigerator for 2 hours.
- Remove the dough from the refrigerator and roll it into sausages.
- Cut the sausages into even pieces, then roll them into balls of the desired diameter.
- Dip the balls into boiling water for 2 minutes.
- Let the boilies cool.
- Dip baits in yellow or red dye.
Recipe for making floating boilies
Sometimes carp fishing with boilies occurs in conditions where some difficulties may arise with sinking baits. Then baits with positive buoyancy come to the aid of the fisherman, for the manufacture of which the following ingredients
:
- 4 parts corn flour;
- 2 parts soy flour;
- 1 part semolina;
- 0.5 parts hemp seeds;
- 1 part milk protein;
- 2 teaspoons vanilla sugar;
- 15 milligrams of betaine;
- 7 chicken eggs;
- purple food coloring;
- 0.5 parts salt.
This bait is made in exactly the same way as the previous one. The only difference is in the cooking process. Floating boilies do not cook in boiling water
. They must be kept over a steam bath for 3 minutes.
Recipe for making dusty boilies
Dusting boilies have gained a very good reputation among amateurs and professionals of carp fishing. To prepare this bait you will need the following ingredients
:
- flavorings (it’s best to use crab flavor);
- 3 parts corn flour;
- 2 parts soy flour;
- 0.5 liters of water;
- 1 part milk powder;
- 10 milliliters of sugar;
- 10 milliliters of fish oil;
- 10 milliliters of betaine;
- pink food coloring.
The manufacturing process exactly repeats the previous two types of baits, only the boilies that collect dust do not need to be subjected to heat treatment
. Just lay them out on paper or a board and let the baits dry thoroughly. It is better to store such baits in the refrigerator.
Adding Flavors
There is an opinion among fishermen that carp are very attracted to various smells, and this opinion is completely justified and true. To increase the effectiveness of baits, you can add the following components:
- roasted and crushed sunflower seeds;
- crushed and roasted peanuts;
- sesame seeds;
- garlic juice;
- cocoa;
- ground coffee;
- ground cinnamon;
- various dips;
- a little cumin;
- vanilla sugar;
- crab and meat flavorings.
But in addition to the aroma, you need to pay special attention to the appearance of the bait; it should be bright. An attractive appearance can be achieved by using a variety of food colorings. Bright colors of baits always attract carp.
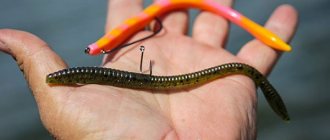
How to attach a boilie to a hair mount?
To plant a boilie use:
- crochet hairline
- a special needle for boilie attachment
- drill (for hard boilies - make a hole for the needle)
- stopper (a piece of Hungarian or stationery eraser)
Nozzle sequence:
- Make a through puncture in the boilie in the center. The needle should protrude 1 cm from the opposite side
- Insert the hook of the needle into the loop of the hair montage
- Pull the needle and hair in the opposite direction
- Insert a stopper into the resulting loop
- Pull the hair from the side of the hook and rest the stopper against the nozzle.
How to attach mini boilies to a hook:
- choose a suitable hook
- make a through hole in the boilie with a needle, nail, etc.
- insert a thin line of 0.2 mm or less into the hole
- tie a piece of match or toothpick to one end of the fishing line
- Tie the second end of the fishing line on a hook, the knot should not slide along the hook
Recommendations from experienced fishermen
When personal experience is not yet enough to fish with boilies, you should turn to experienced fishermen for advice. Only through long-term testing can it be established which methods work well and which should be abandoned. Experienced people who are interested in fishing have very important and reliable information. During manufacture and installation, the following rules should be adhered to:
- To catch fish at depth, the tackle must be weighted. For this purpose, small Cheburashkas are used, the offset hook of which is installed together with a small spring. You can make a corkscrew-shaped spring yourself by winding a thin steel wire onto a small-diameter nail.
- Instead of a boilie needle, you can use a regular awl with a hook.
- It is better to use non-forged hooks for attaching boilies. Such products retain the sharpness of the sting longer, allow you to fish for large carp, and do not break when caught.
- All types of fishing equipment must be made only from strong fishing line or braided cord.
- Mini boilies should only be placed on the hook using a very thin needle. Otherwise, the fragile balls will crumble before being sent into the water.
Sinking, floating, neutral boilies are excellent baits for carp fishing. If the tackle is chosen correctly, then in this way you can catch fish weighing more than 20 kg.
Did you manage to solve your problem using the recommendations from the article?
Yes!
100%
No. More answers required. I'll ask in the comments now.
0%
Partially. There are still questions. I'll write in the comments now.
0%
Voted: 2
Example #4 - Ring on Shank
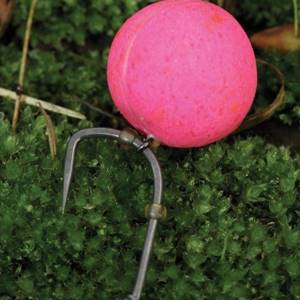
When to use: Best with a pop-up. With a sinking boilie, the efficiency will be noticeably lower
Addition: If you are looking for something unusual, it is quite possible to move away from the classic hair installation and put a mini-ring on the hook, fixing its movements on the sides with special silicone stops. ( editor's note. On the Internet there are different opinions about the pointless purchase of branded stops, supposedly this is not such an important element of equipment, you can completely replace it with cheap analogues. Remember - a bad rod cannot prevent a good hook from hooking a fish, a bad hook can prevent a good rod from catching a fish fish it out. Then it’s everyone’s choice).
So, there are many variations of the ring on the forend, but the meaning is the same - replacing a hair. It cannot be said that this rig is the most catchy, but you need to have it in stock in order to sometimes offer the fish something extraordinary.
Example No. 9 - Regular hair installation
When to use: Anytime with anything
Addition: We could not ignore the most common hair installation, as it was invented at the very beginning. Of course, this hook is the least “sophisticated” and is designed for a super fast turn and an aggressive hook, but... Sometimes all this “tuning” plays a cruel joke. Many fishermen sincerely believe that the same ring can ring under water, and many also say that without heat shrink the bite is much better. Never forget that every carp is different from the next. Somewhere the fish are spotted thanks to all the tricks, but somewhere, on the contrary, the simplest and most uncomplicated installations give results. Never forget about the great-grandfather of all rigs and keep it in reserve if you suddenly fail to get a bite with more modern samples.
Rating: 3 out of 5
Example #5 - Short D-Rig
When to use: strictly with pop-up and on hard mono material. This type of fastening is always used on Chod-Rig and Hinged Stiff-Rig
Addition: In fact, the short D-section itself does not play any role. Due to the rigid installation, which makes the fish perk up and rush away (being caught during this jerk), and the aggressive bending of the leader itself, there is no point in making a long section. The short one copes with a bang, but only if the two conditions mentioned above are met.
How to attach boilies to tackle?
After the first three stages, namely choosing a reservoir, preparing boilies and tackle, it remains to understand exactly how to tie boilies onto the tackle. Using a thin needle, make a hole in the dough bait, and then attach it to the leader that you previously attached to the main fishing line.
Important! Do not attach the boilie to the hook, this will scare away the carp!
Carp is a very cunning fish that will immediately understand what is happening. The subtlety of preparing boilies is that the leash should descend approximately from the center of the hook shank. To do this, pass it through a cambric pre-installed on the hook. This will double the reliability of hooking fish. The length of the leash should be twice as long as the length of the boilie itself.
A beginner in fishing can easily figure out how to knit boilies and then apply this technology in practice. It is important to remember that for fish of the carp family, first of all, it is not the color or smell of the proposed bait, but its nutritional value. The carp will immediately understand that this food will not satisfy it and therefore simply will not touch it. The ingredients for the boilie should be saturated with fats, proteins and carbohydrates.

However, if your goal is short-term success, flavorings are also suitable. Over time, the fish will get used to your new baits and in the future you will always leave the pond satisfied after using tackle with boilies.
Having familiarized yourself with the technique of knitting boilies, feel free to take on practical classes to consolidate the skills you have acquired. Boilies for carp fishing are versatile and valuable equipment for both experienced fisherman and beginners.
Placing the boilie on the hook itself
The boilie can be placed directly on the hook itself, that is, on its shank. It is held in place by a spring attached to the bottom of the hook. This method is only possible with homemade boilies, since a store-bought one simply cannot be pierced with a fishing hook. It’s not entirely correct to use it, but some fishermen still use this method.
Bandage tape
The boilie can be attached to the hook using bandage tape.
It is attached to a hook or an auxiliary D ring, which is attached to the shank of the hook using a Knotless knot.
Thread the ribbon through the boilie using a needle and install the stopper. The tape is made of latex, thanks to this the boilie is attached tightly to the hook.
Algorithm for tying a ribbon: take a latex ring, thread one end of it into the D ring and then thread it into the loop of the latex ring itself, tighten the resulting knot.
Now we have the free end of a closed, double-folded tape. We thread this free end into the boilie and install a stopper.
Bandage thread
Here, a bandage thread is used as fastening. It is made of silicone, just like the tape. Very durable, but also stretches very well. It is attached to the hook thanks to an auxiliary ring; you need to tie it to it with a Knotless knot.
The remaining steps for putting on the boilie are the same as with hair mounting. Only the boilie should fit snugly to the handle.
KNOTLESS KNOT
Surgical loop:
- fold the end of the fishing line in half;
- make a loose loop and thread the folded end through it several times;
- Do not fully tighten the knot;
- Wet the line in the area of the knot and tighten it completely.
Perfect Loop Knot:
- Tighten the knot after wetting the fishing line.
- Pass the top loop through the bottom loop;
- Run the free end of the fishing line between the resulting loops without tightening;
- We make a loop again repeating the first point, placing it on top of the first loop;
- Make a loop by passing the free end under the fishing line;
- The long end of the hair is wrapped around the shank of the hook at least seven times.
- Next, thread the long end into the eye of the hook.
- All that remains is to tighten the knot.
Recipes
For summer fishing, bait ingredients containing carbohydrates with the fragrant smell of spices or fruits are used.
First option:
- 0.5 cups of any seeds.
- 1 cup soy flour.
- 1.5 cups of birdseed.
- 1.5 cups of semolina.
- As many eggs as the dough will eat.
Second option:
- 2st. spoons of anise or cinnamon.
- 1 cup corn flour.
- 1 cup wheat flour.
- 2 cups semolina.
- Eggs as much as the dough needs.
For autumn and spring carp fishing, ingredients containing protein are preferred.
First option:
- 0.5 cups of salt.
- 0.5 cups of any crushed seeds.
- 1 glass of semolina.
- 1 cup soy flour.
- 1.5 cups fish base.
- 2 cups corn flour.
Second option:
- 1 cup ground seeds.
- 1.5 cups of semolina.
- 2 cups soy flour.
- 4 cups fish base.
- Dip. For example, the aroma of fish.
- Eggs, as much as the dough needs.
How to attach boilies to a carp hook?
The hook is selected in proportion to the boilie, single, made of thick and reinforced wire, well sharpened, with a shortened fore-end.
For a floating boilie, the weight is set at the required distance from the hook to lift the bait from the bottom.
Boilies are attached to the hook using hair, bandage tape, bandage thread and directly to the hook itself.
How to attach a boilie to a hair mount?
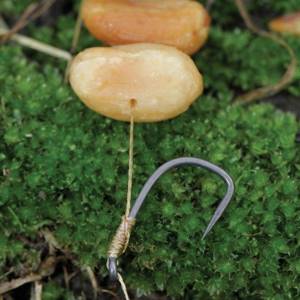
An option for a homemade boilie, it can be attached using a hair and a silicone cambric placed on the shank of the hook, attach a small spring to the free end of the hair, and accordingly, stick the boilie around the spring.
An option for a purchased hair is to make a loop at the free end and thread it into the ring of the hook from the tip side, let go a few centimeters and knit with a Knotless knot. Then pierce the boilie itself with an awl with a hook, hook and thread the hair and fix the free end with a stopper.