A broken feeder is the main misfortune of an angler
Fishing is a very calm and safe hobby. Usually the worst thing that can happen is an unsuccessful catch, which does not upset those for whom fishing is not the main way to make a living. But sometimes a real misfortune happens: a good, high-quality rod that has been tested for years, for which you once paid a fairly large sum, for some reason turns out to be damaged or even broken. It even happens that repairs are more expensive than purchasing a new fishing rod. Fortunately, most fishing enthusiasts have hands that grow from the right place, and they can repair the feeder rod themselves. How this can be done will be discussed in this article.
What does a full-fledged basic repair of a fishing rod consist of?
First of all, you need to remove the rings from the consumable fishing rod. Each ring at the attachment point must be heated with a lighter, from a burner, or in any other way that will be convenient to implement in your home. After heating, it must be carefully removed, using pliers. It is important to prevent the mount from overheating.
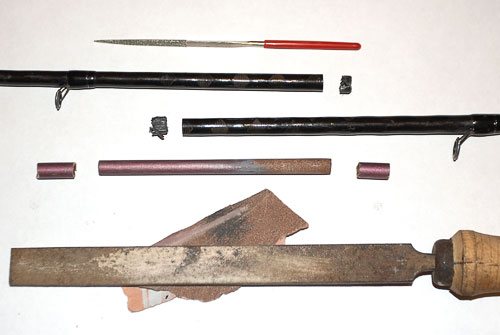
Repair of the feeder rod knee is carried out as follows. First of all, it is necessary to remove the damaged part of the knee. To do this, use insulating tape to rewind the bit with great force in several turns at a short distance from the cracks. This will prevent the rod from splitting further and will allow for a convenient and even cut. The insulating tape is removed at the very last moment. Using a needle file, you need to carefully saw off the damaged part of the rod using the resulting mark. By the way, using a needle file here is much more appropriate than the same jigsaws and hacksaws for metal - the cut will be carried out faster, smoother and more accurately. Similarly, you need to saw the rod along the mark at the other end of the crack. The damaged part can be thrown into the trash bin.
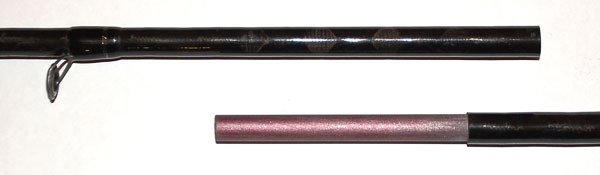
The Chinese fishing rod should be disassembled into elbows, their diameter should be measured, and the most suitable elbow should be inserted into the bottom of the damaged feeder elbow with a thin ring until it stops. The docking area should be marked with a felt-tip pen. The next mark is created at a distance of ten to fifteen centimeters towards the thick part of the consumable rod. An incision must also be made at this location. The resulting piece is inserted from the bottom of the elbow of the feeder being repaired. Both parts should fit snugly against each other and not dangle. Otherwise, the knee should be shortened until an acceptable result is obtained. As a final touch, you can lightly tug the consumable part for better fixation.
The upper part of the rod requires more careful handling. Under no circumstances should you try to force it into the consumable part, otherwise it can easily jam. You should insert it very carefully. Before doing this, it would be a good idea to use a ruler to mark the length of the inserted vertex. Based on this marking, it will be possible to judge how deep the top will go into the flow part.
Why do the tips break?
When the braid becomes loose and sagging, it often gets caught in the rings. But not only. Incorrect placement of the rings can also lead to tangling and breakage of the tip.
When a poor-quality tip is bent, its rings turn to the side; as a result, during sharp casts, the cord can catch the first or second ring.
By holding the feeder tip between your palms, you can see that the rings unfold.
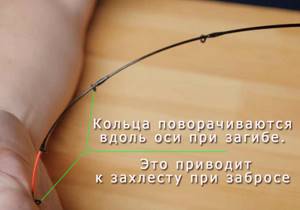
This drawback is common to many feeder manufacturers. Ideally, the rings should not rotate relative to the stiffener during any bending. This check of the feeder tip can be done before purchasing. But even the “crooked” rings of purchased tips can be corrected by re-gluing them. Smooth quivertypes will last longer.
How to repair a feeder whip at home
If it is necessary to repair the top, a completely different approach is used. Of course, the first thing that comes to mind and the simplest thing is to buy a new whip. But both before and now, choosing the right one is a big problem. Previously - due to lack of supply, today - due to its excessive abundance, which makes it impossible to find a suitable size. In any case, for a complete repair you should learn just a few useful operations:
1. Increasing the diameter of the tip.
Before starting repairs, it is necessary to degrease the butt - the thick part of the tip. After degreasing, apply a layer of quick-drying waterproof varnish with a brush. Then the tip is turned with the butt up and dried in this position. The varnish forms a cone that expands from the butt, and after applying several coats you will be able to achieve a perfect fit.
2. Reducing the diameter of the tip.
Oddly enough, reducing the diameter of the whip is somewhat more difficult to implement than increasing it. Here you need to use fine-grained sandpaper. The butt is carefully ground down until the tip reaches the required depth. Once this process is complete, the butt is coated with a layer of quick-drying, waterproof varnish, which will give a tighter, softer fit.
3. Replacing the tulip.
Using a drill of a suitable size, we remove fragments of the whip from the landing tube, after which the tip sits on the glue. If the remaining intact part of the tip is not wide enough in diameter to allow even a millimeter drill through, it should be heated and the fragments squeezed out with your fingers.
4. Replacement of the pass ring.
After preheating the legs with a lighter, the passage ring is carefully cut off from the consumable tip with a knife blade. The ring sits on the glue and is wound. The winding is coated with quick-drying waterproof varnish.
5. Winding the split tip.
Most often, to solve this problem, an ordinary thread bandage with a thin thread is used. The splitting area is glued together, after which an additional layer of glue is applied to the area that needs to be wound. After this, by rotating the tip, it is wrapped with a thread held in the other hand. The resulting bandage is coated with a quick-drying waterproof varnish and painted with bright fluorescent paint.
6. Shortening the tip of the feeder rod.
This is done if repairing a segment is impossible - in this case, the tip is simply cut off to the next ring. Of course, it will become tougher and will be suitable for slightly different fishing conditions. However, it will be able to function for a long time without replacement.
Do-it-yourself feeder repair
HomeArticlesAll articlesArticle
Starnak
Background.
I always thought it was very difficult to break a feeder. You can do this accidentally, for example, by running over it with a car wheel or pinching it with the door of the same vehicle. But in order to go fishing... You have to try. My belief was supported by my personal four-year experience of fishing with a light feeder, which was regularly used to cast excess feeders of 80 and even 100 grams with a recommended maximum weight of 70. In general, I still think so, however, one breakdown still overtook me.
MR spring fishing. A terrible side wind, which I have to break through with a feed-intensive 50-gram feeder (which will contain enough food for an entire hundred square meters), was caught somehow, but I decide and even say it out loud - “the last cast and that’s it.” When casting, I hear a dry crack and half of the light flies into the river along with the feeder. The second knee is cut in half. So much for the indestructibility of feeders...
What to do?
Fishing is over one way or another, but I love this feeder. I don’t even know why, there’s nothing special about him, light, snotty, but I love him and that’s it. This is inexplicable. Therefore, first I went to Extreme and looked for what was probably the last rod there; the sellers took great pleasure in getting rid of the outdated product, encouraging the purchase with an impressive discount. But my heart became attached to the veteran. Memories came flooding back. Here I am convulsively squeezing the butt of the rod, while the fishing line, caught on the screw of the barge, flies off the spool with a whistle... A record bream emerges from the depths, and the rod extinguishes and extinguishes its powerful pulls... Platnik, I gaped, and the carp rolled the feeder almost into a ring between the supports ... The hand did not rise to bury the tackle with which so many fishing emotions are associated. Therefore, the veteran’s wreckage was sent for examination instead of the trash heap.
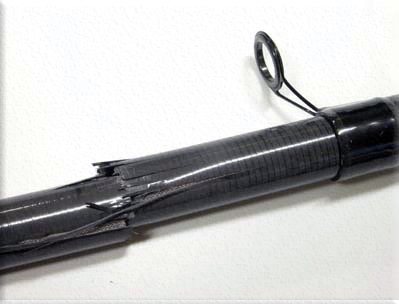
An autopsy with a magnifying glass revealed the presence of a suspicious series of chips and scratches lined up on all sides of the fracture. A suspicion arose that at some point a feeder or a load passed along the feeder, or was somehow weakened or damaged, and this “thin” place ultimately failed... But why grieve over spilled aromix, we must get to work.
The best thing, of course, would be to give the rod for repair to repair specialists (Kashtanov, Sabaneev, etc.), but there is a shortage of free time, as well as the desire to use your little hands, trained in rearranging guides and reel seats. Again, Flex Coat and glue and the varnish disappears... And suddenly my experience will help someone for whom repair is unattainable beyond range. Therefore, the work began to boil, the main stages of which I will now briefly describe here.
Let's start the renovation!
So first the unsightly edges of the fault were removed. A little, without fanaticism, so that the joint is still a joint, and not a step. For this, a diamond needle file with a triangular profile was useful; final finishing was carried out with fine sandpaper.
Step two was the selection of a donor for the insertion. This is the most difficult part of the whole event. Because different manufacturers do not want to agree with each other so that their forms are inserted into each other with the required taper in the event of a breakdown or repair. Here, of course, workshops with a huge supply of material rule unconditionally. However, among the old junk, a club was discovered that had been lying idle for many years - it had waited for its finest hour. Having roughly estimated it, I snatched a piece from it with a similar cone with a reserve, then, trying it on, brought it into place. At the same time, I worked on it with a file and sandpaper, because the cone, of course, did not fit perfectly. I repeat once again - this is the most difficult and tedious part of the entire repair. But also the most responsible. The closer the cone is to the original, the better. After finalizing the resulting insert, I was satisfied enough to move on to the next step.
Next, this insert must be placed on epoxy, joining the two halves of the rod. There are a couple of subtle points here. The first is the correctly selected cone itself. It leaves such a micro gap that the added epoxy is squeezed out with a bang. So, while the coated part fits into place (which I also coated as best I could, just in case), most of the glue will collect at the joint. It, of course, needs to be removed from there. After one side has sat down, install the second side in the same order. If the cone sits correctly, then the insert should not “move”. If the insert “moves”, I think you can wait until the glue sets and then install the other side. But it is better that the insert is tight - this will affect the quality of the repair.
One more nuance - you should, of course, ensure that after gluing the rings are coaxial. For this purpose, I found a whip from an old (I'm afraid to call THIS a fishing rod) stick and used it as a spacer in the rings. The diameter was chosen very well and it was possible to accurately secure the whip in place and center the rings almost perfectly. The knee is sent for drying, first to the radiator (fortunately it is still heated), then to dry at room temperature. Two days (just in case) and you can remove the whip from the rings.
In principle, this repair can be considered complete. After assembling the rod and making a few test swings, I was convinced that it would still serve me. Due to the insertion, the tuning has changed slightly, but in practical terms this is completely unnoticeable. But in addition to glue, there is also varnish... Therefore, I additionally gave it a winding with threads, as when winding a ring or the same reel seat. Unfortunately, it dawned on me late that before this procedure I should have gotten a piece of carbon fiber and wrapped several layers around the joint before wrapping it. But be that as it may, the repair is now completely completed, a beautiful, even joint with neat winding is pleasing to the eye. The last thing left is to carry out trials by combat.
...More than a year has passed since then. This feeder has served me well all this time, both winter and summer. It was with this that I fished during the filming of the film “Catchy Feeder”; it was with this that I raised my record-breaking bream of 3.310. I loaded it mercilessly, as before, and 100g of feeders and feeders, whatever I threw at them... During all this time, the only thing that happened was that the varnish coating cracked precisely because of the lack of carbon fiber winding at the joint. When casting with force, a slight cracking sound is sometimes heard - apparently, somewhere a piece of the insert has moved away from the blank or the glue has peeled off. Otherwise, the feeder works as before. And for some reason I love him. And the new one was never taken out of the case.
Don't part with your favorite gear because of such trifles as breakage. Give them a second life!
Tags: feeder repair homemade
30

Register or log in to comment.
Valerka
-> Article
Do-it-yourself feeder repair
06.02.2013 15:04:42
Thank you very much! Helpful information.
Repair of the lower part of the form
The lower part of the form requires more serious repairs. In this case, it is necessary to strengthen the damaged area. The method itself is not much different from repairing the top. You will only need a thicker thread and you will have to increase the area covering the crack. The work is performed in the following sequence:
- The area with the crack must be thoroughly cleaned and degreased with alcohol. Next, it is covered with a layer of varnish and left to dry in the sun. After this, thread winding is performed. It is better to take good shoe or surgical threads. To preserve the basic working qualities of the rod, it is necessary to make a winding that extends 2 cm beyond the boundaries of the crack at each end. It is very important to make the turns tight so that the thread is pressed well against the form throughout the entire section of the winding.
- Next, coat the winding with epoxy glue. It is important to use good quality glue, just like in shoemakers.
- After the glue has dried, coat the area with waterproof varnish in two layers.
To prevent varnishes and glue from getting onto adjacent areas of the form, it is better to wrap several layers of adhesive film around these areas. It does not allow glue and varnish to pass through. After completing all the work, the film is easily removed, and no marks remain on the rod.
Repair of spinning rods - breakage of the upper part of the rod
To do this, use a diamond tool (any other tool does not cut carbon fiber, but breaks it) to trim the cut. A shortened lower part of the knee is obtained.
The upper part of the broken elbow is inserted into the lower one and the entry is adjusted, shortening the lower part of the upper trim until the mating length is three diameters. This way you can join a broken spinning rod’s knee even while fishing.
It is easiest to repair float plugs in this way, since in them you can simply insert the upper part of the broken knee into the lower one and continue fishing. If the knee is broken almost in the middle, then you need to first trim the thin piece and then cut the end of the thick piece until the entry at the joint becomes the required length.
After adjusting the scraps, it is better to glue them together with a drop of waterproof glue. A fishing rod repaired in this way can be used for fishing indefinitely, that is, until the next unforeseen event.
It is worse if the knee is split in the upper part, at the end of the knee, or if the butt knee is broken. In this case, a bandage is used. You can carry out independent repairs at home according to the following scheme.
The main causes of trouble include:
- Low quality fishing gear.
- Lack of fishing skills with the selected gear.
- The bottom of a reservoir, rich in driftwood, vegetation, and objects of human activity.
- A strong fish whose weight exceeds the permissible limit of the fishing rod.
Manufacturers are trying to reduce the weight of the rod by using carbon fiber in the manufacture of spinning rods. The material is practical, durable, and does not withstand strong physical and mechanical stress.
When purchasing tackle, you should pay attention to the integrity of the structure, the absence of damage, which will determine your fishing success, strength, and duration of use of the product.
You can repair spinning rods at home or in the wild. The complexity of the procedure depends on the nature of the breakdown, the availability of materials, additional knowledge, and spare parts from the fisherman.
How to repair a feeder rod with your own hands
Have you been trying to heal your JOINTS for many years?
Head of the Institute for the Treatment of Joints: “You will be amazed at how easy it is to cure your joints by taking the product every day for 147 rubles .
In order to repair the feeder with our own hands, we will need the most ordinary things that can probably be found in any home: a ruler, different-sized needle files, a file or block, a felt-tip pen and, of course, insulating tape. In addition, it will be good if you acquire an old unnecessary fishing rod made in China, which you can put to use with a light heart.
Our readers successfully use Sustalaif to treat joints. Seeing how popular this product is, we decided to bring it to your attention. Read more here...
Telescopic fishing rod breakdowns and repairs
To understand how to repair telescopic fishing rods, you need to understand what breakdowns occur most often.
Most often, the knee breaks in its lower, middle or upper part.
Depending on the type of damage, a specific method of repairing the fishing rod is selected.
It is extremely common for the whip of a conventional fly rod, which is hollow along its entire length, to break:
- Traditionally, the first third of the upper length of the whip is damaged. To repair it, you need to select and install a new connecting link.
- Less commonly, the whip of the 2nd knee breaks. Here it will help to wind the fiberglass to a suitable diameter and fit it to the next cone. Naturally, the fishing rod will have to be shortened a little, but this will have little effect on the quality of fishing.
- Forms with a monolithic carbon fiber insert sometimes break. If inserted carelessly, the top of the insert part may break, but it can be easily repaired using a diamond file and a new connector.
The situation is simpler with the repair of plug rods.
The whip breaks here infrequently, since overloads occur on the rubber shock absorber tip. If this happens, then the problem can be easily solved by selecting the latest Teflon bushing.
Repair of the upper and middle knees is related to the location of the breakdown:
- Breakage of the upper part involves building up the lead-in part of the narrow knee so that the connection point moves to the undamaged part of the knee. The breakage site is leveled and covered with a carbon fiber bandage that can prevent future destruction of the gear.
- If the lower part is broken, they also make a bandage about 6-8 times the diameter of the knee ( joint, knee (lat. articulatio genus) - the joint connecting the femur, tibia and patella
) at the fracture site.
Apart from this, you can straighten the broken areas and install the upper fragment in the lower part:
- The joint is treated with sandpaper inside and out.
- They are glued traditionally with epoxy glue, making sure there is no excess both inside and outside the cavity.
- A cotton swab dipped in solvent will help fight them.
- After the resin has hardened, a two-layer fiberglass bandage is installed on the outside, preventing the form from deteriorating further.
This method is suitable for repairing the upper and middle legs of plug fishing rods.
How to repair the lower knees is worth discussing most thoroughly. If such a breakdown occurs, then eliminating it consists only of inserting a bushing and applying a bandage.
It is best to use a carbon fiber sleeve with properties similar to those of the fishing rod being repaired.
The bandage will have to be done both externally and internally. The length of the sleeve must slightly exceed 6 diameters of the knee. The narrow knee must move freely in the sleeve.
The complexity of the repair sometimes forces anglers to replace the entire docking assembly.