Worms for fishing are a classic and widespread bait for almost all fish, the effectiveness of which is difficult to compete with other types of bait, as most anglers know very well. And if in natural conditions it is not so difficult to get this kind of bait, knowing about the places of its usual habitat, then in urban conditions the best option is to buy bait. For fishing enthusiasts who periodically go on fishing sessions, the problem of the amount of bait is not as pressing as for avid fishermen who actively fish and use this animal bait in supplements to complementary foods.
Purchasing a large number of pieces of bait will not be cheap, and sometimes it is quite difficult to find high-quality material that is suitable in size for the fishing conditions. The way out of this situation is to breed worms for fishing yourself at home. With modern technologies and adherence to a certain production culture, these processes are within the capabilities of any fisherman, and the costs of raw materials and equipment can more than recoup these investments in a short period of time. Reading this article will help convince the fisherman of the simplicity and accessibility of worm breeding technologies.
Worms for fishing - what is the advantage of the simplest bait
The main advantage of this classic nozzle is its versatility. After all, even having simply dug up worms in the garden, a fisherman has the right to count on catching almost all types of carp fish and even some obvious predators. Moreover, this type of attachment is suitable for both float and bottom gear. Availability of bait also plays an important role. Knowing the vital functions of a certain type of worm, the angler can easily get the bait on his own. The only tool you need is a shovel, and the roadside soils of the roadsides, earthen areas near accumulations of garbage and manure heaps are almost everywhere populated with this type of bait.
Low storage requirements, which require ordinary slightly moistened soil or moss, allow you to stock up on bait for a long period of time without having to worry too much about caring for it. Well, the ease of use of the bait does not cause difficulties even for a novice fisherman. After all, when using a worm for fishing, there are no special requirements even for the shape of the hook. The main thing is that it has a hook that prevents spontaneous sliding of the bait and a size that is optimally suitable for the bait.
What worms are used by fishermen
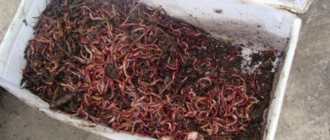
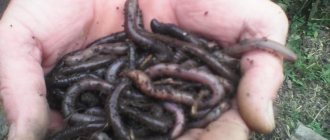
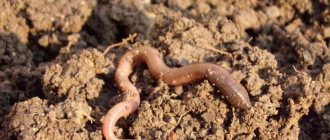
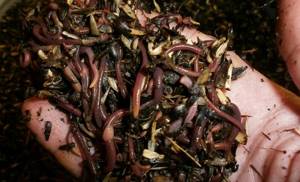
Most types of ringworms living in our latitudes are suitable for fishing; in addition, Californian worms have been bred in artificial conditions for a couple of decades by specialized farms for fishing and the agricultural sector associated with soil formation and poultry rearing. The natives that inhabit our soils everywhere include earthworms, earthworms, and dung worms. In the rotted deciduous masses, the underleaf is widespread, and the swamp worm lives in the marshy and coastal soils of reservoirs.
Varieties of the Californian species of worms introduced and already in some regions gone wild and adapted to the weather conditions of the middle zone include the red worm and dendrobena. Standing apart from these original species is the larva of the beetle beetle or the mealworm, which is also among the popular and unpretentious for storage conditions. The interesting thing is that all of these types of worms listed above can be grown at home.
How to breed worms for fishing
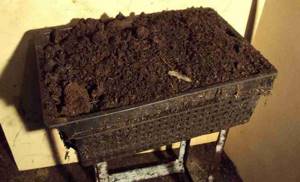
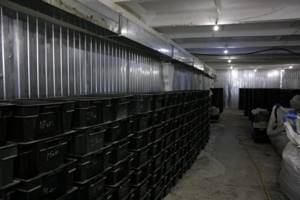
Breeding worms for fishing will require some preparations from the fisherman and, in particular, the preparation of special containers, soils, the initial uterine population of the selected type of bait and the substrate in which the worm will breed and also feed. It is most practical to use plastic or wooden boxes with a height of no more than 40 cm with drainage holes made in the bottom for the worm cage. Soils are used depending on the type of worms, but in most cases you can use soil from molehills or directly from the garden.
Important! When collecting soil to fill worm chambers, you need to pay attention to the absence of ash in the earthen compositions, which will subsequently negatively affect the life activity of the bred organism, increasing acidity.
Biological planting material or breeding stock can be purchased in special nurseries, but you can simply remove it directly from the natural environment, simply by collecting a suitable volume of worms of the right type. The substrate for organizing nutrition and drainage for each breeding species of worm is prepared using special technologies, which the fisherman will learn about after reading the further material in the article concerning the process of reproduction of a certain species separately.
Household breeding technology
Necessary equipment and place for breeding
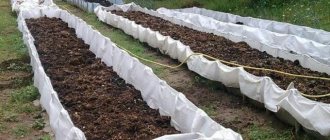
If you decide to start breeding worms, you first need to carry out preparatory work - choose and prepare a place or container. The containers can be wooden, plastic or cardboard boxes (it is clear that cardboard containers will have to be changed frequently), and piles.
They are placed in a barn, garage, or any other specially designated place where the necessary conditions can be met - substrate humidity of at least 70-80% and temperature from 12-15oC to 22-24oC. You can also breed worms in a regular compost heap or pit.
You can breed worms in simple boxes in the basement at home.
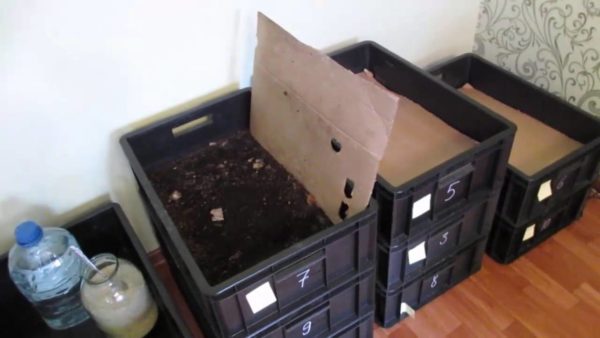
One convenient option is to use two or three perforated boxes stacked on top of each other. The lowest one has holes around the perimeter at the top of the sides. This box is intended for vermicha – the liquid component of vermicompost. A box with perforated walls and bottom is placed on top of it, a nutrient medium for worms is placed in it and individuals are populated; the top of the boxes should be covered with burlap or other “breathable” fabric, since creepy crawlies love dark and damp places.
Making a worm
You can breed individuals on the street, right in the garden, by separating a certain place for this and fencing it with boards or other available material.
Approximate dimensions of the worm: width 1-1.2 m, height 30-40 cm, length arbitrary. Compost is placed on the bottom in a thick layer, leveled and well moistened. Then for 5-7 days the compost heap needs to be covered with material that allows air to pass through.
This could be old burlap, cardboard, or a layer of straw, which need to be watered from time to time with rain or well-settled water (at least 2-3 days).
Chlorine must completely evaporate, since it is poisonous for worms of any kind.
After a week on each square. m, a recess is made in which the creepers are placed, and again the worm chamber is covered with breathable material.

A box or other options can serve as a worm trap.
Compost preparation
As compost for putting in boxes or pits, you can use mixtures of rotted manure, bird droppings, peat, straw, leaves and stems of vegetables and weeds, crushed eggshells and food waste.
Fresh manure should never be used; it contains a large amount of ammonia and the individuals die. Rotted manure 2-3 years old will also be of little use, since it no longer contains useful nutrients.
All organic materials suitable for cultivation are collected on a heap (or in a specially designated place), covered and, periodically moistened, kept for 1.5-2 months.
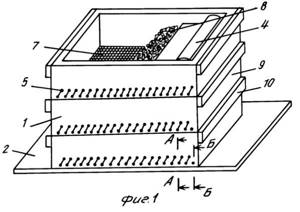
Worm box diagram
Own vermifarm
If you decide to get your own small worm farm, then, first of all, you need to arrange a place to keep the worms, stock up on containers, prepare compost and provide comfortable conditions for breeding.
The purchase of breeding stock is of decisive importance. The most suitable species, as already mentioned, are California red worms or prospectors. One family consists of 1500 individuals. In order to populate 1 cubic. m of compost requires 1-3 families of breeding stock.
Moving into a new place must be done with great care. First, a few individuals are released into a small amount of prepared soil in a separate container, the soil is leveled and the container is closed. After a couple of days you need to add some food. If all the worms are active, mobile, and have a characteristic red color, the entire population can be populated. If dead individuals are found, then it is necessary to correct the acidity of the soil (the most favorable environment is considered to be with an acid index of 6.5-7.5 pH).
Growing worms
How to feed earthworms
Earthworms are true vegetarians and they cannot tolerate protein foods: meat, fish, eggs. When buying breeding stock, you need to find out what the seller fed his wards, since the most common food is the one they tried “from birth”. Nevertheless, they quickly get used to new food, especially Prospectors. It takes some time to get used to a certain type of food, so new components should be introduced into the food supply gradually, giving the worms the opportunity to adapt.
Plant remains, potato peelings, cabbage leaves, various food waste from the kitchen of plant origin, tea and coffee grounds, straw, grass, dry bread are suitable as feeding. Just everything you add to the compost pile should be shredded for easier and faster processing by the creeps. Otherwise, the process of acidification, fermentation or rotting of the products may begin.
You need to feed every 2-3 weeks. Pour the fertilizer over the entire surface of the boxes or piles, evenly, 7-10 cm thick, until the thickness of the processed humus reaches 50-60 cm and the substrate takes the form of evenly processed biomass. The approximate cycle time is 3-4 months from the time of stocking.
Feed the worms every 2-3 weeks
Care and reproduction
The main care on worm farms or worm farms is to maintain the temperature regime, timely feeding, and maintaining the humidity level when watering with warm rain or settled water.
Being in favorable conditions, the worms begin to reproduce. In the compost they lay cocoons - small balls of yellow-sand color. Each cocoon contains several eggs, from which small worms appear 2-3 weeks later, and after another 7-8 weeks they are ready to produce offspring. The unsurpassed leaders in reproduction speed are Prospectors - one individual produces offspring of 1,500 individuals per year.
How to breed crawling worms
In nature, crawlers live in moist soils mixed with rotting plant organic matter, tree leaves and dying grass, which is their main and natural diet. For fishing and the breeding process, crawlers are collected after rains in the evening and at night, when they crawl en masse to the soil surface.
Important! The size of some crawling specimens can reach 30 centimeters; it is these specimens that are best selected for breeding stock.
For the worm hutch, take a wooden slatted box 20 cm deep, which is covered with breathable material; burlap is especially practical to use. The substrate is prepared from ordinary soil mixed with finely chopped hay and leaves, which is subsequently moistened. 20–30 individuals of the breeding stock are placed directly on the surface of this mixture and after two or three months the result is obtained in the form of young shoots of crawling stock. Growing worms in a summer cottage can be done directly in the open ground by organizing worm hutches in a dug trench filled with substrate using the technology presented above. Throughout the warm season of the year, the angler will be guaranteed the availability of bait.
How to Grow Dung and California Worms for Fishing
California red worms are bred at home using a slightly different method from the breeding of crawling worms. This breed is heat-loving and subtly reacts to soil acidity, which requires a more scrupulous approach to preparing the substrate, which, by the way, is also suitable for breeding dung worms. For queen cells, take plastic boxes with drainage holes 30–40 cm high and fill them to the top with a substrate made according to the composition presented below, which includes:
- chopped straw;
- sawdust from deciduous trees;
- manure;
- chopped hay.
- ordinary land.
The substrate components are thoroughly mixed together and moistened. After pouring the mixtures into the boxes, they are thoroughly compacted, after which the mother material itself is placed in the top layer. In the room where the box is installed, it is advisable to constantly maintain the temperature at +20, +22 degrees. These are optimal conditions for feeding and breeding of the Californian species of worm. Dung beetles can be bred at temperatures four or five degrees lower. These types of worms produce ready-made bait 40–60 days after the culture is planted in the substrate.
Types of worms
Let's look at what types of worms you need to buy for breeding and how they differ.
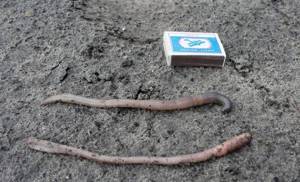
Regular rain
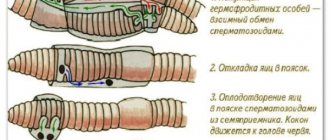
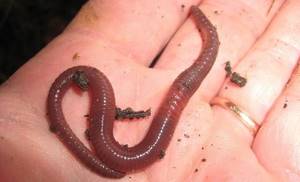
Earthworms are invertebrate animals whose body consists of ring-shaped segments with short bristles. The body is smooth, slippery, cylindrical, 15-30 cm long. The body of the worm moves based on the bristles. The ventral side is flat, the back is convex and dark in color.

The earthworm is a hermaphrodite but reproduces sexually through mating. The thickening on the front is called the girdle. There are glands that secrete a sticky liquid. The animal wraps its eggs in mucus during reproduction. A cocoon of mucus protects the eggs from dampness and adverse factors. After a while, small worms come out of it. The lifespan of an earthworm is 3-4 years.
The earthworm does not have sensory organs, but perceives irritations with the help of the nervous system and reacts to them reflexively. It also has no organs of vision, but it perceives light stimulation. Earthworms sense odors and are capable of regenerating lost body parts.
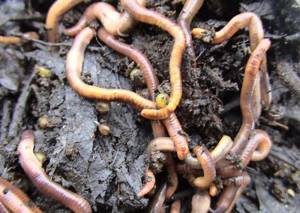
California red
One variety of earthworm is the California red worm, which is often bred at home. Compared to earthworms, Californian ones have many advantages in breeding, growing, and feeding. This animal reaches 6-8 cm in length and weighs 1 g. Reproduction occurs at three months of age. With proper care, each individual produces up to 500-1500 pieces of its own kind per season. The Californian worm is distinguished by both high fertility and longevity. Its lifespan is about 16 years. The only drawback of the California worm is that it is very thermophilic and does not crawl deeper into the ground when the temperature drops.
Prospector
The prospector worm is the result of selective breeding. This species was obtained in 1982 as a result of crossing southern and northern dung worms. A distinctive characteristic of the animal is the presence of the instinct of self-preservation. At low temperatures it goes to a safe depth. This species reproduces in a much wider temperature range - +8...+29 °C.
The productivity of the prospector worm is higher than that of the ordinary earthworm. He is unpretentious, does not get sick and is distinguished by his perseverance in the substrate. Unlike the California red worm, the prospector worm easily switches from one type of food to another. The reproduction rate and life expectancy are the same as the Californian one, but this species retains high viability and productivity at a high density of the substrate.
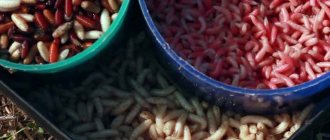
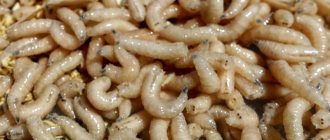
How to breed mealworms
In addition to Californian and earthworms, at home you can successfully breed zoophobus or mealworms, better known in the fishing community. To reproduce them, you will need a solid and low, 15–20 cm, plastic box with a mesh lid. The habitat and reproduction of the larvae is prepared from flour, bran, small sawdust of deciduous trees and ground dried bread. The substrate elements are intensively mixed together and scattered over the bottom of the box 5–10 cm thick.
For breeding stock, the pet store buys a couple of dozen beetles, and in their absence the larva itself, although in this case the breeding process noticeably increases in the time it takes to release the finished product. The beetle culture is placed in a substrate, and the box is placed in a place where the room temperature does not drop below +25 degrees. After two months, the mealworm beetles will begin to reproduce, one of the reproduction phases of which is a grown larva or a mealworm needed by the fisherman for bait.
Video: Worm breeding as a business

Another advantage of California worms is their ability to withstand a wide range of extreme temperatures. Typically these worms thrive in temperatures between 18 - 27 C. When temperatures drop, red worms must be protected from freezing. Even red worms kept outside can easily survive the cold temperatures of northern latitudes. But they are less active at temperatures below 10 C, and under these conditions only the prospector worm continues to work and reproduce.
Of course, you need to provide them with shelter and insulation. This can be as simple as keeping them in a trench filled with aged manure and covered with straw or leaves. Also; When the temperature rises, keep your farm cool. If your temperature exceeds 35 degrees, the worms will try to escape from your bins to cooler areas. Therefore, provide them with shade or, if possible, move them to a basement or cellar.
Red worms are very fertile, and 9 weeks after birth, red worms are mature. Small red worms hatch from small lemon-shaped cocoons. So even your youngest red worms will reproduce within about 2 and a half months and produce their own cocoons. Each cocoon contains an average of five small worms; usually three will eventually hatch, emerge and begin to reproduce. So if you buy a kilo of red worms after about four months, you will have 2 kilograms, and after nine months you will have 4. However, these are just general guidelines. Many factors influence the reproduction of red worms. The soil you choose, food sources, moisture conditions, and temperature all affect how quickly or slowly your worms will reproduce.
Red worms are happy to continue working for you in the conditions they like. Provide them with food, moisture and suitable habitat and they will happily remain in their boxes or colonies outdoors. However, if their habitat becomes dry or too acidic, they will try to escape. If you don't feed them, they will look for food.
Like all worms, red worms breathe oxygen through their skin. In order to breathe, they require material that is moist but not saturated with water. A moist environment also allows organic matter to break down and microbial life forms to thrive. Since worms do not have teeth, it is this soft mixture of decaying food and microbes that the worm feeds on.
Compliance with containment conditions
Worms for fishing at home during breeding require some kind of simple care, in particular, creating a microclimate and setting up a competent feeding process. To install a box with substrates, you will need to allocate a separate room, the temperature and humidity of which will be at constant values, without being subject to sudden changes in values. The temperature range, based on the species being bred, will be between 18–25 degrees, and the humidity in the room should not fall below 50%.
In addition, special requirements are put forward for soil acidity, which is in the pH6-pH7 parameters, which can be checked at home using litmus paper. Failure to comply with these parameters of the microclimate and the composition of the substrates leads to a stop in feeding, which causes a decrease or cessation of the process of reproduction and growth necessary for baiting individuals. It is better to store worms already selected for fishing separately from the queen cell, in special boxes with ventilation holes and less voluminous, adding moss as a bedding instead of a substrate. By placing such storage on the bottom shelf of the refrigerator, the attachment can be stored without loss of condition and its vital functions for up to one month.
Making boxes yourself
Made of wood
A similar box is made from boards (optimal thickness) 2.5 centimeters. Practice has established that the optimal sizes are as follows:
- width 1 meter;
- length 2 meters;
- height 0.5 meters.
We drill holes in the bottom and install the box on bricks or some kind of blocks. It must be installed at a slight angle. This is necessary so that the accumulated liquid (which is of great value) does not stagnate, but can drain. The corners need to be covered with tin. The top of the boxes must be covered with a lid; a plywood or cardboard sheet will do, but you can also put them together from boards.
Plastic box
You can move on to breeding in such boxes at the next stage of breeding, when you gain experience. We do not recommend starting with them because they are not cheap, and if, after trying yourself in this business, you decide that this is not your thing, you will be very sorry for the money spent. Like wooden boxes, plastic ones should have ventilation holes and should be installed at an angle.
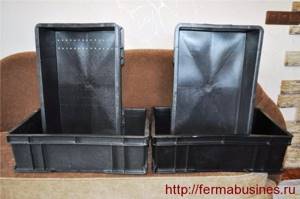
Plastic box
Non-working refrigerator
Many, even experienced breeders, practice breeding worms in old, no longer needed refrigerators. It needs to be placed with the door facing up. We remove shelves and containers immediately, but do not throw them in, they may come in handy later. We drill ventilation holes in the walls and door. We place it on bricks or bars under a small slope.
Cardboard box
Breeding and growing earthworms in cardboard boxes can be called the best option for those farmers who are just starting out. The minimum dimensions of such a dwelling for worms should be 40x30 centimeters. The main advantage of cardboard is that it is usually made from natural materials and is highly breathable. Worms often feed on it. The disadvantages include the fact that this material cannot boast of durability. When you see that the box is becoming unusable, do something simple, namely, put it in a new one, and the old one will be eaten by worms.
Specialized vermicomposters

Vermicomposter
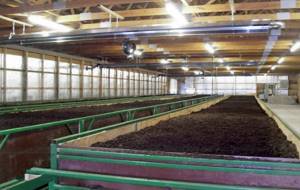
Of course, this is the best option and is most suitable for breeding and growing worms, both at home and in a large enterprise. The disadvantage is that such worm houses are quite expensive and therefore can only be recommended to farmers with experience.
This video explains how a factory-made vermicomposter works.
What to feed worms for fishing at home

You need to feed the worms at home with a certain regularity, but in such a way that the queen cells are constantly supplied with optimal volumes of food so that they do not have time to sour. Severely rotting food does not particularly affect the well-being of the growing bait, but it can seriously spoil the microclimate of the room, causing quite sharp unpleasant odors. Dung worms, like Californian worms and crawlers, are fed with crushed plant organic matter, for which food waste is suitable, for example, leftover bread, vegetable and fruit scraps, cereals and thick soups.
The waste is mixed together and placed in a layer of 1.5-2 cm in the upper part of the box, covering the nutrient mixture with a substrate previously removed to the same volume. To determine when to feed the worms next time, you need to monitor the amount of food remaining every five days. The feed volume completely converted into humus indicates the beginning of a new feed supply. Unlike these types of worms, mealworms are fed every two days, giving them small portions of bran and rolled oats mixed with grated carrots, beets or scraps of other vegetables.
CALIFORNIA WORM
Introduction Even the farmers of Ancient Egypt saw earthworms as a guarantee of future harvests. Aristotle called them the intestines of the earth. And this is true: by passing earth and plant debris through their intestines, worms enrich the soil. Vermicompost, obtained from the secretions of worms, has the following qualities: • Excellent fertilizer, in 1 gram - 1.7 x 10¹⁷ of all kinds of microorganisms, mainly actinomycetes and nitrogen fixers. • Absence of pathogenic microorganisms • Have a stimulating effect on the plant, due to the presence of biostimulants. • The concentration of calcium and magnesium increases by 2 times, phosphorus by 7 times, potassium by 10 times, the content of humic acids increases several times. Only in the 50s of our century the question arose about breeding worms specifically as producers of a very valuable, environmentally friendly fertilizer. The concept of “Vermiculture” arose - the culture of breeding worms. The red Californian worm was bred, which is used to create vermiculture.
What is the California Worm? The California red worm is a new breed of earthworm Eisenia foetida. It was obtained at California State University as a result of hybridization of various breeds of earthworm in 1959.
Features of the California worm: 1. Habitat - a special substrate saturated with organic compounds (manure, composts, organic waste and garbage) but not soil. 2. Long-lived - lives 16 years, laying 20 cocoons per season. 3. He eats twice as much per day as he weighs. 4. Doesn't crawl out of the boxes in which he is bred. 5. The temperature range at which the worm normally exists is from plus 4 to plus 40 degrees. Biohumus can be grown both on an industrial scale and in an apartment, on a balcony and in a summer cottage.
Breeding the California Red Worm “Californian” makes a wonderful “pet”. It can be placed in a box made of wood or plywood, even in a cardboard box, but lined with polyethylene on the inside, in an old glass aquarium, in a plastic box. Closed joint stock company Fart recommends three plastic containers: the first with a solid bottom, the second and third with perforated bottoms. All containers are inserted into one another. Below - with a solid bottom. The procedure for working with these containers is as follows: Pour clean, dry sand into a container with a solid bottom. We place a holey container on it. In this container we put a layer of “living” soil (sold in stores, produced by the Fart company) or a layer of fertile garden soil - a 1 cm layer, put a food substrate on top with a layer of 3 - 5 cm, then dust the food layer with “new soil” (a product of the company “Fart”) or eggshell powder, on top a layer of “living earth” or soil - 1 cm. Worms are placed on the surface of the soil. The prepared substrate is moistened. A lump of substrate, if squeezed in your hand, does not crumble when you unclench your fist. Cover the top of the containers with a piece of polyethylene. When the substrate is processed in a holey container, place a 3rd container on it, charged in the same way as the 2nd. After 1.5 - 2 months, all the worms from the container will crawl into the 3rd container and begin to work in it. Biohumus has formed in the 2nd container, which can be used. Thus, by changing containers, we obtain fertile vermicompost. The sand in the lower container becomes very wet after a while, and moisture accumulates in it as a result of the work of the worms. Sand with moisture is also a useful soil additive. Wet sand should be replaced with dry sand. If it is not possible to purchase the containers described, you can get by with the above-mentioned containers. Sand must be placed at the bottom - it serves as drainage. Then a layer of soil 1 - 2 cm, a layer of food waste 3 - 5 cm, again a layer of soil 1 - 2 cm. A little ground eggshell is added to the food waste - “Californians” do not like an acidic environment. It is more difficult to separate vermicompost from such containers than from containers. You can keep the worms on a starvation diet for a while, and then put food in a certain place, all the worms will crawl to this place. It is convenient to use such containers for preserving the Californian worm in the winter, so that in the summer you can move it to the garden or vegetable garden.
What do you feed the California worm at home? Peels from raw vegetables, especially potatoes, must be thoroughly crushed (turned through a meat grinder), otherwise they will not be processed. The following are perfectly processed: • banana skins; • citrus peel; • apple cores; • drunken tea and coffee grounds; • moldy bread, bread crusts and rolls; • leftover cereals, pieces of cheese; • rotten tomatoes, apples and other plant waste. You can feed the worms grass and leaves. It is not recommended to feed worms with meat waste.
How to feed regularly? When you have containers, feeding intervals are 1.5 - 2 months, i.e. We feed when we charge the container. In single containers we give a little at a time every 2-3 days, trying to feed in such a way that the unprocessed substrate does not accumulate.
Californian worms work “in the wild” In the month of May, the “Californian” can be moved outside, into a compost heap made from household garbage, rotted manure, and weeds. Recommended for a standard “bed”, on a bed measuring 2 x 1 m from 30 to 100 thousand worms. The worms are placed on a heap prepared in advance, made up of well-composted manure mixed with sawdust, straw, and weeds can be used to feed. Feed is added every 10 days. Depending on the weather, water the compost 2-3 times a week. By the end of the season we get wonderful vermicompost. Californian worms must overwinter in a warm place. They are placed in warm sheds, special boxes, or they spend the winter at home, in a city apartment.
Conclusions California red worms are not demanding to keep. If certain conditions are met, they reproduce well and produce fertile vermicompost.
You should remember 1) Worms should be kept in warm rooms in winter, although they can live at temperatures from plus 4 to plus 40 degrees, they work actively at air temperatures of plus 15 - 25 degrees. 2) The mixtures in which the worms live must be moist. To retain moisture, cover the containers with a piece of polyethylene. 3) Feed only plant residues. Eliminate meat waste from the diet. Potato peelings must be chopped. 4) Crushed egg powder should be added to food; worms do not like acidic subtracts. St. Petersburg Service for Assistance to Farmers List of used literature 1) L. Genkin “Bioconversion is underway” w. Chemistry and life, number 4, 1991 2) M. Nadv “Worms are trump cards” w. Chemistry and Life, number 12, 1990 3) “Let the worm do the work” Closed Joint Stock Company “Fart” St. Petersburg 1995.
How often to water worms
Soil moisture has one of the dominant roles in the success of breeding packing material. A decrease in this indicator forces individuals to sink deeper into the ground, completely ceasing to feed. The substrate is moistened using a regular garden watering can, using water at room temperature for irrigation, which is first allowed to stand in the same room for three days.
Important! The optimal humidity of the substrate can be determined in a fairly simple way. To do this, the soil is squeezed in the hand, and the result of the positive moisture factor is considered to be the formation of a dense and non-crumbly earthen clod.
If the soil is over-moistened, drainage holes in the bottom of the boxes will help correct the situation, and excessive evaporation of moisture will be prevented by covering the newly watered substrate with the propagating material with a piece of corrugated cardboard or a special lid with fine perforations over its entire area. The boxes are checked for moisture every week, adding water to the soil if necessary.