Kayak Reviews
04 August
How to make your own kayak
Kayaks are narrow rowing boats with a sharp bow and stern, which are now actively used for rafting, tourism, fishing, hunting, expeditions, family walks and hikes in protected areas. They differ from ordinary boats in their shallow draft, high maneuverability, compact size, light weight and rowing method, which is carried out with two-bladed oars. Kayaks are able to freely penetrate into places where a standard boat cannot enter. These are, for example, narrow bends, littered, overgrown with algae and reeds, or swampy reservoirs, rivers with a large number of steep rapids, and so on. That is why they have become very popular today among lovers of active water recreation. Modern kayaks are made of plastic, polyethylene, composite materials, duralumin, and dense PVC fabric. They come in single, double, triple, quadruple, have different designs and different prices. However, many lovers of spending time on the water do not want to buy a ready-made boat, but rather make it with their own hands. In this case, the optimal choice would be a collapsible model with a shell stretched over a frame made of wooden and aluminum elements. It is better to prefer a single-seat kayak, which is quickly assembled, has sufficient strength, maneuverability, good running characteristics and a fairly large load capacity. The best option would be a model like the Siren kayak, weighing about 16 kilograms, made of plywood and duralumin, which can satisfy both avid fishermen and fans of rafting on mountain rivers or tourist trips along spacious bodies of water.
Where to start building a homemade kayak
To create a kayak with your own hands, you need to have its drawings, which you can develop yourself or find on the Internet. They should show in detail and with dimensions the stems, keelson sections, bulwarks, midships, frames, stems, stringers, fenders, shell. To create drawings, you can take as a basis a kayak 4 meters long, 65 centimeters wide, and 20 centimeters high on the side. If a model similar to the Sirena kayak is chosen, its bulwark, sternpost, stems are made of plywood, the stringer and fenders are made of pine, the midships and keelson are made of larch. The shell can be made of dense PVC or M-72 fabric. Initially, for wooden parts, you should prepare dry, fine-grained pine and larch wood, BS-1 plywood with a thickness of 5.7–9 millimeters, pieces of sheet duralumin with a thickness of 1, 1.5, 2, 3.4 millimeters, a metal rod with a diameter of about 8 millimeters, pieces of stainless steel 08 and 2 millimeters thick. For fastening you will need aluminum rivets with a diameter of 3-4 millimeters, a length of 2-3 centimeters and screws with an anti-corrosion coating. The shell will require about 5 square meters of waterproof fabric, the same fabric will be used for the deck. You also need to prepare a rubber hose with a diameter of 3.5 - 4 centimeters and a length of 2 meters, a rubber cord with a diameter of 0.5 centimeters and a length of 1.2 meters and a slipway on which the boat frame will be assembled.
Instructions for assembling the kayak "Taimen-2"
Download instructions in PDF format – Assembly instructions T-2.pdf
Purpose
The two-seater collapsible kayak "Taimen-2" is intended for tourist trips and walks during daylight hours along rivers, lakes and reservoirs at a distance from the shore of up to 500 m and a wave height of no more than 0.15 m.
Technical data
| Length | 5 m |
| Width | 0.85 m |
| Height to fender | 0.27 m |
| Overall height | 0.4 m |
| Load capacity | 250 kg |
| Passenger capacity | 2 people |
| Dimensions in packaging (no more): backpack | 0.87*0.42*0.29 m |
| pencil | 1.42*0.3 m |
| Body weight | about 26 kg |
| Package weight | about 30 kg |
Contents of delivery
| 1. | Shell (skin) | 1 |
| 2. | Post (bow and stern - both the same) | 2 |
| 3. | Frame No. 1 (small without back) | 1 |
| 4. | Frame No. 2 (large with back) | 1 |
| 5. | Frame No. 3 (large without back) | 1 |
| 6. | Frame No. 4 (small with back) | 1 |
| 7. | Bow keelson (with beveled studs at the end) | 1 |
| 8. | Aft keelson (differs from the bow keelson by the presence of 4 horns at the end) | 1 |
| 9. | Pedal platform – NOT INCLUDED | |
| 10. | Steering wheel – NOT INCLUDED | |
| 11. | Left bow bulwark (curved) | 1 |
| 12. | Right bow bulwark (curved) | 1 |
| 13. | Middle left bulwark | 1 |
| 14. | Middle right bulwark | 1 |
| 15. | The stern left bulwark (differs from the middle one by an oblique cut at the end) | 1 |
| 16. | Right aft bulwark (differs from the middle one by an oblique cut at the end) | 1 |
| 17. | Stern bulwark (boomerang, triangle) | 1 |
| 18. | Fender beam (long thick) | 4 |
| 19 and 20 | Stringer (long thin) | 8 |
| 21. | Medium bow fender beam (thick short) | 2 |
| 22. | Medium aft fender beam (thick with retractable spring bushing) | 2 |
| 23. | Stringer medium nose (thin short) | 4 |
| 24. | Medium aft stringer (thin with retractable spring bushing) | 4 |
| 25. | Bow seat (with 2 parallel plates protruding beyond the edge) | 1 |
| 26. | Aft seat (with a bracket with 2 holes for attaching it to the stem) | 1 |
| 27. | Paddle (includes 1 handle and 2 blades) | 2 |
| 28. | Packaging (backpack) | 1 |
| 29. | Packaging (pencil) | 1 |
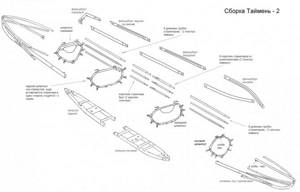
Figure 1. Kayak “Taimen-2”
Safety requirements
Only people who know how to swim can use a kayak. Those tourists who do not know how to swim are required to wear a life jacket during rafting.
Before launching, inspect the kayak and make sure there is no damage.
To prevent the kayak from tilting and moving incorrectly through the water, things must be laid out evenly along the sides, that is, try to put approximately the same amount of things by weight on the right and left sides.
Assembly
Before assembling your kayak, please read these instructions carefully and follow them strictly. Believe me, assembling a kayak this way is much faster than you will invent your own order for assembling it.
The place for assembling and disassembling the kayak must be chosen to be level, without sand, stones, tall grass and sharp objects. Sand can get into the frame elements and at the end of the trip it will be very difficult for you to disassemble the kayak, especially the pistol stringers (with a retractable spring sleeve).
When installing, make sure that when installing frames No. 1 and No. 2, the bend of the brackets (ears) is directed towards the bow of the kayak, and when installing frames No. 3 and No. 4, towards the stern. Since it is not always possible to determine the folds, you can navigate by the backs - they have one straight edge and the other semicircular, the back should be positioned with the semicircular edge down.
Now let's move on directly to the assembly.
Connect the stem (2) to the bow keelson (7) and secure with a screw (Figure 2).
Figure 2. Fixing the stem with the keelson with a screw.
Install frame No. 1 (small without a back) - (3) on the stem (2), fixing the lower bracket of the frame with a screw. Watch the frame turn. There are often 180 degree errors. The criterion for correctness is that the bracket-groove located on top of the frame to secure the upper stringer must be turned towards the bow (Figure 3).
Figure 3. Fixing the frame on the stem with a screw.
Install fenders (18) - (long thick) and stringers (19,20) - (long thin) - pushing them through the frame ears and inserting them into the corresponding stem tubes (thick ones are inserted into thick ones, thin ones into thin ones). Thick tubes are located on top - Figure 4.
Figure 4. Fixation of fender bars and stringers on the frame brackets.
Install frame No. 2 (4) on the bow keelson plate (7). When installing frame No. 2 (make sure that the back is facing forward) onto the keelson plate, insert one of the lower frame clamps into the hole with the transverse groove so that the groove of the clamp fits into the groove, but not all the way, lift the frame so that the gap between its second lower retainer and the plane of the plate were no more than 1 mm. Then, rotating the frame on the first latch, insert the second latch into the hole in the longitudinal groove so that the groove of the latch is in the longitudinal groove, and push the frame all the way (Figure 5).
Figure 5. Installation of frame No. 2 on the keelson.
After fixing frame No. 2, install the fenders (thick short) (21) and stringers (thin short) (23), pushing them through the frame brackets, while simultaneously extending the fenders (18) and stringers (19,20) - respectively thick - into thick and thin - into thin. The nose assembly is ready.
The aft half of the frame is assembled in the same way, and sequentially install the stem (2), aft keelson (8), frame No. 4 (6), fender bars (18), stringers (19, 20), frame No. 3 (5), fender bars (22) and stringers (24). When installing frame No. 3 (without a back), make sure that the bend of the brackets is directed towards the stem - the axes should converge towards the stern. Simultaneously with fixing frame No. 4 (6) on the stem (2), in order to attach the seat, a screw should be passed through the holes in the aft seat bracket (26).
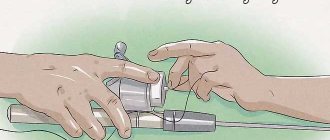
Unfold the shell. Insert the bow and stern parts of the frame assembled in this way into the corresponding ends of the shell (the cut in the deck for the stern part is wider than for the bow part). Insert the ends as far as possible until they stop, then step on the shell inside the kayak, placing your feet between the keelson and stringers, and insert the ends of the frame into the shell to the edge of the deck, resting against frames No. 1 or No. 4 and holding the shell with your feet (photo 1). Insert the parts smoothly, evenly, as deeply as possible and without distortions, since otherwise the frame will be positioned in the kayak with distortions, and you will walk unevenly through the water.
Raise the bow and stern parts of the frame and align the tenons at the end of the bow keelson (7) with the holes at the end of the stern keelson (8) - Figure 6.
Figure 6. Joining the central part of the keelson and assembling the frame in the shell.
Smoothly lower the frame, making sure that the ends of the shell are positioned evenly, without distortions, relative to the frame. Do not allow the bow keelson spikes to pop out of the corresponding holes in the aft keelson. Adjust the stringers and mid-bow and stern fenders inside the shell so as not to break or bend them if they catch on the shell or rest against each other; also make sure that the levers of the spring-loaded retractable bushings are facing inside the kayak so that you do not accidentally damage the shell. Having lowered the frame down, do not let it go under any circumstances! Otherwise, he may jump up and hit you. After it lies on the bottom of the shell, lock the keelsons together using four screws. Those that fit easily are inserted first. Then, by moving the keelson within the limits of elastic deformation - the rest.
Connect the corresponding ends of the fenders (21) and (22) and stringers (23) and (24) starting with those closest to the keelson using spring-loaded extension bushings. Before doing this, make sure that the ends of all tubes - stringers and fenders - are adjacent to the brackets - brackets of all frames tightly, without gaps. For ease of connection, you can slightly move the joined ends of the tubes upward, as shown in Photo 3 and Figure 7.
Figure 7. Connecting the ends of fenders and stringers using retractable bushings
The installation of bulwarks (11,12,13,14,15,16) should begin with the bow (curved) bulwarks. Install the bulwark by inserting the top bracket of frame No. 1 (3) into the hole in the bulwark and secure it with a hook. The longitudinal groove on the bulwark between the tube and the plate riveted to it should be located at the top. Tuck the edge of the shell deck in the bow into the groove of the bulwark, to do this, move the unfixed aft part of the bulwark slightly outward from the kayak and place the thickened edge of the deck into the groove (photo 4).
As you move towards the stern, move the unfixed aft part of the bulwark towards the kayak, thereby pulling on the part of the deck tucked into the groove of the bulwark (photo 5).
Tucking the edge of the deck into the groove of the bulwark, sequentially install the bulwark on the frame brackets, starting with frame No. 2 (4) (the edge of the deck should go around the bracket from below), and secure it with hooks, do a similar operation with frames No. 3 and No. 4 (photo 6) .
It is better to install the bulwarks in turn - first the front one on the right, then the front one on the left, then the middle one on the right and the middle one on the left, then the rear one on the right and the rear one on the left. After this, put the aft bulwark (boomerang, triangle) (17) on the brackets of frame No. 4 - on top of the left and right side bulwarks already put on the brackets of frame No. 4 and secure it with hooks.
To assemble the oar, push the clamps (2) into their sockets, insert the forend of the oar (3) into the blade (1) and make sure that the clamps (2) fit into the holes of the blade - Figure 8.
Figure 8. Oar assembly
To increase the service life of the shell, it is advisable to place pieces of mat under the joints of the stems with the keelsons and the keelsons with each other with screws.
Disassembling and drying the kayak
At the end of the trip, the assembled kayak must be washed to remove dirt and algae, and dried well.
A place for disassembling the kayak must be chosen that is level, without sand, stones, tall grass and sharp objects. Try to disassemble kayaks at a distance of 3-5 meters from each other so as not to mix up the parts of the kayaks.
After drying, disassemble the kayak in the following order:
1. Disassemble the bulwark, exposing the hooks (pliers can be used for this purpose). 2. Disassemble the stringers (23,24) and fenders (21,22) that are connected to each other, pulling the protruding lever with your hands or pliers - Figure 9.
Figure 9. Dismantling stringers and fenders using a loop of rope (pliers can be used).
3. Remove the stringer and fenders from the frames and remove them from the boat. 4. Separate the components of the keelson (they were connected by screws). At the same time, pay attention to the fact that the middle bow and stern stringers and fenders do not fall under the shell when uncoupling the bow and stern parts of the frame, so as not to break or bend them. 5. Smoothly and carefully lift the bow and stern of the kayak up and then pull them out of the boat. 6. Disassemble the kayak parts in the opposite order to assembling the kayak. Do not use axes, stones, branches, etc. for this purpose. items.
After disassembling and drying the kayak, wipe the shell with a dry rag, clean the metal components and parts from sand and dirt and also wipe with a dry rag. Pack your boat parts only in their own shipping bags. Before leaving the end of the hike, be sure to carefully check the parking lot for forgotten things.
Kayak packing
The kayak is packed in two packing bags – a backpack and a pencil.
Packing kayak parts into a backpack
Place the kayak shell on a dry, clean, sand-free area. First, the shell is folded in half along its entire length. After this we begin laying the frames. This is done like this - first we put one small frame lengthwise on the shell, wrap it with the shell, then the next small one, wrap it back with the shell, then the first large frame, wrap it with the shell, then the second large frame and wrap it with the remaining shell. Then place the seat bed on top (face down). All this is placed on a backpack laid out in advance, closed on each side with the sides of the backpack and tied crosswise with a rope.
Packaging in pencil
When packing frame parts, first two keelsons are taken and placed on top of each other so that there is free space between them, then this space is filled with stringers and fenders (all long and short tubes). Next, these keelsons are placed in a pencil, then the stems, bulwarks, blades and forends of the oars, and transom are placed one by one. After laying the listed components of the kayak, tighten and tie the neck of the pencil.
What you need to assemble a homemade kayak frame
The kayak frame includes two stems, five frames, a keelson of four sections, four stringers, two fenders, a midship and a bulwark. To assemble them you will need tongues, locks, an oval bar made of duralumin, fasteners for fixing the fender bars on the stems, an end bar connecting the stringers with the fender bars, locks for the fender bars and midships made of stainless steel. In addition, you will need fastenings of the keelson to the stems made of stainless steel, a square for the midships, a wedge plate made of duralumin, side and middle slats for the keelson, cross members made of plywood, a tongue and lock for the keelson, a rail for its middle section, a bracket for attaching the bulwark and midships from duralumin, bracket for fixing the stringer on the frame, keelson latch made of duralumin with a stainless steel screw, aft bulwark made of plywood with a latch, loop and square.