Making homemade forged spoons for catching large pike
Fishing with oscillating spoons - large-sized spoons (heavy spoons) - implies, first of all, an active search for and catching a fairly large pike.
Accordingly, baits for catching such specimens should not be small in size. It is always desirable to have a supply of large-sized oscillating spoons, of different colors, and made of different metals. Having such a set in your arsenal as a summer spinner allows you to independently produce such summer spinners. It's no secret that homemade oscillating spoons always catch better than store-bought ones.
This is apparently due to the fact that the metal of a homemade spinner receives the energy of the master’s hands, while mass-produced, factory-produced spinners stamped on machines do not have this. Mystical or not, it has long been known that this also applies to homemade jigs, winter spinners and many other fishing lures and gear made by hand.
Below, I would like to invite you to familiarize yourself with the manufacture of oscillating spinners at home for catching pike, and quite large ones.
The master of making these vibrators makes them forged from various metals. Both sheet and rod type. He describes in sufficient detail, with photos, his technology for making such wonderful and catchy spinners.
The master of making these vibrators makes them forged from various metals. Both sheet and rod type. He describes in sufficient detail, with photos, his technology for making such wonderful and catchy spinners.
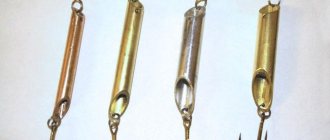
Thin metal spinner
To make such a spinner, sheets of non-ferrous metals and alloys less than 0.5 mm . Such blanks are easier to cut (you can use metal scissors) and process. The process of making a spoon is not fundamentally different from working with thicker spoons.
The resulting bait is light in weight and catches pike well in shallow water with a very slow retrieve. But much more often, the lure needs to be cast a decent distance and fished with it at depths of more than one meter. Then you need to load the spoon.
To make such a spinner, sheets of non-ferrous metals and alloys less than 0.5 mm . Such blanks are easier to cut (you can use metal scissors) and process. The process of making a spoon is not fundamentally different from working with thicker spoons.
How to make oscillators with your own hands
Oscillating spoons, or simply spinners, are a type of artificial bait for catching predatory fish. It is a piece of metal plate bent into a bizarre shape (although there are exceptions) with a tee hook on one side and a ring for attaching a fishing line on the other. It is believed that any self-respecting fisherman should have a set of the most common types of spoons in his arsenal.
Oscillating spoons are used when fishing both with spinning and trolling, and with vertical lures. The first method is, of course, more common. The main models of oscillators include:
- Making a vibrator from scrap materials ↓
- Metal lures ↓
- Making a vibrator in the form ↓
- Final stage ↓
- Blitz advice ↓
Ural. Along with the Prokhorovka, it is used by fishermen for catching salmon species, but it can also perform well when fishing for pike.
Prokhorovka. Classic salmon bait. It has been used for quite a long time and successfully on the rivers of Siberia and the Kola Peninsula. The game is active, sweeping, with good amplitude.
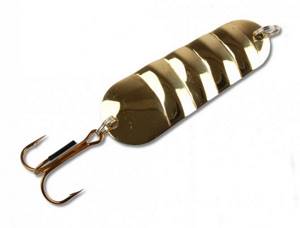
Crocodile. The basis of this spoon is a classic Swedish model from AVU. It is distinguished by embossing on both sides, reminiscent of crocodile skin. It performs well at various depths when catching all types of predatory fish.

Make it a rule, on every fishing trip, the first thing you do is start.
Cobra. A small spinner with a high range and flight accuracy. The game of this spinner resembles the game of fry. Excellent for catching asp in the hunt.
Atom. Russian development. At different wiring speeds it plays differently. Slow retrieving makes it oscillate smoothly and harmoniously, while fast retrieving encourages active play. An excellent option for pike fishing.
These are just the main types of baits that can be found in stores. Unfortunately, the dominance of various manufacturers on the fishing lure market has completely killed some types of spoons and they have lost their former catchability.
The advantages of oscillators include the following:
- Long cast. This allows you to hunt wary fish or expand the fishing area of the reservoir.
- They do not twist the line, unlike rotating ones.
- Their behavior and shape resemble fish, which provokes the interest of a predator.
Making oscillating spinners with your own hands can have several positive aspects. This is the necessary material and shape of the spoon, its size and weight. For some reason, homemade spinners perform better than purchased ones. Well, in the end, making these artificial baits at home is an interesting and not as expensive process as buying them in a store.
Prokhorovka. Classic salmon bait. It has been used for quite a long time and successfully on the rivers of Siberia and the Kola Peninsula. The game is active, sweeping, with good amplitude.
Rod
If you plan to fish from a boat, then choose gear with a length of 1.8 - 2.1 m. For hunting from the shore, a three-meter rod is suitable.
The test must correspond to the weight of the shaker.
Important! To avoid damage to the tackle, choose a test that is one third heavier than the weight of the spinner.
- grinder or hacksaw;
- sandpaper to make the surface smooth;
- electric drill with drill.
Homemade spinner from a coin
A five-kopeck coin is best suited for its manufacture. You will also need:
- round nose pliers;
- pliers;
- metal scissors;
- drill with a diameter of 1 mm;
- screwdriver;
- flat file;
- leash;
- winding ring;
- tee hook from the store.
- The edges of a clean, shiny coin are trimmed with scissors to create a diamond shape.
- The vibrator needs to be given rounded shapes, for which the edges of the workpiece are processed with a needle file.
- At sharp corners, holes are drilled using a screwdriver and a drill. For convenience, the procedure is carried out on a wooden board, and the coin is held by the edges with round nose pliers or pliers.
- The holes are processed with a needle file.
- The sharp edges of the workpiece are retracted from the center to different edges. You will get a curved spoon.
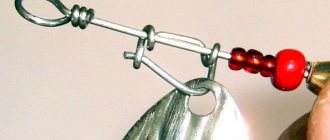
- A leash is attached to one side of the vibrator, and a ring and tee are attached to the other.
The large summer spoon spoon is ready.
Now you can attach equipment to the spoon. So that during the wiring process it scours the pond, a monofilament thread is attached to the end with an acute angle. A more advanced design would be a tubular vibrator consisting of three parts that are movably connected to each other. In the reservoir it will scour even stronger and more actively. And the model’s bends in the water make it very similar to the movements of a fish.
Layout
Let's start with the fact that you can often find spinners of a good shape, but put together somehow.
Sometimes when stamping, burrs remain - we grind them off, and at the same time round off the sharp edges. Then we will work on the holes for the winding rings. For free play, it is desirable that the diameter of these holes is at least twice the height of the winding rings. If necessary, drill holes and countersink their edges.
The sizes of all elements must be harmonious. Let's pay special attention to the hooks. Not only are they of high quality and the right size, but it is advisable to have dark hooks. After all, a light anti-corrosion coating is made for salt water, and in fresh water, excess shine can only alert the fish.
Another way to change the game is to make your lure lighter or heavier. In the first case, part of the metal is ground off from the surface, in the second, it is soldered. If at the same time different “pairs” appear, then a bimetallic spinner with its own electric field is obtained.
How to make
- To begin with, a template is drawn on a piece of the main material, which is a rhombus of certain sizes.
- After this, the diamond is cut out using sharp scissors.
- The minor axis is calculated on the workpiece and the diamond is bent along this contour.
- The workpiece is laid horizontally and a metal plate in the form of a triangle is soldered to its lower part. It is desirable that the dimensions of this triangle be minimal.
- A hook is soldered to this plate.
- A ring is attached to the top of the workpiece for attaching the fishing line, but before that you need to drill a hole.
- After this, the spinner is ready. To make it more attractive, it is cultivated with sandpaper.
From the manufacturing technology, it is clear to anyone that it will take a minimum of time and a minimum of material that can be found in any barn or garage if you rummage well. It would not be a pity to lose such a bait, since its production can cost a penny. Otherwise, the result is a fairly catchy bait that can easily compete with a similar type of factory-made bait.
From the manufacturing technology, it is clear to anyone that it will take a minimum of time and a minimum of material that can be found in any barn or garage if you rummage well. It would not be a pity to lose such a bait, since its production can cost a penny. Otherwise, the result is a fairly catchy bait that can easily compete with a similar type of factory-made bait.
Advantages of using oscillating spinners
This type of artificial bait has a number of advantages:
- easy to make yourself;
- low price of factory oscillators;
- the bait is universal; changing the size of the spoon catches all types of predatory fish;
- casting range and accuracy allow you to catch prey in all types of reservoirs; you can cast to your favorite place at a distance of up to 70 m;
- the unique action of the bait allows you to catch trophies at any time of the year;
- with the help of a spoon, a fisherman is able to search for predators at any depth;
- simplicity and reliability of design;
- It is not inferior in catchability even to the advertised “Jackals” and other various wobblers.
This type of artificial bait has a number of advantages:
Such a simple oscillator
The emergence of various spinning lures in recent decades has led to the fact that the oscillating spoon - an ancient invention - has somewhat lost its popularity.
Without going into a detailed analysis of the reasons, I will say: “But in vain! This is one of the most intelligent and catchy baits, especially in the ultra-light class spinning rod.”
My statement is not at all far-fetched and does not stem solely from personal bias. This is the fruit of practice, observation, analysis, knowledge collected bit by bit. Judge for yourself.
Most modern spinning baits are essentially man-made. Let's take, for example, the most popular spinning spoon or wobbler among spinning enthusiasts. In both cases, their design includes such game properties that in themselves are sufficiently attractive to fish and do not require the angler to have any special sophistication in wiring. It is possible - with some reservations, of course - to say that the bait catches itself, without much participation from the spinning angler. One of my friends jokes about this: “In the chain “spinning - bait - fish”, the fisherman is generally a secondary link!”
The statement is funny, but it confirms the technogenic nature of modern fishing. In the case of an oscillating spoon, everything is different. Appearance, shape and design are of secondary importance, but skillful management, on the contrary, comes to the fore. Without proper wiring, the spinner is dead. This difficulty in controlling the bait is the main reason for the decline in the popularity of oscillating spoons among spinning anglers.
I would like to revive the reader’s interest in this, I’m not afraid to say, art, so I will be happy to talk about the features of controlling oscillating spoons, about their manufacture for fishing with ultralight (UL) - an ultra-light spinning rod.
In this case, we will consider only spinners weighing from 0.5 to 1.5 g with a linear size of up to 22 mm.
In my firm opinion, spinners with parameters beyond those specified cannot be considered “ultralight” class lures. I understand that this statement goes against the generally accepted point of view and requires detailed argumentation, but within the framework of this article I will limit myself to only general considerations about which fish from which bodies of water should an angler master the craft of constructing “micro-oscillators.”
It was not for nothing that I focused on fish species and classes of reservoirs. The same fish in lakes and rivers have completely different customs. In rivers, especially small ones, due to high food competition, fish are always active, so to speak - courageous to bite. And vice versa, in lakes and reservoirs the fish are more peaceful, well-fed, and cautious. Hence the conclusion: it is much more difficult to catch fish of the same species in lakes than in rivers. This is the first thing.
Secondly, fishing in still water and flowing water requires different baits. If relatively coarse UL-class baits are successful in rivers, then in lakes they will be ineffective. For successful fishing in lakes, baits must first of all be small in size - such as oscillating spoons with the parameters already mentioned.

We’ll talk about their production later, but for now let’s talk about what kind of fish the “micro-fishers” are aimed at. Some ultralight lovers conditionally divide fish into two categories: labor and non-labor. Depending on their preferences, spinners define this blurred boundary in different ways. I consider myself to be in the ultra-extreme category and therefore cannot share the position of my hobby colleagues who include asps, chubs, zeys, dace, and some - perches and pikes under the concept of “working fish”.
An experienced fisherman should set himself more difficult tasks than mechanically dragging the river fish of the mentioned species that are brave to bite. And the path to mastering ultra-light spinning comes through the ability to catch white lake fish.
I will list the main breeds of working fish, in my opinion. In lakes and reservoirs this is undoubtedly roach, bream, crucian carp, gudgeon, ruff, and the ultimate dream is tench; with a big stretch - ide and bleak (due to the greater degree of “predation” compared to the previous ones, we will classify these fish as conditionally working breeds and consider them a kind of testing ground for a novice amateur on the way to learning about ultra-light spinning).
There is another working inhabitant of lakes that stands apart - carp. Bites from this mighty fish are a common occurrence when fishing with an ultra-light spinning rod and cause a lot of trouble for the angler. Our baits are miniature, the fishing line is thin, and carp weighing 1.5-2 kg can easily deal with such fishing gear. To successfully resist the lake host, you need at least a middle-class spinning rod and appropriate fishing lines and bait for it. And this does not fit into the class of spinning fishing we are considering. Therefore, we will limit ourselves to just a general designation of the problem: carp is a working fish, but we can catch individuals up to 1 kg.
In the rivers, perhaps, only crucian carp, podust, bream and tench will remain as working fish. In my opinion, other inhabitants of rivers and streams cannot be classified as working fish, which can be caught with ultralight gear; Catching them is a fairly simple matter.
Manufacturing
You can ask yourself the question: why make them yourself if there is an abundance of such baits on sale? There are plenty of them, but there are no ultra-light class spinners on sale. Those sold in fishing stores are too large in size and, at best, are suitable for hunting lake ide. An angler who is interested in UL fishing for working fish using oscillating spoons will, willy-nilly, come to making them himself. There are no special tricks in this matter, everything is simple, you will need a minimum of tools.
Some craftsmen are stopped by one far-fetched complexity. There is an opinion that without accurately copying the shape of a catchable spoon, nothing will work. In my opinion, this is not true at all. Any, even the most unsuccessful, at first glance, spinner works, if not in a lake, then in a river, if not in shallows, then in the depths, if not in summer, then in late autumn. The main thing is to choose the right wiring style.
Dimensions of micro-blades: length 18-22 mm, width 4-10 mm. This is enough for successful UL fishing of working fish of all breeds in lakes. If you reduce these already minimal parameters, the results, no matter how strange it may seem, will be the opposite: the number of bites will sharply decrease, contrary to expectations and common sense.
I am in close contact with one well-known designer of spinners in our city, and he encountered the same thing when using too small “spinners”. According to the MEPPS classification, the minimum spinner size is 000. Reducing it to four or more zeros leads to the same disadvantages as in the case of oscillating spoons. With this example, I want to keep fishermen who are eager to make micro-spoon lures from wasting their time. But who knows? It is quite possible that interesting discoveries await us here...
I consider the development of the “Plotvinaya” spinner to be a special subject of my design success. As the name suggests, the bait is aimed at my favorite fish - lake roach. The prototype of the “Roach” was the Soviet spinner “Fantasy”, the game of which is close to rotation due to the shifted center of gravity. Depending on the speed and manner of driving, you can achieve different games, from leisurely waddling from side to side to rapid rotation around its axis, like the petal of a pinwheel.” And yet, with all the design advantages, “Fantasy” turned out to be unattractive for roaches.
At the beginning of my passion for ultra-light spinning rods, I noticed one peculiarity in the roach’s bites on artificial baits: it most often attacks the spinner, in the movements of which there is something unusual. This could be any glitch in the game: acceleration, stalling, or slight yaw to the side. The “Fantasy” oscillating spoon, like other well-known models, gives a stable, predictable game in the horizontal plane, so I changed the shape and bend of the prototype and got a spoon with fundamentally different properties.
The “Roach” spinner, due to its significant advantage in the rear part, is capable of causing disruptions in the game, which the roach “loves”. At the same time, the overall geometry leads to high mobility: the spoon actively oscillates at the lowest speed and rotates around its axis when accelerated. And one more equally valuable quality: during a free fall, the spoon rolls smoothly from side to side, attracting fish. All this makes the “Plotvinaya” spinner a highly specialized bait for catching this particular fish.
At the beginning of the article, I talked about the importance of wiring and the secondary importance of the shape of the oscillating spinners. In the case of Plotvina, it may seem that I am saying the opposite. But there is no contradiction here - a spinner of any shape can catch roaches if its size and wiring are correct. And “Plotvinaya”, like other highly specialized lures, simply makes it easier to catch, I emphasize – it makes it easier, but it does not catch itself, like other man-made baits.
To conclude the review of the performance characteristics of the spoon, I would like to note that not only roach is successfully caught with this bait, but also all other species of lake fish, without exception.
There is no need to list the necessary tools for making oscillating spinners; I will focus only on the most important - a device for giving the workpiece a curved shape. It consists of two parts - a matrix and a punch. A punch in a technical way or a stamping in an artistic way! in metalworking it is a steel rod, the end of which has the shape of a hemisphere.
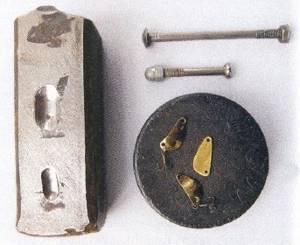
An ordinary MB furniture bolt with a semicircular head is ideal for the role of a stamping punch. The diameter and radius of the bolt head clearly correspond to the bend of the spoon. The matrix - a recess corresponding to the diameter and radius of the punch - is best made in a steel plate. If you do not have the opportunity to make a matrix from metal, it can be replaced with a hockey puck or a piece of thick rubber.
There is one more tool that is difficult to do without in the manufacture of spinners - this is a blank template. Usually it is drawn on paper, then glued to a metal plate and carefully cut out along the contour.
The figure shows the template of the “Plotvinaya” spoon.
The manufacturing process in general looks like this. We draw out and then cut out a blank from sheet brass 0.8 mm thick according to the template, and use a file to bring it to the desired shape. After the final removal of burrs, you can begin squeezing out the internal curves of the spoon using a punch and matrix.
“Plotvinaya” has two internal bends directed in opposite directions, so I use punches with different radii and diameters. The first is the MB furniture bolt with a semicircular head, the second is the MB decorative nut. Screw the nut onto a bolt of suitable thread and length.
First, we squeeze out a small bend in the narrow part of the future spoon, then turn the workpiece over and make a large bend on the opposite side in the wide part. For this I use a steel matrix of my own making. Previously, I did the same operation on a hockey puck - it took more time, but the quality did not suffer. After drilling the 01.8 mm holes, we grind and polish the workpiece. It remains to equip the product with a 03.5-4 mm winding ring and a tee No. 3.5-4 according to the domestic numbering (No. 14 according to the European one). The spinner is ready.
Almost all types of UL-class oscillating spinners are manufactured using this technology. To begin with, a novice designer can simply copy some well-known models. With the acquisition of skills in the manufacture, and most importantly, in the practice of using spinners, the angler will begin to make his own individual designs, adapted to certain conditions.
What color is “Plotvinaya”? I prefer the brass color as I think it is the best for lake fishing. However, you should not limit yourself to versatility. There are lakes and fishing situations arise when lures of other colors, as well as their combinations, are needed. A fan of ultra-light spinning will definitely need spinners made of copper, beryllium bronze, and cupronickel. Two-color spinners and those made of silver stand out. I would call two-color “micro-oscillators” the spinner’s secret weapon when all means have been tried. The most interesting will be silver-black, copper-silver, brass-ocher combinations.
Externally it looks something like this. Let's say the spoon is made of copper. One of its sides, usually the outer side, remains copper, and the inner side is silvered by any of the known methods. During the retrieve, such a spoon, waddling from side to side, increases the visual irritation of the fish. I am far from making fantastic assumptions about what the fish thinks when it looks at the change in color of the spinner playing, but bites happen much more often.
Silver spinners are also useful for fans of ultra-light spinning rods.
It is generally accepted that silver, and especially unpolished, “living” silver, is the best imitation of the shine of fish scales. Quite possible. But to a greater extent I appreciate another quality of the noble metal, namely its high specific gravity. A silver spoon of the same size as a copper or brass spoon is almost a third heavier, and a heavy bait can be cast further. When fishing with an ultra-light spinning rod, this is an extremely important condition. All working lake fish are “shy” to bite and begin to attack the spoon when nothing alarms it. An additional 2-3 m of casting length is sometimes crucial.
As for appearance, my spinners are very simple. Painting in catchy colors, applying patterns in the form of scales, eyes and other beauties are more needed by the fisherman than by the fish. Spoons are a consumable material, the simpler they are to make, the better: it’s not such a shame to tear them off on the hooks.
This is where we finish our acquaintance with the technology and move on to the most interesting part - using spinners in practice.

For ease of remembering, we will assign each transaction its own name.
"Pendulum"
In commonly used spinning terms, the analogue of a “pendulum” will be a classic “step” - with the only difference that instead of performing reeling with a reel, we practice all phases of the retrieve by pulling with a rod. From the side, the movement of the rod resembles the swing of a pendulum, which is why I gave the wiring such a name, since it is not quite a classic “step” in its common form.
Technically, the wiring can be described as follows. The rod is held at an angle of 150° (14 o'clock position on the dial) to the plane of the body. We move the rod from right to left until 120° (“13 o’clock”). The spinner accelerates. After a short pause, return the rod to its original position (“14 o’clock”). The spoon stops and its smooth fall begins. When the rod returns to its original position, the weakened line is reeled in. We reel in so as not to lose contact with the spoon.
The next cycle of the “pendulum” begins with the next pull of the spinner with the rod and its subsequent return to its original position. This is a purely roach wiring option. It is difficult to pull with a rod evenly, the spoon will definitely scour the sides, the length of the active and passive phases of the retrieve will be different. Pendulum wiring allows you to consciously create “non-standard behavior” of the spinner, and this invariably provokes the roach to bite.
"Step"
This is a version of the “pendulum”; all wiring phases are performed solely by rotating the coil. Here, unlike the first option and due to the technical features of the wiring, all movements of the spoon are uniform and are aimed at slow-moving fish such as crucian carp, bream, and small carp.
In the jig technique (Russian version) there is a sequence of alternating windings and pauses, expressed in a numerical value: 1:1; 2:1;|3:1. For example, 2:1 is 2 turns of the reel and 1 is a pause until the bait touches the bottom. In the case of oscillating spoons, it is convenient to adopt a similar counting style. The most common combinations will be 2:1 and 1:1 - the first combination is aimed at roaches, the second at bream and crucian carp.
"Step" with a push." This method is interesting because it allows you to fish the bottom layer due to the fact that the spoon imitates the movements of a weakened fry. It's based on step wiring, but with a twist. When the spinner freely falls to the bottom during a pause, you need to make a smooth forward movement with the rod: as a result, the line is weakened, the spinner is pushed, as it were, and the fall accelerates.
Visually it looks something like this. When reeling in, the spinner actively vibrates. When there is a pause, the bait falls in an arc with slight vibrations, and when the fishing line is loosened, the spinner at first increases the vibrations, then falls almost vertically.
When using a “step” with a push, the spinner must keep in mind: at the moment the spinner oscillates intensifies before falling and during free gliding, bites occur, so you cannot lose full contact with the spinner - you will be late with the hook.
The subtlety in mastering this technique is to practice constant control over the spinner.
"Jitter"
The spinner is cast with short twitches of the rod. The bait moves in jumps: acceleration is replaced by stopping. At the moment of acceleration, the spinner seems to shudder, imitating a frightened fry. If you rotate the reel handle slowly, the spinner may become stuck in place. This retrieve is one of the slowest in speed and most controlled in terms of contact with the bait. It can be recommended for fishing in shallow water and among “windows” in aquatic thickets. Using “trembling” wiring, you can catch dynamic fish well – roach and bleak.
"Snake"
]The essence of this technique is clear from the name: the movement of the spinner copies the movements of a crawling snake. With a uniform winding of the fishing line, we move the rod first to the left, then to the right until the end of the retrieve.
The spinner goes in a zigzag. When mastering wiring, you should not get carried away by excessively moving the rod to the extreme position. If an angle of 90 and 180° (“9 o’clock” and “15 o’clock”) is formed between the fishing line and the rod, then it will be inconvenient to make a hook. The correct position between the rod and line is 45-60° on the left and 130-150° on the right (respectively “10-11 o’clock” and “13-14 o’clock”). This wiring is used for catching roach and roach.
Uniform wiring
It might not have been included in the general list due to its general knowledge. This is classic basic wiring. Most spinning anglers use uniform retrieve in their practice of catching predatory fish.
As for the UL fishing technique we are considering, uniform fishing is noticeably behind in terms of the number of bites from the methods listed earlier. And yet, from time to time, she is prey. According to my observations, the best time for uniform fishing is the midday summer heat, when the fish hides in the shade of aquatic vegetation.
A fan of spinning rods with some experience in fishing with oscillating spoons may notice that in my list I have listed few fishing methods. Indeed, there are many more of them. Nevertheless, the mentioned postings will be quite enough to start using them in practice. All of the listed techniques are basic; when they are combined, other types of postings are born. This is comparable to a multiplication table, on the basis of which complex mathematical calculations are based.
For example, jitter wiring can be done in at least four ways! Depending on the frequency and number of twitches, as well as the winding speed at the output, you will get methods that are outwardly dissimilar to each other, but they are based on the same wiring already mentioned. The same can be said about the “step”. It is enough to make a jerk after the final phase of the fall of the spinner - and we get a fundamentally new style of retrieve.
And now imagine how many additional postings can be made if you combine key methods and their options... The combinations are endless! But there are simply no universal spinner baits - their effectiveness is determined by the fish.
Every fishing trip, even at a place that has been tested many times, always starts from scratch. Weather, a change in the food source of the fish - all this leaves an imprint on the bite. The wiring that was productive yesterday no longer works today, and the spinner has to look for something new. But when a spinning player masters the basic technique, he will “turn on” a subtle process called creativity...
Concluding the story with basic fishing, I want to say to those spinners who want to put this interesting technique into practice: mastering the techniques will require time and hard work. Often, inspired by an article or someone's skill, a beginner, faced with failures, gives up training when there is very little left before the first bite... When fishing with oscillating spoons, there will be no free, easily accessible bites - these are not man-made baits. Only hard work, multiplied by many years of practice, will make you a master of lure fishing.
Tactics
This is a big topic that can take up a lot of space, and the article is already lengthy. But to fill this gap, I refer the interested reader to my article “Roach on a spinning rod? The main thing is to choose bait”, published in the magazine “Fisherman” No. 7/200\'). In it, I spoke in detail about the tactics of catching roach with rotating spoons and, in particular, about the “pincer” technique. Let the reader not be confused by the fact that in the article the main emphasis is on “turntables”; everything told is projected onto oscillating spoons.

It is useful for any spinning angler who approaches our hobby as an art to learn some interesting historical facts.
At the end of the 19th and beginning of the 20th centuries, a whole school of spinning fishing with oscillating lures developed in Russia. Among other lure lovers of that time there were masters who could, at will, catch fish of a strictly certain type. Such skill was achieved due to a certain manner of fishing, a certain horizon and a certain shape of the spoon, which caused predatory excitement, say, only in pike perch. The rest of the predators, being nearby, did not react to the bait.
And vice versa, as soon as the master used a spoon and a fishing style aimed at another fish, a bite followed from the very fish that the spinner wanted to catch. One can unconditionally believe in this ability of our predecessors, and not attribute it to the primordial Russian habit of idealizing hoary antiquity. Among the spinners of those years there were not only wealthy people (this pastime was extremely expensive), but also those who knew how to approach their hobby creatively. The experience of such spinners formed the basis of the ability to catch fish of a certain type at will.
Subsequently, when spinning ceased to be a luxury and moved, as they say, to the masses, the Russian art of fishing with an oscillating spoon was gradually lost. The reason for this was many social and other factors, and in recent decades - the dominance of man-made baits designed for the “weekend spinner”. But be that as it may, in fishing periodicals there will be a publication dedicated to oscillating spoons, which indicates interest in this type of bait. The experience of its enthusiasts is invaluable: it is like a bridge to the future revival of the Russian school of oscillating spoons.
For my part, I hope that my article will make its contribution to this interesting matter. Maybe one of the fans of spinning rods - and not only ultralight ones - will remember some forgotten techniques or talk about the experience of people who own such equipment. It is quite possible that somewhere there are genuine masters of the oscillating spoon, ready to share their accumulated experience.
V.EGOROV, Ekaterinburg.
Making your own spinner spoons
At enterprises, oscillating spoons are made by cold stamping. This process requires complex, bulky equipment (stamping presses) and precise, labor-intensive tools (punches and dies). Craftsmen, however, have learned to stamp the petals of rotating spinners at home using a simple tool. But the petals are made from sheet material up to 0.5 millimeters thick, and oscillating spinners require metal up to 3 millimeters thick. In this case, it is assumed that the oscillating spoons should be relatively heavy, and their mass determines the play of the bait when retrieved.
And yet heavy spoons can be made in a home workshop! Let's consider one of the simple methods, which, in my opinion, is available to everyone.
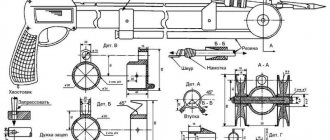
First of all, you need to make an elementary matrix and several so-called strikers.
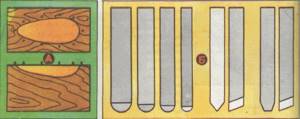
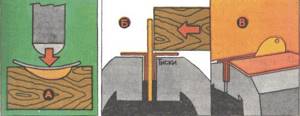
For the matrix, we take a wooden (beech, oak, etc.) block measuring 60X60X120 millimeters, in which, using semicircular chisels, we select a recess (Fig. 1, a), repeating the contours of the future spinner. When hollowing out a recess, we control it by making impressions from plasticine and checking them with a sample or drawing of the spoon.
The strikers are pieces of steel rod with a diameter of 20-30 and a length of 150-200 millimeters, rounded at one end. We make one or two strikers faceted (Fig. 1, b) - they are intended for the manufacture of faceted spoons. If desired, you can have a set of hammers with spherical and faceted heads.
We cut out a blank from pre-annealed copper or brass, which should be 2-3 millimeters on all sides larger than the contours of the future spinner. We anneal the copper by heating it to a cherry color (about 600 °C) and cooling it in water. We anneal the brass, also heating it to a temperature of 600 °C, but cooling it in air.
We place the cut blank on the matrix and fix it above the recess, driving 8-10 nails without heads around the perimeter. Using a large striker we press the metal into the matrix. Then, as necessary, we knock out the workpiece with thinner strikers so that it completely “sinks” into the recess of the matrix. If the deposition process of the workpiece is difficult, it is necessary to carry out another annealing.
We remove the finished workpiece from the matrix, file the edges, drill holes for the winding rings, grind and (if necessary) polish, and paint.
The disadvantage of the described manufacturing process for spinner spoons is the low copying accuracy. This drawback can be almost eliminated if the matrix is made of self-hardening plastics - epoxy and acrylates. Acrylates - protacryl, rhodont, noracryl, stadont and others are used in dental prosthetics. It is not difficult to make a matrix from self-hardening plastics using a proven spinner.
We dilute the plastic according to the instructions included with the plastic kit. Pour the liquid plastic into a box of suitable size. The spoon that will serve as a model is coated with a solution of paraffin (wax, stearin) in gasoline (turpentine, kerosene) and embedded in plastic. After an hour, remove the spoon from the plastic - the matrix is ready. But you can work with it only after a day, when the plastic has completely hardened.
With a little skill, you can abandon the matrix, replacing it with a device made by yourself. It is a block of 60X60X150 millimeters of hard wood, in which there are three recesses (Fig. 2, a), two of which are oval in shape; the third is selected on the edge of the bar. Naturally, such a device can also be made from self-hardening plastic.
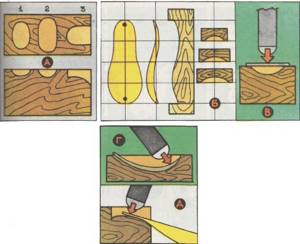
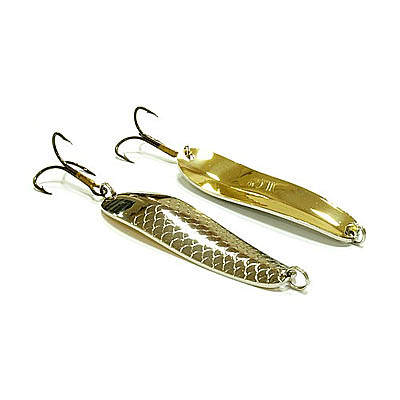
Let's look at how to make a Shtorling spoon spinner with your own hands (Fig. 2, b), using a device and strikers already known to us. We place an annealed sheet metal workpiece (brass, copper) 2 millimeters thick on recess 1 and push down the tail part of the workpiece with blows from a thick rounded striker (Fig. 2, c). Then, on the recess, using 2 blows of a thinner striker, we correct the edges of the workpiece, making them steeper (Fig. 2, d). We control the shape of the future spinner using templates (Fig. 2, b). At recess 3 we knock out the bend of the head part of the spoon - it is slightly bent in the opposite direction (Fig. 2, e). We process the finished workpiece, attach winding rings and a tee. The spinner is ready.
Recently, spinners have acquired so-called weighted oscillating spoons in their arsenal. Among them there are specially designed and ordinary standard spinners, weighted with loads.
Using the method described above, making a spoon-shaped spoon from relatively thin sheet metal and then weighing it down is very simple.
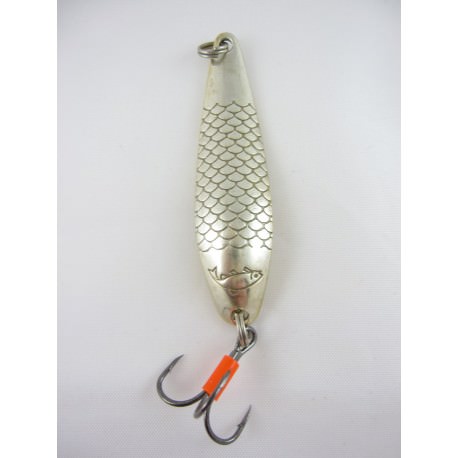
I’ll tell you how I make a weighted oscillating spoon, which I called “Perch”.
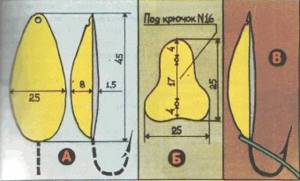
I knock out the spoon according to the dimensions indicated in the figure. 3, a, using templates for control. I file down the edges of the resulting workpiece and polish it. Next, the lure, having previously tinned its inner surface and installed a hook No. 12-16 with a tinned shank, is filled with lead. In the head of the spinner I drill a hole for the winding ring. Then I finally process the surface of the bait - polish it, paint it.
The last, most important operation is installing the tail. I make it from soft vinyl chloride sheet about 1 millimeter thick. I paint the plastic with red ballpoint pen paste dissolved in dichloroethane or acetone.
I cut out the tail according to the drawing (Fig. 3, b) and make two holes in it with a hot needle. I place the tail on the hook as shown in the rie. 3, c, - in this position it is rigidly fixed.
It is necessary to make a reservation that “Okunevaya” plays well with the correct tail sizes. If it is large, the spinner begins to rotate even at an average speed of retrieval. Therefore, having produced prototype samples of new spinners, it is necessary to conduct so-called pool tests.
Taking one of your friends or acquaintances as an assistant, you go to the shore of the reservoir. An assistant casts the spoon being tested along the shore and leads it at different paces, and you, by changing the size of the tail, achieve a good game. Equip the remaining spinners with tails of the optimal size found.
When talking about weighted oscillating lures, we cannot help but talk about the so-called “sandwich” spinner spoons. They are the same in shape as the existing classic spinners, and differ only in the manufacturing technology. These are two thin shells with lead poured between them.
They make them like this. The outer and inner surfaces of the future spinner are knocked out (Fig. 4, a). You can use sheet metal thinner than 0.5 millimeters. The surfaces between which the lead will be located are tinned. Molten lead is poured into the outer surface and the inner surface is pressed into it (Fig. 4, b) so that both surfaces are evenly aligned around the entire perimeter (excess lead will come out through the existing cracks). They drill holes for the winding rings, process the lure, and it is ready.
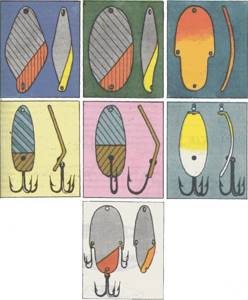
The equipment of oscillating spinners is not very diverse. Its options are shown in Fig. 5.
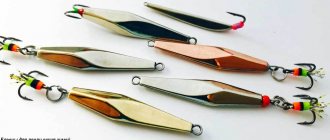
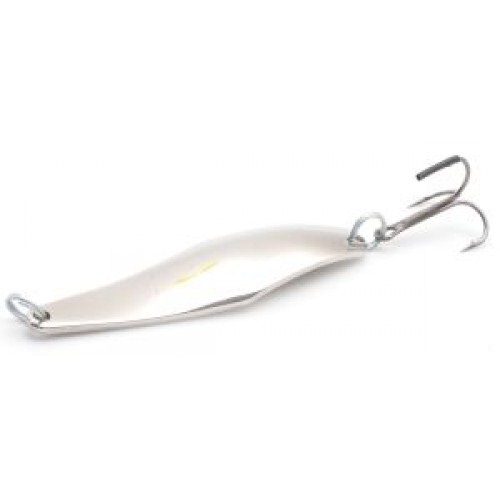
The so-called flat-curved spinners are interesting (Fig. 6). They are easy to make at home, they have proven themselves well in “work”. According to their shape, they are divided into two varieties - smoothly curved and broken.
Smoothly curved vibrators are made by hand using an elementary wooden matrix with a longitudinal recess. The blank, cut exactly along the contours of the selected bait, is placed on the recess of the matrix and bent with a large striker as necessary (Fig. 7, a). Then holes are drilled in the spoon for the winding rings and its surface is treated.
Broken spinner spoons are made in a vice with copper pad jaws (they are needed to avoid large nicks). The workpiece is secured in a vice so that the bend line lies at the level of the jaws of the vice. A suitable block of wood is placed on the protruding part of the spoon (Fig. 7, b) and bent with a strong blow of the hammer. If the angle turns out to be insufficient, and for broken flat-curved spinners it should be about 140°, the blow is repeated.
In the resulting bait, holes are drilled for the winding rings and processed as necessary.
First of all, you need to make an elementary matrix and several so-called strikers.
Necessary materials and tools for making vibrators
When you get the required quantity of workpieces, look for a hacksaw, a drill with metal drills, a file and a wooden block, sandpaper, pliers, round nose pliers.
- First stage. Take a spoon and use a hacksaw to cut off the handle. First you need to make a mark with a marker or pencil, and then we make a cut along it. It is better to make a cut so that a small tail measuring 5 mm remains. It will be more convenient to make a hole on it. After this, we take a file and grind down the irregularities and smooth out the roughness. If you have a machine with a wheel for sharpening knives, then it is better to do this work on it. It will be faster this way and you will get a beautiful petal. It's better not to throw away the pen. You can use it to make a jig for catching pike perch.
- Second phase. Make a hole in the petal. For this operation we will need a drill and a metal drill bit with a diameter of 2 mm. Make a mark with a marker and start drilling. To prevent the workpiece from slipping, it is better to clamp it in a vice. When we drill, we don’t press with all our might. It is better to use a high-quality drill so that it can process metal properly. Having made a hole in one place, proceed to drill a hole from the opposite side. It should look something like this.
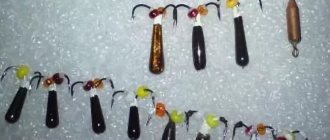
- Third stage. The holes need to be cleaned a little with a thin file to make them smoother. After this operation, we insert a winding ring with a tee into one ear, and either just a winding ring or with a swivel into the other. As a result, we will get such a spinner spoon.
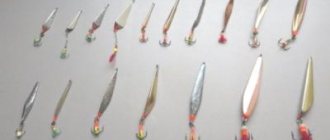
You can make at least a kilogram of these in different colors, patterns, etc. Next, we make holes along the edges and insert a tee and a winding ring or swivel. The bait can be improved by pouring a little tin or lead inside. Before bending, you can put small metal balls inside. The result will be a noisy bait. Who knows, maybe in the future manufacturers will be interested in such a model and make their own more advanced version of such a vibrator.
How to make a spinner with your own hands
You can make almost any spinner with your own hands. There are plenty of available materials for this: dessert spoons, metal plates and even coins. Let's look at some of the simplest options for creating the main types of spinners.
Option #1. What do you need:
Materials for weighting spinners
A rig made from thin sheet metal does not have enough weight to cast well and is difficult to control, especially in crosswinds. Therefore, when making spinners, they are made heavier by pouring low-melting metal into the inner part. Lead or tin is used for this. The first option is used more often, being more accessible in everyday life.
Filling can be done at home. The metal is melted in an ordinary tin can, and the workpiece can be laid horizontally in a box with dry sand.
- Bench vice, designed for fixing the workpiece during processing.
- Anvil. It must have a well-prepared surface, including polishing. This is necessary during cold forging for normal deformation of the metal.
- Chisels of different sizes used when cutting out workpieces.
- Saw for metal.
- Wooden and personal files of various shapes - flat, round, semicircular, square, triangular. Needle files of the same profiles may also be needed.
- Sandpaper of various grain sizes, used for the purpose of fitting, leveling, grinding and other similar operations.
- Drills with a diameter of 1.5 - 2.5 millimeters for preparing holes.
- A hand drill is more convenient for drilling small holes, especially in weighting material.
- An electric drill - with its help you can quickly grind and polish the surface of the spoon using special tools.
- Flap sanders and similar polishing attachments.
- Measuring tool and marker for marking.
Do-it-yourself ultralight baits - how to make a micro-oscillator
The world of ultralight (UL) is interesting not only for the diversity of the species composition of the fish we come across, but also for the ultralight baits that we catch. Today I would like to talk about small oscillating spoons (micro-oscillators), really small ones - their size does not exceed 30 mm. And not only about how to make these interesting microoscillators yourself at home, using the minimum of tools that are almost always at hand in any home, but I will also try to analyze some interesting points in the wiring of such homemade microoscillators. Let's talk about little secrets that will help you master this type of ultralight lure.
The undoubted leaders in the factory production of micro-oscillators are the Japanese. Even the smallest Japanese companies, focused exclusively on the needs of the domestic market, do not refuse the opportunity to have these interesting ultralight baits in their assortment.
We are unlikely to be able to master the production of such micro-oscillators on an industrial scale, but we can try to make a couple of ultralight baits of different shapes and weights for ourselves and our friends with our own hands. This is quite a troublesome matter, but the game is worth the candle. Well, let's add a little patience here.
Even at the dawn of my passion for fishing, I spent a long time looking at oscillating spoons, these variously curved metal lures of various configurations, in “Fisherman-Sportsman” stores. Those baits amazed with their massiveness and significant size. My imagination pictured huge pikes and pike perch. It’s all the more fun now to make greatly reduced copies of them yourself. And when they also catch fish, it’s just a thrill. For the sake of truth, it is worth saying that, in general, they are not at all of record sizes. But we don’t need this, everything is fine with fish in stores now. And it’s better to let our caught one go.
The undoubted leaders in the factory production of micro-oscillators are the Japanese. Even the smallest Japanese companies, focused exclusively on the needs of the domestic market, do not refuse the opportunity to have these interesting ultralight baits in their assortment.
Holes for winding rings and hook in the spoon
After the workpiece is cut, you need to drill holes. This is done with a drill or drill press. The latter is of course much more accurate and convenient, but few people have it. The diameter of the holes is selected in such a way that the winding ring can easily pass through them.
It is best to drill on a piece of wood, pressing the future lure with your foot or holding the entire structure in a vice. It is advisable to use a core. But don't hit it too hard. Otherwise, you can bend a small workpiece. It is advisable to use sharp drills. After drilling, it is advisable to sand the edges of the holes with fine sandpaper or a file. Holes can be drilled after the bait has been shaped. It's just not very convenient.
After drilling, the workpiece needs to be shaped. This is done on a piece of thick rubber. If there is no rubber, lead poured in the form of a plate will do. It is quite flexible. Although it’s better to still look for tires. For example, an old hockey puck. A metal ball is used to create a recess. The ball from the bearing fits well. The workpiece is placed on a sheet of rubber. By tapping the ball with a hammer, the future lure is gradually given a concave shape.
If there are no bearings, you can shape it with one hammer. Although it is not so convenient. In the end, you should end up with a small oscillator. You should not strive for perfect symmetry or maximum resemblance to the original. Maybe your spoon will be even more catchy.
After shaping, the spoon is polished. To do this, use sandpaper of different grain sizes. First of all, the edges of the spoon are processed. They may be damaged during shaping. The edges of the spoon should be smooth and not sharp. They can be processed with a file.
The vibrator can be painted. To do this, it is thoroughly cleaned and degreased. It is best to paint micro-spinning spoons in bright colors. Spray paint is quite suitable for these purposes. Using different colors, you can make the vibrator resemble any fry or insect.
You can do copper plating of the spinner at home or silver plating.
The micro vibrator can be coated with colorless varnish. It will protect the metal from oxidation. This way the spoon will remain shiny for a long time. As a rule, homemade coating holds up well. When fishing, the lure can be darkened by smoking it over a burning candle or match.