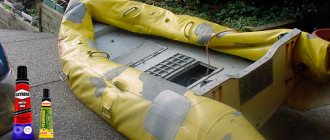
When purchasing a valuable and useful item, any owner undoubtedly wants it to serve him as long as possible. In particular, lovers of fishing and hunting on open water, happy owners of rubber boats, treat their watercraft with trepidation and monitor their condition.
It's no secret that rubber is a special material that can often be damaged. To prevent the money spent on buying a boat from going down the drain, proper care and repair of your personal watercraft is necessary.
Popular brands of glue for rubber boats
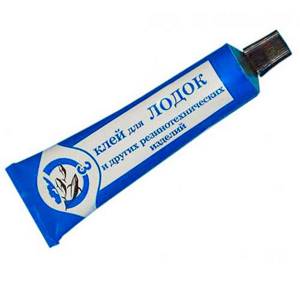
The most reliable means for repairing rubber boats is undoubtedly glue. Its correct choice, in terms of composition, characteristics and purpose, guarantees the quality of repairs and the service life of the boat.
Let's consider the most popular brands of glue that have proven themselves among boat owners:
Glue 4508 (rubber, based on Nairit DP rubber)
This brand is considered the most effective for repairing all rubber products and, in particular, boats. Has high strength. A distinctive feature from other adhesives is that it does not require heating the product during work. If you use it in combination with hardeners (“Leukonate” or “Dismodur”), the wear resistance of the composition increases significantly.
Polyurethane glue for PVC boats
Polyurethane, as a substance, has special adhesive properties. In addition, it is plastic and does not lend itself to mechanical stress.
Radical
The adhesive can withstand low temperatures, pressure and loads and is adapted to sea water.
Gum
This glue contains natural rubber. A distinctive quality is the increased water resistance of the repaired product.
Rubber glue NK
It is a solution of rubber and nefras. Gluing is carried out using the “cold” method.
Adhesives 88 SA, 88-NP, 88-N
These grades are suitable for bonding rubber surfaces, but are used for a specific problem.
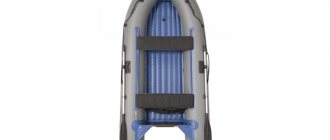
Choosing glue for PVC boats
Correctly carried out repair work guarantees the normal service of the watercraft, as well as human safety on the water. If you seal the boat poorly, it may depressurize and the cavity will begin to fill with water. It is usually recommended to use the glue that comes in the repair kit for the boat, but this product has a small volume and runs out quickly. Therefore, if the product is damaged, you will have to select a new glue, which must meet a number of requirements:
- Strength and elasticity. The best glue is one that has a high level of adhesion to the PVC surface, allowing you to create a strong and durable seam that does not deteriorate over time. Cyanoacrylate-based adhesives are not suitable because they do not have sufficient elasticity: when lowering and inflating the boat, the seam will begin to crumble.
- No stickiness, quick drying. To repair a boat while traveling, the adhesive composition must dry quickly. It is worth assessing the properties of the glue in advance by applying it in a thin layer and checking for tack after 5-7 minutes. Low quality products will stick to your fingers.
- Special composition. Universal adhesives are less suitable than special-purpose adhesives that are created specifically for PVC and rubber. Typically, such adhesives are better able to withstand temperature changes, have increased heat and frost resistance, and are not destroyed by contact with water. Some adhesives can even withstand immersion in sea water.
High-quality glue cannot be cheap, and you should not skimp on your safety. You need to purchase a product of sufficient volume so that it is enough to carry out repairs. The glue should not contain components that spoil PVC, otherwise the boat will be irrevocably damaged.
Which glue to choose?
To eliminate defects on the surface of the hull of a rubber boat, it is best to use glue 4508. The natural rubber and resins included in its composition become elastic when hardened, so this glue can withstand loads and pressure well, and has high water-resistant properties.
Rubber glue and polyurethane adhesives are also well suited for repair work.
Gluing a rubber boat, step-by-step instructions
In order to start repairing a boat with your own hands, you need to correctly identify the problem and its location.
The most common problems
- holes;
- tears on surfaces and at seams;
- damage to oarlocks;
- bottom defects;
- damage and deformation of tapes.
If it is not possible to visually determine minor damage to the body or bottom, you should gradually inflate its compartments and treat the surface with a foaming soap solution. Bubbles will form at the rupture site, indicating the location of the defect dislocation.
Necessary tools and tools
- glue and instructions for it;
- “Galosha” gasoline (car gasoline will not work, as it contains oil);
- patch material;
- self-adhesive tape;
- sandpaper (fine-grained);
- marker;
- brush;
- scissors.
Repairing broken rowlocks
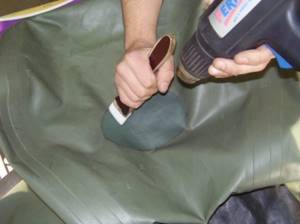
Owners of rowing boats sooner or later face a problem such as wear of the oarlock connection. As a result of constant load, the strength of the adhesive joint weakens and the oarlocks begin to come off. How to seal a boat with PVC in this case? Easy and simple, you only need boat glue and a regular household hair dryer.
We have already discussed the best way to glue a part to a rubber boat, but now it’s our turn to discuss the opposite case. Most often, with oarlocks, only the edges of the clutch come off, and most of the part is held firmly to the body. But to repair it, we need to completely unhook the oar mount and sand the gluing area. So, in order to peel off the oarlock as easily as possible and without harm to the rubber material, you just need to heat it with a hairdryer. As a result of heating, the part will easily come off and will not damage the rubber hull of the boat. Just don’t make sudden movements: you need to peel off the oarlock smoothly and slowly.
Once the oarlocks have been removed, we begin to repair them. It is performed in several steps:
- We remove the remnants of the old glue by sanding the area with sandpaper.
- Degrease the gluing area with a solvent.
- We apply the glue in two stages (apply it, let it dry, put another layer on top and also let it dry). It is important to note that the boat’s cylinders are deflated, because with an inflated body, the connection will not adhere well.
- Apply the oarlock to the gluing area and hold tightly for 1-2 minutes, leave to dry.
Properly repaired oarlocks will hold tight for a long time.
Basic “steps” of repair
Determining the location of the rupture
Significant damage such as holes, cuts and tears can be identified by visual inspection. If the boat allows air to pass through, but the defect location is not found, as mentioned above, you will need a detergent that covers all the chambers one by one. Inflated.
Treating the edges of the damaged area
Having identified the defect, its size and location, the edges of the damaged surfaces are processed before gluing.
The area of intended gluing is cleaned with fine-grained sandpaper. This is necessary in order to increase the quality of adhesion of materials and glue to each other. The fragment cleaned using “sandpaper” is treated with “Galosha” gasoline for a degreasing effect.
Gluing
If additional components are used for gluing surfaces, such as hardeners or similar substances, the adhesive mass must be prepared in advance.
According to the instructions, glue is applied to the contact points of the elements in a thin layer.
In some cases, after applying the glue, it is necessary to maintain a certain temporary exposure for better contact between the adhesive fragments.
How to seal a rubber boat with a cut or torn hole
To repair large cuts you will need nylon threads and a thick needle. It is necessary to sew up the resulting hole in the boat so that the seam forms a rigid and durable junction of the edges, but the threads are not too tight. After all, during use, the vessel will constantly receive waves and high loads, so the seam must be made so that it does not come apart 100%.
If the boat has a hole with torn edges, which are problematic to sew, you should use the gluing method. This operation is carried out similarly to removing a puncture, only with an additional procedure - gluing a patch from the inside. Let's consider how to carry out this action.
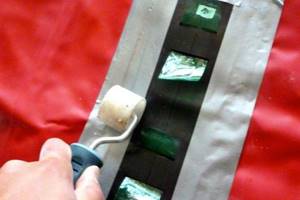
So, to repair a torn hole, you will need to cut two patches, and one will be 5 cm larger than the size of the break, and the second will be another 3-5 cm larger than the first. Apply a layer of glue to the inner surface of the hole and to a smaller patch, while only treating half of the fabric with glue! This is necessary for convenience and strength of bonding. After the layer has dried, carefully place the patch into the hole and glue the edge, pressing it tightly to the inside of the case. For high-quality adhesion, we roll the gluing area a couple of times with a roller.
After letting the first part dry a little and “set”, apply glue to the second edge of the patch with a brush and repeat the gluing procedure. Next, again leave 10-15 minutes to dry, and glue the top patch using the method described above.
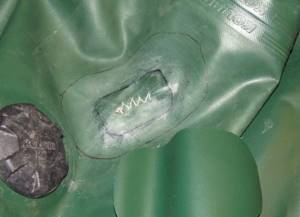
An example of stitching a torn hole in a rubber boat with nylon thread
Repair instructions for individual components
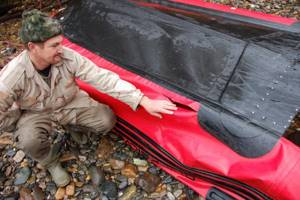
Gluing a rubber boat along the seam
Fishermen and hunters who use rubber boats are well aware that elements such as seams are the first to fail. What does it look like? The special tape that protects the seam begins to peel off over time, allows water to pass through and can contribute to rotting of the suture material.
First, the watercraft should be thoroughly dried and make sure that there is no moisture left anywhere.
Boat seam repairs should be carried out in a dry, ventilated and warm room. At the beginning, the boat should be inflated, but not too much. Then, determine the location of the detachment or damage. Lightly sand it, degrease it and apply the glue itself directly.
It is necessary to ensure that the adhesive is distributed evenly over the entire area. Next, the surfaces are pressed tightly against each other and fixed with fingers or a press for several minutes. To fully achieve the effect, the boat, with taped seams, is left in an inflated state for the time specified in the instructions.
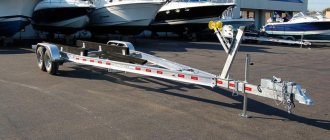
Gluing the transom
The transom of a boat is a special area that can withstand the highest loads, since the motor is attached to it. Under the pressure of the weight of the motor, this element often fails and requires constant repair.
To glue the transom, you need to choose a high-quality adhesive. Polyurethane adhesives do an excellent job with this task. Due to their special composition, they have a high adhesive effect, capable of holding foreign materials (plastic, wood) on the rubber surface.
Rubber rubber adhesive is a popular rubber adhesive that contains natural rubber, urethanes, and various specific additives. It has proven itself well as a means for repairing various surfaces and materials, including rubber.
Due to its increased viscosity and increased elasticity, this adhesive has the following positive effects:
- corrosion resistance;
- vibration resistance;
- resistance to mechanical damage;
- resistance to abrasive materials;
- resistance to deformation.
How to seal a boat transom?
The transom is the area of the boat that should be the strongest, since this is where the motor is mounted. Being under the influence of the motor, it quickly fails and requires repair.
Bonding occurs in the usual way, which includes:
- Preparation of material and tools;
- Cleaning;
- Gluing.
To repair the transom, you need to know the size and thickness of the plywood, which should also be replaced.
Re-gluing the bottom of the boat
An important part of the boat is the bottom; it is the bottom that is often damaged due to various damages.
To glue the bottom:
- Remove the old bottom completely;
- Sand the edges and process them;
- The boat must be inflated;
- Attach the bottom and leave for 2 days for complete fixation.
FAQ
Is it possible to use Moment glue in the repair of rubber boats?
Based on practice, experts and experienced fishermen do not recommend using Moment glue for repairing watercraft. This glue reacts to high temperatures and dries when exposed to sunlight.
How to remove old glue from a rubber boat
It is worth taking into account that when the glue comes into contact with a rubber surface, a vulcanization effect occurs, in which the glue itself seems to be embedded inside the rubber. Therefore, it is not worth tearing off by hand or removing with solvents and other aggressive substances, as this can cause damage to the fabric.
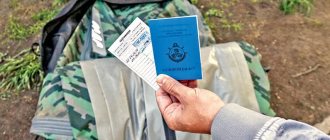
In conclusion, I would like to remind you that sealing a damaged boat at home is one thing. But if it breaks down in nature, it’s not an easy task. Therefore, when going fishing or hunting, keep a boat repair kit with you.
Application of glue
Before you begin repair work on your boat, you must carefully prepare the surface:
- a damaged inflatable boat must be deflated;
- Wash and dry the problem area well;
- in order to avoid the formation of subsequent folds in the work area, it is recommended to place a flat board under it and level the fabric shell;
- degrease the problem area using any solvent, acetone.
This concludes the preparatory work.
What materials will be needed for repairs?
Having carried out a thorough inspection of the PVC inflatable boat and identified the problem area, we proceed to preparing the necessary accessories for repair:
- repair kit, it is provided by the manufacturer and is included with the boat;
- construction knife, scissors;
- roller or metal plate;
- pencil, marker;
- small brush;
- water, soap, rags;
- any solvent, the use of alcohol is allowed;
- special glue for rubber products.
The above list of tools will be required when carrying out repair work at home or on the shore of a reservoir. If the damage needs to be repaired directly while fishing, it is more effective to use a repair kit and a lighter.
The standard repair kit includes materials that allow, under field conditions, to eliminate the cause of vessel depressurization in a short time. The set consists of a tube of special glue, a set of PVC fabrics, the diameter of which is 40 mm and 80 mm (6 pieces).
A special adhesive is used to lubricate the inside of the patch and the gluing area on the boat.
Instructions for use
- The problem area must be cleaned of various contaminants. The use of sandpaper is inappropriate here; there is a high probability of damaging the fabric. This option is more suitable for heavily ingrained dirt.
- Degrease the working surface with either solvent or acetone. The main thing is to observe moderation in everything, otherwise the rubber fabric may corrode.
- Based on the size of the defect, a patch of the desired configuration is cut out. In size it should be several centimeters larger than the actual size of the hole. The cut patch is applied to the damaged area and the contours are outlined using a pencil.
- A special adhesive is used to lubricate the inside of the patch and the gluing area on the boat. Give the glue a little time to dry (10 minutes) and apply another layer of glue to the working surfaces. Wait a couple of minutes.
- Bonding surfaces . Using a hairdryer, you need to slightly heat the problem area and apply the prepared patch to it. The main condition is to check the area for the presence of an air gap. In order for the glued area to “grab” better, it needs to be rolled well with a roller. It is better to operate a repaired watercraft after 2 – 3 days.
For minor damage (scratches), filling them with glue will be enough, but it is better to apply a patch.
To eliminate holes with a diameter greater than 5 cm, it is recommended to use two patches: both on the inside and on the outside. The inner patch should be glued first, followed by the second one.