How to breed dung worms
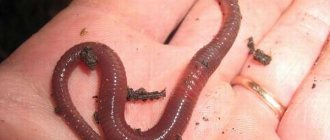
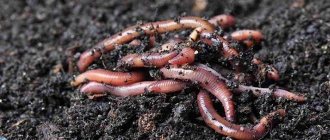
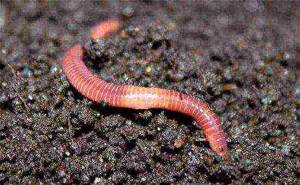
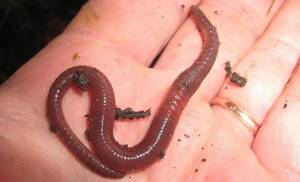
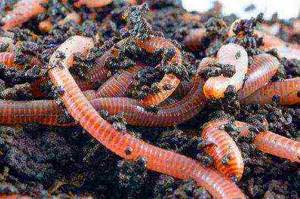
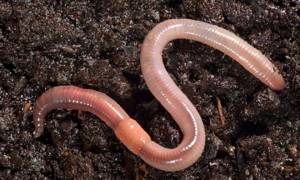
A dung worm is essentially an earthworm; it is distinguished by its slightly longer length, up to 12 cm, and its mobility; unlike its relatives, this worm is able to hide very quickly in burrows.
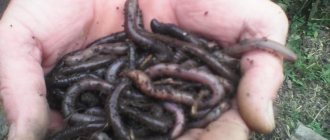
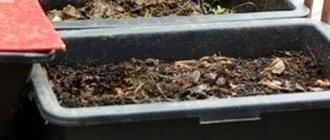
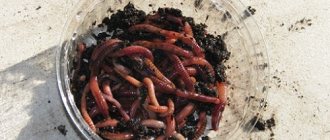
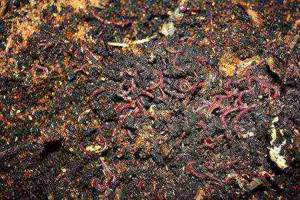
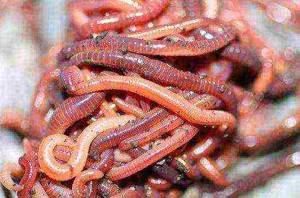
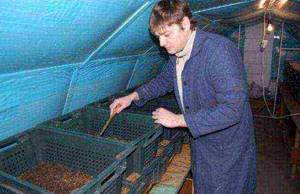
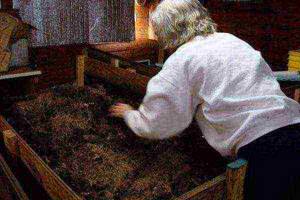
Dung worms live primarily in compost heaps, pits and manure itself, which is where they get their name. Breeding this species is not as difficult as, for example, the Californian (with which it can easily be confused since they are very similar in appearance); for initial maintenance you will need a plastic container, the bottom of which must be equipped with drainage holes, the diameter of which should not be large since the bottom of the container it should be covered with sand to a depth of 2-3 cm so that excess moisture is better absorbed, and also after receiving vermicompost it does not have such a greasy structure. We lay a layer of hay about 5 cm thick on top of the sand, and on top we supplement everything with commercially available vermicompost so that the worms feel at ease after moving. Thus, we have prepared a future home for the dung worm and now we can go shopping for our first family. The dung worm feeds mainly on plant matter, rotting matter, but for breeding at home, food made from kitchen waste is suitable, such as potato peelings. apples, porridge, but not with milk, banana peels, one peculiarity - if the Calefornian and the prospector do not grind the food much, then for the dung worm it is best to turn the food into mass using a meat grinder or a blender. Before placing the worm in a container, the soil must be spilled with water at room temperature, since the dung worm loves high humidity, water it, then squeeze the watered soil in your fist - the water should seep out a little.
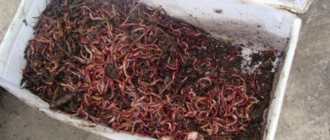
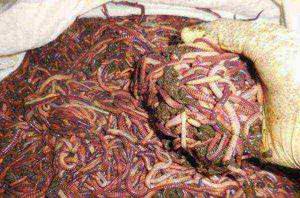
Place the family in a container and wait until the worms hide in the ground, then pour a layer of food about three cm thick on top and cover it with thick corrugated, wet cardboard. Put the container in a warm place, as soon as the worms begin to eat the cardboard, that is, they gnaw through it in such a way that they begin to crawl out of it in several places, this indicates that it is time to feed them, we do the same procedure, that is, a layer of food watering, cardboard and so on until your manure worm container is full. As soon as this happens, you need to stop feeding him, then he will rise to the surface with his entire family and this will allow you to separate and separate the family.
The produced vermicompost is slightly dried and packaged in plastic containers. Next, the family is divided into two parts (you will see for yourself that the number will increase significantly and small baby worms will appear). In this way, you will increase the number of worms progressively and will soon be able to put into production the production of vermicompost, the price of which, frankly speaking, is not small. Below you will see a couple of videos of how experienced breeders breed dung worms. Enjoy watching!
Wild and domestic worms
Earthworms are the general name for a large group of small-chaete annelids that live in the fertile layers of the earth and play a major role in soil formation. Invertebrates live at depths from 5-10 cm to 8 meters, depending on the subspecies.
Species that live at great depths are not suitable for artificial breeding, since they obtain food by continuously digging tunnels and simultaneously absorbing soil along with organic matter. They serve more as rippers than as sanitation workers, because the waste in the piles is not composted.
Therefore, for vermicultivation, technological hybrids obtained only from “surface” species of invertebrates are used. For example, the dung worm Eisenia foetida is the wild ancestor of the Russian Prospector and the overseas “Californian.”
If food is available, dung beetles lead a sedentary lifestyle, feeding on waste from the same heap. These are compost worms.
At the same time, wild worms are not very attractive candidates for home breeding, since they are difficult to tolerate changes in food, do not lay cocoons often, do not live long, and when there is noticeable inconvenience, they tend to migrate from the container.

To create a new vermiculture, worms undergo strict selection, and often interspecific crossing, in order to combine the best characteristics of the varieties in a new individual. This is done to breed unpretentious livestock that easily adapts to feed.
Anyone can repeat a similar experience in order to get their own selective breed in 1.5-2 years.
To do this you need:
- dig up worms, preferably near a pile of manure or waste (the more, the more numerous the offspring will be);
- place them together with the usual substrate in the composter;
- after 2-4 weeks, begin careful feeding with the material that the breeder has in abundance and with which he plans to feed the livestock in the future;
- every 2-3 months, remove adult individuals from the composter, leaving only young animals for breeding to ensure a change of generations;
- after 5-8 repetitions, the container will contain vermiculture adapted to artificial conditions and feed.
But for those breeders who need the fastest results, it is easier to buy breeding stock of already proven breeds of compost worms.

Muckworm. Breeding.
Avid fishermen know that the catch depends entirely on bait and it is very good if you do not have to go to special stores, but have the opportunity to collect it on your own site. From the article you can learn how you can breed a variety of worms in your garden, barn, and even in your apartment, which are used for fishing.
What worms are used by fishermen
Not all worms encountered in our area are suitable for bait. Only a few varieties are in demand among fishermen.
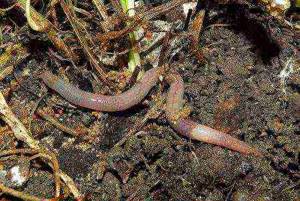
- Crawlers or earthworms. They got their name due to their ability to appear on the soil surface, crawling out of deep burrows only after rain. These are large worms, among which there are real giants up to 30 cm in length. As bait, crawlers are suitable for catching almost all freshwater fish.
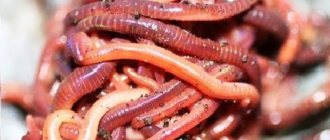
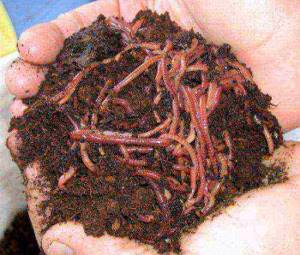
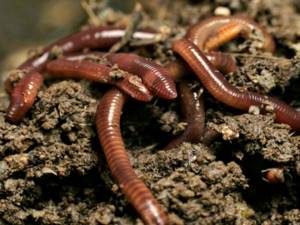
- Dung worms. Judging by the name, you can immediately guess their habitat. These creatures are painted dark red, are small in size and live in colonies, which makes them much easier to collect. Great for attracting fish.
- Subfoliates. They live in piles of leaves, under logs and stones. Medium size, dark purple color. Among the disadvantages, one can note the property of easily falling off the hook.
- Red Californian worms. This variety was obtained artificially from the dung specimens described above. Unlike unpretentious parents, they require certain conditions when growing: peace, quiet, warmth and suitable soil moisture.
Earthworm
All of the listed species, when certain conditions are created for them, live quite well and reproduce quickly in ordinary garden plots. During the cold season, worms can be bred indoors.
How to breed crawling worms
In their natural form, these worms live in the soil, where the remains of plant organic matter can be found, which is what they feed on. By passing soil through their intestines, crawlers transform it into nutritious humus, and thanks to the underground passages they make during movement, air exchange in the soil significantly improves. Gardeners have long noticed that plants grow better where earthworms live.
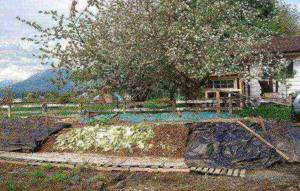
It’s quite simple to build a worm hutch on your property and breed crawlers in it. If this is the warm season, then it is enough to dig a small trench and fill it with garden soil mixed with half-rotten leaves and humus. In a few days, it will be possible to find a sufficient number of individuals there for fishing.
Attention! When setting up a worm pit, it is important to ensure that no ashes or coals get into the soil. Worms can't stand this.
When cold weather sets in, worms can be kept in a barn, on a balcony, in a basement, etc. The main condition for them is that the room temperature should not be lower than +15°C.
They make a worm like this:
- Take a shallow (about 20 cm) wooden box with gaps on the sides.
- The inside is lined with breathable material (burlap, lutrasil, etc.).
- The container is filled with earth mixed with chopped hay and the remains of leaves.
- The substrate is moistened and 20-30 individuals are placed on its surface.
In the future, you need to monitor the soil moisture and regularly add plant debris and other food that the worms eat into the box.
Advice. The soil in the box should be stirred regularly. This distributes moisture and feed evenly. In addition, thanks to this action, the worms do not bunch up into dense balls, within which they can die.
How to Grow Dung and California Worms for Fishing
The box for these varieties is prepared in the same way as for rain varieties. The substrate in which the red worms will live is prepared with a slightly different composition. It includes:
- straw;
- manure;
- sawdust;
- hay;
- Earth.
All components are mixed well, placed in boxes, moistened and compacted well.
Attention! The environment where the worms live should always be moist. At 22%, the inhabitants of the wormhole may die.
The acidity of the soil in which it is planned to raise pets should be within pH6-pH7. At pH9 or pH5, worms do not live. The temperature in the room with worm hutches should be about +24°C. When it gets colder, the worms begin to eat less, burrow deeper into the soil and go to sleep.
California worm
They feed their pets all kinds of plant and food waste. Leftover bread, various cereals, dry rolled oats and bran are suitable.
Advice. In order for worms to reproduce better, you need to introduce dairy products into their diet: low-fat cottage cheese, kefir, yogurt.
Breeding worms at home is more troublesome than buying them in a store. But, if you have a home worm farm, you will always have an unlimited amount of excellent bait at hand. And this, whatever one may say, is already half the success of fishing.
How to breed worms at home: video
When fishing, both artificial and natural types of bait are used. Regardless of the season and fishing method, the worm is not inferior to artificial bait. It is not always possible to buy the necessary worm in a store, and the price of such a purchase can be overpriced.
Breeding worms at home is not a very difficult task; it is enough to have the necessary information.
Rules and features of breeding
Types and characteristics of worms:
Prospector
The most popular in the field of worm breeding is the "prospector". This is a representative of one of the species of Californian red worms. It differs from its counterparts in its high level of productivity and fertility. He has a well-developed instinct of self-preservation. At low temperatures, the “prospector” burrows to a safe depth. The temperature range for reproduction is from +8 to +29 °C. An adult is capable of producing about 1,500 worms per year. The worm is unpretentious in food and quickly gets used to other types of food. Resistant to many types of diseases.
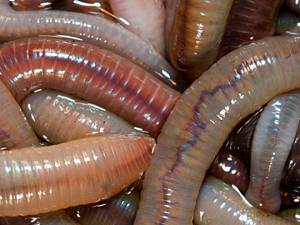
California red worm
California red worm is easy to grow at home. He is less prolific than his fellows. On average, 400 new individuals appear per year. An adult worm reaches 8 cm in length and weighs 1 g. Like the “prospector”, the main advantage is the speed of biomass production. The resulting vermicompost is rich in enzymes, the maximum amount of microelements and active substances. Comfortable conditions for the successful life of the red worm will be a temperature of 15-25 degrees and a relative humidity of 60%. In such conditions, he can live for about 16 years. The disadvantages of the California worm include pickiness in the choice of food, increased heat tolerance and the negative impact of direct sunlight.
Regular rain
The advantage of ordinary earthworms is their good adaptation to the environment. This type of worm is considered a universal bait - more than a dozen different types of fish bite well on it. The length of the grown worm reaches 15-30 cm; specimens that have reached 40 cm are often found. The main disadvantages are low life expectancy (up to 4 years), passivity in reproduction. Despite the disadvantages, earthworms are unpretentious in nutrition and have fairly active growth.
Mealworm
A mealworm is the larva of a beetle. It withstands temperature changes and has a high reproduction rate at home. For development, a comfortable temperature is considered to be 28 degrees, while humidity should not fall below 50%. They are not whimsical in their choice of food.
Muckworm
This worm is a favorite treat for many fish. The yellow liquid inside it has a specific smell that drives fish crazy. These worms are similar in appearance to red worms. The difference lies in the conditions of detention. To create a habitat you need: sawdust, manure, rotted hay or straw, black soil, wet leaves. All this is mixed and pressed well. The greater the soil pressure, the more comfortable it is for worms to live there. They have no preferences for temperature conditions and high humidity.
Dendrobena
In the selection there are also specially bred worms for fishing - Dendrobena. This type of worm reproduces sluggishly, but has a very fleshy body structure. Caring for them has certain difficulties associated with the constant maintenance of increased optimal living conditions.
Worm feeding
Worms feed on rotten or dead plant debris. It is recommended to include potato peelings, stale bread, cabbage leaves, banana skins, kefir diluted with water, grass, rotting straw, leftover grounds of used tea or coffee, chicken droppings, manure, and boiled vegetables into their diet.
The following ingredients should not be added to worm food:
- meat-containing waste;
- citrus peel;
- eggs;
- fermented milk products (the acidity of the environment increases);
- fresh manure (emits destructive heat up to 70 ° C).
Before serving food, it is well ground in a meat grinder. The composition of the feed must be constant. When changing their diet, individuals must undergo adaptation over several weeks.
You need to add a new portion of food 2-3 times a month. It all depends on the temperature regime - the warmer it is, the more often and more the worms eat food. Don't forget, excess food leads to fermentation of the soil, increasing its acidity level.
Worms for breeding
Worms are most often purchased from pet stores, the Internet, and fishing stores. When making a purchase, you should pay special attention to their appearance and general condition. They should be active and of a single color.
Inoculation technology and rules for caring for worms
You can breed worms not only in the village or in the country. Any place without noise and unnecessary vibration is suitable for this: in an apartment on a balcony or a “dark” room, in a garage, in a garden or other utility room. The main condition is compliance with the optimal temperature regime and sufficient humidity (70%). Unpleasant odors can be avoided by sprinkling the feed with soil or vermicompost.
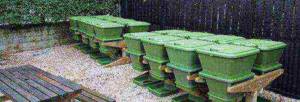
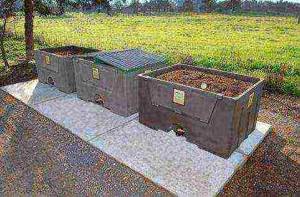
To breed worms at home, you will need to buy a vermicomposter or make a worm house with your own hands. This design is a plastic or wooden box (box), about 40cm high. The breeding container must have ventilation holes.
Holes are drilled in the top of the box or lid. The structure is installed at a slight angle in order to drain the vermichain formed during the life of the worms through a hole drilled in the bottom. An old refrigerator can act as a worm trap. It is placed with the doors facing up, holes being drilled in advance.
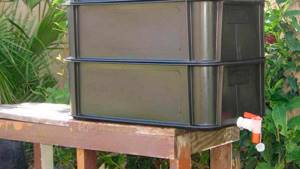
If you don’t want to make a worm farm, you can purchase a ready-made special product for growing worms - a vermicomposter. It is made in the form of two plastic boxes installed one on top of the other. Both have holes for ventilation and special slots at the bottom. The bottom drawer, located on legs, has a built-in tap. It is used to drain the resulting vermicelli.
After preparing the soil mixture, on the 2-3rd day a hole is made in it and the first residents move into the worm house. Afterwards, distribute the soil evenly and cover with a lid. We add food two days after moving in.
To know the required level of soil acidity, we carry out a test settlement in a smaller container. For breeding worms, the optimal acidity of the soil mixture will fluctuate in the range of 6.6-7.7 pH. With higher acidity, the worms begin to die. Its level is reduced by adding eggshells, chalk or limestone to the soil. To increase acidity, sawdust, straw or plant remains are used.
If within a week the surface of the substrate is clean and the worms are actively mobile, then the colonization was successful.
Worms are fed once every 1.5-2 weeks. The food is applied evenly to the entire surface of the box, 5-7 cm thick. Under favorable conditions, worms reproduce very quickly, so it is necessary to have pre-prepared worm nests for relocation. Constantly monitor the humidity. The watering procedure is carried out with warm (room temperature +24 °C) water, using a watering can with small holes.
When the substrate layer is more than 20 cm, it is necessary to loosen it to enrich the soil with oxygen. Mixing is carried out with special forks or other tools with rounded ends. This procedure should be carried out twice a week.
As a result of the vital activity of worms, the soil located in the box is divided into three zones. The top layer contains nutrients. The layer in the middle is used by adult individuals for housing. All the products of their active processing are collected in the bottom layer, which is why it is so important. This layer increases over time. After 3-4 months, the worms are transplanted into a new container, along with a small part of the substrate of the lower layer. And the process begins again.
Reproduction of worms
A new generation of worms emerges from cocoons. One female can lay only one cocoon per week. After a month, newborn worms appear. On average, 20 worms hatch from a cocoon. In two months they grow to the size of an adult. During the year, the worm lays up to 24 cocoons. During the growth period, the worms actively feed, so you will have to feed more often.
Comfortable conditions for reproduction: temperature in the range from +20 to +24 degrees, humidity 70%. It is advisable to keep different types of worms in separate boxes.
Blitz tips
- It is better to cover the bottom of the box with a mesh, this makes it easier to sift out the vermicompost.
- You can keep earthworms and red worms together in one worm bin.
- Cow dung becomes suitable for food only after 6 months.
- The resulting vermicompost is effectively used to fertilize strawberries, greenhouse vegetables, and indoor plants.
- Some types of worms are used to produce medicines.
Today, almost every person is trying to start their own business. However, not everyone succeeds. Often, competitors do not allow you to break into a large market, or you don’t like the job. Have you considered breeding worms at home as a business? No? Then this material is for you.
How to Grow Dung and California Worms for Fishing
California red worms are bred at home using a slightly different method from the breeding of crawling worms. This breed is heat-loving and subtly reacts to soil acidity, which requires a more scrupulous approach to preparing the substrate, which, by the way, is also suitable for breeding dung worms. For queen cells, take plastic boxes with drainage holes 30–40 cm high and fill them to the top with a substrate made according to the composition presented below, which includes:
- chopped straw;
- sawdust from deciduous trees;
- manure;
- chopped hay.
- ordinary land.
The substrate components are thoroughly mixed together and moistened. After pouring the mixtures into the boxes, they are thoroughly compacted, after which the mother material itself is placed in the top layer. In the room where the box is installed, it is advisable to constantly maintain the temperature at +20, +22 degrees. These are optimal conditions for feeding and breeding of the Californian species of worm. Dung beetles can be bred at temperatures four or five degrees lower. These types of worms produce ready-made bait 40–60 days after the culture is planted in the substrate.
Where to get worms
If you decide to start breeding worms as a business, you should collect them. To do this, dig a shallow hole and place some rotting leaves or manure in it. Be sure to moisten the filler. The main thing is not to overdo it. After this, simply cover the hole with a board or a layer of cardboard. A week later, the first residents will appear in your “house”. Transfer the individuals to the box along with the soil in which they lived. For worm breeding as a business to generate income, at least a kilogram of invertebrates is required per square meter. This is about 1000 individuals.

Where to find a worm for fishing
Village residents easily find worms for fishing. They have many promising places for this. The first is heaps of humus from cattle. Every owner who keeps a cow has such heaps. Also, the heaps are located on the territory of farms and farms. You can easily dig up dung beetles in them. Another promising place is last year's straw. They are also located in the farm area in special brick compartments. The straw deteriorates over time and if you dig a little, you can find excellent red worms there.
White worms can be found in ravines and meadows. Earthworms live in the turf of grass and plants and in flower beds. Large earthworms, which are suitable for fishing for catfish, also live there. They are caught at night with a flashlight when they crawl out of their holes. It takes some skill to catch them, as they are very fast and easily hide in holes.
As for city residents, of course, it is better to buy worms in a store. Find yourself a place that sells worms that suit you and don’t bother yourself looking for this bait. If you want, you can look for worms yourself. They can be found in plantings, under leaves and near streams.
Choosing a room
When you have collected worms, you need to think about the place where they will live. A specially equipped room is not required for their breeding. It is important that its area matches your desires. Of course, it is best to breed Californian worms (or any other) in a heated building. A garage or cellar is perfect for these purposes. If you are going to raise your pets in a regular barn, then get ready for the fact that a decrease in air temperature to 4 ° C will affect the activity of the worms. They will simply hibernate. In this case, you will have to forget about breeding worms in winter. If you want to do this throughout the year, then you should take care of heating and, of course, a large farm. After all, the number of individuals will increase. For example, on large farms where breeding dendroben worms is considered a business, their number can reach 100 thousand or more.
Special nursery boxes
Breeding the California worm as a business does not bring much trouble. The main thing is to create optimal conditions for its reproduction. It is best to keep worms in special nursery boxes. You can make them yourself. However, remember that each type of worm requires a box of a certain size. In such nurseries, the most comfortable conditions for invertebrates are created. Boxes can be made from plastic or wood.
Wooden nursery
To make it you will need boards. Their thickness should be 25 millimeters. If you are breeding earthworms, then it is better for you to make a nursery box that meets the following parameters: 100X20X50 centimeters. When the box is ready, turn it over and drill holes in the bottom. After this, place the box on the bars so that it stands at a slight angle. This is necessary so that the valuable liquid (“worm tea” is a waste product of these animals) drains away carefully. Cover all seams and corners with tin tape. This will prevent rodents from entering the nursery. Don't forget the roof. You can simply make it from boards. If they are not available, then you can use a sheet of plywood. Be sure to make holes in the roof. They are necessary for normal air circulation.
Plastic container
If you have achieved positive results, and breeding Californian worms as a business brings you income, then you can purchase special containers made of plastic. You should not buy such products if you are just starting out. Since such acquisitions are quite expensive. Agree, if you don’t like breeding dendrobene or ordinary earthworms, then such a purchase will simply be in vain for you, and you will throw your money away.
If you nevertheless purchased such nursery boxes, then first make holes in them. After all, such containers are completely airtight. Make holes in the roof and on the sides. In addition, there must be a hole to drain valuable liquid.
Cardboard boxes
If you have just started this business, and earthworm breeding is something new to you, then you can use cardboard boxes as nurseries. Their dimensions should be approximately 40 by 30 centimeters or more. Cardboard is an environmentally friendly material that allows air to pass through well and is often used by worms as food. The only disadvantage of such a nursery is its short service life. If the box gets damp and starts to fall apart, you can put it in another one.
Methods for attaching a dung worm to a hook
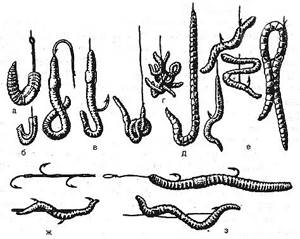
Various methods of attaching a dung worm to a hook
The hook is inserted only into the skin of the worm, without touching its internal part. If the head is pierced, it should be done at the base of the head!
The key to success in the fishing process:
- survivability and mobility of the bait on the hook;
- worm size=hook size;
- the worm must be placed on the entire hook;
- using several worms to catch large prey or combining them with other baits.
You can find tips on how to use worms correctly at https://rybka.bid/2017/06/30/kak-pravilno-nasazhivat-chervja-na-krjuchok/
Let's discover the secrets of the worm business
Recently, many have been attracted to worm farming. As a business, this business is quite profitable if you approach it correctly. In order not to get burned, you should know some simple secrets. First of all, you need to take into account the characteristics of the worms’ natural habitat, what kind of soil they live in, and what they eat. Their “house” can be divided into three floors. On the top, worms feed on organic remains of animals and plants. In the lower tier of habitat, the product of their vital activity accumulates, in other words - humus, as well as a liquid that many call “worm tea”. Between these “floors” your pets will feel most comfortable and will mostly stay there. It is important to fill the nursery correctly. Then the worms will multiply well and increase your profits.
How to properly fill a nursery
If we consider worm breeding as a business, then first of all you should carefully study all the nuances of such an activity. Many novice breeders make many mistakes, the first of which is incorrectly filling nurseries. How to do this correctly?
Fill the prepared container halfway with humus. If desired, you can mix it with shredded cardboard or pieces of newspaper. Be sure to moisten the finished mixture. However, do this with caution. If, when you squeeze the lump, no free moisture flows out of it, then you did everything right. You shouldn't introduce worms right away. The compost filler will release a substance such as ammonia for the first few days. When it has completely evaporated, you can begin populating the nursery.
Make a hole in the prepared filler and place part of the soil with worms in it. Carefully level this area, moisten it and cover it with a piece of cardboard. Do not disturb the residents for several days. They must adapt to their new habitat.
If the worms have spread throughout the nursery, this is the first sign that acclimatization was successful. After which you can add food. Remember, the place where worms breed should be calm and quiet. Therefore, install the nursery where there is no strong vibration or noise.
How often to water worms
Soil moisture has one of the dominant roles in the success of breeding packing material. A decrease in this indicator forces individuals to sink deeper into the ground, completely ceasing to feed. The substrate is moistened using a regular garden watering can, using water at room temperature for irrigation, which is first allowed to stand in the same room for three days.
If the soil is over-moistened, drainage holes in the bottom of the boxes will help correct the situation, and excessive evaporation of moisture will be prevented by covering the newly watered substrate with the propagating material with a piece of corrugated cardboard or a special lid with fine perforations over its entire area. The boxes are checked for moisture every week, adding water to the soil if necessary.
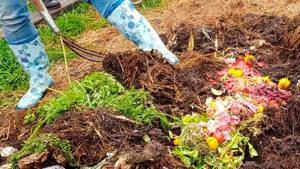
What and how to feed?
Breeding earthworms as a business does not require any special expenses. This also applies to their food. You need to create a compost pile. Manure, grass, leaves, tea leaves, coffee grounds, flour products, egg shells, vegetable and fruit peelings are perfect for these purposes. You should not throw into the compost heap waste products of cats and dogs, manure if the animals have undergone treatment for worms, peeling of onions, garlic, citrus peels, fats, oils, dairy products, meat and fish waste.
When the food is ready, lay it in a small layer - 10 centimeters thick. You need to feed the worms once every 7 days. To determine your pet's satiety level, you can use a piece of newspaper or regular toilet paper. Place it on top of the food and moisten it a little. If the worms have started eating this paper, then it’s time to feed them and add a new layer of compost.
Technology for growing worms at home
Conditions for breeding worms
For productive breeding of worms, it is necessary to constantly maintain comfortable conditions for them. There is no single recommendation on how this can be done, everyone’s climate is different, in some regions it is easier to maintain favorable conditions, in others it is much more difficult. The conditions are as follows:
- ambient temperature +8 +29 degrees
- it is necessary to constantly maintain moderate humidity in the boxes where the worms live
- it is necessary to constantly ensure that the worms always have food, you can calculate it in such a way as to provide them with food for 1 week, instead of constantly adding food

They reproduce in a comfortable temperature from +8 to +29 degrees; if the worms are cold or lack moisture or food, reproduction stops until favorable conditions are restored. Worms die at temperatures above 39 degrees. Cocoons ripen in 2-3 weeks.
Worm cocoons can dry out, freeze and remain in this state for months, but when favorable conditions are restored, the cocoons swell and newborn worms emerge from them.
Wormworms
The choice of a worm farm depends on where you plan to breed worms: in an apartment, in a country house, on the street or in a utility room. The choice will also depend on your goals: whether you plan to organize the production of vermicompost or want to fertilize and restore the soil only on your site.
If you are just starting to deal with worms and are planning to organize a business in the future, start with 1-2 boxes of worms, do not buy a large batch of worms at once, study the process of breeding and obtaining vermicompost, gradually increasing production.
Breeding in an apartment . In an apartment, worms can be kept in plastic fruit boxes; such boxes can be found in any fruit store. We also tried keeping the worms in wooden fruit crates, but the boards were too thin and could not bear the load, so we had to abandon this idea.
Also, at home, worms are kept in special ready-made worm farms and vermicomposters from which it is convenient to obtain vermicelli; such vermicomposters are usually equipped with a faucet.
Outdoor breeding . There is danger for worms on the street in the form of moles, mice, birds and mole crickets, so the container in which the worms will live must have a bottom. Many people keep worms outside in old enamel baths; this method is good because liquid vermicompost drains from the hole at the bottom of the bath.
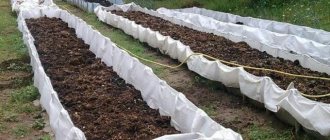
Trench breeding method . The trench should be 60 cm deep, 2.5 m long and 1.2 m wide. Such a trench can accommodate 50,000 individuals. To protect the worms from pests, the bottom and walls of the trench are lined with boards.
It is advisable to place drainage at the bottom of the trench. The next layer is rotted horse manure. Then the soil and the third layer - peat. It is advisable to cover the top of the trench with breathable agrofibre. Subsequently, vermicompost is extracted by sifting.
In the utility room . Worms are kept in completely different ways: on racks in boxes, they make mounds of earth on the floor and worms live in these mounds, they are kept in large wooden piles, in general, it all depends on your imagination and capabilities.
Do-it-yourself vermifarm
Before making a farm, decide what your main goal is: obtaining vermicompost, obtaining liquid vermicompost, or breeding worms. This is necessary so that the worm farm is designed in such a way that you can then extract the final product without any problems.
Vermifarm for an apartment.
You will need a fruit box (or another box that allows air to pass through, size approximately 40cm x 25cm x 25cm), fairly loose soil, agrofibre that breathes on one side, and pre-prepared food for worms.
How to make a worm farm . The first thing you need to do is cut the agrofiber to such a size that it fits into the box and there is still some left that can be used to “wrap” the worms. Next, you need to put the agrofibre in a box, the breathable side should go out so that air can flow to the worms, and inside there should be a side that does not allow moisture to pass through. After this, you can begin to populate the worms in the box.
Usually, when you buy worms, they come with a minimal amount of soil, so you will need to stock up on soil in advance, it should be loose enough for the worm to move around in. Clay will not work in this case. Place a layer of earth, about 10 centimeters, on the bottom of the box. Place the worms on the ground. Cover with a small layer of soil on top.
The next layer will be food: rotted food waste or rotted manure, or rotted leaves. The main thing is that there is not a lot of liquid in the food and that the worms are not in the swamp. For example, we mix kitchen waste with rotted leaves; this is a fairly convenient food option for the home. After the layer of food, you need to add more soil so that you don’t have midges in your home.
Video: Breeding Prospector worms. What you need to start breeding

Vermiferma at the dacha . The principle of organizing worms is exactly the same as described above, the only thing is that in the open air you can already feed the worms with manure or keep them on manure alone. And in this case, you will have a wider choice of containers in which the worms will live.
What to feed worms
Worms are fed with rotted organic matter, this can be: manure, chicken droppings, straw, sawdust, fallen leaves, weeds, kitchen waste. But among organic waste there are exceptions that cannot be fed to worms, these are: meat, bones, fish, milk, lemon, onions, garlic, hot peppers, as well as cat and dog feces.
In 24 hours, the worms pass through themselves an amount of soil equal to their body weight.
Growing worms
After you have introduced the worms into a worm farm or vermicomposter and provided them with food, you need to periodically monitor whether suitable conditions are met for them: humidity, temperature, availability of food, lack of sunlight. It is enough to put food in the worm bin once a week, provided that there is enough food for a week.
Under favorable conditions, the worms will begin to reproduce.
Video: Growing worms at home. We share secrets of how we breed worms

Reproduction of worms
Worms reproduce in a temperature favorable to them from +8 to 28 degrees, in the presence of food and favorable soil moisture. Under unfavorable conditions, reproduction stops.
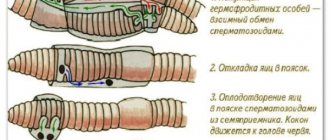
One individual has both female and male genital organs. In order to lay cocoons, the worms mate. Earthworm eggs are laid in egg cocoons. The size of the cocoon is from 2 to 6 mm. Under favorable conditions, worms lay cocoons once every 7 days.
A dung worm has 6-20 eggs in a cocoon, but not all of them develop. Fertilization of eggs occurs after laying. The sperm are in a cocoon and then penetrate into the eggs. Worms develop in a cocoon for 2-3 weeks. The hatched worms are 10-15 mm long and immediately begin to look for food.
How worms reproduce
Earthworms can begin producing offspring at 2–3 months of age. Over the course of 4 months they lay cocoons. They ripen within a few weeks. From one such cocoon no more than 20 individuals emerge, which after 2 months already begin to actively reproduce. The exception is the prospector worm, whose breeding is a more complex process. If you do the math, in about six months the number of pets in one box will increase 50 times. Remember, if there are 50 adult individuals per liter of soil, then you urgently need to either sell them or plant them in new nurseries. Otherwise, their reproduction will stop naturally.
Benefits of invertebrates
Dung worms for fishing have some similarities with ordinary earthworms. Unlike ordinary ones, these individuals are most attractive to predatory fish species. Thanks to them, it is possible to make a rich catch.
Experienced fishermen highlight a number of positive qualities of domestic dung worms. These include:
Earthworms die 30 minutes after being dug out of the ground. Dung worms can survive up to 5 hours without comfortable conditions.
Read here Balancer lucky john classic (lucky john classic) - detailed review, reviews, recommendations, photos + video instructions
When you put it on a hook, it begins to actively move, thereby attracting a large number of underwater inhabitants.
The body of dung invertebrates has a characteristic, pronounced odor. When in contact with fresh or river water, it intensifies, thereby attracting various types of fish. Thanks to this, she is able to detect it in complete darkness or in turbid water.

How to make a profit
Sort the worms every 5 months. To do this, carefully remove the top layer of soil and remove the soil where your pets live from the nursery. After this you can remove the humus layer. Send small worms back to the nursery, and adults - either for further expansion of your enterprise or for sale.
The product can be sold as fishing bait or in a pet store as food. This product is in demand by fish farms. You can sell not only invertebrates, but also worm tea and humus. The latest products are in demand among summer residents.
To collect worm tea, you made a special hole in the bottom of the nursery and a drain. This product is very valuable as an environmentally friendly and natural fertilizer. As you can see, there are a lot of opportunities to make money by breeding worms. The main thing is to know the right approach.
Publication date: Cultivation