Nowadays, a spinning fisherman does not need any gear, bait, or accessories for fishing. In big cities you can buy almost everything by visiting a large fishing store.
Specific requirements can be met through online shopping, often resulting in significant savings. But having bought an armful of spinning rods and a mountain of baits, an angler will not become an experienced spinning player. You still need to master fishing methods, and for this you need to learn how to use bait correctly, including mastering how to mount these baits, if necessary, and fishing with silicone baits just involves the use of several basic types of fishing, for which mounting the bait is of key importance .
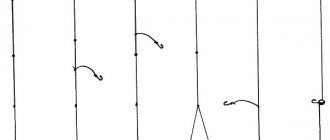
There are several main types of installation of silicone baits. They are determined by the fishing method that the spinning angler chooses, the conditions of the upcoming fishing and, to some extent, the object that the angler is aiming to catch.
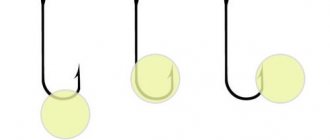
Classical
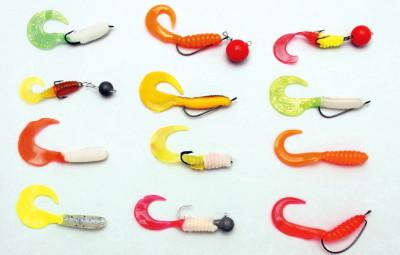
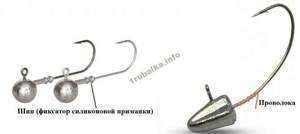
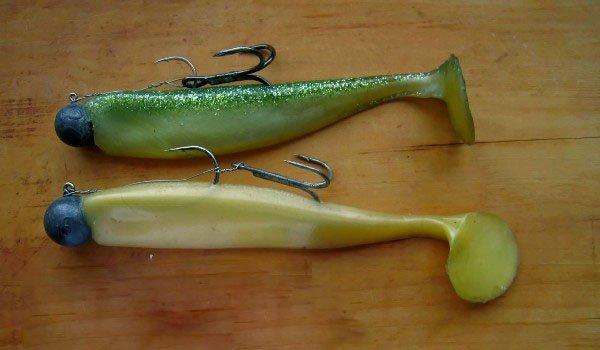
Mounting a silicone bait on a jig head is considered classic . A jig head is a lead weight that can have a different shape, with a single hook sticking out.
The advantage of the jig head is the ease of installation of the silicone bait : you just need to put it on the hook. The disadvantages of the jig head are its unsatisfactory flight qualities (it can somersault in flight when casting) and the fact that at the base of the hook there is a lead “tooth” or other device designed to prevent the bait from sliding off the hook.
This “tooth” breaks the head part of the soft bait, rendering it unusable. Russian fishermen have figured out how to eliminate this drawback. To do this, the “tooth” is cut off , then one of the hooks of the tee is stuck into the “back” part of the body of the bait, and the eye of the tee is put on the ring of the jig head. Thus, after the jig head is fastened with a clasp, the tee becomes an additional element of the equipment, which contributes to better bites, and the silicone bait is securely fixed, without any damage.
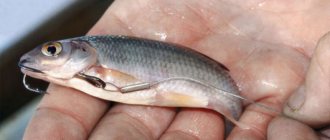
This type of installation is especially effective when catching pike perch, which, as many anglers know, often prefers to hit the “head” of the bait. Of course, such equipment is used in places where there are no hooks.
How to properly equip with jig baits
With some experience, putting any jig bait on a hook can be done quickly and easily. But it is imperative to correctly select the hook size according to the size of the silicone bait or foam fish.
After installing the bait, you can drop a little glue on the shank of the hook near the eye, which will make the equipment more reliable . In addition, so that the bait does not move along the hook and holds better, you can put silicone stoppers on the fore-end.
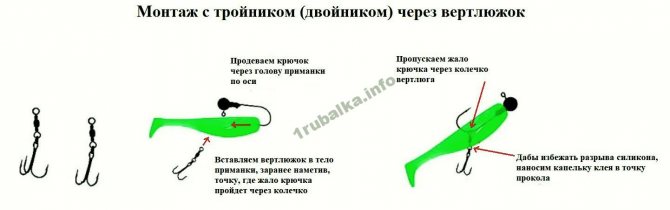
If you are not using a solid jig head (which is a lead weight with a simple single or offset hook tightly mounted into it), but an eared sinker and a separate hook, then these two elements of equipment must be connected through winding rings .
In this case, the eye of the Cheburashka and the eye of the hook that is mounted on it must be located in the same plane . Therefore, if both ears of the Cheburashka are located in the same plane, it is necessary to use two winding rings. If the ears of the Cheburashka are perpendicular, you will need one winding ring.
Single hook
It is best to place a silicone bait on a single hook so that the shank runs clearly in the center of the body . In this case, the body of the artificial fish is perfectly flat, without the slightest bend, which ensures optimal play of the bait on the retrieve for most situations.
There should be no crease between the head of the bait and the point where the hook point comes out of the back, and ideally the bait should not be over-tensioned (tension can significantly shorten the life of the bait).
Double
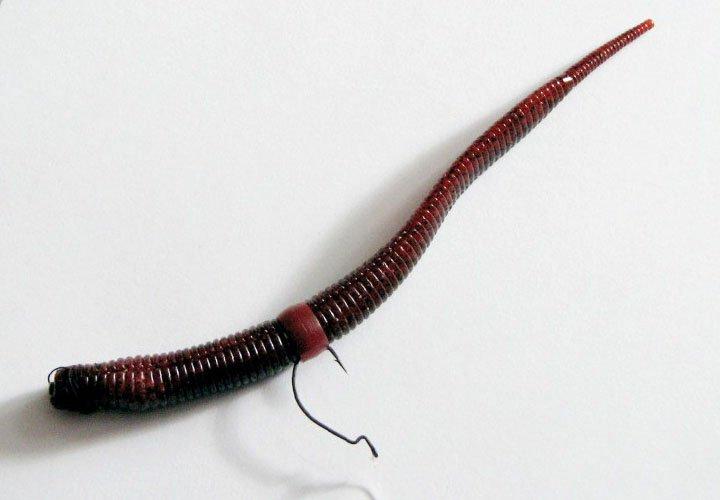
To mount silicone baits and foam fish, it is necessary to use not ordinary double hooks, but special doubles with an elongated shank . But if you don’t have any of these at hand, you can always lengthen the forend of a short double using strong, rigid wire.
Before installing the silicone bait, it is necessary to unclench the double hooks so that a gap of 3-4-5 millimeters forms between them.
Offset hooks
Offset hooks are used to create non-snagging jig rigs, with which you can fish in the strongest places, which often turn out to be the most promising.
A common mistake when equipping an offset hook with a silicone bait is that the tip of the hook is stuck into the back of the silicone fish. You shouldn’t do this, because in this case it will be more difficult to spot the fish.
The offset tip just needs to be brought close to the back of the bait, positioned parallel to it.
To check the quality of mounting the bait on an offset hook, you must:
- run your finger along the back of the silicone fish - your finger should not catch on the hook;
- press on the back of the bait - it should bend.
In order to attach the bait to the offset machine , you need to:
- insert the tip of the hook into the front part of the bait from the end, then turn it 90 degrees, repeating the Z-shaped bend on the offset forend, and bring it out;
- pass the bait along the fore-end to the eye of the hook;
- pierce the bait through the tail section, drawing the hook point perpendicular to the body;
- straighten the bait by placing it on the offset bed so that the body is extended and the hook point is pressed against the back of the bait.
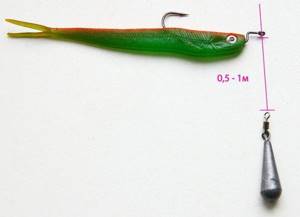
Hinged mounting
Hinged mounting has recently become increasingly popular, as it provides the spinner with ample fishing opportunities. The hinged mounting is a lead (sometimes brass or tungsten is used) weight equipped with two rings or a collapsible design . Due to his resemblance to the famous cartoon character, he is often called “Cheburashka”. Hinged mounting has the following advantages:
- good aerodynamic characteristics;
- possibility of equipping with a single, double or triple hook;
- giving the bait additional play due to its movements left and right during retrieving;
- Possibility of making non-snacking installation.
The shape of the “Cheburashka” can be different: its choice is determined by the specific fishing conditions.
Single hook rig
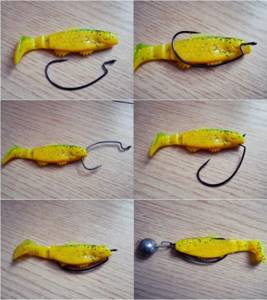
Almost always, an offset hook . If there are no obstacles in the form of snags, aquatic vegetation and stones at the fishing site, you can fish with an open hook. The silicone bait is simply put on the offset machine in the same way as on the hook of a jig head. In order to prevent the bait from slipping, it is fixed with a special silicone stopper.
In blind spots, the hook point must be closed to resist various hooks. For this purpose, non-meshing installation . It is carried out as follows:
- The tip of the hook is used to pierce the head of the bait and bring it to the step on the shank of the hook.
- Fix the front part of the bait by putting a silicone stopper on the fore-end.
- Unfold the bait in the required manner and pierce the back of the bait so that the hook tip is either recessed into the body of the bait, or is brought out, but is located parallel to the body of the bait, barely protruding beyond its limits.
Expert opinion
Knipovich Nikolai Mikhailovich
Zoologist, hydrobiologist. I am interested in fishing at a professional level.
Important! When putting a silicone bait on an offset machine with a non-clinging installation method, you should pierce the head part, orienting the bait not the way it should be in the mounted state, but vice versa. Then, after turning over on the step, it will take the correct position.
It takes a little experience to learn how to make such an installation without errors.
A very convenient device for making non-snacking installations are special corkscrew springs . One end of the spring is screwed into the front of the bait, the other is attached to the eye of the hook. Not only is this mount more reliable than simply fixing the “head” of the bait on the offset step, it also does not injure the bait at all.
In order to give the bait a more natural position on the offset, they use not ordinary straight hooks, but special ones with a wide bend ( wide gap ).
Mounting a silicone bait on a jig head with a hard-soldered hook
The simplest and most affordable installation, but it has a number of negative aspects, which is why many fishermen do not like to use it. The fact is that these jig heads often have a lead spike on the shank of the hook, which serves to ensure that the bait does not fly off or dangle. At the same time, it severely damages the bait, which is why it can only be changed a few times.
Another disadvantage of this type of installation of silicone baits is that the hook is rigidly connected to the sinker and has no freedom, which is why baits with passive play (worms, slugs) are not suitable for us. With such heads it is necessary to use baits that have an active game (twisters and vibrotails).
First of all, we need to choose a hook that will fit the size of the bait. If the bait has a clearly defined body and tail, then take a hook that will come out where the body of the bait ends.
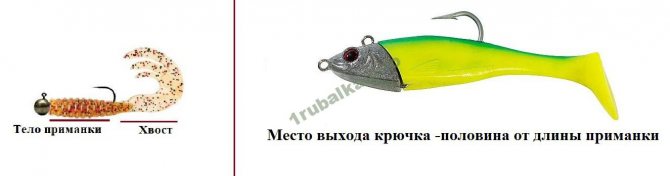
It is a little more difficult with those baits that do not have a clearly defined tail. In this case, we choose a hook that will be equal to half its length.
When installing silicone baits, we attach the hook to the body of the bait and look where the sting should come out, remembering this place (the exit point can be marked with a marker or pricked with a hook). Then we pierce the head of the bait along the axis and thread the hook to the place where it should come out. Then we remove it from the body of the bait. The point of the hook should come out from the back of the bait, not from the belly. By the way, if this is your first time doing this, then don’t be upset that you miscalculated the symmetry a little or went too deep, a little practice and everything will work out.

To equip small baits, small hooks are used, the shanks of which, as a rule, do not have a spike. In order to prevent our bait from dangling and flying off, you need to make such a clamp yourself. To do this, take a thin copper wire and apply it to the shank of the hook, leaving a small tip, and wrap the shank of the hook in a spiral as tightly as possible. We bend the remaining end as in the picture.
Recently, on sale, you can find jig heads with wire wound around the fore-end, which is very convenient, because with such installation of silicone baits, the rubber tears much less.
When purchasing jig heads, you must take into account that from different manufacturers, hooks with the same numbering may have different sizes. For comparison, the photo shows two hooks with the size 5/0 stated on the package.
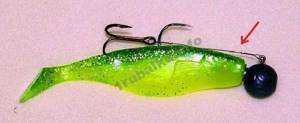
More than once, with passive fish, a situation has been noticed when there are bites, as evidenced by teeth on silicone and other damage, but the fish does not want to be detected. In this case, it is necessary to equip our bait with an additional tee or double. How to attach a silicone bait in this case?
We need a double or tee equipped with a swivel, which is adjusted to the height of the bait’s body. We attach the hook of the jig head to the body of the bait and mark the exit point, then thread the hook through the head of the bait along the axis. We insert the swivel into the body of the bait, having previously marked the point where the hook tip will pass through the swivel ring. We pass the point of the hook through the ring of the swivel and bring it out. Apply a drop of glue to the gap where the swivel entered.
You can also attach a tee using wire as shown in the figure.
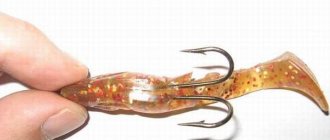
On a double hook
The silicone bait holds well on a double hook, is almost not injured during installation, the equipment flies far when casting, and the percentage of realized bites is much higher than when fishing with a single hook . Naturally, you should fish with a double hook if there are no hooks. Place the bait on the double as follows:
- The puncture site is determined by placing a double on the bait so that the eye of the hook comes out of the “head” of the twister or vibrotail.
- Slightly move the double hooks apart.
- Pierce the bait from the side and pull one of the hooks all the way through.
- Align the double relative to the body of the bait and push the fore-end forward until the eye appears from the head part.
Mounting a silicone bait on a double is used when fishing with a jig-spinning rod.
Expert opinion
Knipovich Nikolai Mikhailovich
Zoologist, hydrobiologist. I am interested in fishing at a professional level.
Healthy! Lures made from “edible” rubber have low strength. When casting, retrieving and biting, the bait begins to break, as it were, at the point where the double hooks exit. In this case, you should cut off a small piece from the head of the bait and attach the double on a new one. This operation can be carried out repeatedly until the bait loses its functionality.
Nozzle methods
Speaking about how to put a vibrating tail on a jig head, it is worth pointing out that this task is quite difficult. The installation associated with the offset machine is used to catch predators in a section of the reservoir that is snaggy.
Mounting on an offset press is carried out in this way:
- the device is picked up and threaded through the fish’s mouth;
- the sting is brought out under the lower part of the tail;
- then the hook is pulled along the body;
- pierce the silicone belly right through from the inside;
- the sting is brought out parallel to the back.
Speaking about how to properly attach a double vibrating tail to a jig head, it is worth noting that the task is quite complex. You need to select a hook equipped with a long shank. If this type of vibrating tail is selected, the attachment process is greatly simplified.
At the initial stage, you will need to determine the point where the puncture is made. However, in this situation, such a place becomes not where the tip enters, but the place where the twin rings are inserted into the bait. It turns out that the point is located on the side, and not on the back. The hooks of the device should be slightly moved apart and pierced the side of the fish with one of them and put the silicone on the fore-end lengthwise.
It is worth pointing out that when deciding how to attach a twister device to a jig head, you need to remember to respect the original shape of the bait. Otherwise, when deformed, the bait becomes negative and this affects its qualities. The non-hook is often deformed when the puncture site is incorrectly determined.
If the bite is sluggish, the bite is not confident, or there are frequent gatherings, it would be wise to equip the bait with tees. This option makes it possible to increase the chances of noticing for predators.
Sinkers can also be used. Equipment can be implemented using a tee. In this case, you need to use unpretentious equipment, which is presented in the form of a plastic or metal tube. The diameter is set to no more than 5 mm. The length is no more than 2 centimeters. It was established that the specified tube should be 1.5 times greater than the thickness of the bait, which is mounted from silicone. The device is used so that a hole can be made on the side of the vibrating tail for installation work relative to the tee.
As in the diagrams indicated earlier, you will need to make markings to determine the points for making holes. The length of the forend is set relative to the length of the forend, and it does not play the role of a loop for fastening and this acts as the main guideline. The puncture is carried out using a pre-prepared tube.
Next, a second sting is used, which is used to pierce the back of the same hole. The point is inserted along the back, the third hook is then inserted without any additional steps. At this stage, installation work is considered fully completed. This device should not be used in areas with vegetation. It is better to use the device in question in an area of the reservoir where there are no stones or algae.
We suggest you familiarize yourself with: Vibrating tail for pike. Top 10 best vibrating tails for pike fishing
As already mentioned, installing silicone baits on a double is not difficult.
To begin with, you should select a vibrating tail that is suitable in size for the double hook. The length of the hook shank should be commensurate with the length of the bait body. A bait that is too long should not lead to searching for a long hook. It is better to remove excess silicone with a knife than to try to choose a hook of the appropriate length - this will not affect the performance of the bait in any way. Correctly threading the bait with a double is necessary for better play and an increase in the number of bites.
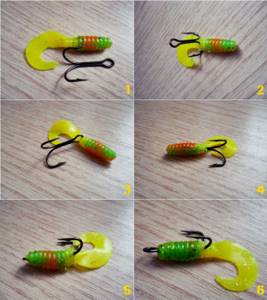
Methods for mounting a double on a bait are as follows:
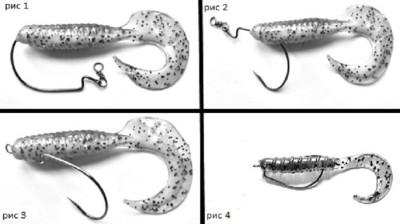
- Classic installation, when the double is inserted into the vibrotail from below, and the hooks seem to hug the bait around the edges (Fig. 1);
- A part is torn off from the body of the vibrotail so that the remaining part is equal to the length of the hook shank. The hook ring is inserted at the transition point of the tail into the body (Fig. 2);
- The ring of the hook is pierced from above the vibrotail approximately in the middle of the body and pushed towards the head. The hooks, like antennas, stick out from the body of the vibrotail and do an excellent job (Fig. 3);
- If you take two doubles and thread them through the body of a vibrating tail, you will get an excellent replacement for a tee (Fig. 4);
- Using a razor or a sharp knife, 2 axial cuts are made from the body to the head (Fig. 5-1);
- The vibrating tail is pulled between two slightly spread hooks, with the shank of each hook falling into the slot (Fig. 5-2).
At first, it was not clear to me how my fishing buddy could so “cunningly” thread the double into the silicone bait. But over time, he explained to me how to do this, including what to do when the hooks are pointing down, but should be up (you just need to pull out the hook and start threading the double from the other hook).
Installation of a double hook should begin with the selection of materials. In order to put the bait on the double, we need a vibrating tail, a hook and a small diameter rod made of dense material. First, we create a longitudinal hole with a rod in the body of the bait, then we make a transverse through hole in the place where the end of the hook will protrude from the bait. Next, bend the hook a little (you can do this with pliers or your hands).
It is better to place the bait on a double hook slowly, getting used to the movement of the hook. Then you need to insert the hook into the hole made in advance. And slowly we bring the bait to the eye of the hook until the eye enters the body of the bait and appears in the axial hole. Then we pull the shank of the hook along the axial hole through the body of the bait, bringing it outward from the head of the bait. All is ready!
You can attach the bait to the cord and go to the pond to check the quality of the new bait. The materials on our website will help you figure out how to thread the bait onto the double yourself. On our website you will learn about putting a double hook on a silicone bait. In this material you can see how to put bait on a hook in order to repeat it at home yourself.
It is not much more difficult to correctly attach the vibrating tail to the offset press. This installation is successfully used for catching predators in snags in water bodies. Taking the offset tool in your hands, we thread it into the fish’s mouth and remove the hook tip under the lower part of the head of the vibrotail. Then we stretch the hook along the body of the fish and pierce the belly of the silicone right through to its back from the inside.
Other methods and their discussion are on this page.
Jig heads can be used not only with soft baits, but also with spoons, wobblers and spinnerbaits. It is important to mount the bait correctly and accurately select the weight of all equipment. Then the bait will work seductively in the desired layer of water, and predatory fish will not leave it unattended.
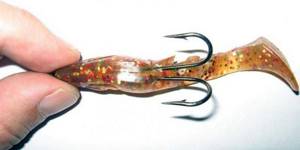
On a treble hook
Mounting a silicone bait on a treble hook is a little more difficult. For installation you will need a short tube with a diameter of no more than 5 mm (for medium-sized baits). With its help, a hole is made in the side of the bait. First mark the place for the hole by attaching a tee so that the eye of the tee sticks out from the “head” of the bait.
One of the hooks is pulled into the resulting hole, which should protrude from one side. Another hook is pierced from the inside of the back of the bait, the third hook remains sticking out from the other side of the bait. The eye of the tee is attached to the ring on the jig head or to the “ear” of the “Cheburashka”. The diameter of the hole is determined based on the size of the tee. A small hole will not allow the tee to be positioned symmetrically. A hole that is too large will lead to play in the tee, which will worsen the performance of the bait.
You can do it differently. A piece of thin wire is passed through the body of the bait so that it comes out at the beginning of the tail, and a swivel with a tee is attached to it.
Jig fishing methods
There are many ways to catch fish with a jig head:
- Search.
- Step-uniform step.
- Stepped heavy.
- Stepped easy.
- Stepped long.
- Stepped short.
When fishing in an unfamiliar body of water, they always start with a “search” method, which will allow you to study the bottom and possible habitats of the fish. To do this, take a heavier jig head. The casts are made randomly and as far as possible, after which the wiring is done. After examining the bottom and a few bites, we proceed to traditional spot fishing.
To do this, attach the necessary jig head and choose a different fishing method. If there was not a single bite during the “search” method, we move to another place in the reservoir until we determine the accumulation of fish.
Stepped-uniform wiring is good when passive predators lie on the bottom of the reservoir:
- The cast is made.
- When the jig head has reached the bottom, we begin to slowly wind the line with the reel at a speed of one revolution per 2 seconds. Make 3-4 turns.
- Let's stop for one second.
- We continue the action with the coil.
- With this method, the jig head with a nozzle seems to hover above the very bottom, flies in front of the fish’s nose, and sometimes crashes into it, provoking an attack.
The most common wiring for jig fishing is stepped. It has several varieties:
- Heavy.
- Easy.
- Long.
- Short.
The meaning of the work is the same for everyone, but with different parameters:
- A jig head with a nozzle is cast.
- The spinning rod is held at 45 degrees relative to the water.
- When the weight reaches the bottom, the line loosens and the rod tip straightens. At this moment, the sinker raises a cloud of silt.
- It is necessary to remove the slack in the fishing line by rotating the reel handle. Usually this is 2-4 turns.
- We make several sharp rotations with the reel handle. If you make 3-4 turns, you get a long step, and if you make 1-2 turns, you get a short one. At this moment, the jig head comes off the bottom and flies through the water column for several meters: in the first case 1-2, in the second 0.5-1.
- The rotation of the reel handle stops, and the head falls to the bottom again.
- After 1-2 seconds, sharp rotations are repeated.
And so on until the jig head approaches the fisherman, or a fish grabs it. Some fishermen replace sharp rotation of the reel handle with twitching the rod, or with a joint movement. Each fisherman adapts individually. The result is a jumping or stepping motion.
At the moment of the bite, it is necessary to make a sharp upward movement with the rod from 45 degrees to 90, which will lead to hooking the fish, and reel it in.
With a heavy retrieve, the weight of the jig head is a little heavier and it almost slides along the bottom. With a light head, the weight is less and it bounces high, as if swimming in the water, making wave-like movements.
On several hooks
When fishing with large-sized bait, it is often necessary to equip it with several hooks, since the predator is sometimes not detected. You can use the following two methods:
- An additional tee is hooked onto a regular or offset hook.
- A small tee is tied to a piece of thin wire, which is stuck into the back of the bait, and the other end of the wire is attached to the eye of the jig head.
Let's look at which fishing methods and which types of rigs are used.
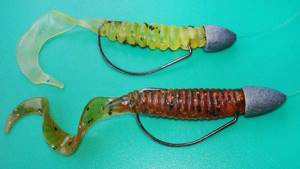
Installation of silicone bait "EIGHTS"
This type of rig is used when fishing with special thick silicone worms called “VEKI”. In the absence of such, you can use ordinary worms, the main thing is that the rubber is durable.
When installing the bait, the hook tip pierces the silicone worm in the middle. As a result, during the retrieve, two hanging edges of the worm play, luring the fish. This installation has an addition, when a metal peg is inserted into one of the edges, and the opposite one is placed on the hook tip along the axis of the bait. In this case, one end lies on the bottom, and the second, with light pulls with the rod, rises and plays.
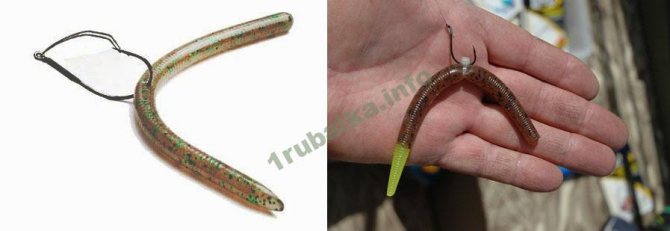
This is how Americans catch bass (largemouth perch); in our country, this type of bait installation can be used when catching pike, perch, or trophy peaceful fish. Such a non-standard technique allows you to diversify the game and can bring results when other baits give up.
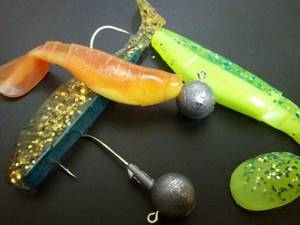
Texas rig
Texas equipment has almost 100% passability through obstacles and is used for fishing in snags, stones, and grass thickets. The Texas rig is a combination of a bullet-shaped sinker with a funnel-shaped recess in the back and an offset hook with a bait attached to it in a non-snagging version.
The offset machine's eye is hidden in the recess of the load, so the equipment does not have any protruding parts, due to which its unique properties are achieved.
Variety of types of edible rubber and selection algorithm
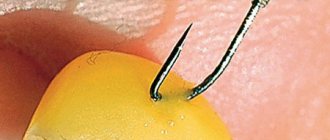
Here are two offset hooks from the same manufacturer.
Only the series differ. Can you find the differences? Well, yes, they differ slightly in size... but in our example this is not significant.
Something else is fundamentally important!
Active baits
This option is necessary for fishing in grass and shallow places. Most often, the buoyancy of silicone bait is close to neutral, but there are also specially created floating models, so you should choose more carefully. The wiring is something between twitching and a jig step.
The selection of specific models of the best brands of edible rubber is described in the link. The surface equipment for fishing with edible rubber is a bombard. We choose a jig spinning rod once and for all.
Carolina rig
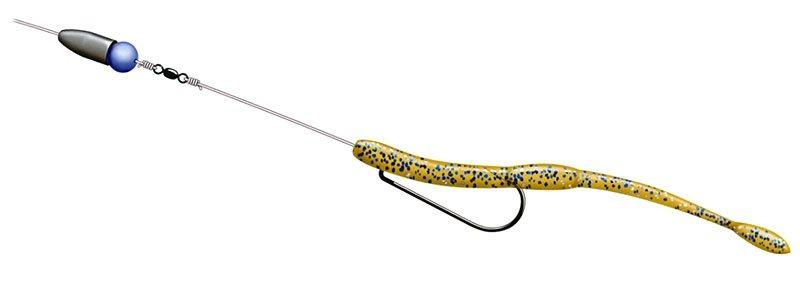
The Carolina rig consists of a sinker, which also has a bullet or olive shape; beads that prevent the knot from breaking and create sound vibrations; a swivel and a leash attached to it with a hook on which a silicone bait is attached. with a Carolina rig both in areas with a clean bottom and in “dead” places . In the first case, the tip of the hook is left open, in the second, a non-snagging installation of the bait on an offset hook is used.
The importance of equipping a vibrotail when fishing
To equip vibrotails with triple hooks, you will need additional unpretentious equipment in the form of a metal or plastic tube with a diameter of no more than five millimeters. The length is enough to be 2 cm. The tube should be one and a half times the thickness of the silicone bait being mounted. This device is needed to make a through hole in the side of the vibrating tail body for mounting a tee.
As in the first installation diagrams, markings are made to determine the point of the required hole. The length of the forend of the tee, excluding the loop for fastening, will be our main guideline. We pierce the vibrating tail with a previously prepared tube, since silicone is a pliable material for these manipulations.
We pierce the back with the second sting through the same hole, bringing the tip parallel to the back of the silicone, and leave the third hook without any manipulation. In principle, the installation of the vibrating tail on the tee can be considered complete. The disadvantages of this installation are its rather low cross-country ability in fishing areas with vegetation. The best option for using silicone baits on tees is in clean areas of the reservoir.
The ability to correctly, competently and effectively equip vibrotails with various types of hooks allows you to use broader strategies when catching a predator. After all, these types of equipment, excluding only the attachment of a vibrotail on solid jig heads, make it possible to use silicone baits in combination with replaceable articulated weights, so-called Cheburashkas among fishermen, as well as when fishing with a bombard under various fishing conditions.
Well, by changing the types of hooks, you can successfully catch them in overgrown and snagged areas of the reservoir and when the predator is passive. Therefore, the arsenal of fishing lures for those who like to catch predators representing freshwater bodies of water should include all the types of installation discussed above. After all, equipment prepared at home will save valuable time on fishing and increase the fisherman’s chances of a successful fishing outcome, even despite the prevailing conditions of the fishing session.
Twisters on an offset hook with a Cheburashka as a jig head
Depending on the type of weight head and the type of hook, different installation options are used. How to properly place bait on a hook:
- A jig head combined with a hook allows you to quickly and easily attach a soft bait to a hook. To do this, you need to select a jig head and a silicone fish so that the hook comes out near the dorsal fin of the fish.
- A non-hook jig can be made on an offset hook. To do this, the hook tip is inserted through the “mouth” of the bait and brought out under the lower jaw. Now the soft fish is pulled through the entire hook, and the abdomen is pierced with a stinger. The hook can be brought out at the top of the bait so that the sting is parallel to the back and fits snugly against it.
- To mount the bait on a double hook, you need to align it with the bait and mark where the hooks exit. Now you need to pierce this place, move the double apart and insert the bait into the eye of the hook. Next, the ear is pressed centrally into the body towards the head. The eye is brought out, after which the bait on the hook is adjusted.
- To equip a tee with soft bait, you may need a tube to punch a neat hole. The hole is made approximately behind the gills, but this depends on the size of the tee and the bait. An ear is inserted into the hole and pulled through the center towards the mouth. Now you need to stretch the bait and remove one hook from the other side. Again, you carefully need to stretch the fish and thread the upper sting through the back. You can lengthen a short hook using a piece of wire; one end is attached to the eye of the hook, and the other is removed from the bait and mounted to the weight head.
Drop shot
When fishing with a drop-shot rig in places without hooks, they often use not an offset hook, but a regular hook. In snags and grass you can’t do without an offset tool. A hook with a bait, set in a non-swimming version, is tied with a special knot so that the hook is perpendicular to the main line or the line of the leash, and the tip points upward.
Choosing a Jig Head
When choosing a jig head you should consider it:
- Form.
- Weight.
- Mounting method.
- Workmanship.
The shape of the head is:
- Ball-shaped. It is the most popular, universal and suitable for almost all bodies of water. Its disadvantage is its poor stability at the bottom - it often falls on its side and quickly falls into the silt.
- The jig head in the form of an iron, or “eri” as it is called, is very popular. Its flat bottom prevents it from falling to the side, falling into silt and soft ground, and also helps keep the bait with a hook above the ground.
- In the form of an oval, reminiscent of a rugby ball.
- In the form of a bullet.
- In the form of a fish head.
The main indicator of a jig head is its weight. It is indicated on the head itself from 5 to 100 grams. You should choose a head that, after touching the water, reaches the bottom in 5 seconds, in shallow water - in 1-2. The slower the jig head falls to the bottom, the more the predator pays attention to it, and the slower the retrieval is, the higher the likelihood of an attack, that is, a bite.
If the reservoir is unknown, it is necessary to explore the bottom with a jig head with increased weight. When fishing on a river, it is necessary to take into account the speed of the current. If wiring occurs along the current, the weight of the head must be reduced, and if against the current, it must be increased. When fishing with a heavy and short step, the weight of the head is taken more than with a light and long one. When fishing from a boat, the weight of the head is greater than from the shore.
Based on the attachment point, they are distinguished:
- Frontal.
- Central.
- Standard.
It determines at what angle the bait will pass over the bottom topography, horizontally, with the hook up or down, which ultimately affects the frequency of bites. Depending on the method of attaching the jig head, there are:
- Stationary.
- Articulated, which are called “ushastik” or “Cheburashka”.
With the same weight, they behave differently. The fishing line is rigidly attached to the stationary head through a leash. Therefore, when retrieving, the hook always faces upward, reducing the number of hooks on the bottom of the reservoir and on snags, and the play of the bait is even and smooth.
This type of connection has disadvantages:
- Due to the rigid connection, there is more air resistance when casting, which reduces the distance.
- The hook of such a head can only be fitted with a nozzle of one size.
- And the main thing with this method of attachment is that the fish often unhooks itself and leaves.
The hinged head is a sinker with rings attached on both sides, reminiscent of ears on the head. On one side, the leash fastener is attached, on the other, the hook. The result is a ring-in-ring connection. This allows the bait to make a variety of movements. The big advantage of this head is its longer casting, the ability to attach hooks and bait of different sizes.
The quality of jig heads depends on the price.
Cheap specimens often have low-quality hooks: blunt, barbless, with a larger barb to secure the bait. More expensive specimens do not have such defects, which, of course, affects the “catchability” of the gear.
Wacky equipment
Wacky rig as a type of installation and fishing method came to us from North America, like other methods of fishing with silicone baits. The main catch of American fishermen was bass, but in our country, with the help of a weki rig, you can catch various predatory and semi-predatory fish. The equipment has proven its effectiveness when catching passive predators or in pressed-in reservoirs.
However, among domestic fishermen, few are familiar with veki, not because its installation or animation presents any difficulties, but because of their commitment to traditional fishing methods. The weki rig is used when fishing for pike in grass windows, perch among stones and in some other situations.
Expert opinion
Knipovich Nikolai Mikhailovich
Zoologist, hydrobiologist. I am interested in fishing at a professional level.
Interesting! There is not a single spinning bait or fishing method invented exclusively for catching largemouth bass that domestic fishermen have not adopted and adapted to fish living in Russian waters. This fact testifies to the significant creative potential of our people.
To install the veki equipment, an offset hook with a fairly wide hook . Silicone worms, preferably “edible” ones, are usually used as bait. You can simply stick the hook in the middle of the bait’s body, but with this type of equipment it will not withstand even a couple of bites. Therefore, the following actions are usually taken.
To make the veki equipment you will need a rubber ring, which you can make yourself. To do this, tie the rubber band with a thread (or a braided cord) so that a loop is formed. Trim off the excess elastic and thread, then put the resulting ring on the Superglue cap. Insert the head part of the silicone worm into the cap and tighten the elastic band onto the body of the bait, placing it in the middle of the worm. The hook is attached to the ring. The equipment is ready.
Often the front part of the bait is surrounded by inserting a piece of nail into it. When fishing in thick grass, you can use hooks with wire protection. The animation of the bait is random jerks with pauses.
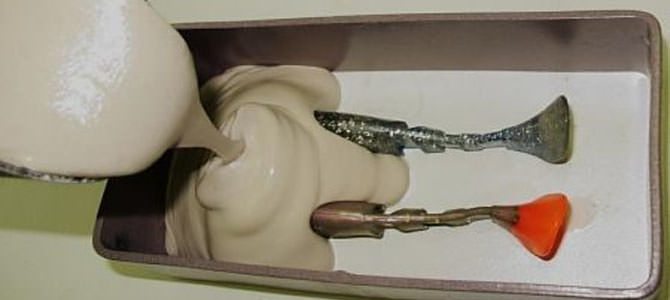
How to melt silicone?
There are several ways to melt silicone at home. Quick melting of silicone is possible when using a gas stove. To melt silicone over a fire you will need a tin can. This could be a cut-off beer can or a canned food can. However, when melting over a fire, several problems arise: • silicone burns quickly; • smokes; • silicone changes its color, and when burned it becomes completely black; Melting in the microwave is completely free of these disadvantages. In order for the baits to be the same color as the original color of the silicone, it must be melted in the microwave. When melting silicone in the microwave, there is one subtlety so that it remains in a fluid state for as long as possible. You must not just wait until the silicone melts in the microwave, but after melting, keep it in the microwave for another one and a half to two minutes. The container in which the silicone is melted must be thoroughly warmed up. Under such conditions, silicone remains in a liquid state much longer. The most readily available material for making molds is gypsum. This form is quite easy to make. It is necessary to dilute the plaster to the consistency of liquid sour cream and pour it into a plastic or cardboard form. Then lower the silicone bait of the desired shape into the plaster. The plaster should harden in an hour and a half. After which you can remove the bait. However, when using gypsum, many problems also arise. • Firstly, making such a mold takes a lot of time, because... The plaster must be thoroughly dried. If the mold is not sufficiently dried, bubbles may form when pouring silicone, which significantly spoil the appearance and quality of the bait. • Secondly, it is quite difficult to imprint small parts of the bait on a plaster mold. • Thirdly, plaster forms are very fragile; if the plaster forms are pressed a little harder against each other or accidentally dropped, they will instantly burst. • The fourth disadvantage is that baits are difficult to remove from the plaster mold. And while this method is still suitable for making vibrating tails and worms, making twisters in plaster form is problematic. Epoxy resin will help solve these problems. Using a brush soaked in epoxy resin, it is necessary to lubricate the plaster mold so that the layer of resin is as thin as possible. After which the form should be thoroughly dried. After covering the plaster mold, the baits are simply removed from it, sharp corners are smoothed out, and the problem with the appearance of air bubbles disappears. However, due to the coating, the size of the bait will be slightly reduced.
Features of installation of vibrating tails
A vibrotail is placed on a jig head hook or on a single hook attached to a Cheburashka by simply putting the bait on the hook. There are no difficulties when equipping a vibrating tail with a double hook. However, a vibrating tail mounted on an offset hook in a non-hooking type does not always meet the requirements associated with the implementation of bites.
The fact is that a vibrotail, especially one with a high body, is not pressed down when biting so that the sting is exposed to the limit necessary for an effective hook. In other words, the number of idle bites does not contribute to effective fishing. Therefore, it is recommended to install the vibrotail sideways , i.e. sticking the hook point into the side of the bait. Although this installation does not look familiar, the performance of the bait does not deteriorate.
How to properly equip a jig head with bait (9 ways)
Silicone jig baits are varied in their shapes and types, and also differ in size and density of the material. All these factors should be taken into account during installation. It’s simply unreasonable to put a silicone bait on a hook, throw it into the water and expect a successful bite. First of all, the fisherman must understand that a vibrating tail can be equipped with different types of hooks: single, offset, double, tee, and this depends on the fishing conditions, the intensity of bites and the type of fish that the fisherman is counting on. The easiest way to attach a vibrating tail is to a jig head.
We pierce the vibrating tail with a sting at the location of the mouth of the artificial fish and string its body until the sting of the hook reaches the point of exit to the surface that we have chosen. We bring the point in the back of the artificial fish to half the roundness of the hook of the jig head. This completes the installation.
Important! The hook of the jig head must correspond to the size of the vibrating tail from the mouth of the fish to the point where the tip of the hook is brought to the surface of the back of the nozzle.
Spoons and wobblers have their advantages, but silicone baits also have them.
Advantages of vibrotail over other artificial baits:
- Cheap compared to the same wobblers or spinners. Although silicone “lives” much less than other baits, it costs a penny. You don’t mind losing it during a snag or throwing it away after being bitten by a predator.
- Ease of installation. The vibrotail, like any silicone, can be easily removed from the jig head and replaced with another one. This procedure will take a few seconds, and time sometimes plays a decisive role during the period of short biting.
- Variety of choice. No other bait can boast such a choice of colors and shades as vibrotails. You won’t find any kind of rubber “fish” in the arsenals of spinning anglers, most of which provide purely visual pleasure for the fishermen themselves, rather than playing an important role in catching a predator.
The vibrotail can be used not only on the hook of a jig head, but also put on an offset hook or attached to a double - it all depends on the purpose. A vibrotail or twister on a hook separated from the sinker is more mobile and often brings more bites from predatory fish.
Mounting on an offset hook allows you to make a “non-snag” and fish in snags or grass. Attaching the vibrating tail to the double makes hooking and landing fish more effective.
Vibrating tail for offset press
In this case, a twister acts as a silicone bait, but attaching a vibrating tail to a double looks very similar.
Silicone on double
/p{amp}gt;