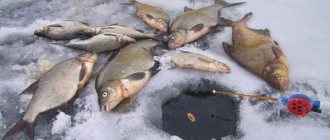
02/21/2020 Bender Rodriguez Homemade Not only beginners, but also some pros are showing interest in how to make a combine harvester with their own hands for winter fishing - step-by-step instructions and visual photos will help with this. Indeed, thanks to this gear, even in strong currents you can catch bream weighing up to four kilograms. And even more.
How to catch bream with it
The correct scheme for catching bream with this tackle is based on just a few simple principles:
- choosing the appropriate length for the working area of the combine;
- strategic calculation of fishing spots;
- good feeding.
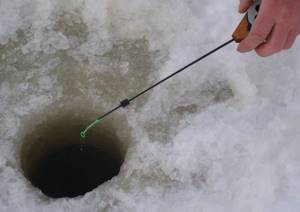
In a strong current, it will be correct to make the hole at an angle. This way the line will not come into contact with the bottom edge of the ice. By moving the feeder and changing the length of the working area, the angler will be able to achieve the correct distance to the feeding spot. When moving the feeder, it is important to fix it in the very position in which the bite will be observed most often.
Harvester equipment
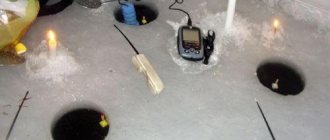
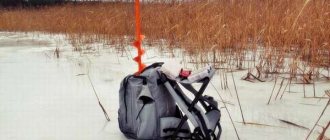
These two friends most often spend the winter side by side. The secret of fishing in such places is quite simple. We drill a couple of holes where we will lower the fishing rods with a lower angle, and 2-3 meters higher, another hole into which we will lower the feeder with bait. Use a large feeder, don't skimp. Food will be washed out of it, creating a fragrant dregs and a trail of edible particles, and two or three hooks with a more attractive bait (bloodworm, maggot) from your fishing rods will “hover” in it. You need to understand that the “combine” only works in places where there is a current, otherwise the whole essence of fishing is lost.
The bait will attract and keep fish near your hooks. Bites will follow immediately. Fishing on the first ice is so catchy that you can quickly exceed the catch limit.
We will talk about a good bait recipe that will not wash out immediately and attract fish for a long time separately, in the next article.
How to choose the right parts for tackle
Although it may seem complicated at first, choosing the parts for this rig is not that difficult.
Fishing rod and float
The fisherman can choose these details based only on his preferences. He should be comfortable handling the fishing rod. There are only two rules to remember:
- The movements of the float should be clearly visible even from a distance. If you use several tackles at the same time, a float with a rattle is an excellent solution.
- It is necessary to place the bit near the hole so that you can make a hook at any second.
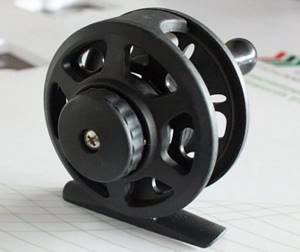
Fishing line reel
The selection of a reel also largely depends on the preferences of the fisherman. This part does not take part in the fishing process, so the only condition is that it can fit at least thirty meters of fishing line.
fishing line
The optimal choice is 0.25-0.35. You should not take one that is too thick.
Leashes
For them, it is advisable to choose a thinner fishing line - 0.14-.0.18. And no more than twenty centimeters in length. Otherwise, the number of kinks will increase.
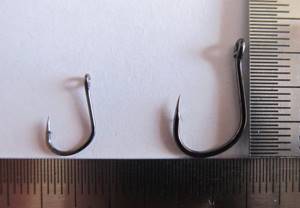
Hooks
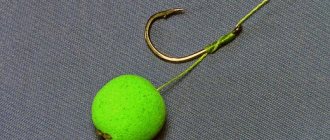
Numbers 5-8 are selected as standard. It is useful not only to sharpen them, but also to make them more attractive to fish. In particular, wrap the rod with white thread and coat it with luminous varnish. If you think about how it looks on the current, you can understand that such a simple move becomes another bait.
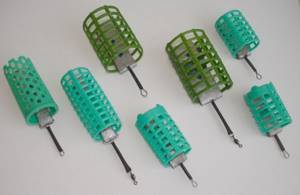
Feeder
The feeder is selected depending on the bait. Fishermen often use store-bought options, but it’s not at all difficult to prepare homemade feeders by simply buying plastic jars at the pharmacy and making a few holes in them. They must be loaded according to the strength of the current.
Assembly
This tackle is very easy to assemble by hand at home or in the garage, as no specialized tools or skills are required. Every fisherman, even a beginner, can make such a tackle.

Winter equipment "combine"
The stages of assembling the “combine” structure are presented below.
- Attach the fishing line.
The fishing line is attached to the rod, somewhere in the middle, then a thin thread is twisted around the rod and secured at its tip. This is "insurance". It is created in case the fish caught by the bite turns out to be too large, strong and active. With sudden jerks in attempts to free itself, the prey can break the fishing rod. There is a positive connotation in such an unpleasant situation - insurance will help you get out your catch.
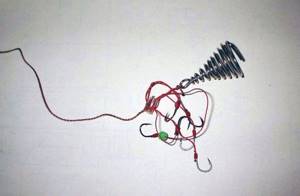
- Secure the combine float.
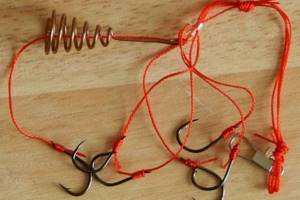
At the very end of the fishing line, a spring part is attached, which gave the tackle its second name. It must be relatively large so that enough food can fit in it for good and abundant feeding of future prey.
- Attach leashes with hooks.
Lead elements with hooks are attached to the spring. Some regions limit the number of leashes that can be used, please take note of this and set the spring base to the number that is allowed. The leashes should be of different lengths, this will allow you to fish at different depth levels.
- Checking the gear.
After assembling the “harvester” is completed, you need to place it in a container of water. This action is necessary to see how the tackle, in particular the float, will behave in the right conditions. The first time it is better to do this without feeding, and the second time to conduct a dress rehearsal with the gear and products that you will take with you, having previously installed the feeder.
How to mount the equipment
The difference with mounting a standard donkey is small. The only difference is in the number of hooks and the distance from the feeder to the edge of the fishing line.
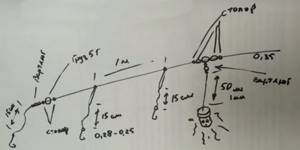
Step-by-step instructions and photos will explain how to make a combine harvester with your own hands for good winter fishing:
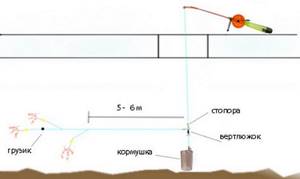
- So, approximately five meters from the tip of the fishing line, a pair of stoppers are fixed so that they move with little resistance.
- A swivel is attached between them. And a feeder is connected to it on a separate piece of fishing line about twenty centimeters long.
- The first hook is attached to the tip of the fishing line. Often for this purpose they take a jig made of lead - it will act as a weight and pull all the tackle to the bottom.
- All remaining leashes are connected at a distance of 50-70 centimeters both from the first hook and from each other.
This completes the collection of equipment. The fishing line is wound up to the feeder, and the rest with leads is wound onto the reel manually. You can also use special visual videos.
Fishing for bream using a combine harvester
Advertising on the website
Many anglers are fans and admirers of fishing in the winter, but such fishing does not always end with a catch.
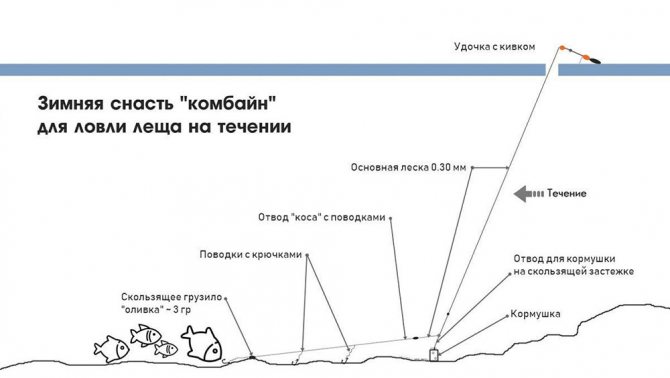
To increase the catch in the winter, special equipment was created, which allows for good catchability results and allows you to catch bream in the current.
This equipment is called a combine, although it includes many elements, but in fact it is very simple to use.
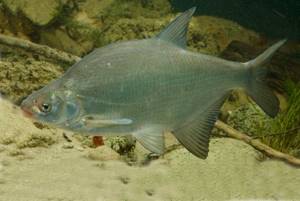
What is a combine harvester?
For those who like to catch bream, it is no secret that this fish is very dubious and treats any tackle and equipment with great caution. Fishermen have to find a great variety of tricks and tricks in order to catch bream. The harvester rig is a simple winter fishing rod, which has a nod, a feeder and several hooks.
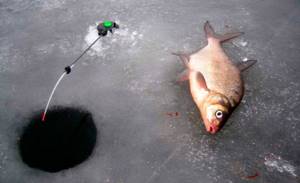
When fishing with such gear, after drilling a hole, the fisherman needs to lower the combine into the water, while the current carries the equipment somewhat away from the fishing spot.
In this rig, the feeder is heavier, which allows it to sink evenly in the water.
Important
Gradually, the current carries out the process of washing out the food from the feeder and distributing this complementary food in the direction where the hooks will be located.
Thanks to this arrangement of the equipment, the bream does not become suspicious, because the feeder itself is located somewhat away from the hooks. This allows you to increase the catch of bream, because they begin to lose their vigilance and swallow hooks. This combine rig was created by fishermen specifically for fishing on currents. Sometimes this equipment is called a descender.
Harvester equipment design
There are quite a lot of elements in the combine equipment itself; to make it, the fisherman will need the following components:
- — the presence of a winter fishing rod, which will have increased strength parameters;
- - you should also prepare a coil with an approximate diameter of fifty millimeters;
- - a nod is required;
- — a fishing line with parameters of 0.3 millimeters is taken as the main fishing line, or you can use a cord with a diameter of 0.15 millimeters;
- - for a leash, a fishing line of 0.14 millimeters;
- - you will also need a jig with a lead tint;
- - several hooks with numbers from 5 to 8 numbers;
- — phosphorus varnish is used;
- - white sewing thread is required;
- — closed feeder with a load;
- - several stop beads;
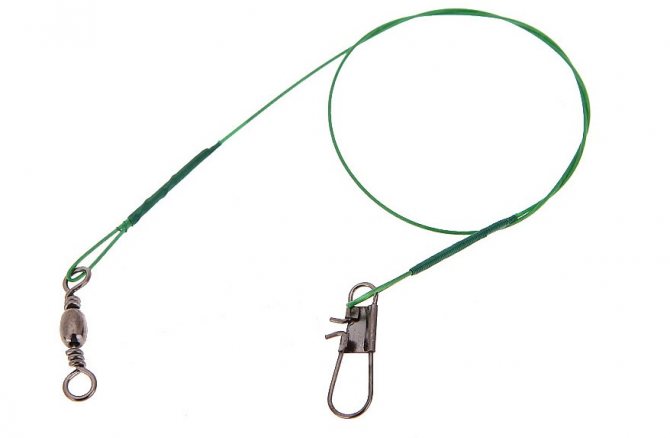
- - swivel with carabiner.
Although the combine includes many components, assembling this equipment is not as difficult as it looks at first glance. By carrying out the correct process of assembling the combine rig, you can achieve high catches of bream, and also avoid numerous twisting of the rig in the process of catching bream in the current.
Making a bream descender
To ensure the correct installation of the combine harvester, the order and sequence of installation must be strictly followed. And only in this case there will be no need to rework the equipment.
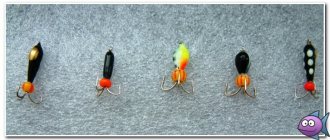
It is imperative to prepare the hooks in advance. You should make sure that they are illuminated in the water, so white sewing thread is wound around the shank of the hooks. After winding, the hook should resemble a jig in appearance. After this, the thread should be coated with phosphorus varnish.
Next, a reel and a nod are mounted on the winter fishing rod itself. You should also wind the fishing line around thirty meters and pass it through the nod. Thread the main line through the swivel with a snap hook, and then install three rubber stoppers.
The leash is mounted to the fishing line using a knot. The length is about two meters, no more. A heavy lead jig is attached to the tip of the main leash.
Somewhere forty centimeters from it in the direction of the fishing rod, an additional leash is mounted, which is about twenty centimeters in length, and a luminous hook is attached to it.
Fishing areas
Bream does not hibernate during the winter. On the contrary, he is very active throughout the year. Therefore, going for bream in winter also makes sense. But the cold season still makes him change his behavior a little.
Due to the structural features of the oral cavity, bream can explore the muddy or clayey bottom in search of food. This means that holes need to be made in such areas.
At the very beginning of cold weather, bream can be quite successfully caught at shallow depths. In the first fourteen days after the formation of the ice crust, its behavior is still little different from that in autumn.
In later winter, the fish move deeper – five meters and further. To find places where there is more oxygen. These are those areas of the reservoir where there are holes and an uneven bottom. If the frosts are severe, then the bream can go to a depth of more than ten meters.
Towards the end of the winter season, the fish return to shallow water to find more food. You need to pay attention to areas with melt water and stay away from places with clusters of plants. Grass that falls to the bottom will rot and destroy the air. There are definitely no schools of bream there.
How to tie correctly?
Properly connected gear is a guarantee of successful fishing in relatively average currents and at great depths. The process of assembling a bream harvester includes the following steps :
- winding fishing line onto a fishing rod reel;
- threading the end of the fishing line through the spring structure of the leash;
- hanging a load or feeder on a monofilament;
- putting a stop cambric on the fishing line;
- attaching a swivel to the end of the monofilament;
- tying with a loop to attach leashes on a piece of fishing line 4 meters long;
- attaching a piece of fishing line to the free end of the swivel;
- attaching leashes to loops;
- A large lead jig is installed at the end of the rig.
The described type of gear assembly ensures a catch of large bream.
Features of the selection of complementary foods and bait
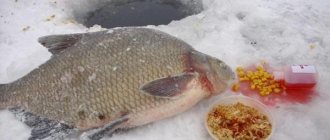
The bait must necessarily accommodate pieces of bait. For example, if worms are chosen as bait, you can cut several of them into pieces and add them to the bait. Thanks to this, the fish will be more willing to swallow the bait itself, which can also be maggots or bloodworms.
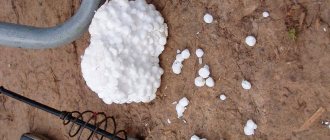
It is important to understand that underwater fish sense odors, which means that odorous bait must be used. The best choice would be a cough effervescent tablet. Dissolving in water, it not only creates bubbles, but also spreads an attractive smell for fish, along with the bait from the feeder.
If the fisherman has correctly assembled the gear and selected bait and complementary food, then there is practically no doubt about the success of the fishing. Namely, “practically”, because the success of the business depends not only on these details.
Fishing technique
The main advantage of fishing with a descender is that there is no need to create a large number of holes. This is especially true at the end of the winter fishing season, because... Drilling holes is difficult due to the thickness of the ice crust.
However, for productive fishing, it is recommended to make the holes in steps. This facilitates catching fish over a large area, searching for large concentrations of bream, and with this method of drilling, the drains do not get confused with each other.
The depth of fishing with a combine in the current is about 5 meters . It is recommended to adhere to this condition, because in most cases bream lives closer to the bottom of the reservoir. When fishing in shallow water, the depth indicator may deviate downwards. Also, there is a recommendation that drilling holes should be carried out in places where the channel turns or narrows, or above holes.
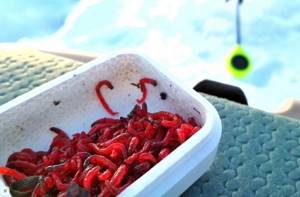
The main bait is bloodworms; pea mastyr can be used closer to the end of the winter season.
To set up the feeder, you need to track a couple of bites. This is how the side of the bite is determined. If the first hook collects more catch, then this indicates that there is not enough bait for the second and third hook. If the bite occurs mostly on the last hook, there is a need to move the bait away from the first and second hook.
The factor influencing the success of bream fishing is the restraint and accuracy of the fisherman . The bream's excellent hearing means that at the slightest noise it can easily swim away.
Proper refueling of gear and immersing it in water is one of the main conditions for fruitful fishing.
- The bait is placed in the feeder, the bait is placed on the hooks.
- The hooks are the first to sink into the hole. Depending on the strength of the current, the dive time may increase or decrease, because... hooks should not get tangled.
- The feeder is immersed in water to the very bottom.
- The fishing rod is placed on the stand, and the remaining fishing line is wound onto the reel.
After washing out the bait from the feeder, the bream, smelling it, somehow swims past the hooks. Further, it all depends on the chosen bait.
Advantages of using a combine harvester on the current
When fishing for bream in the current, a descender can offer many advantages. Eg:
- a large number of self-cuts. If you use this particular tackle for fishing, suspicious bream are much more willing to grab bait placed far from the hole. And he often gets hooked himself, even without the “help” of the fisherman;
- stable complementary feeding. Due to its resistance to drift by water currents, a weighted feeder can provide a feeding path. And thereby attract as many bream as possible to the bait;
- durability. Due to the presence of a filled feeder, the equipment is securely held on a specific section of the bottom;
- catchability. It is provided by the “tail” carried away by the water below the hole and the bait, which is washed out of the feeder naturally.
The most important advantage is ease of manufacture and durability. Even an inexperienced fisherman can make such a tackle quite easily and quickly.
How to do it yourself?
How to make a winter or summer descender? To make it yourself, you must follow a certain sequence of actions.
- Prepare hooks in advance that need to be rewound with white thread and apply luminous varnish to the surface.
- As a fishing rod, you can use a nodding fishing rod that can support the weight of the fish. The ideal material for making such a fishing rod is lavsan. The most convenient would be a fishing rod with a stand.
- Installation of gear, which includes the following steps: Installing a reel with fishing line up to 30 m and threading it into the nod. You can use a metal spring as a nod.
- Before installing the rubber stoppers, the main fishing line is inserted through the swivel with a carabiner.
- Tying the leader material with a knot to the fishing line.
- Installing a lead jig at the end of the main leash.
- Tying an additional leash with a luminous hook at a distance of 40 cm from the jig.
- Attaching a leash, 30-40 cm long, to a weighed feeder.
- Tying a loop at the free end of the leash.
- Installing the feeder on the swivel carabiner.
Making a feeder using a transparent jar with a lead weight. To run the fishing line into it, you need to make holes in the bottom. At the end, thread a leash 30-40 cm long through the bottom of the jar and tie a loop.
For fans of lively fishing, winter bream fishing with a combine harvester may turn out to be uninteresting and monotonous. However, today there are quite a lot of fans of this type of fishing, since it is simple and accessible to everyone. This is why even inexperienced fishermen can successfully catch bream using a combine harvester .
Useful tips
Here are some recommendations from real pros that will be especially useful for beginners in winter fishing:
- The combine must be placed in such a way that the main line lies directly on the bottom and does not dangle in the current.

- The hooks must be sharp.
- Bream is a cautious fish. Even the slightest noise can scare away an entire flock. Therefore, after completing drilling a hole, it is very important to maintain silence. Try to move quietly.
- Any movements must be made outside the area where the baited hooks are placed.
- There should be no foreign odors on your hands.
- It is very important, especially for a novice fisherman, to take into account what kind of fish he is going to catch. Because each type of fish has a love for different baits and baits. Additionally, this knowledge will help you imagine the approximate size of the fish and select the correct size hooks.
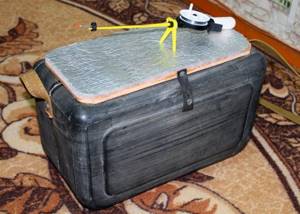
- It is useful to equip the sole of shoes and the bottom of the seat box with special soundproofing material.
And all this is just a small list of important nuances that will help make fishing successful. But if you take each of them seriously, the catch will be really rich!
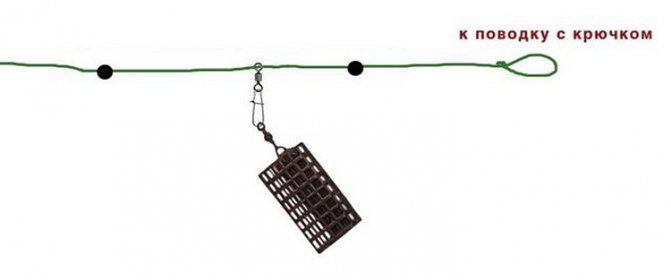
Installation of gear
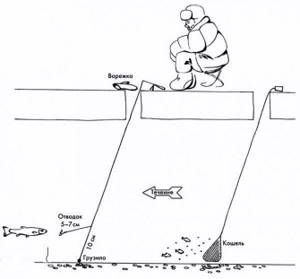
The picture below shows a schematic structure of a “harvester”.
To simplify the design, you can use a regular sinker instead of a feeder. It is better to lower the feeder separately, as shown in Figure 1, to prevent tangling of the fishing line.
The main line is 0.3 mm, leashes of 0.2 mm are suitable, equip the leash with a fairly large hook. Don't go too small and don't make this tackle too thin. In the pits you aim to catch fairly large fish. And although winter trophies resist the current less than summer ones, a large fish will still easily break a small hook or break off a too thin leash when inserted into a hole.
Keep in mind that you will need large diameter holes - 160-200 mm, and a good winter tent in which fishing will be comfortable.
This is calm, measured fishing that you can enjoy all day long.
Nozzle
For winter fishing to be successful and worthwhile, you need to carefully select, along with other gear, a good bait that will be able to lure fish in cold water conditions. A classic of the genre - bloodworm. It is often planted in bunches of several pieces; there are special means for this - bunching plants. Following the bloodworms are maggots, worms, pieces of soft meat.
You need to understand that reservoirs differ in conditions, which means that different nozzles will be needed. There are cases when, during ice fishing, plant baits worked better than live bait, however, such stories are rare.
In cold weather, protein foods are preferable for fish; they are easier to eat and absorb for organisms weakened during the winter. In addition, it is more nutritious.
General Tips
For ice fishing, you need to carefully select the load, monitoring its weight so that the “combine” feeder is firmly and thoroughly held in the desired area. In the absence of external interference and obstacles, compliance with this rule practically guarantees a good bite and a significant catch.
When making a feeder at home, try not to use a drill - it can damage fragile equipment. It's better to take a soldering iron or a sharp drill bit.
If the current is fast, then holes should be punched at an angle towards the flow.
TAGS:
Lure
During the fishing process, a necessary action that makes a significant contribution to the success of fishing, in addition to the correct selection of gear, is feeding the future catch. During the cold months, live bloodworms and jigs are considered the most productive complementary foods. They are easily and quickly washed out of the feeder, they are dispersed in the water in the bottom area, creating a good feeding area for fish.
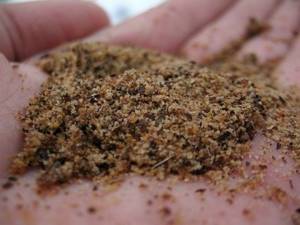
In winter, it is quite unlikely to get such food on your own; you can look for similar options - purchased ready-made food or hand-cooked cereals, which, it should be taken into account, extremely rarely help achieve the desired result. If you still decide to use plant food, then take a feeder feeder.
Another factor that can negatively affect the process of complementary feeding is an incorrect or unpleasant smell. Fish have an excellent sense of smell and the wrong scent of bait can scare away even very hungry prey from the fishing zone.
For the feeder, you need to hollow out a separate hole just above the fishing spot. Then it will create a feeding zone around the fishing spot, from which the fish will reach the hooks along the “paths” of the “harvester” feeders.