Fishing Rods Review
06 February
Review of guide rings for fishing rods
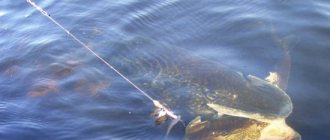
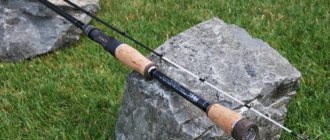
Almost all modern fishing rods are equipped with rings through which the fishing line passes. Their main function is to prevent tangling and sagging of the fishing line, due to the fact that the load during fishing for large fish is evenly distributed along the length of the fishing rod. This is especially necessary when fishing with long casts.
The rings are securely fastened and arranged so that when looking through the first ring, the centers of the circle of subsequent rings up to the last coincide.
Otherwise, there is a high probability of breaking the rod while fishing.
The materials used in the manufacture of guide rings are metal ceramics, aluminum oxide and silicon carbide.
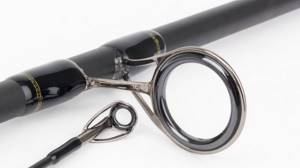
Guide rings on modern fishing rods consist of a durable insert and a frame (frame). The frame is attached to the body of the rod by means of one or two legs. Sometimes on fly fishing rods there are wire rings coated with chrome.
The frame is usually made of steel. Two parameters determine the characteristics of the frame - the diameter and height of the hole in which the solid liner is located. Professional fishermen usually, when talking about size, do not mean the internal diameter of the solid liner, but the diameter of the frame.
The solid liner or insert is the main working part of the passage ring, which is determined by the parameters:
1. Hardness is an indicator of wear resistance.
2. The risk of insert deformation decreases in proportion to the increase in bending strength.
3. Thermal conductivity - an indicator of the conductivity of heat generated by friction of the fishing line.
4. Density.
It is also worth remembering that the surface of the hard liner must be absolutely clean. This will significantly reduce the coefficient of drag of the fishing line on the surface.
Description of design
The pass ring consists of a frame and an insert. The mass of throughput parts has a direct impact on the whip. Ideally, the rings should have a slight heaviness. Therefore, these parts are made from corrosion-resistant material with a low specific gravity.
Depending on the purpose of the fishing rod (manner of fishing, nature of the water, weight of bait), there are different types of frames and inserts.
Steel rings have many negative aspects: frames that rust, inserts that wear out and crack, and difficulty in polishing. One plus is that they are cheap. But this price is not worth this quality.
Frames are made of steel or titanium (less commonly). For titanium ones , a new form of carbon fiber is used, making them 30-40% lighter. Titanium rings are designated by the letter T. They are used in models such as the “Legend Elite (St. Croix)”. To significantly increase susceptibility, a technique is used to tightly connect titanium and carbon fiber, for example, “Titanium 2000”, which uses a Fuji SiC steel frame.
Frame options:
- diameter;
- horizontal extent;
- height;
- number of legs;
- form.
In the manufacture of inserts, metal ceramics coated with titanium nitride, silicon carbide, aluminum oxide and porcelain are used.
There are 8 insert options available: “Gold Cermet”, SiC, “Alconate”, “Hardloy”, “Hard Ring”, “O”, “Hard”.
They differ in significant characteristics:
- hardness;
- density;
- thermal conductivity;
- bending strength.
Comparative characteristics:
SiC inserts are characterized by uniform heat distribution throughout the entire element. This property eliminates heating in one place.
In “Gold Cermet” the thermal conductivity is less, but the titanium nitride coating is quite resistant and the bending strength is twice as significant.
“Alconate”, “Hardloy” have high hardness, thereby being heavier, but have lower thermal conductivity.
The following follows from this: it is impossible to reach the highest limit for all characteristics at once. Therefore, when choosing rings, you should base it on the parameters of the spinning rod and its purpose.
The type of insert from each manufacturer differs due to the color shade, but you need to make sure. The brand of rings and type of insert are noted in the spinning rod manufacturer's journal.
Types of pass rings
- BALZER SIC
SIC – with silicon carbide insert. A distinctive feature is incredible strength and wear resistance to loads and high temperatures. The only drawback is their relative fragility.
- SIH - Made from lightweight yet durable material and designed to hold maximum weight.
- LOW is a special element to protect the cord from overlapping when throwing a whip.
- With ceramic insert - designed to block a cord made of monofilament material
Requirements for rings
- Polished surface.
- No cracks or chips.
- Lack of roughness.
- Solid and clean base.
- Strength of the material.
Parameters taken into account:
- size;
- weight;
- diameter.
To use your fishing rod effectively and for a long time, you need to secure it.
To protect a fishing rod from breakage, there must be a precise arrangement of rings - their number depends on the length of the rod.
As you approach the end of the form, the gap between them should increase by 0.02 centimeters. Proper placement will turn the spinning rod into a reliable tackle.
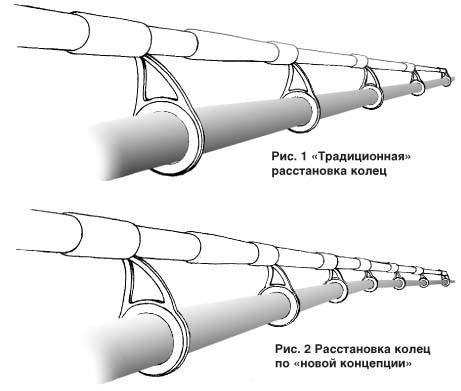
What is the FUJI KR concept ring arrangement?
KR CONCEPT or “ KR-concept ” is a set of rules and recommendations from Fuji that manufacturers of spinning rods should use to make the most of the properties of guides.
Some rules for placing guides on the rod blank were taken from the old NEW GUIDE CONCEPT (NGC). But there is one very significant difference between these two concepts. If NEW GUIDE CONCEPT is suitable for many series of guide rings intended for spinning rods, then for KR CONCEPT only rings of certain series are suitable. The KR concept arose due to the increased popularity of thin braided cords, which went well with light and small guides (Fig. 1).
Replacing pass rings
They must be removed or replaced if a flaw is detected (cracked frame, damage to the insert).
Materials
Required tools:
- New part.
- Sharpened knife.
- Adhesive base that hardens quickly.
- Epoxy-based paste kit.
- Nylon cord or braided thread (with a minimum diameter).
- Container for mixing epoxy glue.
- Rod.
- Brush (to distribute the paste evenly).
Installation
Now you can start assembling:
- The place where the ring element is wrapped needs to be heated (you can use a hair dryer), as a result of which the coating area will become less hard. If the heating has cooled quickly, it can be reheated. If the coating has not become soft, then you should stop trying to heat it. This is due to the fact that a substance is applied to this surface that differs in structure from the epoxy base.
- Removing all coating. In order not to spoil the shape, you need to carefully make a cut on the surface of the foot with a sharp blade. Repeat the process until all the winding has been removed.
- You can remove all remaining particles without damaging the surface using a wooden or plastic base.
- Sharpen the edges of the handle. It will make it possible to wind the cord with ease (according to the sewing nomenclature, the thickness of the synthetic thread is recommended No. 50). The process of winding the cord occurs in two stages: tensioning the cord and securing it to the whip (it will be more convenient to use a thick cardboard box).
- To achieve the best tension, you need to pass the thread through something thick, such as a stack of paper. In order to prevent the coil from unwinding ahead of schedule, it must be placed in any container.
- Due to the rotation of the element around the form, the cord is fixed. For reliability, you should overlap and secure the winding section with tape. Continue until the thread reaches the end.
- When the line begins to reach the top, about 0.4 cm, it must be placed behind the cord. Upon completion of the winding, fix the thread and trim off the excess.
- Thread the cord through the loop and secure. Cut off the remaining cord. To prevent unwinding, you need to tighten the element well.
Replacing the pass ring on a spinning rod
Let's start by actually removing the pass ring from the spinning rod. The operation is not difficult, but requires care and attention. There is no need to rush here, remembering that there are many other and more effective ways to damage a spinning rod blank than by removing the pass ring from it.
1. First of all, you should warm up the area where the ring is wrapped with a hairdryer to slightly soften the coating. I note that such local heating does not last long, and it is likely that during the dismantling process it will have to be repeated several more times. On inexpensive spinning rods, usually made in Southeast Asia, you may find that heating does not have any effect on the hardness of the coating. This means that the windings are not coated with traditional epoxy compounds, but with something completely different. In this case, you should abandon hopeless attempts to warm up, and simply go to step 2, since such “non-standard” coatings are quite easy, as a rule, to be removed even when cold.
2. Using a sharp knife or blade, we cut the coating of the winding, but only from the side of the foot of the pass ring (photo 1), since this is the only way we can guarantee that the spinning rod itself will remain undamaged. After making the cut, you must try to remove at least part of the coating. Usually this can be done without much difficulty. Then it is advisable to find the tip of the thread leading to the end of the winding. If this happens, then all that remains is to simply unwind this thread, while the remnants of the winding coating will peel off. If for some reason this does not work out, then you will have to remove the coating in parts, making additional cuts and periodically heating the area of the wrapping with a hairdryer.
3. Be that as it may, after removing the winding and removing the pass ring, there are still coating residues on the spinning rod blank, which also need to be gotten rid of. This is usually done with the help of a hairdryer; you can also use alcohol as a “softener”, but only after making sure that it does not damage the coating of this particular spinning rod blank. As a tool for scraping off the remnants of the winding coating, you should not use very hard and sharp objects - for example, metal ones. It is better to use softer materials - wood, plastic - to avoid, again, damage to the coating of the form. For example, children's counting sticks are good for these purposes.
4. So, the old guide ring has been dismantled, and the surface of the spinning rod blank has been cleaned of the winding and its coating. However, it is still too early to start winding a new ring; you still need to prepare it.
Firstly, it is highly advisable to grind off the edge of the ring foot - for a more convenient and painless entry of the thread into it (photo 2). Initially, this place on new guide rings does not smoothly fade away (photo 3), and for this reason, certain difficulties may arise when winding - and the larger the ring, the greater the difficulty. It is, of course, better to perform this operation on an emery wheel, but if we are talking about a single pass ring, then there are no particular problems in doing it manually.
Secondly, it is also a good idea to adjust the lower surface of the foot of the guide ring directly to the place on the spinning rod form where it will be installed. This is not at all difficult to do, after first wrapping the non-working side of a small piece of medium-sized sandpaper around the spinning rod blank in the desired area (photo 4). A delicate adjustment operation will allow you to remove small burrs on the lower edges of the foot and provide a larger area of contact of the guide ring foot to the spinning rod blank.
And thirdly, the access ring must be temporarily secured at the selected location. If we are talking about replacing the ring on the butt leg of a spinning rod or completely replacing the throughput rings on a spinning rod, this can easily be done using a soft silicone ring, cut from a tube of a suitable diameter, pulled away from the edge of the foot. And when part of the winding sufficient to fix the ring on the spinning rod blank has already been completed, the ring is cut off. But when it is necessary to replace one passage ring located between other rings, fixation in this way, alas, is impossible. In this case, to temporarily hold the ring in the right place, you can use a narrow strip of masking tape or electrical tape, or even just a small-diameter rubber band, previously folded several times.
5. A little about the choice of threads for winding the legs of the pass ring.
The best option is those specially designed for these purposes (photo 5), but you cannot buy them in any store. In general, it is extremely difficult to buy them in any store in our country. This is the harsh reality... But this does not mean that you cannot use some other threads. In principle, any synthetic thickness in the region of No. 50 according to the sewing classification will do. It should only be taken into account that the threads should not be fleecy. In addition, if we are talking about “professional” large-capacity bobbins, you need to be 100% sure that these threads are not impregnated with anything. The fact is that some of these threads are treated, for example, with silicone - for better glide, and silicone with coatings for rod windings (at least with those that are most often used for these purposes - based on epoxy resin) “is not friendly "
6. As for the winding process itself, then, of course, you can get smart and do it completely “by hand”, i.e. without using any devices to maintain constant thread tension and fix the spinning rod blank. But it’s still better to take on the task of making basic equipment. Moreover, it is really offensively simple. For example, as a “bed” for a spinning rod, you can use an oblong box made of thick cardboard - for shoes, say, etc. All you need to do with it is to make two shallow V-shaped cuts at the ends and reduce the height of one of the longitudinal walls on the side where the thread will approach the spinning rod blank by an amount equal to or slightly more than the depth of the cutouts at the ends.
The device for maintaining thread tension is even simpler: the thread is passed through the pages of some thick book, the tension will depend on the number of pages on top. It is advisable to place the spool of thread itself in some kind of bowl so that while winding the thread it does not jump around wherever and however necessary (photo 6).
By the way, about thread tension. Unfortunately, it is not possible to express its optimal value in any specific units. It is achieved, so to speak, by exercise. There is only one tangible criterion for this very “optimality”. The fact is that almost always after winding the pass ring, it must be aligned with the others. According to the radius of the form, and not according to the distance between the guide rings, because the second problem can and should be solved by initially precise positioning. It is not always possible to wind it so that the ring fits exactly into a “cone” or a straight line (when we are talking about small rings in an arrangement a la New Concept), especially when there is not much experience in such work. So, if the thread tension is too weak, then the winding will simply unravel when the position of the wound guide ring changes relative to the others. If the tension is too much, it will be extremely difficult to move it. As always, we must look for the “golden mean”...
7. Well, now, before starting the winding process, there is very little left: to prepare a simple set of tools for its unconditionally successful completion. You should have at hand:
- a sharp knife or razor blade;
- a piece of monofilament fishing line 10-15 cm long and about 0.14-0.2 mm thick;
- a piece of masking tape;
- some small oblong object, again, not sharp and not made of too hard material.
The same counting stick, for example.
Looking ahead, and in order not to arouse suspicion of an unhealthy addiction to “small, non-sharp and non-rigid oblong objects,” I will say that this accessory of the “noble ring winder” will be needed in the future to tighten the turns of the thread.
8. Let's go... The first task to be solved is fixing the beginning of the thread. To do this, you need to make one turn around the spinning blank and overlap it, as shown in photo 7. Then, fixing the overlap with your finger, move the beginning of the thread along the blank parallel to the axis of the future winding and secure it to the blank with a piece of tape (photo 8) . I would like to point out that it is better to use paper masking tape. Other similar materials (stationery tape, electrical tape, etc.) leave much more marks on the form of the spinning rod, which will then have to be specially removed. Next, without loosening the fixation of the overlap, it is necessary to make several (usually 5 or so) turns with the working end of the thread so that the beginning of the thread is well fixed. After that, we carefully detach it from the surface of the form and, for greater reliability, we tighten the resulting simple structure (just in case: the pulling should occur at an obtuse angle in relation to the direction of movement of the working end of the thread to the spinning blank during the winding process - photo 9). Now all that remains is to cut the beginning of the thread, if possible flush with the last of the turns already made. And the ease and quality of this procedure will directly depend on the sharpness of the knife or blade at hand.
9. Next, for some time you will have to do the routine: wind and wind, not forgetting to adjust the coil to the coil with the same “oblong object” mentioned a little earlier (photo 10). But 3-5 mm before the end of the winding, you need to do the following: fold the previously prepared piece of monofilament fishing line in half and place it under the thread (photo 11). Then, having wound the winding to the end, fix the thread with your finger - the same way as was done when fixing the beginning of the winding. Then loosen the tension of the thread and cut it, leaving a short tip, about 5-7 centimeters. After this, without loosening the hold, pass the thread through the loop of the fishing line and tighten it so that the winding does not unravel. With the freed hand, the loop of fishing line is pulled to the edge of the winding and pulled under it. Just a little, a couple of turns (photo 12). The last operation consists of cutting the end of the thread and tightening (or, rather, pulling) it using a fishing line loop under the winding. This is where you should be careful: the length of the already cut end of the thread should not exceed the distance from the edge of the winding to the place where the loop was laid. Or more precisely, to be somewhat shorter than this distance. If this condition is met, the end of the thread after pulling the loop will not come out between the turns of the winding, but will remain under them. Those. everything will look quite nice and neat (photo 13).
10. Since we are talking about winding guide rings, it makes sense to talk about one more technique that is practically not used on factory-made spinning rods. On the one hand, it is not mandatory, on the other hand, it fixes the pass ring more reliably. We are talking about the so-called “locking wrap” (“lock” or “lock” winding). Technologically, it consists in reaching the end of the leg of the pass ring and continuing the winding somewhat on the other side. If we are talking about small “low-footed” guide rings, then this technique is performed very simply: 2-3 turns are added (photo 14).
For larger guide rings, there is a more complicated technique: the thread is wrapped 1-3 times in a figure of eight around the ring leg and the spinning rod blank, and then the same 2-3 “regular” turns are made around the blank, as in the first case (photo 15). At the same time, the tension of the thread must be maintained, which at first often causes some difficulties. But this is a matter of skill, and one that can be quickly acquired, nothing more. And, of course, if you plan to do a locking wrap, then when cutting the thread at the end of the winding, you should leave the end of it long enough—more precisely, long enough to perform this technique.
11. Now about the most unpleasant thing - about the winding coating. The trouble, first of all, is that it is not always possible to buy special epoxy compounds intended specifically for these purposes. In our country, at the moment, you can find the products of only one manufacturer on open sale - the American company Flex Coat. As for the use of some other coatings, then as your imagination and life experience will tell you, you can cover it with nail polish, even with parquet... You just have to keep in mind that the durability and quality of such work will be inferior to that done using proper materials.
Professional coatings, in relation to the products of the mentioned company, are divided into two types: High Build and Lite Formula (although, just in case, I note: what Flex Coat calls “Lite Formula” is usually called “Regular Build” by other manufacturers "). Compositions of the first type are thicker and more viscous, having less time to set. But they lay down more “thickly” and allow you to efficiently cover the winding with one layer. The second type, Lite, is more liquid, spreads better over the surface and takes longer to dry, but gives more time to work.
However, when using a “light” composition, it should be borne in mind that, most likely, it will not be possible to cover the winding in one layer - such coatings are laid in a rather thin layer, and within a day or two after applying the first layer (but not earlier than a day later), there will be a need to apply a second one. I won’t advise you on what type of coating to choose: I myself use Regular Build, and many of my colleagues use High Build. In general, this is a matter of personal preferences and preferences.
12. As for directly working with such coatings, there are two main, from my point of view, points:
1) precise dosage of components is required. You should not try to mix the components of the composition in the required proportion (1:1) “by eye”; it is better to use syringes with divisions indicating the volume: each component needs its own syringe;
2) to obtain a good decorative result, you should try to apply the coating with long longitudinal strokes. At least most of it. Although, I can honestly say that in many ways the “pretty” of the final result of the coating depends on the quantitative experience of such work. Therefore, if suddenly the pass ring you covered or several do not look as good as you wanted, do not be too upset. It's just a matter of time and skill...
Correct placement of rings
The rings should be placed along the inner seam line of the whip. The technological seam can be found by looking at the cross section of the whip. The layer of its wall is different, so where the thickening of the wall is visible, there is a seam. There is no doubt that it is along the seam line that the whip has maximum rigidity and it is there that the passage parts should be located. This is one of the indicators of a quality spinning rod.
You can correctly arrange the rings in the following ways:
- The traditional way is to take several parts and form a cone-shaped tunnel. The leading component serves as the foundation, and the last component serves as the top of the structure.
- New option – The cone is contracting. The first part moves to the center of the structure. The main line is passed through the small elements.
Specificity of the arrangement – Straight-line arrangement
- Mostly 6-7 elements are used.
- The casting distance of the bait is influenced by the number of rings. The range increases as they decrease. You can check the correct installation or replacement of access elements in the following way, and also identify errors and inaccuracies.
- The assembled fishing rod should be taken with the first hand near the tulip, and with the other 35-45 cm lower.
- Next, slightly bending the tip of the rod, slowly wrap it around its axis.
- A rod bent along the seam line will begin to slip and be knocked out of your hands. At this moment, you need to fix the tip of the fishing rod and look at how the passage elements are positioned. They can be in 3 positions: Their location is strictly above or below relative to the whip . This indicates an excellent spinning rod assembly with the greatest rigidity.
- They are located strictly to the side at 90°, either to the left or to the right . This indicates placement along the softest line of the whip. It follows from this that either the fishing rod is designed for a slower action, or, if the marking indicates it is fast, then this indicates careless assembly by the manufacturer.
- Rings are considered incorrectly placed if they are placed randomly . The consequence of this is that the top of the blank will move along an unclear line of movement and it will be impossible to make error-free casts over long distances. The whip will quickly deform due to twisting forces, for example, when playing fish or bending even under low loads. At a certain point with active fishing, the rod will simply break in 4-6 weeks.
Mounting the ring to the rod
- Attaching a tulip . Any water-resistant glue is suitable for attaching a tulip to a spinning rod. If the part is reused, if the tip of the spinning rod does not fit into it, it is necessary to clean the tulip hole . This is done using a drill or pin. If the rod tip still doesn’t fit, use a micrometer to measure the difference between the diameters. If it is no more than 0.1 millimeters , carefully remove the layer of varnish from the tip of the rod. 0.2 millimeters - a new tulip is needed.
- Attaching the rings . They are attached to the spinning rod with threads. The choice of thread thickness depends on the weight of the rod and how close the ring is to the tulip (the heavier and further away, the thicker the thread should be).
- We begin the winding by fixing the beginning of the thread: we wrap it around the rod, overlap it and, pressing the overlap with a finger, secure the beginning of the thread on the form with masking tape (it should be parallel to the axis of the future turns).
- We make 5 turns with the other end of the thread, fixing its beginning, and cut off the remaining part of the non-working thread.
- We continue to wind the thread. There should be no gaps between turns . A stick (ice cream stick or counting stick) is convenient for adjusting them.
- We make a loop of fishing line 5 millimeters before the end of the winding and wrap it with thread (we will need it to thread the other end of the thread under the winding).
- Having completed the winding, fix the thread with your finger, remove its tension and cut the thread 7 centimeters Without removing your finger, draw the thread into the loop and pull it tight. The loop pulled to the edge of the winding should be pulled under it. This way the end of the thread ends up under the winding.
Final result
When thinking about how to glue rings onto a spinning rod, remember that this operation is painstaking . In order for the result to be perfect, a certain skill is required. If this is your first time repairing a spinning rod yourself, you may not get a particularly beautiful winding or evenness of the coating. All this will come with experience. In conclusion, a video showing how to replace the ring on a spinning rod.
Features of glaciation of rings during winter fishing
The causes of icing are:
- Low temperature (below 0°C).
- Strong frosty wind.
There are several methods of recovery after icing:
- Silicone grease in the form of an aerosol version (repeat the process again after an hour and a half).
- Balzer or Komarov ointment.
- If there is no ointment, the tip of the spinning rod should be dipped in water for a couple of seconds.
Tips and tricks
- It is necessary to self-regulate the flame when the winding is removed.
- When attaching the tulip, you need to pay attention to the insert and prevent it from breaking.
- When choosing a tulip for your fishing rod, it is best to take the fishing rod with you. If there is such a chance, then when choosing you need to take into account the gap of 0.02 cm between the elements.
- When purchasing access parts, you should carefully inspect the insert so that there is not the slightest crack or chip. You can run your fingers over them and you will immediately feel the defect present.
- The adhesive for fixing the ring elements must be of high quality.
- A frame with a SiC insert in the natural black color of steel can be painted, but the time and effort spent on this process is not worth the achievements.
- To polish the parts yourself, you need to lubricate them with GOI paste or diamond paste, glue the leather onto a stick attached to the drill, and thus polish each ring for 5-10 minutes.
- When choosing a tulip and guide rings, you should take it quite seriously, since not only expensive equipment is at stake, but also the result of landing large fish.
Depending on the fishing method, the following classes of match rods are distinguished:
- rods that are designed for classic fishing in currents or in still water;
- rods intended for carp matches;
- rods that are used for fishing at a distance of 40-50 meters or more from the shore.
Rods of these classes have different lengths, action and test. Therefore, we must always remember that fishing with rods of inappropriate test and action may not be optimal and will subsequently lead to its failure.
Classic fishing with a match rod is fishing with equipment weighing up to 10-15 grams for small roach, bream, crucian carp and other fish at a distance of up to 30 meters.
The rod action ranges from soft to medium hard. These match rods have the appropriate test and a length of 3.9-4.2 meters. With this type of fishing, great strength of the rod is not required, so one of the main advantages of rods for the classic match is its low weight. Thanks to the minimal weight of the rod, it turns out that the entire tackle has optimal balancing. This allows for efficient retrieving and accurate casting, which is quite difficult in the current.

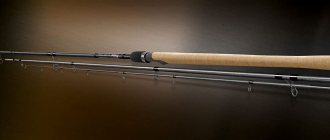
Classic match rod
Fishing rods for carp match should be quite durable in their structure and at the same time allow for casting light equipment. Carp match rods are similar in length and test to classic ones, but their weight is slightly greater. Increasing the weight of rods for carp matcha by 10-20 percent increases the power of the gear, and this is especially necessary when catching strong and large fish. The structure of the “matches” can range from soft to medium. This makes it possible to make the longest casts with light equipment and gives an advantage in the process of landing fish, since the load is distributed along the entire length of the rod blank for the match.
Match rods, used for fishing at a distance of more than 40-50 meters, are quite powerful rods that are designed for equipment weighing more than 20 grams, their usual length is 4.5 meters. Models with a length of 4.8 meters are used a little less frequently; they are used in adverse weather conditions (strong headwind or side wind). These rods have a medium-hard to hard action, and the increased power allows for powerful casting of heavy rigs.
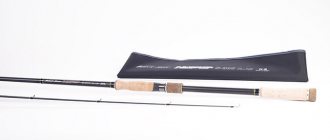
Long distance rods
It should be added that when choosing a match rod of one class or another, you need to decide what kind of fish and at what distance you are going to catch. For catching rudd, roach and crucian carp at a distance of 30 meters from the shore - the best match rod is a light class rod for catching carp
– at a distance of 50-70 meters from the shore, you need to choose a match rod in the medium or heavy class. But since match rods belong to a very expensive category, and not everyone can afford to buy several blanks at once, it is better to buy a middle class rod, the length of which is 3.9-4.2 meters. This rod can be used for fishing in most of our reservoirs.
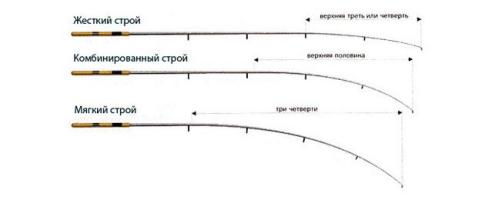
Build and test rods for match fishing
As for such a parameter as the action of match rods, compared to the characteristics of the action of spinning rods, rods for match fishing generally fall into the category of very soft to medium. This is explained by the fact that when fishing for a match, natural baits are used, and they do not withstand harsh force casts. And also because float rigs are much more difficult to cast over long distances, compared to spinning baits, since match rigs have a large windage and separated centers of mass. In order for a match rod to have good range, it must be of medium or soft action. This will make it possible to smoothly disperse non-compact and lightweight equipment when casting.
The test for match rods is the upper limit of the weight of the equipment that is suspended from the rod. Basically, the test is indicated by the manufacturer on the form of the fishing rod for the match. Universal rods include rods with a test weight of 5-20 grams.
When choosing a match rod, you can evaluate its range by comparing two rods of similar test and length. To do this, swing the rod strongly and compare the bending curves. Basically, the longer-reaching rod is the one that has a smooth and uniform bend along its entire length. It should also be remembered that the lower the test of the rod, the softer its action will be.
Match rod structure
Rod rings for match fishing
Basically, match rods are equipped with good quality guides in a light frame. But there are also nuances that should not be forgotten. First of all, it is necessary that the diameter of the uppermost ring be of a rather large size. This is especially true when fishing with sliding equipment so that the stopper assembly can freely pass through the ring.
Another important parameter is the distance between the reel seat and the lower ring. Quite often it happens that on rods that are intended for fishing with an inertial reel, the ring is located quite close to the reel seat, since fishing with an inertial reel does not involve long casts. And when installing a spinning reel on a fishing rod, there may be difficulties when casting at close distances, in the form of wear on the fishing line and overlapping of the fishing line over the lower ring.