Lead is a universal metal, used not only in aircraft construction, automotive production and for the creation of rechargeable batteries. Among fishermen and hunters, lead is a very important alloy that allows it to perform various tasks. In fishing, it is used for jig rigs, when collecting various bottom gear and float fly rods. The density of this metal allows even a small sinker to have sufficient weight for long casts. But how to make a fishing weight from lead products that are not intended for fishing equipment.
Content
- Materials
- Samples
- Mold making
- Casting sinkers
- Pros and cons of making your own sinkers
Hi all! Today I want to share my ideas, best practices and experience in making lead weights for spinning fishing.
I’ll say right away: this method is only suitable for small batches and simple shapes of sinkers. For example, I would recommend making collapsible Cheburashkas using aluminum molds, which I use myself)
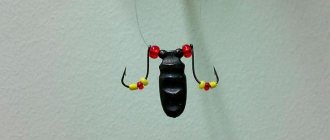
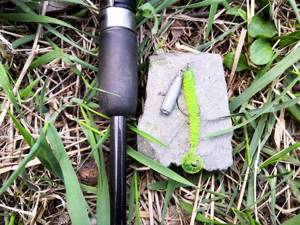
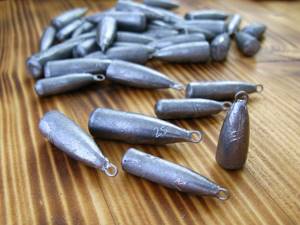
Before the start of the season, I decided to add weights to my collection - “bullets”, for the increasingly popular jig-rig.
Materials
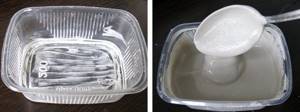
So where do we start? First, we need to prepare a set of materials for making molds for our future sinkers. I make the forms from ordinary building plaster.
I use stainless steel wire with a cross section of 0.8 mm. Also, we will need ordinary disposable containers, any fatty cream, such as “baby”, water and an old spoon.
Samples
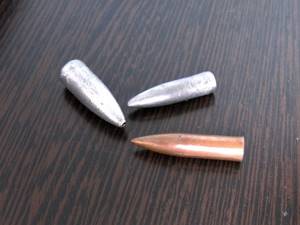
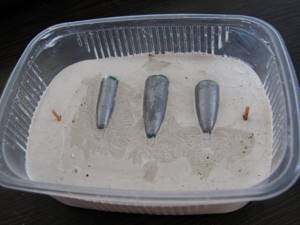
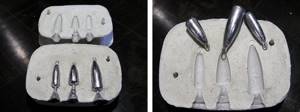
These are ready-made sinkers, purchased or previously manufactured. Any thing can serve as a model. I made one sample from a real bullet)
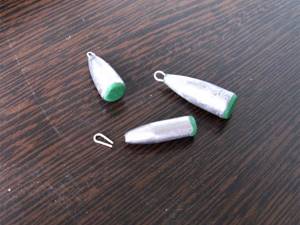
The shape can be slightly adjusted with plasticine, but only a little, because... When the gypsum sets, it releases heat and a large volume of plasticine will simply melt. In this case, I took the bullets I had previously made and equipped them with wire loops, fixing it all with green plasticine.
Mold making
You need to prepare the gypsum mixture according to the “powder to water” rule, in a ratio of approximately 1:1, you need to focus on the consistency, it should be creamy.
Pre-lubricate our mold and samples with the prepared fatty cream.
Pour the mixed plaster into the container to fill exactly ½ of the container and tap it on the surface, expelling air bubbles. As soon as the gypsum begins to set, it is necessary to immerse our samples halfway in the hardening plaster. The setting time of the gypsum depends on the brand of the powder itself, the minimum time is 2 minutes, i.e. after 2 minutes we begin to carefully look at the surface of the plaster. As soon as it becomes matte, it’s time!
We insert guides along the edges of our form. It can be anything, I use pieces of wire, toothpicks, lollipop tubes.
Now we wait for complete hardening, 20-30 minutes is enough.
Then we lubricate the surface of the mold and the samples recessed in it with our rich cream.
We dilute the plaster again and fill the container to the top. We also remove air bubbles by tapping and leave to harden for the same 20-30 minutes.
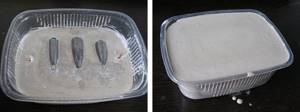
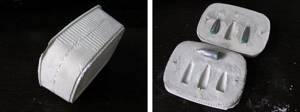
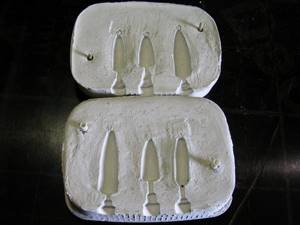
After hardening, carefully remove the mold from the container and carefully separate it into two halves, removing the samples.
That's it, the form is ready! We leave it to dry for a couple of days near the battery - the water should completely evaporate.
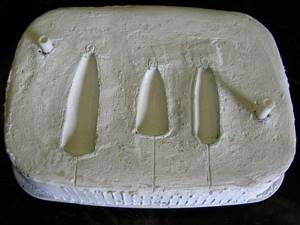
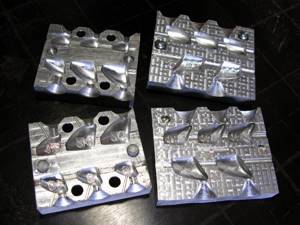
So I made 3 molds with different weights. Before the molds become unusable, the weights cast in them will last me for 2 or 3 seasons). The main disadvantage of such forms is their fragility. Gypsum is a fairly fragile material, so molds quickly crack, caverns and chips appear in them, especially for split molds. Bullet molds last much longer. For example, the uniform shown in the photo in the article is already in use for the second or even third season.
After the mold has completely dried, it is necessary to make sprues. To do this, mark the line of the sprue, connect the mold and drill out the sprue in the shape of a funnel using drills of different diameters. For the top point of the funnel I use a 10.1mm drill, for the bottom I use a 3.5mm drill.
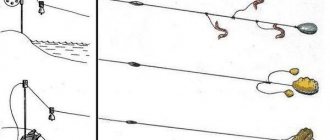
How to Correctly Throw Float Tackle?
Throwing the tackle correctly is generally not difficult, but even here you need a certain skill and dexterity. Many novice fishermen stand up to their full height when casting, take the rod with both hands and throw the bait over their heads.
Most often, when casting in this way, there is a splashing sound, a splash on the water, which scares the fish. Throwing the bait over the head is one of the main ones, but it also needs to be done correctly, exactly to the chosen place without an unnecessary splash.
To do this, you need (preferably while sitting) to take the rod in your right hand and, in a circular motion behind your back, with a sharp movement, similar to the swing of a whip, move the rod forward.
When casting strongly, the rod should be stopped at approximately 45° to the water so that the tip of the rod serves as a shock absorber, otherwise there is a risk of breaking the equipment.
3 ways to improve your fish bite!

Over 15 years of active fishing, I have found many ways to improve the bite, and here are the most effective:
1. Bite activator . This pheromone additive attracts fish most strongly in cold and warm water. The Fish Hungry bite activator has proven itself to be excellent - Read more…
2. Tackle with increased sensitivity . You should first familiarize yourself with the features of using a particular type.
3. Pheromone baits . They attract the attention of fish, stimulate hunger and cause a schooling reflex, which allows you to collect a lot of fish in one place.
You can get the rest of the secrets of successful fishing for free by reading my other materials on the site.
3 ways to improve your fish bite!
Over 15 years of active fishing, I have found many ways to improve the bite, and here are the most effective:
1. Bite activator . This pheromone additive attracts fish most strongly in cold and warm water. The Fish Hungry bite activator has proven itself to be excellent - Read more…
2. Tackle with increased sensitivity . You should first familiarize yourself with the features of using a particular type.
3. Pheromone baits . They attract the attention of fish, stimulate hunger and cause a schooling reflex, which allows you to collect a lot of fish in one place.
You can get the rest of the secrets of successful fishing for free by reading my other materials on the site.
When casting correctly, the line should lie on the water in a straight line. With a short rod, the easiest way to cast is to take the rod in your right hand, and hold the line slightly above the hook with your left hand.
Then pull the line a little and move the rod to the left. After this, with a slight movement of the rod, the line with the bait is sent forward and slightly upward.
Casting sinkers
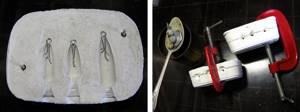
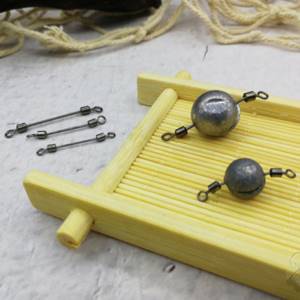
Now we can start casting the lead weights! To do this we need wire for the ears, lead, a torch or crucible and a clamp.
We bend the ears from the wire using pliers and put them into the mold.
We connect the two halves of the form and fix them with a clamp.
Melt the lead. I have old cheburakhs, tire weights and other lead scrap. I heat up the lead with a gas torch, it literally takes a few minutes, it’s very convenient! Next, pour the lead into the sprues and let it cool, that is, when you pour it into the last mold, the first one has already cooled down, everything is very fast!
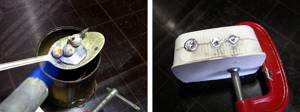
Now we separate the mold and remove our weights.
Next we repeat in the same sequence.
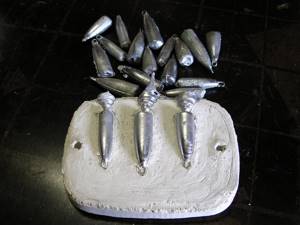
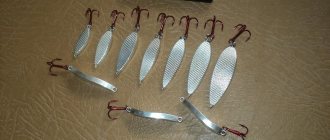
Weights are cast very quickly, sometimes before fishing I remember that I have run out of a load of a certain weight, and then, in literally 20 minutes, I cast the dozen or one and a half weights I need. It takes less time than going to the store for the same goods)
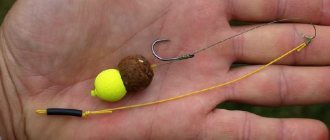
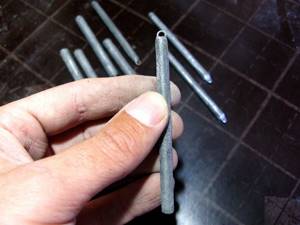
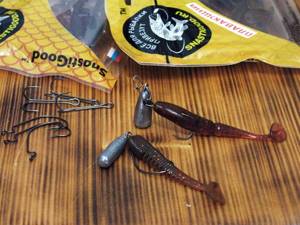
In this way, you can experiment with the shapes and weights of sinkers, and invent some special shape of sinkers that are not available in stores. For example, last season I experimented with stick weights, making several versions of non-snagging weights with different lengths and diameters. The weight of such “stick” sinkers can be reduced directly while fishing, thanks to the small diameter of 6 and 8 mm (if you need to reduce the weight, you can simply bite off part of the sinker with pliers). Also, thanks to such diameters, the load passes 95% of hooks!
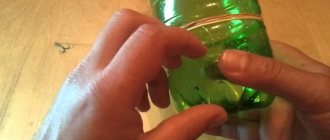
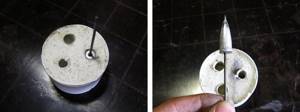
Another simplest form for casting weights is the “bullet” for Carolina. To make such a mold, you need to pour plaster into any sufficiently high mold, I took the cap from an aerosol can, and simply place the bullet samples coated with the same cream on top with the sharp side into the hardening plaster - that’s it, the mold is ready.
To cast such bullets, it is necessary to insert a “mortgage” made of steel wire, lubricated with ordinary toilet soap, into a mold, and pour lead on top. That's all.
The insert is removed from the bullet, leaving a hole for the fishing line.
Step-by-step instructions on how to make it yourself
Expert opinion
Knipovich Nikolai Mikhailovich
Zoologist, hydrobiologist. I am interested in fishing at a professional level.
If you follow safety precautions and have a basic understanding of physics, the process of creating a matrix and casting a sinker is not difficult.
You need to prepare the necessary tools, materials and clothing in advance so as not to be distracted from melting later.
Manufacturing of matrices
There are many materials for matrices. The use of some does not require special skills (plaster molds), others (potato molds) require using your imagination.
Plaster
The method allows you to make a disposable mold for a simple weighting agent. You will need:
- gypsum;
- planks;
- screws or small nails;
- candle;
- finished sample sinker;
- wire.
The process is divided into several stages:
- Make a composite box from planks, fastening them with bolts or nails.
- Thin the plaster so that there are no bubbles in it.
- Pour some plaster into the box and let it harden.
- Dip a sample of the weighting agent halfway into the partially hardened plaster. Drill a hole on the side of the workpiece through which liquid metal will flow. To prevent the hole from sticking together, place a cylinder of suitable dimensions in it, for example, the body of a fountain pen.
- Spread vegetable oil over the hardened plaster so that later it is easy to separate one half of the mold from the other.
- Place the other half of the box on top and pour plaster into it so that it completely covers the sample.
- When the plaster has hardened, carefully disassemble the box and remove the sample and the filler cylinder.
- Clean the mold and coat the inside with a layer of soot (soot from a burning candle).
- Attach the sinker loops along with the eyes. Assemble the shape and secure it with wire.
- The matrix should dry on its own for 1-2 days. Can be dried in the oven.
Potato
It is difficult to say who and how was the first to come up with this exotic method, but it works. You will need:
- large potato;
- knife;
- rosin;
- cargo sample.
In general terms the procedure looks like this:
- In an unpeeled large potato, a casting cavity is cut out to fit the size of the future product.
- A sample of the sinker is melted to such a state that a crust forms when it comes into contact with the potatoes.
- When the crust has cooled, additionally coat it with rosin so that the layer is 1-2 mm.
Expert opinion
Knipovich Nikolai Mikhailovich
Zoologist, hydrobiologist. I am interested in fishing at a professional level.
The first pour will need to be done very carefully, but then the mold will dry out more and more, and the process will go well.
From sealant
Silicone is highly versatile. The qualities of the material make it possible not only to create protective coatings or implants from it, but also to make good matrices for casting.
List of materials:
- heat-resistant sealant (GERMENT works well);
- talc;
- planks;
- screwdriver;
- soft brush;
- weighting material sample.
Mode of production:
- Make wooden formwork.
- Mix talc and sealant in a 1:1 ratio. The consistency should be like plasticine.
- Lubricate the inside of the formwork with talcum powder.
- Place the finished mass in the formwork so that it touches the walls, but only occupies half the volume of the box.
- Level the mass inside the formwork.
- Take the model of the future sinker and press it halfway into the mass.
- Using a screwdriver, make a groove for pouring lead.
- Using a stick dipped in talcum powder, make blind holes in the mass so that you can then adjust the two parts of the mold.
- Place the formwork in the refrigerator for several hours to harden.
- Mix the sealant with the talcum powder again and make the other half of the mold.
- Remove the formwork from the refrigerator and use a brush to apply a layer of talc, which will serve as a separator.
- Add the fresh mass to the formwork and compact it thoroughly.
- Dry the product for 2 hours, then remove the formwork.
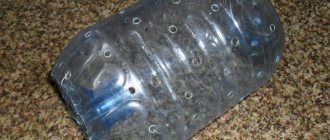
From cardboard
Expert opinion
Knipovich Nikolai Mikhailovich
Zoologist, hydrobiologist. I am interested in fishing at a professional level.
The material can be ordinary thick paper.
This simplest method allows you to make a workpiece quickly, but it will require processing with a file.
Materials:
- sand;
- thick paper;
- old dishes.
To make a mold, you need to roll the cardboard into a cone and insert it into sand poured into any container. Then lead will be poured into the cone, the paper will burn, but during these seconds the metal will already harden a little and take the desired shape.
Watch how to make this load with your own hands in the video:
Making weights
This operation is inextricably linked with the creation of the matrix. Sinkers can be of different shapes depending on the type of tackle. This must be taken into account when creating matrices.
For the donkey
Expert opinion
Knipovich Nikolai Mikhailovich
Zoologist, hydrobiologist. I am interested in fishing at a professional level.
Conical, spherical and cylindrical weighting agents are used for donks.
If you don’t have a sample at hand, you can make a model from plasticine, pen caps, paper, etc. Consider the specifics of the chosen form creation method.
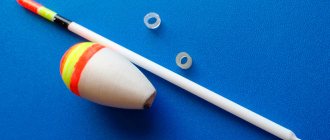
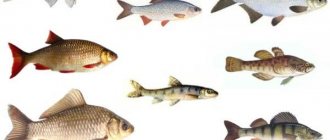
For a float rod
Since pellets are usually used as weighting agents for fishing with a float, it is better to take large pellets as a sample .
The mold will have to be made from plaster or sealant, since potatoes and cardboard with sand do not allow you to achieve the desired shape and size. It is more convenient to make a number of holes in the mold for lead. This way it will be possible to make several weights at once.
Sliding
Expert opinion
Knipovich Nikolai Mikhailovich
Zoologist, hydrobiologist. I am interested in fishing at a professional level.
This type of weighting material is used both on spinning rods and on float rods. It is considered more perfect because the fish, having grabbed the bait, does not feel the weight of the sinker.
It slides freely along the fishing line. There is a reliable way to make several products at a time.
Required materials:
- an oblong cylindrical object (for example, a large drill);
- the wire;
- wire;
- scotch;
- sand;
- hacksaw for metal;
- paper.
How to make:
- Roll the drill into the paper, remove it, and secure the paper with tape so that the roll does not unwind.
- Cut a piece of wire so that it is 2-3 cm longer than the roll, and insert it into the tube.
- Bend both ends and fasten with short pieces of wire to secure the wire inside the tube.
- Align the wire so that it is stretched more or less in the center of the tube.
- Stick the tube into the sand.
- Pour molten lead into the open end of the tube. If necessary, use pliers to trim the wire so that it is centered.
- Remove the remaining paper, cut the long lead blank into pieces to fit the size of the sinkers.
- Squeeze the wire out of the blanks.
- Using sandpaper or a file, give the workpieces the desired shape.
With rubber shock absorber
This tackle is very effective, but is prohibited in a number of regions. The weights for such a bottom must be very heavy: up to 400 g. They must be made flat and rough.
Expert opinion
Knipovich Nikolai Mikhailovich
Zoologist, hydrobiologist. I am interested in fishing at a professional level.
For the best adhesion to the ground, you can place pieces of soft and thick wire into the sinker during casting.
If they stick out like the arms of an anchor, the sinker will lie very well on the bottom, and when it catches on an obstacle, the soft wire will straighten out, and it will be possible to pull out the tackle.
For such donks, all the described methods are convenient, except for the potato method: it is almost impossible to find potatoes of a suitable size.
Collapsible Cheburashkas
Sinkers of complex shapes, such as collapsible Cheburashkas, are best made in a plaster mold.
Materials:
- gypsum;
- cardboard, plastic or matchbox;
- a little plasticine;
- knife
- metal plate 4 x 0.8 mm, and 10+ cm in length;
- soap;
- lead;
- container for melting lead;
- wire;
- sample of collapsible Cheburashkas.
Manufacturing process:
- Make formwork from plastic or cardboard; even a matchbox will do.
- Remove the eye from the sample sinker and insert the metal plate.
- Mix the plaster and pour it into the formwork.
- Submerge the sample sinker on the plate halfway into the plaster.
- When the plaster dries, you need to lubricate the surface with soap.
- Mix more plaster and pour it into the formwork to completely hide the sinker.
- When the plaster dries, remove the formwork.
- Without waiting for complete drying, separate the halves of the mold.
- In the still wet plaster, make channels for pouring lead and venting air.
- After complete drying, the forms can be used for their intended purpose.
- Make ears for Cheburashkas from wire.
Pros and cons of making your own sinkers
The most important advantage is the low cost of the resulting weights. It is also important that you can always cast the missing weights within 10-15 minutes if you have ready-made molds. I practice this quite often; before fishing, I quickly cast a dozen weights, if necessary.
Another plus for these homemade products is that you can choose a special shape and weight of the sinker for your fishing conditions, equip it with any accessories, “play” with the diameter and size of the loops, etc. Also, this is a quite exciting and educational lesson in physics and chemistry for your children! Children are happy to get involved in the process, even for this alone it’s worth trying to make a mold and cast weights yourself!
Now about the disadvantages: the most important one, as I already mentioned, is the fragility of the form. You can add reinforcing additives to gypsum, such as lime and others, but this will not fundamentally change the situation. Also, one of the disadvantages of this method is a certain amount of flash on the finished weights, this applies to collapsible forms. A mold for a “bullet” with a hole is the most successful option both in terms of durability and ease of making the mold, and in terms of casting the sinkers themselves. I 105% recommend making a mold for bullets! Another disadvantage is the difficulty of marking such cargo. The grams have to be marked manually.
In general, making such sinkers does not require any special equipment or any special knowledge or skills, everything is extremely simple!
That’s probably all, if you have any questions, write in the comments, I’ll be happy to answer;)
Simple options
The simplest thing is to make lead weights using a plaster or sand mold. This method has a number of undoubted advantages:
- accessibility and prevalence of material;
- lead melts at a relatively low temperature - 320°C;
- ease of manufacture.
The use of lead and gypsum when making sinkers yourself has several significant nuances:
- at a temperature of about 200°C, water begins to actively evaporate from gypsum , which leads to destruction of its structure and splitting of the product;
- Lead, when hardened, is pressed into plaster , which makes it almost impossible to remove the sinker without destroying the mold;
- a gypsum workpiece has a large number of micropores , which leads to the need to polish the finished product.
When using sand instead of gypsum, the process of preparing the mold is greatly simplified, however, the requirements for the material of the box in which the workpiece will be located when pouring lead are increased; it is advisable to use a metal support. The product itself will be somewhat less aesthetically pleasing and will require serious polishing.