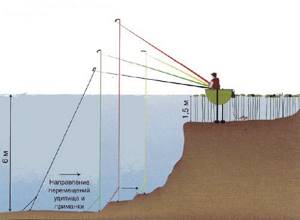
The topic reveals the tactics of catching fish in winter using a fishing rod with a float rig on a nod with a hook or jig from the bottom of a reservoir without a current and at half-water.
In the first case, for float fishing, a hook is tied with a winter float weight, consisting of a system of sinkers.
In the second, between the float and the jig, for the convenience of balancing the equipment, a lead pellet selected by weight is usually built in.
The page discusses several methods of active fishing in winter using a float with a jig, but fishing tactics in both cases require the integration of a nod with a shock absorber made of a metal adjustable spring into the equipment of a winter float fishing rod.
Options for equipping a float fishing rod with a nod and a jig in a reservoir without a current can be found in the pictures drawn for this occasion.
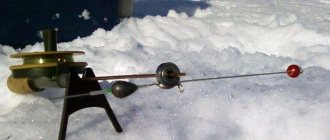
You can learn how to check the balancing of a winter float rod using a nod on my YouTube channel when watching the video Winter float rod for bream with a jig, where the underwater equipment shown in the photo took part in the filming.
The topic suggests tactics for catching fish in winter from the bottom of a reservoir without a current and fishing in mid-water.
Examples are given in which cases of winter fishing on a fishing rod with a float would not be hindered by the presence of such a signaling device as a nod with a sensitive elastic spring.
To begin with, I’ll draw a picture with the simplest set-up of a winter float fishing rod with two bite alarms - a nod and a float loaded with one large jig.
In real fishing conditions without a current, one or a pair of small sinkers are built into the equipment between the float and the jig to quickly balance (adjust) the underwater float equipment in winter.
Advantages of jig fishing in summer
The device of this bait is simple. This is a small hook, which is soldered with a fore-end into the tip of any heavy metal - tin, lead.
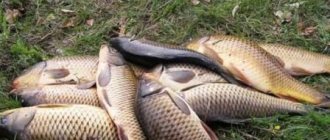
The differences between these winter and summer baits are determined by the life of the fish at different times of the year. In the summer, the fish are more active and the bite is more constant and faster. Even in the summer, fish come out that in winter do not show interest in the bait. For example, crucian carp and tench.
The standard summer jig has different sizes compared to the winter jig, as well as a different color. For example, it is used to catch crucian carp, resembling a dung fly pupa.
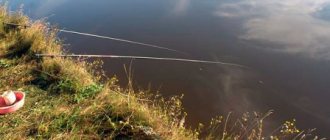
Fishing with a jig from the shore in the summer is a creative endeavor. At this time, the fish have enough food and the fisherman has to come up with different ways to move the bait in order for a bite to occur. This process is more productive in extreme heat, when the fish hides in thickets of grass.
Selecting a location
You can fish with a summer jig both from the shore and from a boat. Places from bridges and sunken barges are good for fishing from the shore. They are characterized by the fact that you can immediately cast this bait to a decent depth.
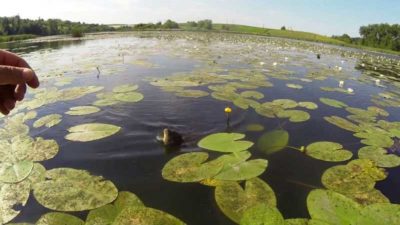
When fishing from a boat, it is lowered to the bottom and then pulled up in different ways, attracting fish. When there is dense vegetation at the place where you are fishing from a boat, the angler will have to be extremely careful. In this place there are a lot of bait breaks due to hooks. You also need to observe the depth at which the bite occurs. After all, in different weather, fish behave differently.
Tools used
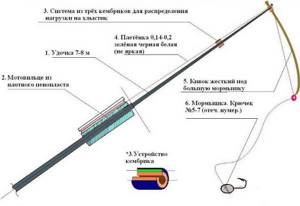
Summer jig fishing is carried out with two types of fishing rods - with blind equipment and with sliding equipment:
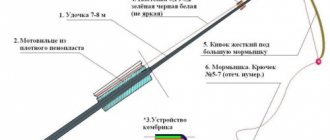
- For blind rigging you need a rod 6-10 meters long without rings and a reel. The line is on a reel, which is attached to the tip of the rod. The fishing line itself should be 0.10-0.15 mm and transparent.
- Sliding rigs require a rod with a reel and guides. Having a reel makes it easier to change the depth of lowering of the nozzle. With such gear you can catch a large specimen.
Much attention is paid to the nod; it must be firm. But also preserve the game of the jig. Usually made from a metal plate or Mylar strip.
Fishing equipment
An important condition for successful fishing is the ability to play with a jig.
The choice and composition of gear largely depends on the method of fishing. For fishing from the shore, for example, you need a rod of about 4-6 meters, and for fishing from a boat, a two-meter rod is enough. Therefore, the choice of gear must be taken responsibly and take into account the nature of the fishing.
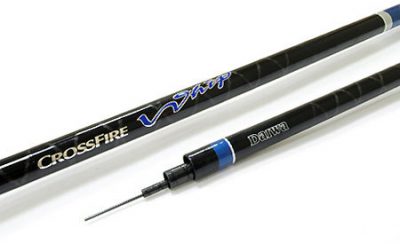
Choosing a rod. For jig fishing in summer, you need to select a light rod. Since “playing” from the shore with a six-meter fishing rod is not so easy, there is no need to take a longer rod. Currently, the lightest material for fishing rods is carbon fiber. Passage rings must be present, otherwise the line will always get tangled during the “game”.
The nature of the fastening of the gear. People distinguish between “deaf” and “running” gear.
- “Blind” or rigidly fixed tackle means that the tip of the fishing line is fixed to the end of the fishing rod, or a small reserve is wound on the reel, about the third knee. This method of fastening will not allow the line to be released at a sufficient distance when landing a good fish.
- “Running” or moving tackle is when the fishing line is threaded through guide rings and attached to a reel. The coil, in turn, can be inertial or non-inertial. This tackle will allow you to adjust the length of the released fishing line and effectively fight large fish.
- Nod. As mentioned above, a side nod is used for fishing. It is selected depending on the length of the rod and the weight of the jig. The longer the rod, the longer the nod. The ideal position of the nod is to have its tip slightly raised when the jig is empty. Experienced fishermen advise marking the tip of the nod with a bright color to make it easier to distinguish the bite.
- Mormyshka. As a rule, a jig for summer fishing is larger in size and weight than for winter fishing. Heavy jigs are used in strong currents or for catching large fish. Calm, not very intense movements can attract chub, ide, crucian carp, and sharp and fast movements can seduce perch.
The main attribute of successful fishing is the correctly set pace of the “game” of the bait. To enhance the attractiveness, you can attach a couple of bloodworms to the jig.
Preparing gear for jig fishing in summer
Choosing a rod. To fish in summer using this method, you don’t need any special gear. All configurations are suitable for summer fishing. Knowing the basics of collecting gear, any fisherman can assemble it himself.
When fishing, a light action rod is required. This includes both fly fishing rods and spinning rods with small test indicators. All this is necessary so that the angler sets the game for this bait and feels it well.
Carbon fiber and composite fishing rods are just right for this type of fishing. To use from the shore and from a boat, different lengths of the rod are required, for example, from a boat no more than 4 meters, from the shore you can use 8 meters.
At different depths, the equipment changes; a rod with guides or a clean fly tackle is used.
Choice of fishing line. Fishing with a jig in the summer involves the use of monofilament fishing line. It is advisable to select the diameter according to the size of the fish and the weight of the bait used. You also need to take into account that with a thicker fishing line there will be no play and the sensitivity of the entire tackle will decrease. But even a thin fishing line will not withstand the jerks of the fish.
How to properly fish with a jig in the summer
For successful fishing with a jig in the summer, you need to properly arrange the game with the latter. On a float rod, this can be done with the tip of the rod, or using current or wind.
We must remember that the key to successful fishing with a jig in the summer is its movement in the water during fishing. Working with this bait is an interesting activity. You have to stir up the mud, drag it along the bottom, lift it and lower it, throw it and freeze in the depths of the water, rotate it in a circle.
Based on such manipulations, each fisherman develops his own fishing technique.
Loading with jig
Loading a winter float with a jig has its own characteristics. To adjust the weight of the bait and the carrying capacity of the float, the same 3-liter jar of water is suitable as when loading equipment with one sinker.
When choosing winter jigs, you should take into account their difference in weight. Tungsten products are used for fishing in great depths, and tin baits are successfully used in shallow waters. The best option for a winter float fishing rod is lead jigs with bait.
Correct loading of a winter float is performed in the following sequence:
- A winter float with the carrying capacity of a jig is selected. But given the light weight of the jigs, this is not easy to do. There is a way out though.
- Move the float towards the bait and lower it into the water. When the weight of the jig is less than the carrying capacity of the float, then when lowered into a jar of water, it will float at the surface.
- Add a pellet with an end slot, but do not crimp it. It is necessary to find the weight of the additional load at which the float slowly sinks under the water.
- Secure (squeeze) the shot over the jig at a distance of 30-40 cm.
Tactics and wiring
Summer jigs, despite their size, must oscillate, just like winter jigs. Some anglers make up to 300 vibrations per minute. Such a high frequency makes it possible to fish without an additional attachment.
There are some fishing methods for this type of fishing:
- gently lower the jig to the bottom, this will be visible by the nod. After 2-4 seconds, raise it 5-8 centimeters above the bottom. Throw it back and gently pick it up again. A cloudy spot and sound waves appear, this method especially works in the absence of bites;
- The jig sinks to the bottom and moves without leaving the ground. Suitable for clean water;
- The jig is pulled along the bottom and stops in extreme positions.
Practice shows that the use of “sandwiches” - the presence of several baits - makes this bait the most delicious morsel for fish.
Fishing with a float rod
A jig with a nozzle and a float increases the number of bites. Just a real lifesaver for anglers on the river and lake. In the summer, fish are caught more actively and larger ones are caught. Therefore, their hooks must be large and strong.
Also in summer, jigs made of tin and lead are more suitable. Another feature of the float + jig rig is the absence of all sinkers, the latter acting as a weight.
The rod is used from 2 to 8 meters. The form is the easiest to use, since you have to hold it in your hands all the time.
Jig on a plug
HomeArticlesAll articlesArticle
Egor
I’ll immediately make a reservation that the fishing method described below is purely amateur and is prohibited by the rules of sport fishing at competitions of any level, as it is very prey. We'll start with winter fishing.
When catching bream fish with a “standing” jig from the bottom with a bloodworm attachment, we always immediately react by hooking the rise of the guard. To attract the fish's attention to the bait, it is very useful to periodically lift the jig above the bottom with soft rocking movements. When catching bream in a game, we also instantly react by hooking to the slightest pressure from the guard. Hooking without delay is a guarantee of success.
The same principle can be used when fishing with a plug on a float tackle, if you tie a jig instead of a hook, but let’s start from the beginning. To begin with, let’s remember some fairly common occurrences during summer fishing trips.
- You watch the float very carefully, but the bites are practically invisible, and yet the bloodworm or maggot is thoroughly sucked.
- During the next recast, you unexpectedly feel a fish on the hook, although there was no bite at all.
Why is this happening?
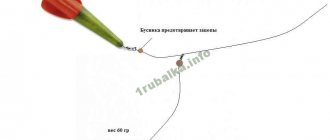
The traditional float rig for a fly rod and plug ends at the bottom with a pad and hook. This equipment has one significant drawback - a large degree of freedom between the hook and the underarm. After all, it is the feeder, raised by the fish during a bite, or moved to the side, that signals us with the movement of the float, indicating a bite. The further the feeder is located from the hook, the greater this degree of freedom. As a result, the tackle becomes, as it were, blind around the hook inside the ball zone, and we may not even notice the bite until the fish moves the hook in any direction.
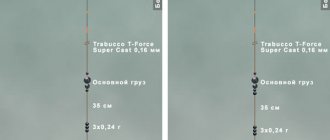
In Fig. 1. shows two options for positioning the under-hook at a distance of 30cm and 12cm from the hook, and the difference in the degree of freedom of each rig is clearly visible. Inside each improvised ball, the fish can do whatever they want with the bait - you won’t notice anything.
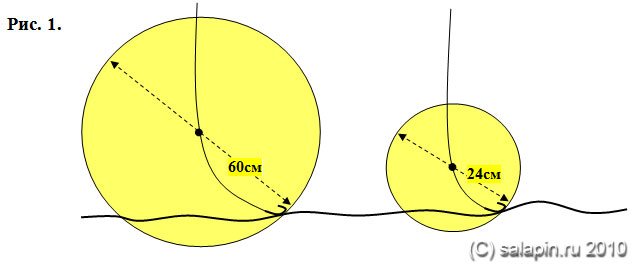
If the fish is inactive and capricious, then in still water it carefully sucks the bait on the hook, without even moving. During the current, the fish can also thoroughly suck out the bait, rafting along with the flow and not indicating its presence in the underwater, and then spit out the sucked bloodworm skins with impunity. Hence the lack of visible bites when the bait is eaten.
This means that the smaller this spherical zone of freedom, the less will be the degree of freedom of the nozzle, and the greater the chances of noticing a bite. It is necessary to use equipment that does not have a parasitic degree of freedom at all and will instantly transmit a signal to the float about the presence of a bite.
To eliminate this degree of freedom, you need to bring the stock close to the hook. It would seem that the problem can be solved very simply, but that was not the case. When fishing from the bottom, an unoriented hook will begin to constantly cling to any roughness on the bottom, since it is in an uncontrollable and non-adjustable position. This is especially true on a cluttered, grassy or rocky bottom with shell rock. To avoid snags as much as possible, it is necessary to orient the hook with the tip up, and such an arrangement is only possible with a jig.
So we come to the essence of the method of fishing with a jig with a float.
Selection of jigs
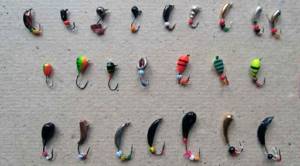
Having tried various forms of jigs in practice, I came to the firm conviction that their shape does not at all affect the number of bites and the result of the entire fishing. Meanwhile, attaching bloodworms and removing fish is much more convenient and faster with an elongated teardrop-shaped jig than with a spherical or round one.
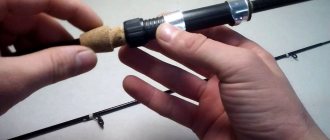
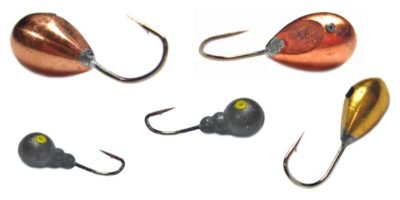
Depending on the depth of fishing and the size of the fish, it is enough to have three to four standard sizes of jigs weighing from 0.05 to 0.2 g. Preference should be given to tungsten jigs without a through hole in their body. In Photo No. 1. the most acceptable and successful forms of tungsten jigs for summer float gear are shown. When purchasing jigs, you should pay attention to the quality of the jig hooks. They should be thin and very sharp, allowing the larvae of bloodworms or maggots to be inserted without seriously injuring it.
Just like for traditional float tackle, leashes with attached jigs are prepared in advance and stored on leashes. The leash line is tied to the jig by the protruding ring of the hook. The main advantage of this installation is a reliable, very durable, self-tightening knot that is not damaged and does not weaken during fishing, which also allows you to change the position (tilt) of the jig in relation to the leash line. Photo No. 2 shows the correct position of jigs hanging on a leash before casting. Please note that all jigs are located almost horizontally with the hook up, which minimizes the likelihood of snags both when fishing with a retrieve from the bottom and when playing with a plug.
After catching or leaving the fish, the jig will definitely turn around the knot and begin to hang, as shown in Photo No. 3 . If you leave it in this position, then you are guaranteed a hook. Therefore, after attaching the bloodworm, before the next cast, the jig must be turned around the knot so that it takes its original position, as in Photo No. 2.
Unlike the shape, the color of the jig has a stronger effect on the quality of the bite. The most universal is the black or brown color of the jig, which does not stand out against the background of the bottom of the reservoir and does not alarm the fish.
When fishing with bloodworms, the most acceptable color of the jig will be red, matching the color of the bait. They can be painted in advance, or you can choose the color directly on the pond if you use alcohol-based permanent markers in black and red, as in Photo No. 4 . Such a blitz of painting lasts for more than an hour of fishing, after which the color should be restored again with another touch-up. Fortunately, the paint of an alcohol marker dries instantly, and the painting process itself takes no more than ten seconds.
To change the color of the jig, the previously applied alcohol color can be washed off with a drop of alcohol applied to a cloth. This quick method of changing the color of a jig is quite suitable for winter fishing. A couple of multi-colored markers and a small bottle of alcohol will not take up much space in your pocket and will not freeze in the cold.
Now let's move on to the floats
For fishing with jigs, you need special floats designed specifically for registering bites on the rise. Such floats have been on sale for a long time and they have proven themselves in jig fishing.
The first and, in my opinion, the best model is presented in Photo No. 5 . They are distinguished by a relatively short keel and a not very thick black passive antenna. When biting on the rise, even with a small and light jig, it comes out high out of the water and is perfectly visible at any distance. You get real pleasure from such bites. Unfortunately, lately I very rarely see them on the shelves of fishing stores.
Photo No. 6 also do an excellent job . A small thickening in the middle of the antenna is also clearly visible above the water when biting on the rise from any distance.
If you were unable to purchase such floats, do not despair. They can be quite easily made yourself from an ordinary sports float of a spindle-shaped or teardrop shape with the tip up. Photo No. 7 shows two self-converted floats for jig fishing.
Fundamentally, they are no different from the first model. As a thicker passive antenna, you can use a thin empty ballpoint pen rod 60–80 mm long, into which a thin yellow or red active antenna is glued on top.
You must first carefully remove the original antenna from the float, as well as the wire eye, since we will no longer need it. Then, using a drill of a suitable diameter, we carefully drill out a place in the float where the thicker passive antenna will be glued. Before gluing the passive plastic antenna, you need to treat its end with fine-grained sandpaper so that the “Super Moment” type glue securely fixes it in the body of the float. We use the same glue to fill the area where the wire eye is removed from the body of the float so that it does not “drink” the water. Paint over the place where the passive antenna is glued in with a black alcohol marker. At this point, all work on the manufacture of a specialized float is completed and you can proceed to the manufacture of equipment. Let's look at this procedure in more detail.
Correct loading
If you fish with a regular float rig with a hook at the end, then if the leader breaks, replacing it does not disrupt the loading of the entire tackle, which you have carefully adjusted at home. When fishing with a jig, the equipment should also be loaded at the base of a thin red or yellow active antenna, taking into account the weight of the jig, and the thicker passive antenna should always be under water. But what if you suddenly need to put a leash on a pond with a heavier or lighter jig? Indeed, in this case, the load of all the gear will be disrupted, and fishing will become impossible.
To avoid these problems, you should start loading the equipment with the heaviest jig from your combat arsenal that you plan to fish with. Having loaded the equipment to the base of the thin active antenna, remove the heavy jig from it and place the next, lighter jig. Naturally, underloaded equipment will immediately respond to this by slightly floating a part of the passive antenna above the water. Now you need to experimentally add pellets of such weight to the fishing line of a leash with a lighter jig so that the total weight becomes the same as that of a large jig and again only a thin active antenna protrudes above the water. Similarly, we load the leashes with even lighter jigs. As a result, the total weight of leashes with jigs of any size will be the same. Now, when replacing the jig, if it breaks, or when switching to another size, the load of the entire tackle will remain unchanged.
Having leveled the weight of the leashes with jigs of different sizes on one of your existing floats, we safely surround the rest of the floats at the base of a thin active antenna with any leash. After all, their weight is now the same.
Separately, I note that the length of the leash for a jig should be longer than that of a traditional leash with a hook, but most importantly, the leashes should be absolutely the same length. The optimal length would be 40 - 50cm, so that the loading pellets are as high as possible and are located right next to the leash loop. There they will be less noticeable to the fish and will not interfere with the play of the jig during the fishing process.
Leash storage
Photo No. 8 shows my compact foam leashes. On the left jig, the jigs are heavier and without loading pellets, and on the right, they are lighter and with loading pellets at the loop.
As a rule, when purchasing tungsten jigs from a batch of the same standard size, you can be sure that they are all the same in weight. If you have experimentally selected additional pellets for one jig, then you can safely put exactly the same pellets on the remaining leashes with the same jigs.
There is another important advantage of all weight-leveled leashes with jigs. They can be used on a float of any weight from your jig arsenal, without any additional adjustments to the load on the pond. Thus, there is no need to have separate sets of leaders with jigs for each type and type of float. All leashes are interchangeable without changing the total load of any of your jig tackle, regardless of the size of the jig and the weight of the float.
When placing the equipment at home in a jar of water at the final stage, tie a thin line to the jig and pull it up to simulate a bite on the rise. Try to remember how high the passive part of the thick antenna rose above the water. It’s even better to make light transverse scratches on the passive antenna at the lifting level for each jig weight. Then, on the pond, you will know exactly what rise of the passive antenna should be expected in the event of a bite on the selected jig.
Fastening our floats to the main line of the equipment
Floats for jig fishing do not have a wire eye and are attached to the main line of the selected equipment already on the pond using three cambrics located on it, as shown in Photo No. 9 . One thicker cambric is mounted on a fairly strong passive antenna and should be located on it slightly below the ascent level for the specific jig chosen. Two other cambrics are fitted onto the keel of the float. Thus, for each float weight, we can have any number of rigs of various lengths to suit any kit of your plug. From an economic point of view, this is very justified, since the float is the most expensive part of any float equipment.
Unlike traditional float equipment, on which the float, due to the way it is attached, is always and everywhere present, jig equipment does not require the presence of a float on spare reels. And if so, then reels with spare rigs of different lengths for different parts of your plug and for each float can be made compact so that they take up less space in your set, such as in Photo No. 10 . On the left reel there are four rigs wound at once for the 3rd, 4th, 5th and 6th whales for a float weighing 3g. On the right reel there are three rigs wound for the 4th, 5th and 6th whales for a heavy float weighing 5g, converted from a sports one. The diameter of the main line for each equipment is also indicated here. Cambrics for attaching the float are present on each equipment.
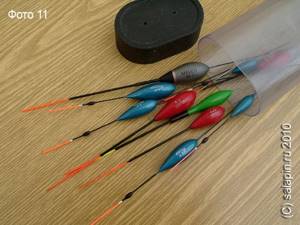
Since our floats are separated from the equipment, it is advisable to put them in a pencil case, where they will be reliably protected from accidental damage during transportation, as in Photo No. 11 .
So, the equipment is ready and now we will move on to the features of jig fishing.
Fishing technique
The technique of fishing with a jig using a plug is not very different from fishing with a hook, however, there are several differences in the techniques of playing with the nozzle.
You have become the owner of a unique piece of equipment, which is many times more sensitive to bite detection than conventional hook equipment. The reaction speed of a float jig to a bite is comparable to a winter jig on a guardhouse, which allows you to hook a fish before it has time to spit out the bait. You should hook immediately after the passive antenna surfaces, otherwise you may be late.
The most effective way to catch bream using a jig is from the bottom, although sometimes even in half-water it can be quite successful, so the first and most important thing is the accuracy of setting the depth on the equipment in the fishing zone. The plug allows you to perform this operation with pinpoint precision. Feeling the bottom relief in front of you to the right and left of the central point, you need to find the deepest place and adjust the depth of the jig rig along it. The jig in this place should touch the bottom, while the passive antenna should be almost completely immersed in water. The ideal protrusion of the passive antenna from the water is no more than 0.5 cm. As you can see, for this gear the accuracy of setting the depth should be an order of magnitude higher than when fishing with a hook. Below we will look at playing with a jig on an uneven bottom.
If the depth on the rig is set more than necessary, then in a static position the passive antenna will come out of the water too high and rising bites will be poorly visible or not visible at all. And if the depth is made less than necessary, then you may not get any bites at all, since the fish will not always take the bait hanging above the bottom.
Playing with a jig rig is also slightly different from playing with a hook. First, you need to completely forget the technique of fishing with a stationary bait, as is sometimes done when fishing with a hook. The slightest displacement of the float to the side by the plug, or a slight hold in the current, leads to the rise of the float and, accordingly, the jig, so you need to play with a small amplitude and very smoothly. Sharp and fast movements of the jig sometimes also attract fish, especially perch and roach. The main principle is the constant movement of the nozzle, so you should not allow the jig to lie motionless on the bottom for too long. What is acceptable, and even useful in winter - lying on the bottom for a long time - is simply contraindicated in summer.
Ways to play with a jig
From my practice, I have identified three, the most effective, ways of playing with a jig when fishing with a plug.
- A slight shift of the float to the side by 4–7 cm, or a very short hold in the current, and then release the float. In still water, when playing this way, the jig will smoothly rise above the bottom and just as smoothly fall slightly to the side of the start. In a small current, the jig will smoothly rise above the bottom and smoothly drop slightly downstream. Bites on the rise follow both at the moment the jig is lowered to the bottom, and immediately after touching the bottom. If there are no bites within 4 - 6 seconds after touching the bottom, we repeat the game, and so on throughout the fishing.
- In still water or weak currents, another technique is very effective. A slight shift of the float to the side by 5–10 cm and its stop without releasing the float. With this type of play, the jig will smoothly rise above the bottom and smoothly land in a small downward arc away from the start. Performing such movements at intervals of 4-6 seconds, the jig makes movements whose trajectory is similar to a micro jig. Bites also follow almost immediately, both while lowering the jig to the bottom and after touching the bottom.
- In still water, a very slow, even and long pull of the float, in which the passive antenna slightly comes out of the water, is also effective. At the same time, the jig slowly floats a few millimeters above the bottom, slightly scratching the uneven surfaces and imitating the movement of bottom living creatures. With such a game, bites most often follow the bottom of the float. In a weak current, a long pull with and against the current can alternate with a slight release of the float, or a short stop, which also creates an interesting game of the jig.
By combining these three main methods of play, you can achieve different effects of jig movement at the bottom level, and your personal experiences on site will tell you which game is most effective on each specific body of water, depending on the type of fish, months of the year, time of day and other factors. Perch and roach prefer a rather energetic and long pull, creating the effect of a running bait. I had to catch with a quick game on bloodworms, even squinting at 500 - 700g, driving the jig along the slope of the edge. Bream breeds, on the contrary, prefer smooth and sedate play.
Features of such fishing
When fishing with a plug, the fisherman has the opportunity to move the jig only to the right and left parallel to the shore above the baited area. If the bottom is uneven and the jig has reached the tubercle, then the float will immediately show this with its passive antenna. Here you need to gently pull the line to sink the passive antenna, and hold the tip of the plug in place for 4-6 seconds. If there is no bite, repeat the game. When the jig descends into the recess again, there is no need to tighten the line, because Initially, we have already adjusted the depth of the equipment in this place and the jig touches the bottom. After just 5 minutes of fishing, you will know by heart the bottom topography in the jig playing area and will automatically pull the line in the right place.
If you have stopped playing with a jig and are holding the bait in one place for a long time, then do not be surprised if you catch almost nothing. Believe me, only constant play with the bait is a guarantee of success in jig fishing.
The bait, as a rule, is the larvae of bloodworms, or maggots, as well as a small worm. The number of bloodworm larvae attached to a jig hook ranges from one to a good bunch, or in combination - a “sandwich”.
Fishing with a jig using a fly rod can also be very effective, but it is a little more difficult to set a very precise depth on the equipment, especially on the bottom with a slope from the shore. Playing with fly tackle is also less varied than with a plug, but on a flat bottom the chances of fly tackle and plug are almost equal.
A jig instead of a hook very often helped me out on the most lackluster days, but as I mastered this type of fishing, I became convinced that even in a good bite, a jig is more effective in many ways than a regular hook.
There are noticeably fewer slips, since in 95% of cases the hook of the jig bites into the fleshy upper lip, rather than clinging to the thin film deep in the fish’s mouth.
It is much easier to attach bloodworms and maggots to a jig than to a small hook, which is sometimes even difficult to hold with your fingers.
Removing fish from a jig is also much easier and faster than removing a deeply swallowed hook with an extractor, since the fish does not have time to swallow the jig deeply.
During repeated friendly “get-togethers”, the jig on a plug was always at least twice as fast as the traditional float tackle, both in terms of the quantity and quality of the fish caught.
Try it, and you will not regret the time spent on making summer jigs for a plug or swing.
Published in the magazine “Fishing in Rus'” N2/2008
Tags: jig float plug
7

Register or log in to comment.
Tiras 60
-> Article
Jig on a plug
31.03.2015 08:30:47
“The pod, raised by the fish during a bite, or moved to the side, signals us with the movement of the float, indicating a bite. The further the feeder is located from the hook, the greater this degree of freedom. As a result, the tackle becomes, as it were, blind around the hook inside the ball zone, and we may not even notice the bite until the fish moves the hook in any direction.” Igor, I completely agree! https://salapin.ru/news/onenet1468.htm
Tiras 60
-> Article
Jig on a plug
31.03.2015 08:42:28
Sorry! https://salapin.ru/news/onenet1468.html
How to make a jig for summer fishing with your own hands?
Jigs for summer fishing can be made at home. Some methods have been developed:
sawing is the easiest way. Various rods, tubes, pieces of copper, steel, and bronze are cut into pieces. Then the hook is soldered and various finishing treatments are performed;- soldering - a shape is cut out of copper or bronze plates and a hook is soldered. Such good jigs can be obtained by filling copper spirals with lead;
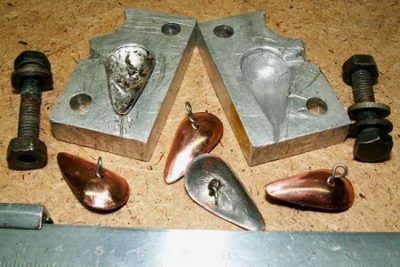
- casting - the beginning of work begins with the preparation of a jig mold for pouring molten metal. For this, chalk, plaster, and brick are used. After filling the mold, wait for the finished bait to cool and then begin processing it.
When casting and soldering, personal protective equipment must be used.
Types of jigs
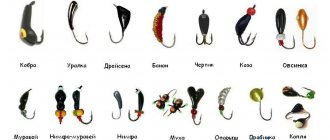
Let's move on to consider the question of what jigs are for summer fishing. In principle, all models work:
- simple pellets;
- devils;
- Uralki;
- goats;
- ants;
- oatmeal;
- perch eyes;
- carnations.
A winter set of jigs can be successfully used for summer fishing.
In this case, you should try to use models of different colors depending on the lighting. In sunny weather, it is best to use dark options:
- black;
- green;
- copper.
When it’s cloudy outside or under a layer of duckweed, bright models will work better:
- silver;
- golden;
- yellow;
- white.
Tips and tricks for fishing with summer jigs
We suggest you familiarize yourself with some tips from experienced fishermen:
In order for such tackle to catch well, all its elements must be assembled according to the rules.- When fishing with a jig, there is no load. This means that the weight of the jig should pull the line.
- The weight of the bait should correspond to the water speed and depth.
- The thinner the line, the smaller the jig should be, otherwise there will be no full-fledged game.
Of course, like any other fishing method, fishing with a jig in the summer is not complete without experimentation. Only by observing the behavior of fish and changing something in the equipment, you can achieve good results.
Video on the topic:
narybalke