Related Posts
Ultrasonic rat and mouse repeller- How to make a homemade mousetrap - catch rodents in simple ways
How to make a mousetrap from simple materials
There are three ways to fight rats that have settled in your home or outbuildings: chemical, biological and mechanical. The most common is the first way, which involves the destruction of rodents with poison. But if we talk about efficiency, then the mechanical method is in no way inferior to the chemical one. If you wish, you can use a purchased trap or, saving significant money, build it yourself. How to make a rat trap with your own hands?

Using poison is an easy, but not always the best way. The main disadvantage of such persecution is the impossibility of eliminating all corpses. Some rodents try to get into deeper holes and die there. Over time, the room becomes filled with an unpleasant cadaverous odor. If preference is given to rat traps, then you will control the number of dead rodents, and such a fight will not subsequently result in corpse “flavors”.
DIY beaver trap
You can make a walk-through beaver trap with your own hands or purchase a factory-made product. If you purchase a store-bought trap, before installing it, you must remove all grease from it with a rag soaked in gasoline, then keep it in water for several days to completely remove all excess odors. Then you need to tie a strong cable about one and a half meters long to the trap ring. After this, the trap is placed in the water and weighed down.

Walk-through beaver trap
Homemade beaver traps are often made in the shape of a cylinder about 80 cm long and about 30 cm in diameter. To make such a trap, wire with a cross-section of 4 mm is used, from which you need to make four rims and several longitudinal rods. Two of the longitudinal rods make five-millimeter projections on the side of the front rim; they should be directed into the cylinder on both sides. Also, a rod needs to be attached to the front rim, onto which a tight steel spring is placed and a door that opens with its help. Please note that the door only opens into the cylinder. Next, a guard is made from wire with a cross-section of 2 mm, consisting of a hook with two ring-shaped screws, a tie and a loop. A metal hook 8-10 cm long is attached to the longitudinal rod with one of its turns, and the second one acts as a tie with a guard loop. Another loop with a diameter of 15 cm is movably attached to the two upper longitudinal rods. The surface of the rear rim needs to be intertwined with 2mm wire. A two-meter pole must be attached to the front rim, with which the trap will be installed and removed from the hole. When the samolov is alerted, the door is retracted to the rearmost position, lowering the spring. To secure it in the open position, you need to engage the bottom edge of the door with the end of the hook. In this case, the alert loop is in a vertical position, blocking the passage. When an animal enters the trap, it touches the loop, the hook is automatically released from the door, and it slams shut.

Walk-through beaver trap
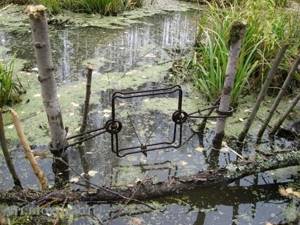
Another design is the floating trap. To construct it, you will need two logs that need to be tied in the shape of the letter “A”. Bait is placed in the middle of the trap - these can be fresh stakes or branches. Below, under the crossbar, a trap is fixed, through the frames of which the animal will have to pass in order to get to the bait. The structure is placed in the water and tied to the shore.
Options from plastic bottles
It may take 10-20 minutes to make a rat trap from plastic bottles. The process is simple, and the adaptation does not require expensive materials and equipment.
The main thing is to show imagination and perseverance, then you can make an excellent bottle trap for catching hated rodents.
Vertical trap
A simple vertical rat trap made from a plastic bottle is quite simple to make:
- First cut off the top. We install it on the edge of any surface so that parasites have easy access to the container through the cut part;
- You should step back a centimeter from the cut edge and make a hole;
- A piece of fishing line or twine is threaded into the container;
- The second end of the fishing line must be firmly secured so that the trap hangs on it when it falls;
- It is recommended to place a piece of treat at the bottom of the container.
As soon as the rat smells it, it will run in search. Then she climbs inside the trap, which loses its balance and hangs on the fishing line. The rodent cannot get out of the trap.
Horizontal trap
A horizontal rat trap made from a plastic bottle is made in just a few minutes.
The main thing is to follow the sequence of actions:
- The plastic bottle is installed horizontally above the surface of the bucket or container;
- You need to make holes in the lid and at the bottom of the bottle for a metal pin. Its ends should peek out slightly, the bottle should rotate around its axis;
- Pieces of fragrant bait are glued using tape; they must be placed in the area where the label used to be;
- Additionally, you can install a ladder to the trap, along which the rat can get to the bait. A small wooden plank will do.
Once the rat approaches the bait, it will not be able to stay on the surface of the bottle because it will spin. As a result, the rodent will fall into the container.
Bottle trap trap pit
A homemade rat trap is made like this:
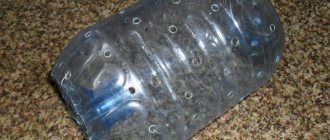
- For a rat trap you will need a plastic bottle with a volume of 5 liters. The neck is cut off into it;
- The cut is covered with a sheet of whatman paper. The edges are fixed with tape;
- A cross-shaped cut is made in the center of the sheet;
- A piece of bait should be hung over the cut.
The rat grabs the treat, falls into the cut, and falls into the container. And after that he won’t be able to get out of it.
Plastic bottle trap sharp petals
This version of the rat trap is considered effective, and the manufacturing process itself is easy:
- Cut off the top of the bottle along with the neck;
- It is necessary to make cuts along the cut edge. The length of each should be 5-8 cm;
- The edges of the cuts can be made sharp;
- We place bait at the bottom of the container;
- We bend the cut edges inside the trap.
The rat will crawl inside the container for the bait; the curved edges will make it easy for him to do this. But she won’t be able to get back out; the protruding cuts will block her path.
Electric rat trap
Models of electrical devices are quite popular today. They are not as difficult to make as they seem:
- you need plywood on which holes are made for the wires;
- We cut out several rectangles from aluminum cans and make holes in them;
- we stretch the wires through the slots (we make different polarities in the wiring);
- you need to output two common wires to the structure (plus and minus);
- we attach rectangles on plywood (with glue), in one row, at a short distance (we connect a phase to one plate, and a zero to the second);
- you will need an electronic unit, which can be borrowed from an insect racket; we place it on plywood, short-circuit the electrodes in order to remove the existing charge;
- add a capacitor;
- cut off the bottom of the plastic bottle, install it in the form of a house on top of the aluminum rectangles;
- food is poured inside the house;
- we plug the trap into the network, the animal receives an electric shock when it touches both plates.
A relatively humane method for those who do not want to look for options on how to kill a caught rodent.
Covering live trap
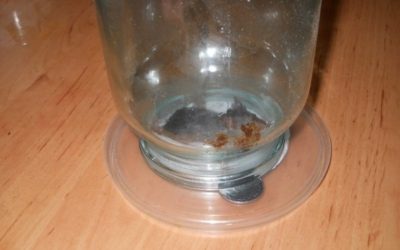
This is perhaps the simplest version of a homemade rat trap. To catch a rat or mouse with it, just take a pan and a coin of suitable size - turn the pan upside down, tilt it slightly and rest one edge of it against a coin placed on its edge.
Bait is placed under the pan. When the rodent climbs for the bait, it will certainly touch the coin, it will tip over and the pan will cover the animal.
Here is an example of an implementation where a jar is used instead of a pan:
The disadvantage of the design is frequent false alarms (when a rat touches a container or coin before it has climbed inside the rat trap).
A more sophisticated homemade trap of this type is the improved “coin container.” For example, a container can be rested on an unstable stand, a thread can be tied to the stand, the thread can be thrown over a spacer in the container and the bait can be tied to it:
The rat will sneak under the container, pull the bait and move the “guard”.
Another option is to use a strip of cardboard of sufficient height instead of a coin with a special corner for attaching bait:
Here the animal, pulling the bait, knocks over the cardboard and covers itself with the trap.
It is only important to keep in mind that to make homemade rat traps you need to take a container that is heavy enough so that the rat cannot move it.
The video below shows another interesting example of such a rat trap:
Tin Can Trap
The method is simple and very common, especially suitable for those who do not have time for something more inventive. A second hole is made in the tin drink can, from the bottom. A stick is threaded through, without branches or anything else, so that it does not cling. Take a regular bucket or any other deep container and fill it halfway with water. We smear the jar with something edible and place it together with the stick in the middle of the bucket. We secure the ends of the improvised beam so that they do not move. We attach a board to the container, along which the pest will climb to the trap. To get to the bait, the rodent will jump onto the jar, thinking it is a stationary surface. But the tin will turn around its axis, throwing the parasite into the water.
Wire noose
The trap of such a device can exactly replicate the structure of a snare. Just use steel wire instead of a cord. You can also make an imitation of a hunting snare, attach a steel noose to the surface near the bait, so that the animal that reaches for the bait has a deadly noose on its body.
An interesting option for catching parasites, often used when hunting small animals living in burrows.
In order to fix the animal in the hole, a wooden beam is made with several “holes” and spring mechanisms.
Tunnel trap
This design is very often used to exterminate not only rats, but also mice and moles in summer cottages; it is not like a tunnel-type rat trap that tips over; it operates on a completely different principle:
- you need a piece of pipe (plastic) or other product sealed at one end;
- needles are attached to the end and are directed inward;
- the bait is placed inside the trap;
- the individual enters inside unhindered, cannot get out, the needles kill the animal, or it will remain inside the trap.
An interesting type of homemade rat trap.
Cylinder traps work on the same principle, but without needles. The animal climbed inside and couldn’t get out because of the smooth walls.
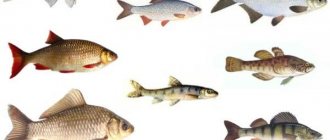
Versha
To catch rats, they use tops, similar to fishing gear. A cage with a cone entrance: the animal runs inside, but cannot go back out - the second entrance is a dead end. You can't go back either, the door only locks in one direction. The general meaning is that there is an entrance, but no exit!
The rat will climb inside the trap, and the mesh behind it will return to its previous position, preventing the rat from getting back in.
How to catch a rat at home? Today there are plenty of options: you can get a cat, use chemistry, but it’s better to make a rat trap with your own hands!
Zürner trap
This classic trap works on the same principle as the tipping rat traps described above. Its difference lies only in the completeness of the design and appearance: the Zürner trap is a wooden house with two entrances, in which the bait is located in the middle of the “corridor”, and the floor on both sides of it is made of boards on hinges. When the animal approaches the bait, the board collapses under its weight, the animal falls into a large closed chamber, after which the board returns to its original position on a hinge.
The figure below shows a diagram of such a rat trap:
Thanks to its successful design, the Zürner trap can catch several rats at once.
As a rule, such a trap is made independently from wood, since the industry has not established the production of Zürner traps. Despite its effectiveness and certain advantages, the Zürner trap is rarely used in practice, largely due to the complexity of manufacturing.
Glue rat trap
Ready-to-use glue traps for rodents are available on sale today. However, such a trap is often prepared independently.
Making a glue rat trap is simple: take a special glue for rodents (for example, RaTrap, Alt, EuroGuard), spread it on a piece of cardboard, and place bait on it in the middle. The rat, attracted by the smell, tries to get the bait and puts at least one paw on the glue. Realizing that she cannot come unstuck, she begins to frantically try to escape, puts her other paws in the glue, or even sticks her head. After this she can no longer get out.
If the rat is not freed, it will die of thirst only after a few days. This is the main disadvantage of glue traps: often you have to throw out such a rat trap with a still living rodent (sometimes squealing periodically), which is difficult for especially impressionable people.
On a note
A significant disadvantage of glue traps for rodents is also the possibility of pets getting into them - a cat or dog can easily get dirty in the glue. Washing off the sticky mass is very problematic; it’s easier to cut off the sticky piece of wool.
Trap glue
This glue does not pose a threat to people. This is a sticky trap for quickly catching mice. Especially in the country, the use of this product is recommended, since for plants it is better to choose a product without poisons.
Among the advantages:
- Destroys all types of rodents and insects.
- No tint, moisture resistant.
- There is no poison in the glue, so it is perfect for summer cottages.
- Sticky glue gives results and holds rodents for a long time.
- Suitable for dry rooms and areas with high humidity.
Making a rat trap
If you decide to wage a “war” against rodents in an inhumane way, then the following option is possible:
- Make a loop from a cord or rubber band. The loop should tighten freely.
- We attach the noose to the edge of a wooden board or plywood so that the tip of the tape hangs down.
- We attach the bait to the edge of the board so that the rat’s path to the food runs through the loop.
- We tie a strong thread to the bait, one end of which is tied to the noose, the other to the load. You can use a kitchen hammer, a piece of brick or a pry bar as a load.
- To prevent the rat trap from falling from the surface on which we placed it, we press the board with bricks or blocks. The blocks can be covered with a paper screen attached to the board.
- When the rat grabs the bait, the weight falls, tightening the noose on the rodent.
Important! This method is convenient to use for both young and adult animals.
Rat trap made from a bucket of water
A simple and frequently used design:
- We bend a U-shaped frame from wire.
- Cut out a rectangle from plastic. The width and length of the rectangular plate should be slightly smaller than the wire frame.
- We make a through hole in the plate.
- We place the plate inside the wire structure and secure it with a nail or screw. The plastic should rotate easily inside the wire, but not fly off the fastener.
- We attach a plastic lid to the free ends of the wire (we use this for home canning).
- We install the structure on the bucket so that one edge of the plate is on the side of the bucket. The other edge should be above the water.
- We attach a rail or board to the bucket so that the rat can climb onto the plate.
- Pour bait, for example, cake, into the lid. It can be purchased at fishing stores.
- The rat climbs the rail onto the plate.
It moves along it towards the bait. Above the water, under the weight of the rodent, the plate turns over, tipping the rat into the water. The design should look like this
Important! Rats can swim, so it might not work. Perhaps transformer oil can be used instead of water. Fill the bucket with oil to about a sixth of its volume. The plate can be replaced with an aluminum can.
Catching a rat with alabaster
This method of exterminating rodents does not apply to mechanical rat traps, but has a high degree of effectiveness. To hold the event, you need to mix alabaster with wheat flour in equal proportions and pour the dry mixture into a container. The prepared food should be placed next to the rat hole, placing another bowl, but this time with water. The mechanism of action of the trap is as follows: the rat eats flour with construction glue, after which it finishes the meal with a drink; the alabaster instantly solidifies in the animal’s stomach, which leads to its rapid death.
By mixing alabaster into a treat for a rat, you can quickly get rid of the rodent - in contact with water, the mixture hardens and the animal dies
I fight rats by mixing flour and alabaster in a one to one ratio. You can spread the resulting mixture on newspapers and place containers with water nearby. And you definitely won’t have rats anymore!
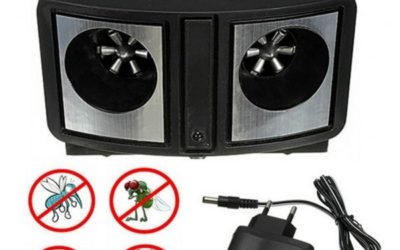
Ultrasonic rodent repellers
Using ultrasonic devices to repel rats and mice is effective and environmentally friendly. It allows you not to use poisons and chemicals that can harm not only rodents, but also children and pets. Electronic repellers use sound frequencies above 20 GHz, which rodents cannot tolerate. Modern devices prevent animals from becoming addicted, as they constantly change the intensity and frequency of the waves. This has an irritating effect on rats and also disorients them. Ultrasound begins to have an effect on rodents already in the first hours of operation. According to experts, the repeller should work for a day. After which it is turned off. After 12 hours, the device connects again and works until the rodents are completely gone.
When using a repeller indoors, you need to remove unnecessary objects. Waves will not be able to break through bags of potatoes or brick partitions . Therefore, in some cases it is better to install 2 or 3 devices. They need to be installed no closer than 5 meters from each other.
It is also important to consider the environment in which the repeller is located. Wood, glass and concrete reflect ultrasound, while soft surfaces, such as upholstered furniture, absorb it. Therefore, using the device in empty rooms is more effective.
You can buy rodent repellers in hardware stores, supermarkets and at the market. You can use online stores. When choosing such a means of struggle, you need to familiarize yourself with the parameters. Many devices have modes that can be used in the absence or presence of people and pets in the room. It is worth familiarizing yourself with the possibility of manually setting up the repeller, as well as switching it to automatic mode.
When choosing a device, you should also pay attention to the warranty period. Some ultrasonic devices can last 2-3 months. Others have a warranty of up to a year.
An effective tool, but many parameters will have to be taken into account for its use
Can for catching rats
To make this rat trap, it is not necessary to use a can; any other container that tapers upward, for example, a three-liter glass jar, will do. The can needs to be opened, placed on a flat surface and a small sheet of paper or film placed on the neck. The piece of paper should be cut in the center, so that upon contact with the piece of paper the rat will fall deep into the container. You should definitely put bait on the leaf that emits a pleasant smell for the rodent. It is important to provide a convenient approach to the top of the can or jar, leaning against a plastic strip, thick cardboard, board, etc., so that the rat can easily get to the treat.
The device of a water trap in the form of a can, jar or bucket with a piece of paper is simple, but effective
I was told about a simplified version. A film (polyethylene) is stretched over a bucket of water from above and tied around the bucket. A cross-shaped cut is made in the center of the film. The bait is suspended above the bucket. Traps to taste. It was used by the author at his dacha in the winter (when mice come running there from the fields) without the constant presence of the owner. Up to 40 mice are then scooped out of the bucket. If there are a lot of them, you can put several buckets
Do-it-yourself rat trap from a pipe
The essence is the same live trap made of mesh, only it is made of a pipe, the door is on springs:
- Close one of the holes in the pipe tightly with a fine metal mesh. It can be secured using self-tapping screws.
- At the other end of the pipe we make a deep cut. We insert a round door into it, the diameter of which matches the diameter of the pipe. The door can be cut from wood or metal. The cut should be 1–2 mm larger than the width of the door.
- We tie a strong thread to the door. The bait should be attached to the other end of the thread.
- We place the bait in the pipe along the entire length of the thread.
- We lift the door and place it on a weak support, for example, a thin branch.
- The animal runs into the pipe following the smell and grabs the bait.
The thread twitches and lowers the door. Humane means of getting rid of rodents
Important! Instead of a pipe, you can use a metal container, cylinder, or even a tube. The method is effective for rats of any size.
Installing a walk-through beaver trap
- One of the most used places for placement is a dam. This is a place with high access, great depth for setting a trap, and also a high probability of encountering prey. From each dam there is access to another river or dam. If the beaver population is large, there may be several dams. In this case, you need to determine the main one, which differs in height, length, and the presence of huts or habitable burrows.
- Sites for tags located along the shore. These areas are most often visited by beaver families, and traces of their emergence from their burrows can easily be seen.
- Mounds of sticks, mud and mud built by beavers near water to demarcate their territory for marking by other animals. It is very effective to place beaver stream baits on these signal mounds.
- Beaver trails are passages left for visiting the territory of other animals or when cutting the distance to a feeding place.

Beaver trails
- Beaver feeding trails left by them to move to feeding areas. Beavers leave such trails especially actively in late autumn, when the animal prepares supplies for the winter. Usually the feeding trails are very noticeable, which makes it easy to place traps on them and catch prey.
- Deep channels built by beavers to access distant feeding areas to protect themselves from predators. The channels are very narrow for installing leg traps, so only walk-through traps are used here.
- You can set a trap on an opening - short trails of minks on the shore of a reservoir, but usually there are a lot of them, and a beaver can visit the same opening very rarely.
- It is also not always successful to install a trap near the hut, since there is more than one, and the huts can be located very deep. Here it makes sense to set a trap only in late autumn, when animals make forays to build a hut.

Installing a trap at the hut
Before installing the trap, it is necessary to check its functionality, the sufficient tension of the springs, and the tightness of the arcs to each other.[/wpmfc_cab_ss] Excessively tight springs can burst at the most inopportune moment. To properly install a walk-through trap, it is necessary to clear the area so that it is as stable as possible. If installation is carried out on channels, then its depth must be taken into account. If it exceeds 60-70 cm, you need to install two traps on top of each other. On climbs and dams, traps should be installed on both sides. In winter, traps are installed on fences to the approaches to the hut or underwater food supplies, burrows, as well as under the ice with bait.
Walk-through beaver trap
Types and purpose
The material and method of making the snare are selected depending on the type of game. For birds and small animals, wire, metal arcs, branches, sticks, ropes and similar objects are used as a basis. For hunting large animals, metal, parachute lines, nylon, canvas, and the like are used.
Traps for sable and other fur-bearing animals are divided as follows:
- Next option.
- Pass-through model.
- Wood modification.
The first category of self-catchers is installed on the animal trail. Despite the different types of devices, they have a common design feature. It consists of a pair of connected arches with a base that hold the animal’s paws using a spring mechanism. Among the types: frame, plate, plateless types.
Passage models are classified as humane snares. In them, the grip is by the neck or body, the game dies quickly, without much suffering. In this case, the skin of the animal is not damaged.
Wooden versions are designed for catching squirrels. The design is a pointed crutch fixed in a tree. The arc looks down, and a canopy is mounted on top.
General rules for installing traps
First you need to make sure the effectiveness of the purchased trap. It is important that the guard is reliable, the fastening of the arches is strong, and the spring strength is sufficient. There should be no deformation, damage or cracks on the trap. Before installing the trap, you must also carefully prepare the place. It is important to place the plane where there is solid ground, otherwise the animal will knock it down and run away.
You also need to prepare the device itself:
The surface of the selected area must be cleared of grass and any debris. The plane itself must be secured with a reliable connection to the nearest tree (cable, chain). If the device is standing in water, it is weighed down with a weight. The entire principle of securing the trap is always described in detail in the instructions. It is installed in the chosen place, covered slightly on the sides so that it does not scare away animals.
How to install correctly
Traps should be installed in places where pests appear; they can be identified by a large accumulation of excrement. In an apartment, it is best to place a trap in the kitchen. If we are talking about a private house, then a cellar or basement would be the best choice for placing mousetraps.
10 Best and Unique Rat Traps
In homes with garbage disposals, the best advice is to place traps on the floors behind waste disposal areas. Particular attention must be paid to the first floor, where all garbage is dumped.
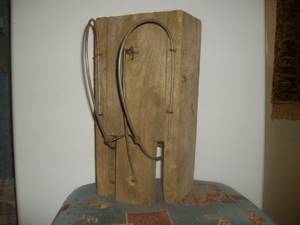
Kulemki
Commercial hunting for marten, first of all, is considered successful if the fur of the animals remains intact. The next criterion is the number of individuals caught. How to catch a marten, observing these two conditions?
Hunter A.M. Simonov, who once lived in Rus' in the Lensky district of the Arkhangelsk region, invented a bag for these purposes. Such a marten trap helped the hunter get up to a hundred unharmed skins a day, just like catching martens with traps. Nowadays, you can buy a bag at any hunting store. However, do not rush and spend extra money. Anyone can make marten traps with their own hands.
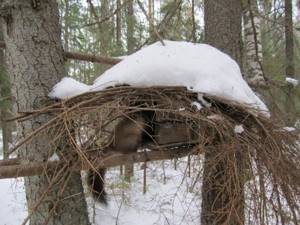
The principle of operation of the bag and its advantages
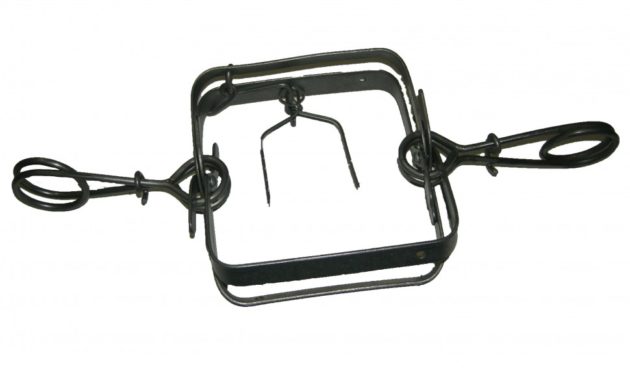
Spring marten traps have a similar operating principle to a mousetrap. The difference is that the bag’s catching mechanism is covered with boards on the top and sides.
Catching martens in this way has a number of advantages:
- The trap will last for many years and does not require annual treatment.
- Economical use of bait will save time and money.
- Birds will not peck the bait hidden inside.
- Will remain operational in snowfall and thaw.
- The death of the animal occurs instantly, which eliminates catches.
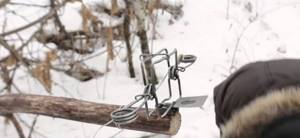
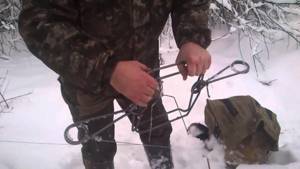
Installation Rules
Hunting for marten with self-catchers will be productive if you secure them correctly and in the right place. The spring bag is attached to the tree trunk in a vertical position, and the bait is fixed inside. The higher the ambient temperature, the more often the aircraft should be checked to ensure that the caught animal does not become rotten. Every hunter can master this simple craft. Martens do not change their habits, which makes them easier to hunt.
How to make it yourself
To make a bag with your own hands, you need:
- Make two side walls from 30x40 boards.
- Make a lid from plywood with a longitudinal slot in the middle.
- Attach a bait hook to the top slot.
- Make the gatehouse from wire 14-17 centimeters long.
- At the point where the hook comes into contact with the guard, make a recess in the latter to protect against false triggering (warning).
- Make a spring-crush from strong wire 5 meters long.
Previously, hunters made traps right in the forest, using a single tool - an ax.
How to make mouse traps with your own hands
Homemade mousetraps made from plastic bottles are the simplest, but not the only way to get rid of night noises, unpleasant odors, and a continuous feeling of disgust. No special devices, tools, or equipment are required for the manufacture. The maximum you need to have on hand is a PET bottle or jar, a knife, and thread. Naturally, prepare bait. It doesn't have to be kneaded. Just crumble everything listed above, and the mice will come out of their shelter as soon as the house is quiet.
Mouse trap from a jar
A regular half-liter or liter glass jar will do. Well, another coin worth 2 or 5 rubles. A mousetrap from a jar is made as follows:
- Place some bait mixture on the table or floor.
- Cover it with a jar so that there is nothing extra outside.
- Place the neck on the edge of the coin and wait.
The design is unstable, but that's what's good. The rodent, wanting to get a treat, climbs into the jar, touches a coin, which immediately falls. Now the mouse is a hostage. Nothing will happen to her, especially since there is something to eat there. A similar structure can be made from a bucket or any other container. The main thing is to lay a piece of linoleum, plywood, etc. under it. This is necessary to take the prisoner out into the garden or wasteland and simply release him.
Bottle trap
At the dacha, in the pantry or in the garage there will always be a plastic bottle, which will be a mousetrap, which can always be made at home. To make it, do the following:
- A mouse trap made from a plastic bottle will work if you wash the container first. The pungent odor will overpower the aroma of the luring mixture, which will not be able to attract the victim.
- Take a sharp knife and make a side cut at the top near the neck. You should not burn or scorch, as the acrid smoke will cause the bait to become uninteresting.
- Tie a plastic bottle mouse trap to a stationary object on the table, and put some bait inside. Now install it so that the bottom is outside the table.
As soon as the mouse climbs inside and gets to the food, the container will fall and hang in a vertical position. The mouse won't be able to get out. All that remains is to take the trap and take it outside the site. Now it can be used more than once.
From a bucket and a bottle
In this case, in addition to a plastic bottle, you will need a bucket, tape, a board and a metal rod. This is perhaps the most interesting way to catch a mouse. The step-by-step instructions look like this:
- Make holes in the lid and bottom of the container.
- Thread the rod so that it coincides with the longitudinal axis and does not interfere with rotation.
- Fill half a bucket of water and place a rod on the sides.
- Tape the bait in the middle of the container.
- Install the board in the form of a kind of ramp.
The principle of operation of such a mousetrap made from a plastic bottle, assembled with your own hands, is simple. The rodent, smelling the smell of food, climbs to the edge of the bucket. Unable to reach, he tries to lean on the walls of the bottle, which rotates with the slightest effort. The mouse falls into a bucket of water, from where there is no way to get out. The only drawback of this method is the need to take the “prey out of the yard” in the morning.
Video: a simple and effective DIY mousetrap
To assemble a mousetrap from a plastic bottle with your own hands, it is better to use the advice of a professional. To do this, watch the video file, where you will be told in detail about the manufacturing process and the principle of operation. Do it together with the master, use his advice and recommendations. Make several different traps at once. Don't put in too much food. Its task is to lure with smell, but nothing more. You've already read the rest.
Of course, there are many ways to open the “mouse hunting season” on the Internet, but these three are the most popular and effective. The thing is that the materials are always at hand. No special skills required. There is no need to use mechanical means. Everything is designed for tricks. But most importantly, there is no need to kill a living creature, which you then simply release away from the house. Using these three methods, you not only get rid of parasites, but also do not harm nature.
HelpfulUseless
Other options
Below are a few more examples of homemade traps:
- The boar plane is made using an ordinary plastic pipe. Several holes are made in a workpiece 1.5 meters long and 100 mm in diameter, and the edges are covered with lids. The tube is fixed with a chain to a post dug into the ground. Bait in the form of cereal grains is poured into the inside of the tube. The essence of the snare is to attract the attention of the boar for an aimed shot from the gun.
- An ordinary sable trap can be made from a two-millimeter metal plate, which is cut in the form of an arc. The second analogue is prepared by cutting teeth using a hacksaw or metal scissors. The spring mechanism is taken from the bicycle shock absorber. You can use a steel plate as a “watchman”.
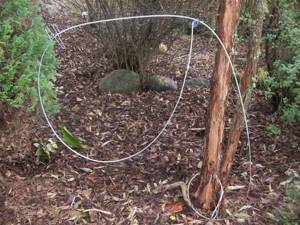
- A ground beaver trap is made in the form of a snare made of fishing line. They hang him from a tree and drive a stake into the ground. Under the influence of the tension force, the trigger mechanism is activated. This is a primitive method, suitable for hunting if there are no other devices at hand.
Bird snare
You can fight birds using a hunting snare. With its help, it will be possible to detain even individuals of impressive size.
Assemble the structure according to the diagram posted on the website. Proceed step by step:
- Find a log of medium thickness. Length about 2 m.
- Drill through.
- Dig into the ground.
- Thread some fishing line or rope through the hole. Tie a weight on one edge and make a loop on the other.
- Lay the loop on the ground.
- Make a knot near the hole. Insert a perch into it and place the bait on it. As soon as the bird lands on it, it will immediately fall and be pulled into the noose.
You will have to fight for the safety of your harvest. But keep in mind that it is permissible to resort to all these methods exclusively on your own site. Using them for hunting purposes is prohibited by Russian legislation.
DIY beaver trap

Walk-through beaver trap
You can make a walk-through beaver trap with your own hands or purchase a factory-made product. If you purchase a store-bought trap, before installing it, you must remove all grease from it with a rag soaked in gasoline, then keep it in water for several days to completely remove all excess odors. Then you need to tie a strong cable about one and a half meters long to the trap ring. After this, the trap is placed in the water and weighed down.
Walk-through beaver trap
Homemade beaver traps are often made in the shape of a cylinder about 80 cm long and about 30 cm in diameter. To make such a trap, wire with a cross-section of 4 mm is used, from which you need to make four rims and several longitudinal rods. Two of the longitudinal rods make five-millimeter projections on the side of the front rim; they should be directed into the cylinder on both sides. Also, a rod needs to be attached to the front rim, onto which a tight steel spring is placed and a door that opens with its help. Please note that the door only opens into the cylinder. Next, a guard is made from wire with a cross-section of 2 mm, consisting of a hook with two ring-shaped screws, a tie and a loop. A metal hook 8-10 cm long is attached to the longitudinal rod with one of its turns, and the second one acts as a tie with a guard loop. Another loop with a diameter of 15 cm is movably attached to the two upper longitudinal rods. The surface of the rear rim needs to be intertwined with 2mm wire. A two-meter pole must be attached to the front rim, with which the trap will be installed and removed from the hole. When the samolov is alerted, the door is retracted to the rearmost position, lowering the spring. To secure it in the open position, you need to engage the bottom edge of the door with the end of the hook. In this case, the alert loop is in a vertical position, blocking the passage. When an animal enters the trap, it touches the loop, the hook is automatically released from the door, and it slams shut.
Option #5: Tunnel Trap
The entrance hole of the tunnel rat trap is made in the form of a valve with sharp petals. The operating principle of such a device is as follows:
Such structures are often used to catch courts, mice and rats in garden plots - in this case, the structure is made from a piece of pipe, at each end of which a valve is installed. The trap is then installed in the underground wormhole. In the end, it doesn’t matter from which side the mole (or rat) approaches the trap - the animal will still be caught.
It is also useful to read: Choosing an effective electronic rat and mouse repeller
Here is another example of a trap of this type:
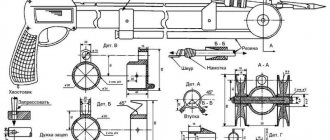
Step-by-step manufacturing instructions
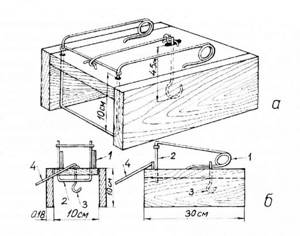
a - trap in a charged state, b - trap with the mechanism released; 1 – spring, 2 – pressure, 3 – hook for bait, 4 – guard
- Frame. After cutting the boards into pieces of the required length, we knock down 3 of them in the form of a narrow U-shaped box, open on both sides (without the top and ends for now). In the remaining board for the top we mark holes: a central one, about 3 cm in diameter, two side ones (almost at the front edge of the board, about 1 cm) and 2 very small ones, almost at the level of the central hole (for securing the spring elements - guard, pressure and hook). For the hook, a small longitudinal groove is cut in the board near the guard to prevent the trap from triggering spontaneously.
- A crush is formed from the wire using pliers, the ends of which are inserted into small side holes.
- In the same way, we fold the U-shaped guard and install it upside down (the bar goes under the board) with the rings facing up.
- We insert wire staples into the rings to secure the hook and guard.
- We install the hook and guard on the brackets.
- We fix the finished, equipped top board.
- On the back side we fasten with self-tapping screws a coarse mesh twisted from the same wire.
It is still advisable to paint the wooden parts (this way the frame will not rot in a wet forest, and if you choose a camouflage paint, it will also not be so noticeable). At this point - after the paint has completely dried and the smell has evaporated - the production of the bag can be considered complete.
Photo gallery: Spring bag design
Marten in a spring bag Attaching the bag mechanism Homemade box for the box Bag from the inside Finished bag close-up Finished bag before installation
Video: Making a box with your own hands
Advice: during manufacturing it is necessary to observe safety precautions - since the pressing force of a good spring reaches 10 kg, and if handled carelessly, especially when checking the functionality of the bag, you can break your fingers.
Types of traps
What are the best traps to choose for catching a beaver? There are two main types of devices - pinching (trace), passing (pressure). You can install a purchased product or make a homemade trap of any type, but the former are considered the most inhumane and inconvenient. The principle of operation of pinch traps is as follows: when touched, they grab the paw and hold it (this is why the devices are often called leg-grabbing devices). They are divided into the following types:
- plate - a metal plate reacts to the advance, causing the trap to operate;
- frame - they are steel frames with canvas, they are triggered after touching the latter.
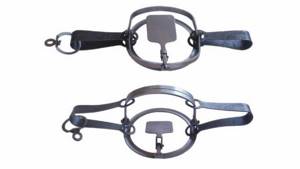
The traps described above are now rarely used. Mostly hunters choose pass-through devices. They are more expensive, but more effective. Such self-catchers work on the principle of a mousetrap - they capture the neck, sometimes part of the body of the animal, as a result of which it dies quickly. There are other types of traps, for example, loops. It is currently illegal to catch a beaver with a noose, regardless of the season.
It is worth taking a closer look at the best-selling brands of hunting traps.
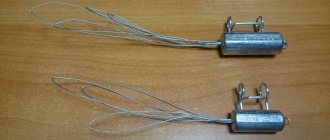
KPN 140
This trap has independent frames and small dimensions (passage – 14 cm). Can be used to catch various rodents, suitable for beavers. After the trap is triggered, two grips are formed. Two springs are torn off the hooks, and a blow of considerable force is applied to the animal’s body. Branches and twigs that get inside will not interfere with the normal operation of the device. The trap's alert works when moved back, left, right, forward, so the animal will be caught in any case, all you have to do is go through the frame.
KP 250
With the help of such a trap you can also catch beavers. You can charge it yourself: you need to rotate the springs so that they are outside the frames. Next, they compress the spring with their hands, hook its upper ring with a hook, while stepping on the loop, pressing it with their foot. Pull the trap until the springs close, then secure it with safety hooks. Next, a guard is secured in the center of the frame, and the frames are pressed together. The protruding part of the guard is hooked to the opposite frame.
This trap has an improved analogue - KP 320. It is excellent for catching beaver, lynx, otter, and badger. Compared to the KP 250, this device has reinforced springs and a circular action guard.
This trap can also be placed on a beaver. It is sold in different modifications - with one or two springs. Alarms are also different - circular, bilateral. You need to charge it in approximately the same way as described above.
How to make a trap? Homemade traps for hunting: types, photos
- November 20, 2018
- Equipment
- Eugene
Getting food is one of the first necessities for humans. Since ancient times, people have invented traps and tools for catching game and large animals. It also wouldn’t hurt for modern citizens to know how to make a trap. Who knows how fate will turn out? And those who like unarmed hunting will find these skills useful.
Trap - types and manufacturing methods
The easiest way to make a trap for small game is from fishing line, parachute lines, tendon fibers, etc. As a base, you can take wire, metal arcs, staples, rings, improvised parts, pieces of wood and sticks. To catch large ungulates, the trap will have to be made from reliable, durable materials, for example, from a parachute line and durable fabric, such as nylon, parachute fabric, canvas, etc. Let's look at several types of traps and the principles of their operation. Piercing trap
The most dangerous traps. Their design has been tested for centuries. They were used only in places where the presence of people and pets was excluded. The principle of operation of traps is based on the impact of bone or steel spikes, tightly stretched along the path of animals. They affect quite large animals. Including roe deer, deer, wild boar. The trap is made of a springy metal rod or a flexible but strong enough pole. The tension force must be sufficient to provide a sharp impact. 1-2 sharp spikes are rigidly attached to the end of the rod. Their length depends on the size of the intended prey.
The trap is set on a path where animals regularly walk. The free end is securely fixed between four pegs. The second end of the pole with spikes is stretched along the path in such a way that the animal, breaking the stretched rope, releases the stretched end. The trap acts like an extended spring.
Crushing Trap
They are very easy to make from scrap materials. For example, if hares, ferrets, rats and other small animals get into the habit of coming to the site. Take a fairly heavy slab, flat stone or log. One end is raised and fixed with any stop (stick, metal rod). A springy metal rod (stick) is installed side by side in a semi-arc in a tense state. One end of it is fixed between two pegs. And the second one is stretched and tied, for example with a fishing line, to the third peg with bait located directly under the slab. And so that at the slightest touch the loop jumps off and the metal rod straightens. Another piece of fishing line is used to tie the tensioned end of the rod and the stop that secures the plate. It turns out to be a giant mousetrap. The animal pulls the bait, the rod straightens and pulls the stick that fixes the plate behind it. And a slab or stone crushes the slow beast.
Bird trap
This trap is difficult to make, as drilling will be required during manufacturing. Take a flat log 2 meters high. Both ends are sharpened with an axe. Near the top of one of the ends, a hole is drilled through for a perch of the appropriate diameter. The free end of the log is driven or buried in the ground in a vertical position. A pole about 20 cm long is inserted into the drilled hole. Moreover, the pole should fit loosely in the hole, maintaining a small gap.
- Next, take a fishing line (rope, tendons) and make a regular loop.
- Then the loop is simply placed on top of the perch and hangs freely from the sides (therefore, in a strong wind, such a trap is unlikely to be made).
- A knot is tied behind the loop.
- The free end of the fishing line is pushed through the hole in the log. In this case, the knot is placed at the junction between the entrance of the perch and the hole in the log.
- Finally, a suspended weight is tied to the free end.
The principle of operation of the trap is as follows: the bird sits on a perch to eat the bait. This causes the pole to shift slightly, and the knot slips into the hole. The released weight pulls the line down, tightening the loop on the bird's legs.
Squirrel trap
Take an ordinary pole two meters long. Moreover, the pole does not need to be cleared of bark and knots cut down - the more natural, the better. Along the entire length, at a distance of 40-50 cm from each other, 3-4 loops are attached from an inconspicuous flexible wire. One end of the wire is wrapped around the log, but almost loosely - so that the wire can turn in different directions. And there should be a loop at the other end of the wire. The loop should be vertical up. Wire loops hold their shape better and are much stronger than rope loops. To be effective, they need to be disguised with something (twigs, leaves).
The pole, with its loops up, is attached to a tree trunk in squirrel habitats. Squirrels are lazy by nature. And if possible, instead of jumping from the ground, they will prefer to run up a tree along an inclined plane. When the squirrel finds itself inside the loop and the loop begins to tighten on it, the squirrel naturally gets scared and jumps down. Due to the fact that the loop is fastened loosely, it rotates under the weight of the squirrel around the pole and the squirrel ends up in a suspended state.
How to make a mousetrap with your own hands
You can get rid of mice in your home by purchasing one (or several for greater effectiveness) of the industrial-made traps listed above. But what should you do if rodents surprise you late in the evening, or store-bought traps and live traps don’t work properly? Making a quick mousetrap from available materials is not as difficult as it seems, you just need a little patience and ingenuity.
There is an improved version of the cage mousetrap: the so-called live trap
Making a mousetrap using a plastic bottle
There are many options for catching mice using a plastic bottle. Depending on the location of objects in the house, the habitats of rodents and other factors, you can modify and vary the method of making and installing traps, you just need a little imagination.
How to catch a mouse right in a bottle
The easiest way:
- Take a plastic bottle.
- For reliability, you can lubricate the walls inside the container with vegetable oil.
- Place bait.
- Secure the bottle at an angle so that the mouse can climb into it from the floor or other surface.
A simple and reliable mousetrap can be made from a plastic bottle
Plastic design for catching mice
Complicated way:
- Take the bottle.
- Cut it in half.
- Lubricate both parts with oil on the inside.
- Place bait.
- Place the upper part in the lower part with the neck down, securing the structure with paper clips.
A mouse trap can be made from a cut plastic bottle
Trap from a bottle and string
For this method you will need a thin but strong rope.
Algorithm of actions:
Take a plastic bottle. Tie a rope up to 50 cm long to the neck.
Place bait in the container.
Attach the other end of the rope to the table with tape.
Place the bottle on the edge of the table in a horizontal position, it is important to balance it correctly
Mousetrap made from a bucket and a plastic bottle
To make it you need to do the following:
- Take a small plastic bottle.
- Use an awl to make holes in the lid and at the end.
- Insert a knitting needle or a straight piece of wire 1–2 mm in diameter into the holes.
- Attach bait to the bottle.
- Grease a bucket with oil or fill it halfway with water.
- Place the bottle on top of the knitting needle (wire).
- Place a piece of board against the bucket.
When caught in a trap, the mouse ends up in a bucket of water
Trap from a cut bottle
Another option for making your own trap:
- Take the bottle.
- On the side where the bottom is located, cut strips 3 cm wide and half its circumference long.
- Sharpen them and bend them inside the bottle. This way, the animal that gets inside will not be able to get out.
- Place a piece of chocolate or a loaf soaked in sunflower oil in the trap.
Video: how to make a trap from a plastic bottle
An easy way to catch a mouse in a bucket
A very simple but effective “trap” can be made from an ordinary bucket:
- Fill it halfway with water.
- Place it at the edge of a table or chair.
- Place a school ruler with bait on the edge of the surface above the container, maintaining balance so that the structure does not fall into the bucket.
Before the mouse reaches the bait, it will fall into a bucket of water
How to catch a mouse with a jar
The design is very unstable, but nevertheless can be very effective. You need to do the following:
- Take a jar and a five-ruble coin.
- Attach the bait to the inside of the container using a piece of double-sided tape.
- Place the jar upside down on the edge of the coin.
Instead of a jar, you can use a wide glass or any other container with smooth edges
Trap with glue
To make it, you will first need to purchase glue in the store that is designed specifically for catching rodents. You can make a mousetrap as follows:
- Take a cardboard.
- Apply glue to the surface.
- Place a piece of fish, chocolate or bread with vegetable oil in the center.
The trap is made with glue designed specifically for catching mice