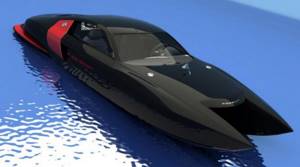
Theory
The submarine model is built according to the same principles as the real one.
In a waterproof housing, inside of which all controls and electronics are hidden. On the outside, it is surrounded by a “light” permeable body, which serves as a streamliner and a beautiful appearance. Our model will consist only of a durable body. At speed, the submarine can dive using depth rudders, and in a static position only with the help of a ballast tank. How it works? When floating on the surface, the mass of the boat is slightly less than the mass of the volume of displaced water (Archimedes' law). Those. if the boat has a volume of 3 liters, then its mass should be slightly less than 3 kg.
Theoretical calculations of the immersion of a submarine model.
There are 3 main problems during construction. They are completely independent and can be solved separately.
- radio equipment (2.4 GHz does not work underwater)
- sealing - housing, engine shaft and steering rods
- ballast tank
Let's start in order.
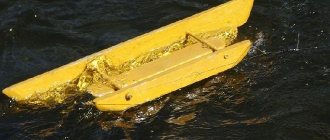
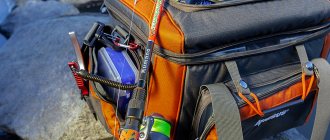
Making a radio-controlled boat for baiting fish
Such a radio-controlled cargo ship does not need speed, so you don’t have to think about contours. The main thing is capacity, load capacity and stability.
The above requirements are well suited to a type of vessel such as a catamaran. We will build on this.
Look at the body sketches in a 3D editor. This is exactly what an unpretentious boat for delivering bait looks like. This boat will have 2 motors that rotate water jets; the turn is carried out by reversing the thrust of the engines. This allows the RC fishing boat to turn around almost on the spot.
The ship's hull can be made from anything. You can use plywood and then cover it with fiberglass and epoxy resin, but it is better to use PVC or plastic for making advertising stands. Coroplast also works well.
Plastics do not rot and do not require impregnation or complete covering of the body with fiberglass.
The body is glued end-to-end, and the joints are glued on the outside with a strip of fabric; this can be done at the last moment before painting.
A powerful power frame is made of aluminum profile along the top of the boat. This allows you to distribute the load over the entire body and attach a convenient handle for carrying.
The bow compartments are filled with polyurethane foam, the same can be done with the aft compartments after installing the deadwood tube. This will make the ship unsinkable, since foam is much lighter than water.
The water-jet propulsion unit is very simple to manufacture - it is a water propeller located in a ring tube and the water supply channel is closed by a grid. This solution allows you to protect the propeller from winding up algae or gear.
See about copters: Radio-controlled boats and speedboats in the Sports and Hobbies store
In order to prevent water from entering the vessel, it is necessary to install and.
Motors are used.
The cost of a deadwood pipe is 200 rubles, the shaft with a propeller is 160, the motor costs 600 rubles. Total 960 rub. You will need 2 pieces of this in total.
You can go the other way and put . The cost of one such engine assembly is 2,700 rubles, but everything is already installed in it and even a water supply has been made to the engine cooling radiator. However, for a slow-moving boat, delivering bait is not necessary.
Motors will require regulators, take them. Cost 490 rubles. It has a water-cooling radiator and reverse speed (this is necessary for turns on water-jet propulsion).
2 regulators are also required, so another 900 rubles and it turns out to be 1860.
To open boxes with bait you will need 1 or 2 servos. 2 – if you open each compartment independently. Yes, and it’s easier to install a servo on the compartment.
We take inexpensive servos in a dust- and moisture-proof housing, they are perfect, they have a force on the shaft of 3.5 kg, the cost is 145 rubles. Total 2150.
Operating procedure
1. Assembling the hull of a catamaran boat. - draw a sketch of the boat:
- Having made the markings, cut along the red lines; — bend along thin lines and bend angles: 1 – tilt of the bow of the boat; 2 — raising the bow of the boat; 3 – lifting the stern; 4 – tilt of the stern; - fasten the bent parts with paper clips; - glue the paper with any glue, after which the shape of the boat will be ready; — measure the displacement of the boat; — we will make the form rigid, for which we will wrap the body inside with cellophane and fill it with filler; — epoxy mass is applied to the resulting blank, wrapped in fiberglass; — after hardening, the body can be easily removed; — a second hull is also being made for the catamaran.
2. Installation of rails for mounting the propulsion motor, antenna, gearbox, deck, electronics.

The slats are installed in the following sequence:
— slats for mounting the engine (1) — at the stern of the boat; - the engine is placed with a slight tilt, while a hole is drilled in the stern in order to install the screw shaft casing, for which the syringe body will be used; in this case, the thin end of the syringe is installed outward (7) ;
— antenna slats (2) , which are made of thick, stainless wire (preferably brass); - the gearbox rack (2.3) and the gearbox itself (4) , after which the housings are connected, for which:
a) two welding electrodes are ground with fine sandpaper; b) holes are drilled in the boat hulls at a distance of about 10 mm from the bow and stern; c) the rods are inserted into the holes and tightened with nuts, and the joints are filled with epoxy;
- deck slats, after which a deck is cut out of a piece of plastic, holes are drilled along its contour, holes for the antenna, switches for the type of work and power supply, as well as for a tube with wires.
3. Production and installation of the propeller shaft and the propeller itself.
— the screw shaft is made of stainless steel with a diameter of 2.5 mm , it must be threaded to install the screw and polished; — a four-bladed screw is made from a piece of stainless steel with a thickness of at least 0.5 mm , then it is installed on the shaft and tightened with two keys using screws; — the installed screw at the fastening points is filled with sealant.
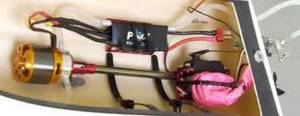
4. Installation of electronic equipment and decks.
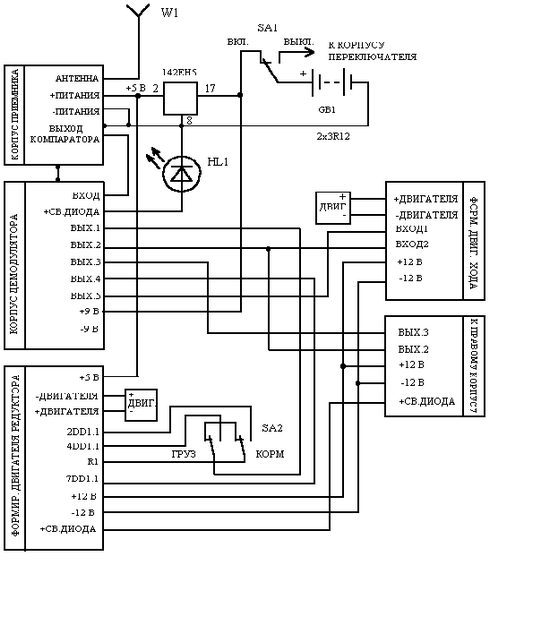
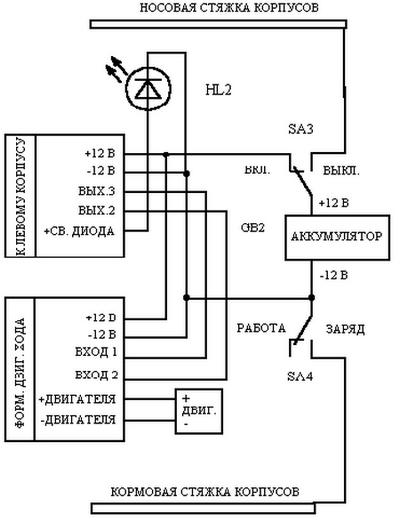
— before installing the equipment, the hulls are aligned on the water, taking into account the location of the batteries and accumulator (the unsinkability of the boat is achieved by filling all free spaces with foam plastic); — to pass wires between the housings, a plastic tube is installed; — the electronic components of the right and left housings are connected in accordance with these diagrams:
Connection diagram of the left case
Connection diagram of the right case
- the electronics are checked and configured;
- decks are installed using sealant and screws.
5. Making a transmitter (can be made from the control panel housing of an old TV or calculator):
- a connector for the antenna is made in the center of the body;
- on the side you need to install a power switch from a children's toy;
- a modulator board with a supply voltage LED is installed at the top of the case;
- a transmitter and a Krona battery are installed in the lower part of the case;
- about 15 m long to the car battery.
The boat is ready for operational testing and operation.
Ballast tank
This is usually the most difficult part of a submarine. But we will do it simply - we will use a micropump. More precisely, a peristaltic micropump - it holds the pressure itself and does not require additional valves. The pump itself is capable of developing a pressure of 1 atmosphere, which means it can pump a tank at a depth of up to 10 meters. The pump is controlled in the same way as a conventional electric motor - a speed controller or servo with micro switches.
There is an option to fill a rubber ball, but it may burst. We will use a 150 ml syringe, called a Janet syringe. The pump itself moves the piston. Later, you can hang sensors and monitor the volume of incoming water.
The original silicone tube in the pump was 2.54mm, changed to 46mm. As a result, throughput increased by 1.5 times. The motor is designed for 6 volts, I supply 12. The motor heats up a little, but not critically. The final speed is 100ml in 20 seconds.
Battery and charger
An inexpensive computerized charger allows you to charge directly from a car battery. Costs 680 rubles.
We take LiPo batteries - these are the best that can be found on the model market.
We put 2 batteries in the cart for 380 rubles, the total price became 5710.
See about copters: LADA Vesta SE/SW Cross/CNG Operating manual for the car and its modifications
You can not skimp and take the top ones, 2 pieces for 1150 rubles and the total price will be 8150 rubles, but since fishing is not every day, it is cheaper to change cheap ones every 3-4 years.
To connect the batteries to the regulators, we take connectors, this will add 160 rubles.
And here is a video of how a homemade boat sails to deliver bait across the lake.
I’ll talk about connecting all the electronics in a separate article, but for now, let’s summarize.
Layout
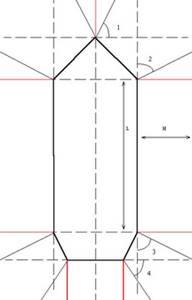
The boat measures 60cm in length and 7.5cm in diameter. Inner diameter 71mm. The plugs extend 2.5cm each.
Inside the case is divided into “compartments”.
- 1 - battery and receiver
- 2 - tank
- 3 - pump
- 4 - servos and speed controllers
- 5 - main motor
The tank must be in the middle so that the boat sinks horizontally (there is no trim).
The fastening elements are made of 5mm thick porous PVC sheet. Then they are tightened on iron pins located along the body. The rear plug should also be secured to studs to ensure the rigidity of the assembly with the motor and steering rods.
Initially, stroke controllers were used to control the motor and pump. But their reverse is much slower than forward rotation, which is not convenient for the pump. During testing, I did not install a separate UBEC power circuit and used the built-in 1 amp BEC. Because I received a defective servo that jammed, at that moment the current jumped and burned the entire regulator.
The 550 series motor is redundant for a model of this size; you can get a smaller one. It is attached with screws to a special bracket to the rear plug. Connection to the shaft through a brass coupling.
It is also worth installing Fail-safe modules on the pump and motor channels. The engine is set to turn off, and the pump is set to purge the tank.
All drawings are on a separate page.
Radio-controlled boat using Arduino and NRF24L01 radio module made from ceiling tiles
I want to talk about my passion for radio models, in particular boats. To control the motors, I decided to use an arduino and a ready-made remote control for quadcopters. This remote control is assembled using the NRF24L01 radio module, and besides, one kind person decoded the protocol.
1 model
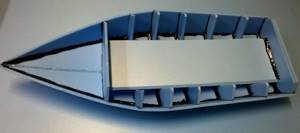
To begin with, I decided to choose a hull type: catamaran. I took this picture as a basis:
Based on this picture, a sketch of a 3D model was made in order to make a pattern from it in one wonderful program pepakura designer:
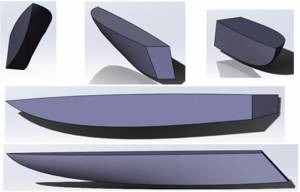
But of course the program could not make a normal pattern based on my too curved surfaces. While I was studying what 3D models should be like, I decided to make them without drawings “by eye”:
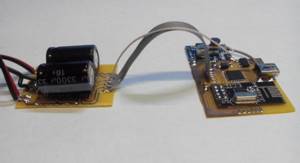
And the arduino itself (homemade) with a driver for SI9986:
And of course the video:
Not a single duck was harmed.
A number of shortcomings were identified:
- The model is heavy.
- Ceiling glue (for guns in the form of a syringe) is heavy and gets wet from water.
- An oil chamber using lithol (someone suggested as an option for leaks on the shaft side) does not work well.
- The voltage of 1 lithium battery is clearly not enough. Requires at least 2S battery.
- The propellers were taking in air.
- The drivers on the SI9986 eventually died from overloads.
- The engines from the old radio-controlled helicopter required a radiator, as it was very hot.
- My boat design was clearly unsuccessful: short and high.
After a little work on bugs and increased experience in creating “correct” 3D models, several new cases appeared:
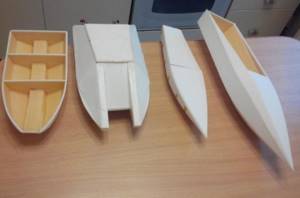
For the next model, the smallest one was chosen, which I expected would perform well.
Model 2
In principle, I was happy, but it became clear that the motors needed to be changed to one powerful one, and the direction needed to be controlled by the steering wheel.
Model 3
I did not fully assemble this model, but I learned how to make 3D models to obtain patterns, and also learned what frames are and their purpose.
A pattern was made from this model:
I also learned about an excellent replacement for ceiling tiles: laminate underlay.
The lining has a number of advantages compared to the ceiling:
- Sheet size: 1000 x 500 mm.
- Different thicknesses, I bought 3 and 5 mm thick, but so far I only use 5 mm.
- Lack of different profiles and pictures.
- Good strength due to greater thickness (for 5 mm).
Otherwise they are very similar:
- Light weight.
- They are not afraid of water.
- Low price and availability.
The glue used Titanium, but then switched to hot melt glue, with which the assembly speeded up several times.
The motor, steering wheel and shaft were store-bought, spare parts from a store-bought radio-controlled boat. In addition, I learned how to fuse brass nuts into plastic, and the engine mounting problem no longer existed.
This motor is very power hungry and has a huge starting current, about 10 A, maybe higher. Therefore, I decided to make the motor driver simpler: from 1 field-effect transistor, abandoned the reverse gear and simplified the development of the board.
A control board was developed, wired and manufactured, consisting of a homemade arduino based on Atmega328P, an NRf24L01 radio module, a field-effect transistor driver, and several voltage stabilizers. The board was also tested:
All that remains is to check the board with the “big” motor and install it in the board, install the servo drive with a body kit, think about sealing the boat cover and it can be tested on the water.
And of course I share boat patterns, with different dimensions, for those who want to assemble:
Boat_v3.1_450x173x85
Boat_v3.1_590x227x112
Boat_v3.1_750x288x142
Continuation:
I made a short video showing all the main stages of boat assembly
How much does it cost to build a boat for delivering bait?
So, the final price of the equipment is 5,870 rubles.
Is it a lot or a little?
Bait delivery boats sold in stores cost about 30,000 rubles. At the same time, they use brushed motors (20-30 trips on water and you need to change the motor brushes or replace the engines) and outdated equipment on the FM band (prone to interference, you can lose control of the boat).
Usually, after six months of using a purchased boat for delivering bait, they begin to remodel it - change the engines to a brushless version (see the price above in the article), along with the engine, the regulators will have to be changed to a brushless version.
The transmitter and receiver also require replacement - they install Turnigy 9x, it operates in the noise-immune range of 2.4 gigahertz.
See about copters: Designer of the I-153 “Chaika” fighter
A lead-acid battery loses its characteristics over the winter, unless, of course, it is discharged and charged a couple of times a month - but who does that? So, on the advice of experienced people, they change the battery to LiPo, they are not susceptible to such phenomena, and buy a charger for them.
In fact, all that remains of the purchased boat is the hull and a pair of servos for opening hatches with bait.
Are you ready to pay 30 thousand rubles for a pair of servos costing less than 300 rubles and a housing that can be made in a couple of weekends?
So it turns out that making a boat for delivering bait with your own hands is much more profitable!
To catch up - you can buy a cheap toy boat for 2-3 tr, add floats on the sides to it (made from polystyrene foam and covered with tulle on a scuba tank, fiberglass on a plastic one, or painted with auto enamel) and drive it around. You can open the feeder compartments by pulling a strong nick or fishing line from the ground - this is the cheapest option!