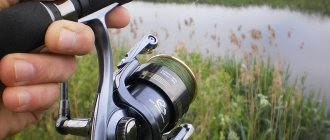
Novice fishermen will certainly find it useful to know how to tie a sinker to a bottom. Many of those who are just learning the art of fishing consider the weight to be an unimportant element of equipment for a bottom fishing rod. Little attention is paid to selecting and securing the weight on the fishing line, and this negatively affects the success of fishing. Donkey sinkers must be of high quality, so it is better to buy them at a specialized fishing store. The fisherman must also know the techniques for fixing such equipment.
Sinker for a bottom fishing rod - what it should be

Before looking for an answer to the question of how to tie a sinker to a donka fishing rod, a fisherman must study the varieties of this fishing tackle.
When buying a bottom sinker in a store, pay attention to the following parameters:
- Product form. The most famous and popular options among buyers are sinkers in the form of an olive, a drop or a pellet.
- Donk mounting method. Usually the load is fixed on the fishing line in such a way that it either slides along it or remains motionless.
- The materials from which the element is created, their quality characteristics. On sale you can find sinkers made of metal alloys (including lead or tungsten). The first option has a significant drawback - a high level of toxicity. In England, for example, lead weights for fishing rods are generally prohibited because they are considered hazardous to health.
- Sinker weight. The product can have a mass of 3-75 g. (this parameter depends on its shape).
Drop-shaped weights are in great demand among fishermen. They are easily retrieved from the bottom of the reservoir and fly well. However, loads of this shape have some disadvantages. For example, they do not hold the float well in large currents. If you plan to fish in choppy waters, choose a flat sinker. It is not so pliable to a strong current and helps the hook sink to the very bottom. But it is worth considering that in this case the fishing line more often gets stuck between the stones at the bottom of the reservoir and breaks.
Before buying a sinker for a bottom fishing rod, you need to study the characteristics of the reservoir (are there boulders or snags at its bottom that will prevent fish from fishing).
The weight of the sinker is selected based on the characteristics of the reservoir:
- if the river has a flat bank, then it is better to equip the bottom with a more powerful load (to cast the line as far as possible);
- to fish in reservoirs with stagnant water, it is better to equip the rod with a sinker with a small weight;
- round, pear-shaped or conical weights are suitable for fishing in rivers and lakes with a rocky, silty bottom;
- flat sinker models are an ideal choice for reservoirs with a sandy bottom and large currents;
- a sinker, which has a floating upper part, is useful for fishing in rivers where the bottom is strewn with a lot of debris.
It is worth paying attention to the modern version of the weight in the form of a feeder with odorous bait.
In addition to performing its main function, a tied type of bait also actively attracts fish to the hook (the bait option is selected depending on who you decide to catch). When choosing a weight for a donkey, look at its quality and do not buy a homemade product. It is very easy to distinguish a product created in a handicraft way from one made in an industrial environment. In the first case, the cargo has an untidy appearance, an uneven surface and a too soft structure. In addition, its actual weight is always very different from that stated by the seller. Of course, an experienced fisherman will be able to fish with such a sinker on the line, but for a beginner this activity will be too difficult.
When choosing a sinker for the bottom, pay attention to how smooth its surface is. Smooth weights have minimal resistance when in the water at the time of the bite. To increase this parameter, some sinker manufacturers even coat their surface with varnish.
Loading the fly rod float
Fly tackle, as a rule, is loaded with classic pellet weights of different weights. A small catch weight is usually installed near the hook, which does not alarm the fish, and the main part of the load is concentrated at some distance from it. The space between the hook and the line is called the “lead” and usually has a thinner diameter than the main monofilament. The distance from the hook to the sinker directly depends on several factors:
- wind forces;
- current forces;
- season;
- depths at the fishing site;
- the type of fish to be caught.
If you are fishing in a body of water with a current or you have to fish in a strong wind, then this distance should be at least 20 cm. If this condition is not met, the hook will constantly cling to bottom debris, and the float will immediately sink. Such fishing cannot be effective, since the angler will not be able to make high-quality fishing.
The length of the gap between the hook and the underlay may vary depending on the season. In the spring and summer months, when the water warms up well, fish can feed in the upper layers of the water. In this case, it is better to use leashes with a length of 20 to 30 cm. The bait on a long leash will slowly sink in the water column, which is as close as possible to the behavior of natural food. The fish grabs the bait without fear, behaving naturally. If you attach a feeder at a distance of 5–10 cm, then the bait carried away by it will quickly sink to the bottom layer and remain unnoticed by the fish.
In autumn and winter, on the contrary, the leash length should be quite short, since fish in cold water prefer to feed from the bottom. A hook on a long leash will take a long time to sink to the bottom soil, which will significantly reduce the fishing rate. In addition, while the bait falls to the bottom, the rig will already swim past the baited point and the likelihood of a bite will decrease.
When fishing, you need to have a set of weighted weights that may be needed to reload the float.
The depth at the fishing site and the type of fish that will serve as the object of fishing also affect the distance between the hook and the hook. If we are talking about catching bleak from a depth of up to 1 m, then a leash 10 cm long is sufficient. The bleak quickly reacts to a bait that has fallen into the water, so there is no need to install a long leash. When fishing for roach, the optimal length is 20–25 cm, since this fish often feeds in the water column. To catch crucian carp in early spring and autumn, when it feeds from the bottom, you should choose short leashes no longer than 15 cm. When fishing for crucian carp in the summer, the distance from the hook to the load should be increased to 20 cm.
Features of fixing the “pellet” sinker on the fishing line
The “pellet” weight has a round shape, similar to a gun shot (that’s why it was called that).
It is attached to the fishing line according to the following scheme:
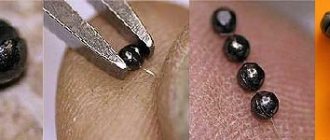
- You need to prepare auxiliary tools with which you can easily secure the sinker. These include scissors, tweezers, pliers and a special tool for such elements.
- Each pellet weight has slots. Before fastening, grooves should be made in them. To do this, a fishing line is inserted into the slot, and then the sinker is clamped with pliers.
- A special pellet tool is used to finally secure the product. After the manipulation is completed, the weight is removed from the thread.
Do not clamp the sinker with your teeth. The metal surface of the product will damage tooth enamel, and you yourself will not be able to control the force applied to clamp it.
The location of the sinker on the fishing line
Inexperienced anglers often consider the sinker to be a secondary element of fishing equipment. Accordingly, fishermen pay minimal attention to the choice of sinker and the method of attaching it to the fishing line. In fact, each piece of equipment is important in its own way. After all, an established system, in particular harmoniously selected and correctly attached elements, can provide the fisherman with good catches.
Experienced fishermen love to watch inexperienced fishermen. In particular, a particularly funny moment is the attempt of a novice fisherman to attach the “sinkers” to the forest. Don't want to be a laughing stock to your “colleagues” anymore? Please read our article.
Most often, novice fishermen choose an ordinary iron nut or homemade sinkers as a sinker. But a much better choice would be to purchase from a specialty store. These do not necessarily have to be branded sinkers. It is enough to get by with middle or budget class equipment. The main thing is that the purchase is of decent quality. When buying a sinker, you need to pay attention to its appearance and storage conditions.
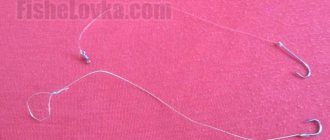
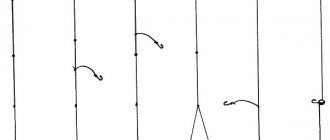
Methods for securing an olive sinker
Olive-shaped sinkers are easy to use, and therefore are most popular among donk owners. They are completely attached to the fishing line or remain free, sliding along it.
There are several methods for attaching this element to a fishing thread:
- In the process of preparing for fishing, you should check the weight level of the float, and in accordance with it, select a weight with a suitable weight. The sinker must be tied to the line below the float when the rod is equipped with equipment. A micro-swivel is installed at the end of the scaffolding, acting as a limiter. A hook and leash are then attached to it. Here it is necessary to correlate the immersion level of the float with the weight of the swivel.
- A bead is used as a limiting element (stopper) for the weight, which is put on the fishing line. Then the free edge of the line is passed through it (by wrapping the bead around the thread several times). Next, a leash and a hook are tied to the remaining edge of the fishing line.
- The functions of the stopper are taken over by the pellet sinker. The “olive” is attached to the fishing line after the float. The pellet is attached immediately behind it, with a distance of 10 cm from the edge of the scaffold. A leash and hook are tied to the remaining edge.
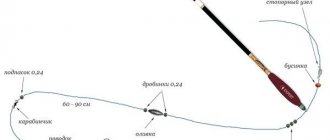
Three popular ways to attach a sinker to the fishing line of a bottom fishing rod
Experienced fishermen use 3 methods of securing a sinker on a bottom:
- The fishing line is threaded through a through hole located along the weight. During fishing, the element slides freely along the thread above the leads. The carabiner with which the leashes are connected together with the main nylon thread prevents him from going lower.
- The sinker is attached to the end of the working line, and the leashes (1-2 pieces 15-25 cm long) are located above it.
- The weight is fixed between the leashes on an auxiliary piece of fishing line 40-50 cm long. The leashes themselves are fixed on the main fishing line below and above the weight. The large distance between them eliminates the possibility of hook snags.
orybalke.com
How to knit leashes for fishing? Leash with one and two hooks. HD
FishingVideoUkraine
3 years ago
In this video we show how to knit classic fishing leashes, which are attached to many types of equipment, using a loop-to-loop connection. First I will show you how to make a leash with one hook, and then we will knit a leash with two hooks. —————————————————————————————— The best affiliate program for your channel. Apply and earn money from the AIR (Agency of Internet Rights) team of professionals - https://www.air.io/?page_id=1432&aff=2068 —————————————————— ——————————— Also see: — How to tie a hook, easily and quickly? (Standard knot) - https://www.youtube.com/watch?v=KKKN0nPf55Q - How to tie a leash? “Loop to loop connection” (DOUBLE LOOP JUNCTION) - https://www.youtube.com/watch?v=6NNxEFyiICE - Figure Eight knot. Loop with a Figure Eight knot - https://www.youtube.com/watch?v=N8aT7TCEX4k - Our channel - https://www.youtube.com/channel/UCu7qYCWymoN.
FishingVideoUkraine channel - https://www.youtube.com/playlist?list=PLPGnd00DWe4gvmD3DC87nMXZo2UjiQ8zW ●Fish cooking - https://www.youtube.com/playlist?list=PLPGnd00DWe4i0jsRF_DsUFXo8-NIvQv_k ●Photo and video reports - https://www .youtube.com/playlist?list=PLPGnd00DWe4g7LULjdRj5RFwp4iCJ2z0Q ●The best fishing knots. Film series = https://www.youtube.com/playlist?list=PLPGnd00DWe4gQOy9MhuFJDRKK12_yl6KX ●Equipment for silicone baits - https://www.youtube.com/playlist?list=PLPGnd00DWe4ijm2bOhuCq81nkNDHzKRdd ●Fisherman's workshop - https://www.youtube. com/playlist?list=PLPGnd00DWe4gI8MSz7gpfPVZCH8N6Myqz ●Video reviews (Unboxing) - https://www.youtube.com/playlist?list=PLPGnd00DWe4jXTvR3OkuoqDzgAuDvZwuF ●Outdoor recreation. Camping - https://www.youtube.com/playlist?list=PLPGnd00DWe4hX1baoEgi8s55UVJ_8PSNr ●Video demonstration of our products - https://www.youtube.com/playlist?list=PLPGnd00DWe4io3TXlI__yHDGbEy7IYPfH ●Fishing crafts - http. //vk.com/fishing_video_ukraine ●Twitter - https://twitter.com/fishing_channel ●Google+ - https://plus.google.com/102677405329281237837 ●Instagram - https://instagram.com/fishing_video_ukraine/
videoline63.ru
Content:
- For hooks
- For leashes
- For fishing accessories
- Units for mounting gear
- Fishing knots for different purposes
- How to tie fishing knots
- Video “Fishing knots for all occasions”
And besides, there is simply no universal knot, they are all created for specific purposes and are suitable only for a certain type of fishing line, for example, some knots will perform well on fluorocarbon fishing line, but on braid they will not withstand even the lightest load, the same the situation with the fishing line.
To prevent this from happening, I recommend that you carefully study all sections of our website, which will tell you for what purposes and with what materials fishing knots will work best. I think it will be better if we divide the entire page into the most common categories.
For hooks
How to tie a hook to a fishing line correctly - first of all, I recommend that you pay attention to the article, which discusses the main points and techniques for tying fishing knots for hooks with an eye and a blade on braided, regular and fluorocarbon fishing line.
How to tie a jig correctly
is of interest to many fishermen, because not all fishing hook knots are suitable for thin winter fishing line and a small jig eye. But there are no particular difficulties with this.
How to tie a fly to a fishing line
Every fly fisherman who respects himself and his hobby should know this. Among the variety of foreign knots, only a few of the best, simple and at the same time durable ones can be distinguished.
How to tie a second hook to the main line
Not many fans of float fishing know this, but most are interested in this question, so I think this article will be useful to you and you will find all the answers you are interested in there.
What can weights do?
1 Increase the intensity of the load.
If you chose walking to lose weight, but the process of losing weight has stopped, then you can safely “connect” weights. A trainer would advise you to switch from walking to running or change the type of workout, but this advice does not suit everyone. Weights come to the rescue - even with 1-2 kg, the pulse increases noticeably.
We suggest you read: How to tie a hook to a fishing line. How to tie any hook correctly
2 Increase the amount of muscle tissue.
After 25 years, a person loses approximately 1-2% of muscle mass per year. Metabolic processes occur precisely in muscle tissue. Thus, it is muscle cells that use fat as energy, including after exercise.
If you are losing weight on a strict diet, like a week on a single product (rice, buckwheat), keep in mind: you have lost even more muscle tissue than nature prescribed. So, muscles help us not gain fat and burn excess fat. Weights will help us preserve what nature has given us.
On which part of the body is it more effective to carry weights? Meet!
For leashes
Fishing knots for leashes are very diverse and there are quite a lot of them; we will fill this section as information about new knots becomes available. In the meantime, I recommend paying attention to the following materials.
Every fisherman should know how to tie a leash to the main fishing line, because sooner or later he will still have to master the technique of knitting knots suitable for installing a leash. What adds to the complexity is that you have to connect a thick main line with small diameter leashes.
The figure eight knot is best suited for tying leashes. It has gained popularity among fishermen due to its ease of tying and increased strength. Fishing knots of this type do not deform the fishing line, which adds strength to them.
Tie the leash to the fishing line at 90 degrees
This is most often required for winter fishing, although when equipping summer fishing rods it is often necessary to achieve a right angle between the main line and the leash with an additional hook.
We tie hooks (make leashes).
As a rule, a classic leash, designed for catching ordinary auk fish, for example, roach, ram or rudd, has 3 hooks, and therefore, we will also knit 3 hooks. By the way, in this article I already told you how to tie a fishing hook.
For leashes we use fishing line with a diameter of 0.30 mm. We thread the fishing line into the eye of the hook and leave the tip about 12 - 15 cm long.
We direct the tail towards the hook tip, and then bend it towards the eye, leaving a small loop next to the hook tip.
It should look like a loop like this.
We clamp the loop, take the tail and wrap it around the shank of the hook. We make 5 revolutions.
When you make one turn and grab the line for the next turn, press down on it with your middle finger to prevent it from unwinding (from personal experience).
Now we clamp the fishing line and insert the tail into the loop. From this position, pull the main line until the loop is almost tightened.
We intercept, holding the tail, and tighten the loop to the end.
You should end up with a knot like this.
Well, the hook is tied, and now the next step is to tie the resulting leash to the main fishing line.
We tie the leash to the main fishing line.
First of all, we determine the length of the leash. Typically, the length depends on the type of fish you want to fish for. If you are going to fish for a specific species, for example, bream or carp, then it is advisable to check the length of the leash, size and number of hooks with fishermen in your area or take it from the literature.
And since we are knitting a universal leash, suitable for catching most varieties of river fish, we will take the optimal length - approximately 20 - 25 cm.

We measure the required length and mark it with a regular triple or quarter knot. This node will be the limiter node.
For fishing accessories
The clinch unit is suitable for mounting various fishing accessories, such as feeders, sinkers, wobblers, spoons and silicone baits. It has many modifications and is characterized by ease of knitting and increased strength.
Every fisherman should know how to tie a fishing line to a reel, because the outcome of a fishing trip when landing a trophy specimen, which is capable of reeling all the fishing line from the reel, can depend on the correctness of the actions. In this case, the maximum load will reach the knots on the spool.
You must know how to tie a swivel to a fishing line; the most common fishing knots for tying a swivel are a mandatory element of knowledge for every self-respecting fisherman.
All spinning anglers and feeder fishing enthusiasts need to know how to tie a carabiner to a fishing line, because this wonderful accessory allows you to very quickly change bait or equipment and can withstand maximum loads.
How to tie a spinner to a fishing line
It is necessary not only to know, but to remember as a souvenir for every predator fishing enthusiast. The maximum load that your tackle can withstand may depend on the attachment of the spinner.
How to tie a float to a fishing line
interests many float fishing enthusiasts. There are many knots for tying a float, including a locking knot for a sliding float, which serves as an important link in the sliding rig.
How to tie a sinker to a fishing line
Every fisherman who has at least once tried to make feeder or bottom tackle on his own should know this, because without basic knowledge of such components there is nothing to do in feeder fishing.
Weaknesses of fishing knots
Fishermen have come up with a lot of knots, including both simple knitting patterns and very sophisticated ones. However, the quality of the connection does not always depend on the complexity. It is more important to reduce the number of sharp kinks that weaken the line.
Loss of strength most often occurs at the moment of strong tightening of the formed knot. Experienced anglers always moisten the line with water or saliva before final tightening.
Untying of knots can occur for two reasons.
- If the tightening torque is insufficient, the line gradually slips out of the engagement.
- At the last stage, some anglers cut the protruding tip of the line too close to the base of the knot. Under load, the tip of the line slips out of the knot and the connection is untied.
Units for mounting gear
How to tie a fishing line to a fishing line is the highest searched query among people looking for any information about fishing knots. So I think it will be useful to all lovers of this active recreation.
How to tie fishing line to braid
? This question is very often asked by fishermen when it becomes necessary to connect a braided cord with a regular fishing line. Most often this happens when there is a need to wind additional fishing line on a reel.
How to tie a cord to a fishing line
A must-know for all carp fishing enthusiasts and more. After all, there is often a need for a strong connection of the cord with fluorocarbon or monofilament fishing line.
How to tie a shock leader to the main line
- this question was asked by every carp angler who at least once had to fish on a reservoir with a rocky bottom.
How to tie fishing knots
Attentive fishermen often notice that packages with hooks and boxes with other fishing tackle often contain instructions on how to tie fishing knots. But the mistake of many is that they consider such units to be universal, but in fact they can only be used for those materials on the packaging of which they are shown.
Despite their great strength, some fishing knots can weaken your fishing line or braid by up to 50% of the manufacturer's specified strength. This fact is not particularly pleasant, so you should carefully choose the types of knots with which you are going to tie this or that part.
A knot is a mandatory attribute of any equipment, because there will always be a need to tie a hook, lure or carabiner. Every angler must have knowledge of how to tie the right fishing knots, regardless of whether he is a beginner or has considerable fishing experience behind him.
There are many secrets and tips related to tying knots among fishermen. The most common of which is wetting the knots before tightening. Thanks to this simple action, you can be sure that the fishing line will not deform.
It is worth choosing which types of fishing knots to use in a given case. Based on several factors, the most important of which is the diameter of the fishing line or braid. It is best to bite off the excess fishing line with your teeth or cut it off with tongs; there is no need to burn it with a lighter or matches.
The knitting pattern for the ideal fishing knot has not yet been found. Since each node behaves differently on certain materials. The main thing is that the knot is strong, reliable and you can tie it easily.
And for those who came to watch a video about tying fishing knots, we recommend watching the video below. I hope you liked our diagrams and photos of fishing knots, and also you found useful information for yourself.
fishermanblog.ru
How to knit leashes correctly
22 Sep 2013 |
Section: Miscellaneous Hello dear readers of the site sesaga.ru. When you go fishing, you often see a situation where some fishermen, coming to fish, absolutely do not know how to tie hooks, and there is nothing to say about leashes at all.
People buy ready-made hooks or leashes in specialized stores and go fishing with them. But when a situation happens that all the hooks are torn off and there is nothing else to catch, then they pack up and go home. It’s also good if someone managed to catch something, or if one of the fishermen took pity and gave him his spare leash, or tied his hooks. And if not.
In this article I will tell you how to make the most common and easy-to-make leash , which can be used with both a spinning rod and a casting rod.
All the nodes here are light and simple - the main thing is to understand the principle itself. And when you understand what’s what, then it won’t be difficult to knit leashes for catching any fish, be it catfish, carp, pike perch or bream.
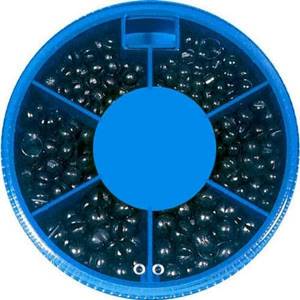
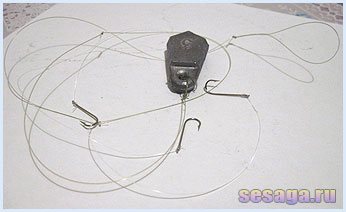
And so, let's go. We will need: fishing line with a diameter of 0.40 mm and 0.30 mm, three hooks (the size depends on the fish that are found in your reservoirs) and a lead sinker No. 3. To make it easier to distinguish sinkers by weight, they were assigned numbers - the heavier the sinker, the higher the number.

Table of application of knots and their strength
| Knot/Fortress | Knot/Fortress | Knot/Fortress | Knot/Fortress | Knot/Fortress | |
| Line to line (leash, braid) | Fisherman, waterman 75% | Grapevine, 80% | Centaurus, 85% | Nail, Albright, loop to loop, 90% | Surgical, weaver, clew, 70% |
| Fishing line with hook | Palomar, double palomar, blood, 80% | Uni knot, 75% | Sheet, 70% | Snud, regular leash, 95% | Sliding snood, loop, stupid leash 90% |
How to tie fishing line to fishing line
The simplest knot. You will need two fishing lines, preferably braids:
- lay side by side, one to one;
- make a loop up to 7 turns around the fishing line;
- shape into a knot, tighten;
- trim off unnecessary ends.
Thus, the main and auxiliary lines are connected, or fixed to each other.
Fisherman's knot
The best fishing line is braided. Monofilament slips a lot and you shouldn’t even experiment with it. For the bundle:
- align the ends of 2 braids;
- make a loop of 8-10 cm at the base of one fishing line, which is thinner;
- pass through the previous line around the circumference;
- twist up to 5-6 turns on a thread from a thin fishing line around the one that is thicker;
- tighten the connection or the place where the knot is formed;
- pull the end of each line one by one;
- fix the knot;
- trim off excess ends. The fishing knot is ready.
A more advanced fishing knot can be made from braided wire to avoid breaks:
- connect 2 fishing lines to each other;
- twist one around the other, forming a loop;
- with the fingers of one hand, take the 1st loop received;
- pull the free end up;
- skip the first loop behind the second;
- repeat the steps with another fishing line;
- Pull the loose ends and tighten the knot.
Vine
Suitable for tying two lines or tying a hook. It is considered a fairly strong knot, unlike, for example, a “fisherman’s” knot, but is not suitable for tying connections of 2 lines of different diameters. The knot will look weak. Only monofilament thread is suitable for use. Output strength is 80%. The number of turns must be made taking into account the thickness of the fishing line. The thinner it is, the more revolutions you need to perform, up to 8. Grapevine for tying two fishing lines. Installation:
- fold 2 fishing lines together;
- bend the end of 1 fishing line back;
- take the fold with your fingers to make a loop;
- pull one end to both lines;
- make 5 turns inside the resulting loop;
- take the ends of the fishing line with your hands on which the knot is made;
- pull in different directions;
- tighten into a single knot;
- the same must be done with the 2nd fishing line;
- pull the long ends of both knots;
- trim off excess edges. The “Grapevine” knot is usable.
Centaurus
For tying a spinner, sinker, hook to braided or monofilament, regardless of diameter, Centaurus is the best universal knot. Tensile strength – 85%. Sequence of work:
- take a hook with a ring into which to thread the fishing line;
- pull the end of the main line to the hook, winding it 2-3 times around the main line;
- pull the short end;
- tighten the knot tightly.
This is the best and most durable knot among all known. You can make the following version of the knot with both monofilament and braid:
- take 2 fishing lines. You can use different diameters;
- wrap one around the other up to 5 times;
- First insert the wrapped thread inside the first fishing line;
- tie both ends of one thread;
- carry out similar actions with another fishing line;
- pull the long ends, tighten 2 knots;
- trim off excess. The Centaur node is ready.
Nail
As a knot it is suitable for firmly tying two lines of different thicknesses. Braid is suitable. The output is a fairly compact unit. To make it you need:
- pick up any object in the form of a tube like a nail to obtain this node;
- place two lines parallel to each other;
- lean the pipe against the first line;
- wrap around up to 10 turns, thereby connecting the tube with the first fishing line;
- stretch along the tube;
- pull both ends of one thread to obtain the first knot;
- carry out the same actions with the second fishing line;
- pull the long ends;
- pull the nodes towards each other;
- trim off excess edges.
Scheme:
This is a good knot if you have braided lines of different diameters, and you can connect a fly fishing line in this way to an extension cord or to a leash. As an alternative, you can use a thick needle instead of a nail.
Water
This is a simple knot and beginners will quickly learn how to do it. You can use either braided or monofilament line. The knot is suitable for fishing in winter if the main line breaks:
- place the fishing line on the panel;
- take with both hands and turn clockwise to form a loop;
- holding the double end with one hand, thread the short end into the loop with the other hand;
- make a turn around both lines;
- tighten the knot by pulling the long ends in one direction and the short ends in the other;
- trim unnecessary edges to avoid tangling.
Scheme:
Surgical knot
This knot is more often used to attach a leash to a fishing line, rather than for the purpose of quickly securing two fishing lines. According to the principle of knitting, the knot is similar to the “water” knot. You can use braid or monofilament. At the break it will be up to 70%. Knitting sequence:
- Place 2 fishing lines parallel to each other;
- form a loop from both at once;
- skip the loop, making 2 turns around the circumference;
- moisten the resulting node;
- pull off.
This is a quick, easy and reliable way to tie two lines together to connect them together.
weaver's knot
Also suitable for attaching a hook to a fishing line:
- thread the line through the hook or eye;
- make 1 turn with the tip of the thread around the axis;
- return to original place;
- tighten the knot.
Thin synthetic fishing line is not suitable for tying, although the knot is simple and quite strong. You can tie a hook to a shoulder blade in this way.
Albright node
Albright is more applicable when fishing with a spinning rod for the purpose of connecting fishing line and leash, also when it is necessary to obtain high sensitivity of the tackle for balancing. Albright is a fairly popular knot, done as follows:
- cross 2 fishing lines with each other;
- make a loop at the cross point;
- pass 1 end of the fishing line through the resulting loop;
- wrap around yourself and the loops up to 10 times;
- thread through a nearby loop;
- moisten the end of the fishing line with water to ensure a strong connection;
- tighten and trim the edges.
The strength of the knot is high even when made from thin fishing line. You can also lengthen the leash in this way.
Loop in loop
It is more of a connection than a node. Used with monofilament line.
- fold the thread in half;
- wrap the tip of the second thread around the resulting ring from the first thread several times;
- fix the loop by bringing the tip of the thread into 1 turn.
So fasten 2 monofilament fishing lines or attach a leash by inserting the tip of the thread into it.
How to increase your fish catch?
Over 7 years of active fishing, I have found dozens of ways to improve the bite. Here are the most effective ones:
- Bite activator . This pheromone additive attracts fish most strongly in cold and warm water. Discussion of the bite activator “Fish Hungry”.
- Increased gear sensitivity. Read the appropriate manuals for your specific type of gear.
- Pheromone -based lures .
General requirements for fishing line tying technology
Loop in loop
The most common and simplest method is the “loop-to-loop” method. Despite the fact that this fishing knot is very easy to learn, it cannot be said that it has a high level of reliability.
The dressing is carried out as follows:
- At the ends of the main fishing line and the desired leash, 2 elongated loops are knitted.
- The end of the fishing line with the loop must be folded in half and wrapped twice around its axis.
- The loop of fishing line that was originally tied is threaded through the ring that is formed at the end of the entire structure, and then tightened.
- To complete the fastening, you need to fasten the loops of the leash and fishing line together.
The next type of assembly is also quite simple, and most importantly, it can be made right on the spot, without additional equipment.
- The leash and the main line are applied to each other.
- Now you need to wrap part of the fishing line around the leash and then pull its end to the top.
- This end of the fishing line must be pulled into the resulting loop, but do not tighten it.
- The end of the leash needs to be wrapped around the loop once.
- The knot is tightened.
- Now you need to do the same with the end of the main fishing line and tie it to the leash.
"Nail"
The knot, which is referred to as the “Nail,” has a high level of strength, but also great difficulty in mastering it.
You can tie it up as follows:
You need to tie a stop knot on the main line. The leash and cord are parallel to each other. The leash line must be threaded under the main line. A turn is made around the main line. Thread a through object, such as a fountain pen, into the resulting loop. Now make a few skeins around the main line and pen
Now you need to thread the end of the leash through the handle and carefully tighten the knot, while making sure that the turns do not get tangled or overlap each other. The remaining part of the leash must be removed
"Eight"
Another fairly common knot is called the “Figure Eight”. In essence, it is quite simple, but at the same time, it confidently attaches the leash and the main fishing line.
- The leash and cord are laid parallel to each other.
- Now you need to knit a loop that will look like a figure eight, like a “Flemish loop”.
- Now it's time to tighten the knot.
Knot-free fastening
A knotless fastener has its undeniable advantages, including saving time and a high level of strength, but there are also disadvantages: it adds extra weight to the tackle, and is often used only for braided lines.
To fix such a fastener, first of all, it must be selected correctly based on the thickness of the fishing line and the dimensions of the bait. The fastener should be a little thinner than the fishing line. To secure it, you need to take a few simple steps:
- Place the eye of the tackle into the eye of the fastener.
- Now the fishing line needs to be thrown onto the hook of the connector, which protrudes to make a double fishing line.
- You need to wind the fishing line onto the connector several turns 3-5 times.
- Now the fishing line needs to be inserted into the second eye and tightened.
- Excess line must be removed.
- When you have to make leashes at home, it is useful to immerse the fishing line in warm water for a few minutes. The material will become elastic, and the knot will be reliable after tying.
- If the installation of a fishing line with a bait, hook or leash takes place on the shore of a reservoir, then before finally tightening the knot, it is necessary to moisten it with saliva or water.
- In some cases, fishermen treat the finished dried knot with glue, after which the joint must be maintained for 24 hours.
- In the process of knitting knots, it is necessary to calculate the length of the piece of fishing line so that after the connection is formed, a tip of 2-5 cm remains. After this, it remains to cut off the excess thread, leaving 2-3 mm.
Knots for diverting leash to fishing line
You cannot do without such knots if you need to tie a leash to a fishing line. Here are the best options:
Bloody Knot
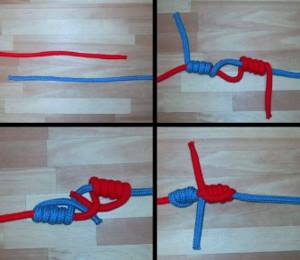
A universal bloody knot, simply irreplaceable if you need to tie hooks or a spatula when fishing with a spinning rod. You can use monofilament or braid, or in combination: braid and monofilament, just make 3 turns. The strength of the fishing line is maintained up to 75%, and if the fishing line is thin, then you need to make a larger number of turns (up to 7-8 times):
- take 2 fishing lines of the same diameter;
- pass the tip of the thread through the eye of the hook or around the shank;
- make a loop from the fishing line, holding it with your hands;
- make 5 revolutions around the forend with the free end;
- press the fishing line to it, while trying to ensure that there is no intersection of the turns with each other and they are located exactly 1 opposite the other;
- make a twist with your right hand;
- pull the free end of the thread into a coil;
- moisten and tighten the edges of both ends of the fishing line at once;
- if necessary, move the resulting knot to the eye or blade of the hook;
- Tighten well again.
To install a bloody knot, braided or monofilament is suitable. Tensile strength reaches 70%. The knot can be used to tie a leash to a bottom (float) fishing rod, and also to tie together two different fishing lines: braid and monofilament.
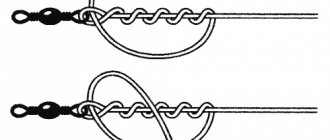
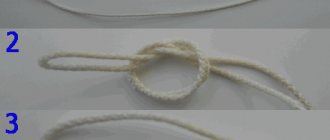
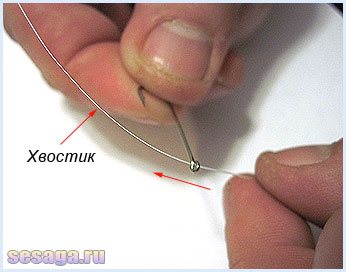
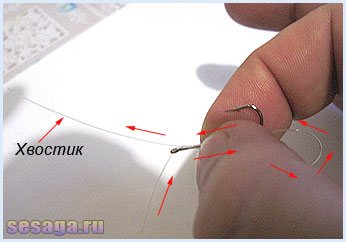
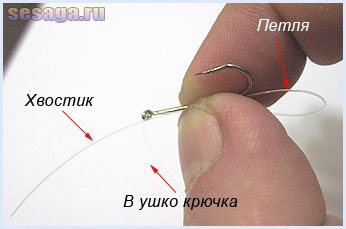
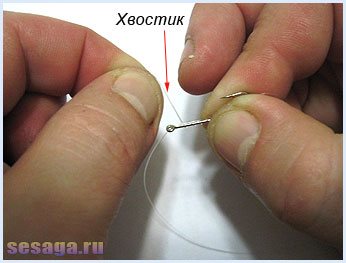
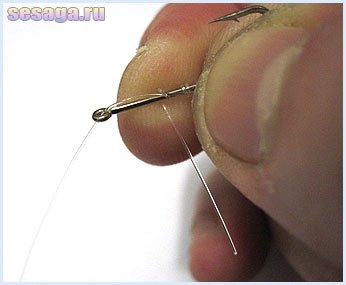
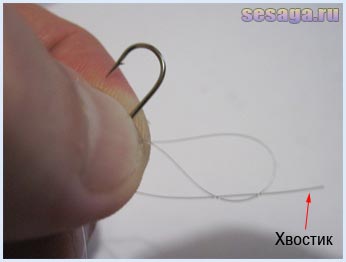
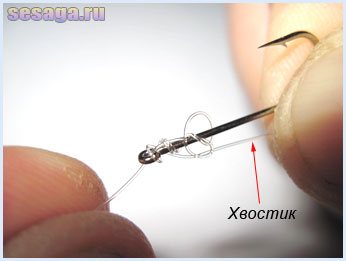
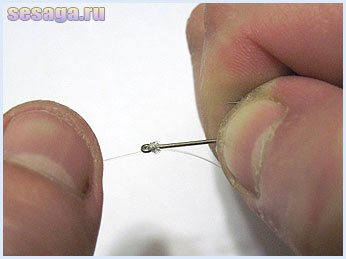
How to tie drop weights?
Make one simple knot on the fishing line. Next, you need to pass the free end of the line through the drop sinker ring. Then twist the end of the fishing line near the main one - preferably 7-8 times, depending on the weight of the sinker and the characteristics of the fishing line. After this, carefully tighten the resulting knot. The knot made at the very beginning “protects” the line from untying and provides the entire knot with reliability and strength. Thus, every inexperienced fisherman can easily and quickly tie a drop sinker to the fishing line.
“Droplets” sinkers are attached with knots on the fishing line itself
How to tie a leash to a cord or fishing line
To tie the leash to the main fishing line, the steps are simple and even a beginner can do it. But the result is a reliable and easy to untie knot. You can do it like a “surgical” one, tying it in a simple way, stepping back from the edge of the fishing line up to 25cm. Further:
- fold the end of the fishing line in half;
- pass through the resulting loop;
- tighten.
The folded end of the thread should form a loop. To attach the main line to the leash, you need to pass the free edge of the leash through the loop.
Loop in loop
It is made as follows:
- fold the main line in half;
- tie a regular knot at the fold to make a loop;
- at the end of the fishing line, trim off the excess ends;
- make the same loop on the leash;
- tighten the knot.
In the same way, you can tie a swivel, attach a fishing line to a leash using a carabiner, or simply thread the loops through the swivel ring. The device allows you to quickly change hooks as needed. A fishing line or fluorocarbon will do.
To perform a simpler and stronger version of a loop in a loop for the purpose of attaching leashes and other metal devices (hooks) you need:
- step back on the main line 8 cm from the edge;
- bend the measured size back;
- attach another thread so that you get 2 threads that do not intertwine;
- moisten the fishing line with water to make the connection stronger.
The result should be a loop of sufficient diameter so that your thumb can easily pass through.
How to tie a hook to a leash or line
For tying a hook to a fishing line or leash, the following knots are suitable: figure eight, bayonet, step, roller, salmon, tuna, blind. To get a simple version of the node you need:
- make a loop at the end of the fishing line and leash;
- pass the tip through the eye of the hook;
- throw around the circumference to obtain a blind loop.
Double palomar
Palomar is a well-known knot among fishermen for tying a hook or spoon to a fishing line. Braided thread is rough, so it is not suitable for knitting. Although sliding fishing line can be used if necessary, tied to a swivel, hooks or monofilament. For light knitting, it is better to use monofilament while maintaining the tensile strength of the fishing line up to 80%, and you should not use a thick thread, it is better to use a medium in diameter. For production:
- fold 2 threads parallel;
- tie a knot from the first braid;
- bend the tip parallel to the other thread;
- insert into the eye of the hook, holding the resulting loop;
- weave with leading braided thread;
- wrap around 3 times;
- insert the hook into the loop;
- wet the knot;
- tighten, trim the excess ends of the braided thread with scissors.
Uni knot
To knit this knot you need to practice a little:
- pull the braided line through the eye of the hook;
- make a loop;
- wrap the end of the braid around the main line 2-3 times;
- make a second loop;
- pass the end of the fishing line through the 2nd loop;
- make up to 7 turns around the double line;
- moisten the braid;
- trim off excess edges with scissors.
The Uni knot is best used when the fishing line is at least 60 cm long.
Shkotovy
The knot is designed for tying a hook and fishing line. Tying - step by step:
- thread the fishing line through the hook (eye);
- make 2 turns around the forend;
- moisten and tighten the ends.
In this simple way you can quickly attach a hook to a fishing line.
Knot Snood
Snood is a universal knot for tying a shoulder blade or hooks. Both braided and monofilament thread are suitable. The output strength reaches 95%. For knitting:
- take the hook with the sting of everyone with your left hand;
- make a loop;
- attach to the hook so that the tip moves towards the sting or pass through the ring;
- hold the edge of the loop near the ring of the shoulder blade with one hand;
- make turns with the other hand, winding it around the fore-end near the bend 2-3 times;
- throw a loop;
- Pull the long end of the line while holding the hook with your other hand.
Sliding snood
To tie this knot, there is no need to use the end of the fishing line; you can make a knot anywhere, which will become indispensable if you want to connect a hook, for example, with monofilament. Output strength. quite high. Moreover, additional fishing line can be used as fastening. So, for installation:
- take a piece of cord with one hand;
- with the other hand - a hook with the fore-end bent upward;
- make a loop from the cord, attaching it to the fore-end so that the tip points towards the sting;
- make 3 turns around the forend;
- attach working thread;
- make 2 more turns;
- tighten by pulling an additional loop;
- trim off excess ends.
Sliding snood
Loopy
To tie this knot, it is necessary to take into account that the main line must be tight. The method is suitable if the hook does not have an eye or for connecting the leash to the fishing line. The knot is quite reliable and the degree of strength will depend on the number of turns made around the main thread. For work:
- pull the end of the fishing line through the eye of the hook or ring of the leader
- place the loops along the ring, holding with the fingers of your left hand
- with your right hand, wind the free end up to 7 times
- thread the end of the fishing line into the resulting ring
- pull and tighten the knot.
Palomar
This is the most famous knot among anglers and is best suited for monofilament. The braided thread, due to its roughness, will not tighten the knot tightly. Tensile strength – 80%. Thanks to Palomar, you can tie a hook to a fishing line or a spinner to a fishing line. So, for installation:
- fold the fishing line in half;
- pull the resulting loop into a ring of another fishing line folded in half;
- tie a ring around the circumference, making several turns;
- take the hook in your right hand, and both ends of the fishing line in your left hand;
- place the end of the loop over the shank of the hook;
- tighten the knot in this way;
- trim the ends. The Palomar knot is ready.
Blood
This is a simple knot for tying a hook, despite the terrible name, when sailors used to tie the knob in this way to a whip, which they used to beat slaves, leaving bloody marks on their backs. You can attach a sinker, jig, hooks, or spinner to the monofilament line. Tensile strength – 70%. If you have a monofilament thread with a cross-section of no more than 0.6 mm and a metal leash, you can use a locked blood knot. Tensile strength – 80%. For work:
- pass the line through the eye of the hook;
- wrap the tail around the circumference of the forearm up to 8 times;
- insert the tip of the thread through the resulting loop turns;
- make a knot, tighten;
- trim off excess ends.
Stupid leash
A monofilament thread or braid of average thickness of 0.2-0.3 mm is suitable. This leash is similar to a simple leash, but its name is not as stupid as it seems. The point is that the winding should be carried out not inside, but outside the monofilament. Eventually:
- insert the tip of the cord between the winding and the forend;
- tighten the knot and move it to the eye of the hook;
- trim off excess ponytails.
The silly leash is ready.
Regular leash
This is a good strong and versatile option for tying two thin monofilaments or fishing line to the eye of a hook or spatula. Tensile strength – up to 95%. If there is a bent ring on the hook you need:
- pass the fishing line through it, bringing it to a bend;
- turn towards the ring to form a loop;
- make 7 to 10 turns around the hook with the end of the main line;
- take the fishing line by the ends;
- pull in different directions;
- tighten the knot.
Knots for tying hooks
And the simplest of them is the so-called “loop-to-loop” method. Although it is worth noting that “simple” does not equal “unreliable”.
The dressing order is as follows:
- Two ordinary, but elongated loops are knitted at the ends of the desired leash and the main fishing line.
- Then the end of the fishing line with the loop is folded in half and wrapped a couple of times around its axis.
- The initially tied loop of fishing line is threaded through the ring formed at the end of the “structure” and then simply tightened.
- The loops of the fishing line and the leash are fastened together and that’s it, the fastening is ready.
There is a so-called “improved fishing knot”. It is knitted in the same way as “loop to loop”, easily and quickly. It is important that it can be done right on the spot and no special devices are needed for this. The knot turns out to be universal.
And this happens as follows:
- You need to attach the main line and the leash to each other.
- Then wrap a leash around part of the fishing line and pull its end up.
- Pass the same end into the resulting loop without tightening it.
- Wrap the end of the leash around the loop once.
- Pull the knot.
- Take the end of the main fishing line and do the same operations with it, tying it to the leash.
A knot called “Nail” has good strength.
It is not as easy to implement as the other two, but its effectiveness is worth all the effort:
- You need to tie a stop knot on the main line.
- Place the main line and the leash parallel.
- Thread the leash line under the main one.
- Make a turn around the main line.
- Thread some oblong hollow through object such as a pen into the resulting loop.
- And make a few more skeins around this item and the main fishing line.
- Then pass the end of the leash through the object and tighten the knot (this should be done very carefully, holding the turns so that they do not overlap each other and get tangled).
- Trim off the excess part of the remaining leash.
We invite you to familiarize yourself with: How to tie a braided line - DIY crafts for fishing with your own hands
Another knot that is very popular among experienced fishermen is the figure eight knot. Simple and uncomplicated in its essence, it copes with its duties perfectly and firmly holds the connection between the leash and the main fishing line.
How it fits:
- The fishing line and leash are placed parallel to each other.
- A figure-eight loop is knitted according to the “Flemish loop” principle.
- The knot is tightened.
Moreover, more than one side leash can be tied to the main line. There can be several of them, up to three pieces (!). But they need to be connected correctly. And this must be done not only so as not to tangle the leashes, but also so as not to tear them off from the main line.
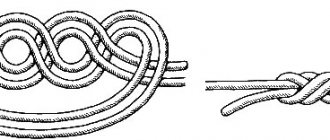
And this is best done with the help of the so-called “snake knot”, which is knitted like this:
- Scheme for tying several leashes with a snake knot.
It is necessary to position the main line parallel to the lead line. - Make several turns (literally two or three) with the end of the leash around the main line.
- Perform a similar operation with the end of the main line.
- Thread the ends of these lines through the loop formed in the middle of the structure.
- Tighten carefully.
It turns out one already tied leash and two freely protruding ends, to which, if you initially make them long, you can tie a couple more leashes. For reliability, you can attach swivels with carabiners to them and attach leashes to them.
In this case, everything depends on imagination, the main thing is not to overdo it and not to make a structure that will clearly scare away the fish. If there is no need for three or even two leashes, then it is better to simply cut off the ends.
As they say, it was not the gods who fired the pots. It’s better to practice many times, so that later, if an unforeseen situation arises (for example, a break in the leash right in the pond), you can quickly fix the problem and not lose precious time, which is so important during the fishing process.
The minimum size used here is a fishing line of 0.08 mm and a hook number 16. As you can see, the leash with the hook is almost perpendicular to the main fishing line. When attaching bait (raspberry or mormysh), its downward bend will be insignificant, and the hook with bait will not come into contact or get tangled with the main fishing line, and if all the gear is carried in height, the play of the bait will be much more interesting and richer, which will inevitably affect the increase number of bites.
Here you can see that under the weight of the jig, the leash line has sagged, but still neither the jig nor the leash touches the main line, and a simple hook with an attachment will always be to the side.
Additional leash on the main line of the winter fishing rod
This is also very useful if you equip your winter fishing rods with additional leaders and jigs.
At the end of the article I will share equipment for catching winter bream. And in the summer, from a boat, large bream (from 3 kg and above) confidently take such equipment, and I often use it.
Fishing is carried out from a boat with a winter fishing rod. The nod is used for fishing with the devil. The wiring is carried out in a variety of ways, almost like a devil, but mainly with maximum amplitude. Bream bites are also common when the tackle is slowly lowered.
My equipment parameters for catching bream in the summer from a boat are for a depth of 8-10 m: fishing line - 0.12, hook No. 14, weight - 1.25 g. In winter, I use more delicate tackle: for bream - fishing line 0.1 mm , hook No. 14.16 for roach - it also does not pass by this equipment, fishing line 0.08 mm, hook No. 16.18.
Author-Alexey Brevnov (Homemade FISH)
- How to tie a hook correctly
- How to prepare bait and catch trophy bream in winter
Bloody Knot
A universal bloody knot, simply irreplaceable if you need to tie hooks or a spatula when fishing with a spinning rod. You can use monofilament or braid, or in combination: braid and monofilament, just make 3 turns. The strength of the fishing line is maintained up to 75%, and if the fishing line is thin, then you need to make a larger number of turns (up to 7-8 times):
- take 2 fishing lines of the same diameter;
- pass the tip of the thread through the eye of the hook or around the shank;
- make a loop from the fishing line, holding it with your hands;
- make 5 revolutions around the forend with the free end;
- press the fishing line to it, while trying to ensure that there is no intersection of the turns with each other and they are located exactly 1 opposite the other;
- make a twist with your right hand;
- pull the free end of the thread into a coil;
- moisten and tighten the edges of both ends of the fishing line at once;
- if necessary, move the resulting knot to the eye or blade of the hook;
- Tighten well again.
To install a bloody knot, braided or monofilament is suitable. Tensile strength reaches 70%. The knot can be used to tie a leash to a bottom (float) fishing rod, and also to tie together two different fishing lines: braid and monofilament.
To tie the leash to the main fishing line, the steps are simple and even a beginner can do it. But the result is a reliable and easy to untie knot. You can do it like a “surgical” one, tying it in a simple way, stepping back from the edge of the fishing line up to 25cm. Further:
- fold the end of the fishing line in half;
- pass through the resulting loop;
- tighten.
The folded end of the thread should form a loop. To attach the main line to the leash, you need to pass the free edge of the leash through the loop.
Loop in loop
It is made as follows:
- fold the main line in half;
- tie a regular knot at the fold to make a loop;
- at the end of the fishing line, trim off the excess ends;
- make the same loop on the leash;
- tighten the knot.
In the same way, you can tie a swivel, attach a fishing line to a leash using a carabiner, or simply thread the loops through the swivel ring. The device allows you to quickly change hooks as needed. A fishing line or fluorocarbon will do.
To perform a simpler and stronger version of a loop in a loop for the purpose of attaching leashes and other metal devices (hooks) you need:
- step back on the main line 8 cm from the edge;
- bend the measured size back;
- attach another thread so that you get 2 threads that do not intertwine;
- moisten the fishing line with water to make the connection stronger.
The result should be a loop of sufficient diameter so that your thumb can easily pass through.
For tying a hook to a fishing line or leash, the following knots are suitable: figure eight, bayonet, step, roller, salmon, tuna, blind. To get a simple version of the node you need:
- make a loop at the end of the fishing line and leash;
- pass the tip through the eye of the hook;
- throw around the circumference to obtain a blind loop.
Double palomar
Palomar is a well-known knot among fishermen for tying a hook or spoon to a fishing line. Braided thread is rough, so it is not suitable for knitting. Although sliding fishing line can be used if necessary, tied to a swivel, hooks or monofilament. For light knitting, it is better to use monofilament while maintaining the tensile strength of the fishing line up to 80%, and you should not use a thick thread, it is better to use a medium in diameter. For production:
- fold 2 threads parallel;
- tie a knot from the first braid;
- bend the tip parallel to the other thread;
- insert into the eye of the hook, holding the resulting loop;
- weave with leading braided thread;
- wrap around 3 times;
- insert the hook into the loop;
- wet the knot;
- tighten, trim the excess ends of the braided thread with scissors.
We suggest you familiarize yourself with: Catching ide in the summer with a float rod and bottom tackle
Uni knot
To knit this knot you need to practice a little:
- pull the braided line through the eye of the hook;
- make a loop;
- wrap the end of the braid around the main line 2-3 times;
- make a second loop;
- pass the end of the fishing line through the 2nd loop;
- make up to 7 turns around the double line;
- moisten the braid;
- trim off excess edges with scissors.
The Uni knot is best used when the fishing line is at least 60 cm long.
Shkotovy
The knot is designed for tying a hook and fishing line. Tying - step by step:
- thread the fishing line through the hook (eye);
- make 2 turns around the forend;
- moisten and tighten the ends.
In this simple way you can quickly attach a hook to a fishing line.
Knot Snood
Snood is a universal knot for tying a shoulder blade or hooks. Both braided and monofilament thread are suitable. The output strength reaches 95%. For knitting:
- take the hook with the sting of everyone with your left hand;
- make a loop;
- attach to the hook so that the tip moves towards the sting or pass through the ring;
- hold the edge of the loop near the ring of the shoulder blade with one hand;
- make turns with the other hand, winding it around the fore-end near the bend 2-3 times;
- throw a loop;
- Pull the long end of the line while holding the hook with your other hand.
Sliding snood
- Clinch knot
- Davy knot
- Baya knot
- Orvis node
- Palomar node
- Pitzen node
- Uni node
- First you need to make a regular loop and press it to the hook;
- The hook is wrapped with the free end of the fishing line, at least 10 turns;
- Then we thread the same free end into the previously made loop and moisten the knot with saliva;
- Gently pull the end of the leader line, tightening the loop at the shank of the hook;
- We tighten the knot at both ends of the fishing line at the same time;
- Trim off the excess at the free end.
- A loop is made from fishing line and passed through the eye of the hook;
- We knit a regular knot;
- Pass the hook into a new loop;
- We wet the knot and tighten it as follows: first you need to pull both ends at the same time, and then additionally pull each end separately.
How to tie a fishing line to a fishing rod
For tying fishing line to a fishing rod, a connector is the most profitable option, but you don’t need to choose from cheap models in stores. It is worth paying attention to the lock, which should not have easy movement. It takes some effort to move. Requirements for the nozzle - full compliance in size with the whip or the tip of the fishing rod, smooth surface, absence of burrs to avoid rapid chafing of the fishing line, fairly tight fit in the fishing rod or along the surface of the circle.
Using a connector or blind attachment
Stages of work:
- make a loop at one end of the fishing line, without tightening it too much;
- attach a hook or leash with a sinker to the other end of the fishing line;
- open the connector lock;
- loop the hook, pull the edge slightly;
- secure the resulting structure with a lock.
Use plastic connectors, but not too fragile ones that will break quickly. The most reliable are metal, but over time they become rusty from water. Although due to them you can quickly and easily change equipment.