I know a lot of fly fishermen. But I often meet people I don’t know while fishing who are mastering this wonderful fishing method. Of course, it's always interesting to see how others fish. And these observations led me to the conclusion that at least 70% of fly fishermen fish with dry flies. They get caught always and everywhere.
There is no doubt that such fishing has the right to life, just like any other. It is interesting, visual, effective, and even brings a healthy boost of adrenaline with every bite. But let’s remember that fly fishing, generally speaking, is very, very diverse and “fixating” on one of the approaches to fishing to some extent impoverishes the fisherman. Fishing with nymphs and wet flies, believe me, can give you many memorable and exciting moments. When I myself started practicing with nymphs, it was extremely difficult to get any useful information on this topic and, therefore, there was no need for a lot of stuff. Therefore, I want to share my experience with those who want to start fishing effectively using nymphs and wet flies.
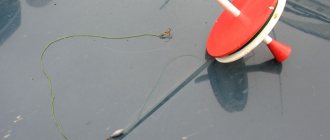
Installation of gear
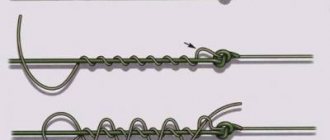
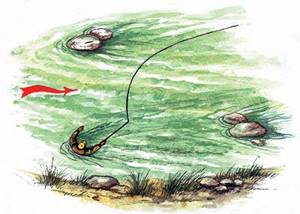
I offer two options. Option No. 1 (Fig. 1). Conical leader made of monofilament, leash 1 m long. Option No. 2. Braided leader or leader of different immersion speeds, leash 1 m long. Recommended set - Slow Sinking (SS), Extra Super Fast Sinking (ESFS). Fundamentally, these options differ in the presence of a kind of additional “sinker”, which is the sinking undergrowth. Both options are valid and fully capable. As, by the way, there are also many others. I’ll tell you a terrible secret and say that installation No. 2 is more effective when fishing with nymphs and wet flies and, most likely, you will come to it. But first, I’ll advise you on installation No. 1, as it’s easier to operate and less expensive financially (what if you don’t like nymph fishing). In both installation options, the last point is a nymph or a wet fly. Let's try to form a “nymph” working box.
How to catch
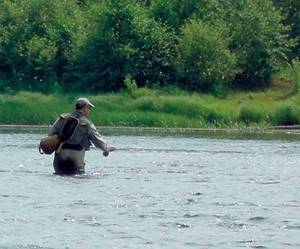
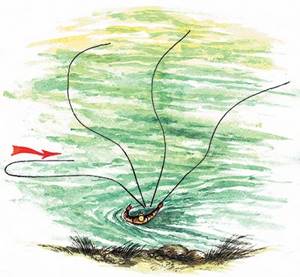
Let's start with the simplest approach, but take my word for it, it will bring you success. Find a section of the river with a fast current and a depth of up to 1 m (or better yet, even shallower). Moreover, the faster the current, the greater the chances of success. Because in the approach under consideration, guiding the nymph will not be entirely correct, and the fast current and shallow depth will smooth out the errors. Tie on a Gold Head with a brass head in gray or olive. When choosing a color, pay attention to the amount of underwater grass in the intended fishing area. If there is a lot of it, then use an olive-colored nymph. For general development, I will outline a fairly generalized approach to choosing the color of a nymph. For rocky bottoms, it is recommended to use gray nymphs, olive nymphs for places where there is underwater grass, and when fishing on a river with a sandy bottom, sand-colored nymphs are used, respectively. Although, by and large, you shouldn’t get hung up on choosing the color of the front sight. Go into the water and stand with your back to the current (Fig. 2). Cast at 45° to the left downstream for a distance of 5–7 m. Hold the line in your left hand. Wait until the line is completely straightened, then repeat the cast to the right. Take two steps downstream and repeat the casts. You will feel the bite along the cord held in your left hand, like a blow, a pinch, a jerk. In response to this, make a short wrist hook. If there are no bites, then place a fly with a tungsten head and repeat several postings. If the water is clear and the sun is shining, use black-headed nymphs.
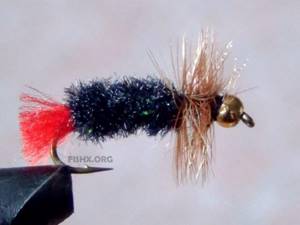
If flies with heads don't produce bites, try placing a wet fly tied on size 12-14 hooks with a red or black head. Most often, when fishing, selecting and changing flies is one of the necessary factors for success.
Of course, the described approach is quite primitive, but it is quite legitimate and will undoubtedly bring you the first fish caught with a nymph or wet fly. I will immediately give a positive example of using the above algorithm. At one time, I tried for a long time and unsuccessfully to get clear advice on nymph fishing from the fly fishermen I knew. It should be noted that there was a lot of advice. But the next time we went fishing, it was followed, alas and ah, by another failure. And so again and again. Finally, I was lucky, one wonderful fly fisherman, still of the Soviet school, after listening to the lamentations about “this disgrace in the form of nymphs,” advised me what I offered to your attention above. Without putting things off for a long time, I rushed to the grayling river closest to Moscow, entered a shallow riffle, and threw it to the left. A bite followed almost immediately. Casting to the right, oddly enough, also brought fish. Subsequent fishing made me, as they say, “holier than the Pope” in relation to nymphs. But the story had an interesting continuation. A couple of days later, after, as you understand, more than colorful stories and, of course, instructions, I brought my friend, a fan of dry fly fishing, to this roll. We started fishing with “that same nymph.” Three hours later, without seeing a single bite, we moved to another riffle, where we caught quite well with dry flies. The funny thing is that more than ten years have passed since that fishing trip, and my friend still fishes with dry flies, completely ignoring nymphs. The contrast between my colorful stories and the realities without bites had a painfully negative impression on him. Now, of course, I understand that I was very lucky in that fishing trip. The fish were in the water column and were more than active. However, as you can see, even the most primitive approach can sometimes give a decent result. Although the main skills learned from this method of fishing with nymphs should be the feeling of the line and fly when retrieving, as well as timely perception of bites and, of course, the emergence of confidence in the effectiveness of “nymph” fishing.
Let's start easy
Instead of an introduction:
Having decided to plunge into the world of two-handed fly fishing, at first I was completely confused - there was such a flow of new information, but there was practically no systematic information.
The information below is a kind of “squeeze” from posts and articles on forums such as: https://www.fly-fishing.ru/fly/forum/, https://www.mushki.ru/terki/, https://www.kola-salmon.ru/forum/.
I would like to express my gratitude for the information to: The Max, Andrey S., Garik, Spey.Caster.
You guys are really moving fly fishing in our country. Thank you very much!!!
1. Spey (Classic spey, Long cord).
1.1. Design features:
- long or extra-long head (depending on the class and specific model of the cord from 55 to 85, and sometimes up to 100 feet!);
— extra-long front cone;
- short rear cone.
see for example SA Distance Spey
1.2. Spey cords are usually floating and come with interchangeable ends of varying degrees of immersion. The head of the spey cord is longer than the heads of other cords, it is weighted completely differently, the mass seems to be stretched. In this connection, they allow you to make long and ultra-long casts, have good control over casting and retrieving (since it allows you to work on a fixed cord without constantly firing the running line). The long front cone of one of the primary functions carries a delicate presentation of the front sight. In deep holes with strong currents, when fishing in the channel zones of deep rivers, spey lines, even armed with fast-sinking ends, will not be convenient, because the thick floating part of the cord will carry the sinking end from the depths. However, on clamps near the shore, as well as in places with not very strong currents or shallow depths, the spey cord, due to its floating body, will make it possible to more accurately control the fly line and eliminate snags. Due to the length of the head, they require quite comfortable conditions for casting. As a rule, they are used on large rivers in not very deep places.
1.3. Types and features of casting.
You can use an overhead and any spey-shaped casts: Roll Cast, Switch/Jam Roll Cast, Single Spey, Double Spey, Snake Roll, Snap T, Snap Z, Circle Spey, Peri Poke.
Spey casting with cord-cords has its own characteristics, and the style of casting with long-bodied cords is called “modern spey”.
2. Scandi (Scandinavian head, Short cord).
2.1. Design features:
- a head of medium length (depending on the class and specific model of the cord from 30 to 40 feet);
- long front cone;
- short rear cone.
Note: There are super short Scandinavian heads. For example, as an ultra-short head, you can consider RW Ambush (head length 21 feet), which is closer in shape to Scandi cord and in length to Skagit.
see for example SA Scandi Extreme Head
2.2. In fact, they are a short-bodied and somewhat more load-bearing version of classic spey cords. It is not very convenient to fish with heads at long distances: for fishing at long distances you will have to shoot a long length of running line, which, moreover, likes to get tangled, and it is difficult to control the movement of the fly at long distances. They are very undemanding in terms of free space; you can cast from almost any position, moreover, if you don’t need to throw far. Based on this, they are used for working at medium distances with heavier flies on the same class of gear. Fishing with heads is justified in narrow, overgrown places, also in strong currents, when the wind is too strong. When fishing in places with a quiet current, it is necessary to install a very long conical leader on the head, otherwise all the fish will run away from the splashing of the head. Often the front cone of the Scandi is trimmed, which brings it closer to the Skagit.
The main difference between Scandi cords for two-handed rods is that, as a rule, these are separate heads (without running and tippet ends) in various variations - floating, sinking, neutral buoyancy, and also with sinking ends. Their advantage is the convenience of arranging heads with leaders and leashes, as well as changing the heads themselves. In general, they solve the vast majority of practical fishing problems with slightly greater ease of use and ease of operation. They are easier to change, easier to adjust to the rod, fly and angler, easier to vary the equipment that comes after the head. You can have one reel with spooled backing and running for similar classes of rods and change only the heads.
For example, in deep holes with strong currents, when fishing in the channel zones of deep rivers, fast-sinking heads will provide the required depth of the retrieve, thin running will not affect the depth in any way, however, on clamps near the shore, as well as in places with not very strong currents or shallow depths, you will have to change the head to a lighter one - otherwise you can’t do without a hook (although this largely depends on the angler’s knowledge of the river). However, when using fully sinking heads, controlling the fly pattern is problematic.
2.3. Types and features of casting.
You can use an overhead and any spey-shaped casts: Roll Cast, Switch/Jam Roll Cast, Single Spey, Double Spey, Snake Roll, Snap T, Snap Z, Circle Spey, Peri Poke.
Casting with scandi lines has its own characteristics, and the casting style is called “underhand”.
3. Skagit.
3.1. Design features:
- short or ultra-short very heavy head: depending on the class and specific model of the cord from 16 to 30 feet;
- long, but not as pronounced as Scandi, front cone;
- short rear cone.
Note: The front cone is not as pronounced as that of Scandi, sometimes it is completely absent, for which some people call this cord “flying sausage”.
see for example SA Skagit Extreme Head
3.2. The Skagit is an ultra-short head, mass concentrated in a small area, short front and rear cones, designed for tight conditions, sinking tips, undergrowth and bulky heavy flies. Allows you to cast heavier flies in more cramped conditions than scandi. Skagit cords are used when conditions are very cramped, when for some reason you need a strip with a two-handed fly, when the flies are too heavy. The pros and cons are even more pronounced than those of Scandi. The disadvantage is that the cord splashes down noisily (the “sausage” splashes in the water).
3.3. Types and features of casting.
Due to the specifics of skagit cords, you can perform spey-shaped casts with a long anchor: Roll Cast, Double Spey, Snap T, Snap Z, Circle Spey, Peri Poke.
Like any other type of line, casting with skagit lines has its own characteristics, which allows some authors to distinguish a special style of casting - “skagit casting”.
PS Where to start?
It is clear that having gained some theory, it is still difficult for a beginner to decide: where to start mastering a two-handed tackle? At one of the posts on this issue, our GURUs agreed in a dispute))) Out of respect for them, I decided to convey the dialogue almost verbatim...
Garik
But I would pose the question (as to where to start, my note) completely differently. In principle, it’s different... We are dealing with a person who has just picked up a two-handed tackle. Now his main task is not to catch fish (no matter in what conditions and with what fly) but to train and try to understand the principles of working with two-handed tackle. All this does not fit in with the geography of residence and the species composition of the fish. Everyone needs this, everywhere. It is quite logical to assume that before this the person fished with a one-handed weapon. Accordingly, he has muscle memory. Having picked up a two-handed weapon, he continues to throw with a one-handed weapon in accordance with his muscle memory, which means most likely with his right (upper) hand. The left (lower) hand, as a rule, does not even hold the fishing rod, but simply holds on to it. This is fundamentally wrong because, having two hands, you need to work with both. But after one-handed training, a person does not know how to work with his left (lower) hand. Which technique is most demanding on the work of the lower hand? That's right - underhand. When is it better to use the underhand? That's right - when working with heads. If we draw a parallel with a one-handed rope, then a beginner trains with a cord whose head is 9 m. This is normal and things are starting to work out for him. Let's give a beginner a cord with an 18m head. What can he do with her? That's right - nothing. Let's advise the beginner, depending on the species composition of the fish and the flies used, to use a long-bodied line. And based on the conditions described above, this advice will be completely logical. But what can a beginner do with it? That's right - nothing.
Conclusion: Regardless of the place of residence and the intended fish, first you need to equip the fishing rod with a head and ends and train the underhand in order to teach the left (lower) hand to work more than the right (upper). And as you understand the processes, you can gradually move on to longer heads and then to long-bodied cords.
Again, regardless of the composition of the fish and flies. Simply because none of us can ever know where fate will take us tomorrow. This means you need to master the maximum number of different techniques and be prepared for all conditions.
Another reason to master the technique of casting long lines in the future is that it’s very beautiful!
Andrey S.
In general, I would recommend a short-bodied spey cord (with a head up to 17 m) with replaceable ends for initial training, and for fishing, it is very versatile. Having fished with such a cord, you will be able to understand what is missing, because versatility leads to a decrease in certain characteristics. Then, after some time, having ends from the cord, they can be adapted to the Scandinavian head and get good specialized tackle for fishing with larger flies and in more difficult conditions. And then separately, a medium-bodied spey cord, only floating - for medium-sized flies and generally for pleasure. You just need to gain initial experience and understand what your soul desires. Without this, there is no point in spending money on sets of cords/heads.
…
The most average-universal and at the same time the most common universal two-hander on the Kola (north bank) is 14 feet, class 9. Can be fished at any water level. Usually this is the choice of anglers who do not plan to collect a whole fleet (2-3 rods, more is a pathology) of rods for various conditions.
The most averagely versatile cord is WindCutter® VersiTip Spey WF9/10/11 TIPS for such a two-hander. Is it a good choice of cord? It’s very good for a beginner, it couldn’t be more universal, it’s not difficult to learn to throw. You can fish at any water level, with almost any flies.
Naturally, over time you will want something more specialized, but such a kit is good for a start in order to understand what requirements you will have for gear in the future. And then this set will not remain unnecessary.
Garik
But I can’t help but agree with Andrey. And I think that WindCutte is an excellent cord for both training and fishing. True, I can’t say the same about the one-handed weapon. I didn't like the one-handed WindCutte. But that’s not about that now.
With the set that Andrey outlined, you can really fish in almost any conditions. But…! For example, I decided to sharpen myself more finely. And I changed the 9 to 10 and 8. Of course, this entails additional costs, but I like narrower gear more. But if we are talking about buying only one fishing rod and that’s it, then the choice of 9 will be optimal.
Taken in full
alex41643 / https://mushki.ru/terki/viewtopic.php?t=371...asc&start=0
Let's complicate things a little
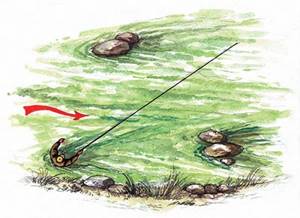
Next, we will try to complicate our actions a little, but this, accordingly, should have a positive effect on the number of bites. We do everything the same as in the previous case, with the exception of the actual casting itself. And there are no longer such strict requirements for current strength and depth. Before casting, wind about 1.5–2 m of line from the reel; this loop should hang freely below your left hand holding the line. Cast at 45° downstream. At the last stage of casting, ideally, when the line has straightened out but has not yet laid down on the water, release the supply of line from your left hand and try, with a wrist movement of your hand, to lay out a loop of the line towards the current (Fig. 3). This technique is called mending, and you will use it constantly in the future. A similar technique is used when fishing with a dry fly. There, a loop of line laid out against the current ensures natural floating of the dry fly. In our case, mending allows us to additionally solve the problem of quickly deepening the nymph. Next, carry out the wiring as in the case described above. You will feel the bites on the cord held in your left hand. When touching on the topic of bites, the question of using an indicator quite reasonably arises. This is a kind of device, essentially a banal analogue of a float. In our case, when wiring on an almost straightened cord, this very indicator is not needed, you will already feel the bite on the cord. When casting against the current, when the line has not begun to straighten, and you do not yet have the skill to see a bite by the movement of the line directly in the water, you can use an indicator. But this already applies to more “advanced” nymph fishing, which I will try to understand below.
Directions of development
To further improve your fly fishing skills, you will need to master casting with casting, performed at different angles towards the current. After “setting up” such casts, you should experiment with the shape of the loop when casting, laid out towards the current. In general terms, the sharper this loop and the angle of casting in relation to the current, the faster the nymph sinks (Fig. 4). Try to evaluate the effect of the weight of the fly and its silhouette (thick/thin) on the speed at which it sinks. But remember that “reaching” the bottom with a fly is not synonymous with successful fishing. Very often fish bite in the water column more actively than near the bottom. Moreover, understanding the behavior of fish, the reasons influencing the mechanism of its feeding, and determining the feeding horizon is undoubtedly a more global and important task than mastering the technical features of nymph fishing. As you accumulate your own fishing experience in the process of communicating with colleagues in the hobby, answers to the formulated problem will come. But, generally speaking, nymph fishing requires constant close analysis of what is happening while fishing. For example, choosing flies for a specific fish at a certain point in time. The wide variety of nymphs and wet flies can be overwhelming. It is clear that there is no need to engage in global search and testing of them. Because it looks more like collecting than practical fishing. Decide what kind of fish and in what conditions you are going to catch. Now, fortunately, descriptions of many flies are available, which also include a link to a specific fish. Among the flies suitable for catching the fish you are interested in, there will undoubtedly be those that quite accurately imitate the underwater fauna of your region. The degree of realism of lures may vary, but there should be a general similarity. There are other approaches regarding the accuracy of the prototype display, but this is a topic for a completely different article. You should end up with 6-7 different types of nymphs and 3-4 types of wet flies in your box. At the same time, focus on the presence of baits of the same type, but of different sizes, weights and colors.
Good luck!
Choosing a place and fishing features
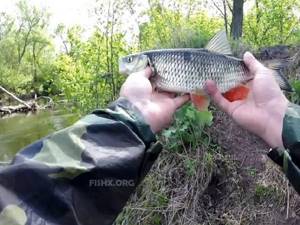
The chub prefers a fairly strong current, where river streams meet and break, spinning in whirlpools and forming a reverse current. In addition, there is nothing better for this fish, tired of the heat, to stand under the shade of tree branches hanging over the water. It is shady here and there is food falling into the water from the branches. These are various insects and flies. Often such places are under a steep bank, where there is a black hole. Large fish usually stay here. Other places attractive to this silvery red-finned predator are slopes into a hole after a riffle and the edge between the riffle and the hole.
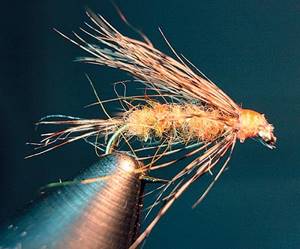
In spring, when there are still few flying insects, the prey of chubs is usually various larvae that live on the bottom and in bottom silt deposits. Take, for example, the caddisfly. This is a very appetizing bait for any fish, including chub. Therefore, various imitations of insects are often used in the form of this very caddisfly. These could be fly fishing lures – Pepping Caddis wet flies. In addition, products from Czech manufacturers are used - weighted PolishWoven Nymphs. They also imitate the amphipod beetle, which for some reason is infected with parasites. These are Orange Shrimp baits. Taking into account the season, these baits are made weighted. To do this, another element is added to the baits - heads made of gold-plated or silver-plated metal. All this is a tribute to spring, when most insects are just preparing to fly out.
At the height of spring, the mass emergence of the flies begins. These moths will mark a new phase in the chub's habitat. These fish begin to rise to the surface layers of water for a new type of food. And now fishermen are using flies that imitate flying moths and flies. Such a bait is, in particular, Alder Fly.
But that is not all. The main event and the main feast of predators is the flight of the mayfly . There is a lot of it. But the life of a mayfly is short. Therefore, chubs indiscriminately grab mayflies and everything similar to them from the surface of the water. And fly fishermen are taking advantage of this situation. At this time, the chub takes well on a nymph with a golden head, for example, May Fly Nymph and Pheasant Tail. In addition, chubs are already hunting for May beetles and their imitations - Killer Bitle, May Bitle.
Closer to summer and in the summer , artificial nymphs, May and Colorado beetles, beetles, bronze flies, dragonflies and other flying insects are widely used.